Joins reference
Joins let you connect different models to each other so that you can explore more than one model at the same time in Lightdash and see how different parts of your data relate to each other.
Adding joins in your models
Joins are defined at the same level as the model parameters in your YAML file.
When you open Lightdash, the dimensions and metrics from your joined model will appear below the ones in your selected model.

- Omit
fieldsto include all metrics and dimensions defined in the joined table. - When joined fields reference other fields, those other fields must be included.
- The
sql_onstatement can include references to user attributes for row-level filtering.
Rename a joined model
When joining tables, you may want to rename for readability. This can be done with the label tag, for example on the messages model it makes sense to rename the joined users table as “Sender”:
Join the same table multiple times
If you need to join a table multiple times, you can use an alias to distinguish between the different tables. A common use case is joining a user table multiple times to another table depending on the type of user. For example this messages model has both a sender and a recipient:
Note the following important differences when using alias in joins:
- You must reference the fields in the model using the new alias. Notice that the joins above use
${sender.user_id}rather than${users.user_id}. - Because of the above, any fields in the base model or joined model that reference any field
${users.*}will fail to compile. Be careful of aliasing tables that are used in the base model. - Joined models are automatically relabelled with the alias but you may also customise this using the
label:field as above.
Specify your join type
If you want to specify the type of join to be used in your SQL query, use the type field in your YAML configuration file. Set its value to one of the following: inner, left, right, or full. This will determine how the tables are joined in your query, aligning with SQL’s inner join, left outer join, right outer join, or full outer join respectively.
Here’s an example of how to specify a join type:
By default, if no type is specified, Lightdash will use a left join.
Here’s a table to help you understand what each join type means and how it translates to SQL:
| Join Type | Generated SQL | Description |
|---|---|---|
| inner | inner join | Returns rows that have matching values in both tables. |
| left | left outer join | Returns all rows from the left table, and the matching rows from the right table. Non-matching rows will have NULL for right table’s columns. |
| right | right outer join | Returns all rows from the right table, and the matching rows from the left table. Non-matching rows will have NULL for left table’s columns. |
| full | full outer join | Returns all rows when there is a match in either the left or right table records. Non-matching rows will have NULL for columns of the table that lacks a match. |
inner
An inner join returns rows that have matching values in both tables. For example, if you have a users table and a subscriptions table, an inner join would return only the users who have a subscription.
Here’s an example of how to specify an inner join:
left
A left join returns all rows from the left table (i.e. the model where you’re adding the join to), and the matching rows from the right table (i.e. the model you’ve specified in - join:). Non-matching rows will have NULL for right table’s columns. For example, if you have a users table and a subscriptions table, a left join would return all users, and the subscription information for users who have a subscription.
Here’s an example of how to specify a left join:
right
A right join returns all rows from the right table (i.e. the model you’ve specified in - join: ), and the matching rows from the left table (i.e. the model where you’re adding the join to). Non-matching rows will have NULL for left table’s columns. For example, if you have a users table and a subscriptions table, a right join would return all subscriptions, and the user information for users who have a subscription.
Here’s an example of how to specify a right join:
full
A full join returns all rows when there is a match in either the left or right table records. Non-matching rows will have NULL for columns of the table that lacks a match. For example, if you have a users table and a subscriptions table, a full join would return all users and all subscriptions, and the subscription information for users who have a subscription.
Defining join relationships
You can define the relationship between tables in your joins to help Lightdash show warnings and generate the appropriate SQL. This is especially useful for preventing SQL fanouts issues described in the SQL fanouts section.
To define a relationship, add the relationship field to your join configuration:
Supported values:
one-to-manymany-to-oneone-to-one
Always join a table
If you need a table to always be joined, you can set the always field to true.
This will make sure that even when you don’t select any of the fields from the joined table it will still be joined in the query.
Only select a subset of fields from a join
Use the fields tag to select a subset of fields from a join. This is useful if you want to join a model but only a few of its fields are useful in the joined context. For example this messages model only needs the name andemail fields from the users model. Note we must also include the user_id field since it’s needed for the join.
Using joined dimensions or metrics in your YAML
Once you’ve joined a model, you can reference the metrics and dimensions from your joined model in your configurations.
For example, I can filter one of my metrics using a dimension from my joined model, like this:
You can also reference joined metrics and dimensions in custom sql, like this:
Every joined field that you reference in a YAML file adds a dependency that you’ll have to include in all future references to that model.
For example, you might define deals.unique_enterprise_deals by using a joined field in a filter: ${accounts.segment} = 'Enterprise'.
Then later you need to join deals to a marketing_attribution model.
The unique_enterprise_deals metric must be excluded from the join unless you also join accounts to get the accounts.segment field.
Check out our dimensions and metrics reference docs to see all of the other configurations you can use with your joined fields.
Hide joined tables
Sometimes, you need to use an intermediate model to join two models together and don’t want to show its columns in the list of available metrics/dimensions. You can add a hidden: true tag to joins, like this to hide these intermediate models:
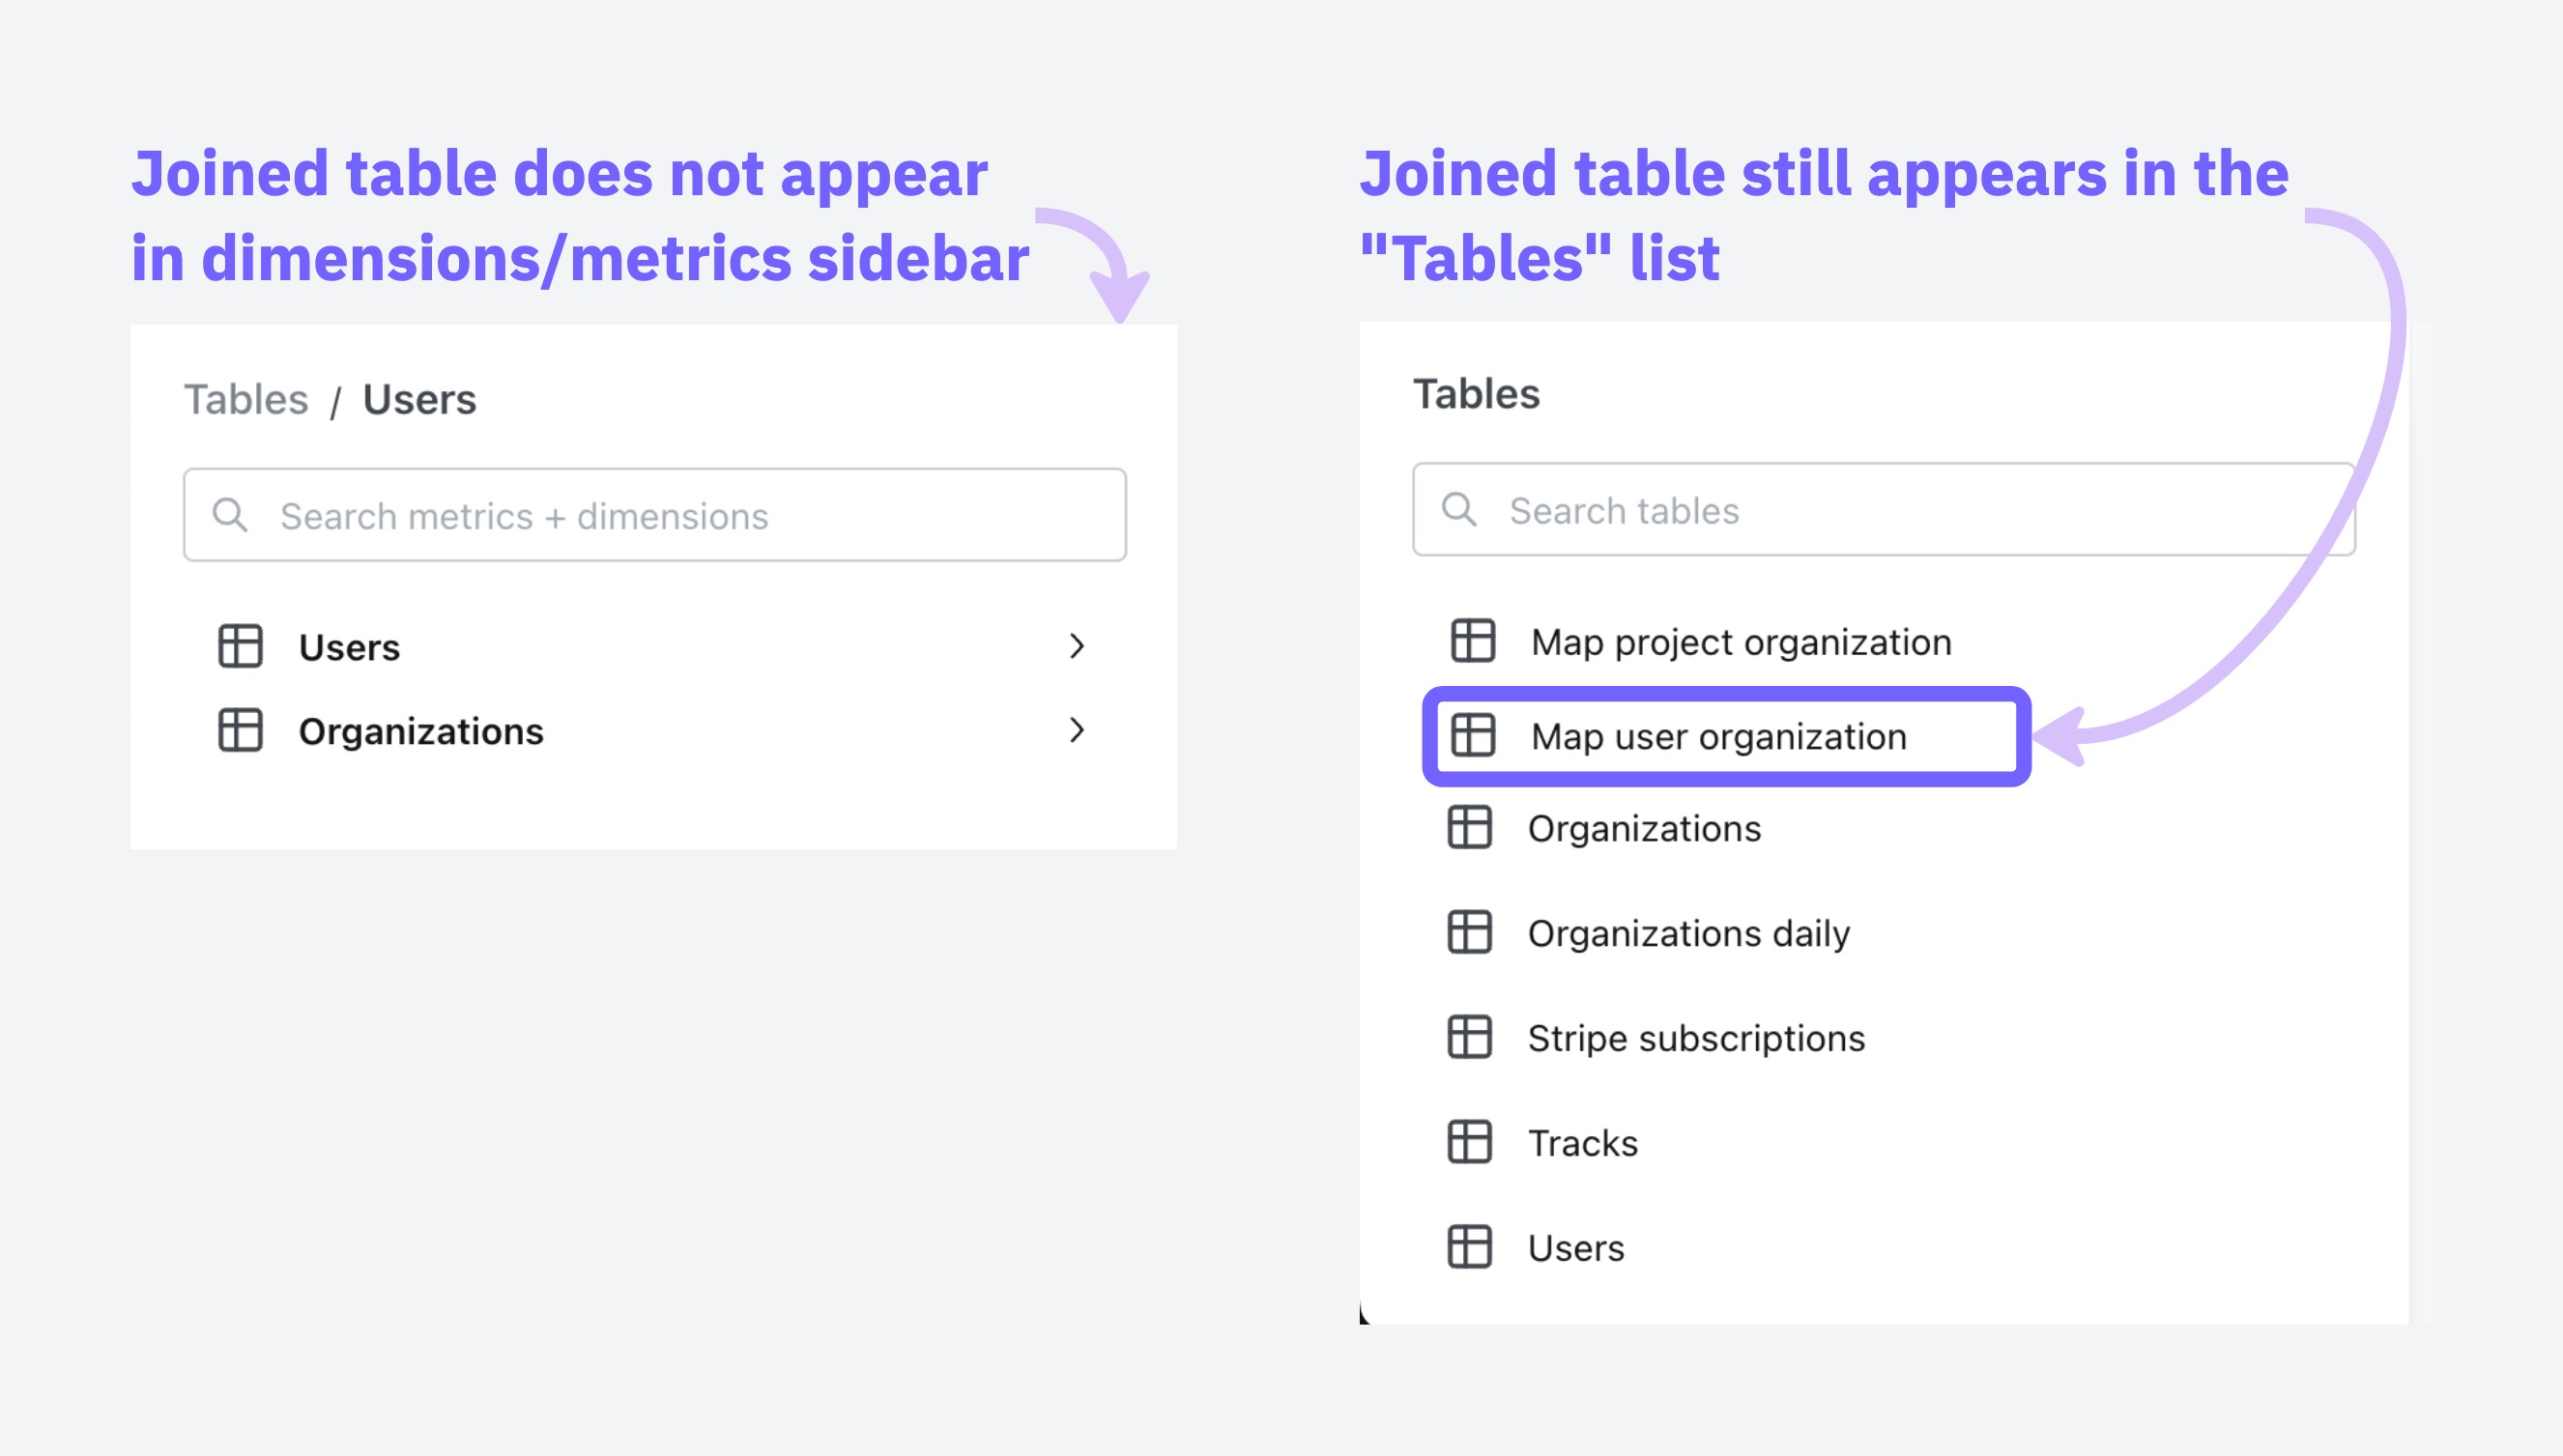
Using just the hidden tag in the join and changing nothing else will remove the joined table from the sidebar of metrics/dimensions in users, but it will still appear in the Tables list as a table to explore on its own.
You can adjust which tables show up in the Tables list by adjusting your tables configuration under project settings, read the guide here.
SQL fanouts
When joining tables in SQL, it can accidentally inflate your metrics if those tables have one-to-many relationships. Understanding when this happens helps you know which metrics need special handling.
When dealing with joins that might cause metric inflation, certain types of calculations remain safe to use.
Safe vs. risky metrics
These metrics stay accurate even when the data contains duplicates:
- min and max:
min(order_total)andmax(order_total)give you the same answer whether you have duplicates or not, because they’re looking for the extreme values, not counting or adding things up. The maximum value in a set doesn’t change just because that value appears multiple times. - Aggregate functions with
distinct:count(distinct user_id)ensures each user is counted only once, regardless of how many times they appear in the joined result.
These metrics can give you the wrong answers:
sum,count,avgwithout using distinct- Custom calculations that treat duplicated rows as separate data points
Common scenarios and what gets affected
Single one-to-many join
Example: When you join an organization table to a users table, each organization can have multiple users.
In this scenario:
✅ User metrics remain accurate Since each user appears exactly once in the joined result, any metrics calculated on the user level (like average user age or total user count) will be correct.
❌ Organization metrics become inflated - Each organization will appear multiple times in the result set (once for each associated user). This means organization-level metrics will be counted multiple times, leading to inflated results.
For example, if “ABC Corp” has 2 users, its org_total_users metric cannot be summed because it will be duplicated twice.
Raw tables
organizations table
| organization_id | organization_name | org_total_users |
|---|---|---|
| 1 | ABC Corp | 2 |
| 2 | XYZ Ltd | 3 |
users table
| organization_id | user_id | user_age |
|---|---|---|
| 1 | 100 | 57 |
| 1 | 200 | 13 |
| 2 | 300 | 20 |
| 2 | 400 | 30 |
| 2 | 500 | 19 |
Joined Output
Organizations are multiplied by the number of users
| user_id | organization_id | org_total_users | user_age |
|---|---|---|---|
| 100 | 1 | 2 | 57 |
| 200 | 1 | 2 | 13 |
| 300 | 2 | 3 | 20 |
| 400 | 2 | 3 | 30 |
| 500 | 2 | 3 | 19 |
We cannot sum org_total_users on this joined table because it will be incorrect.
Chained one-to-many joins
Example: When you create a chain of one-to-many relationships by joining users to their orders, and then orders to their support tickets.
In this scenario:
✅ Ticket metrics remain accurate - The final table (tickets) in the chain will have accurate metrics because each ticket appears exactly once in the result set.
❌ Upstream tables experience compounding inflation - The further up the chain you go, the worse the inflation gets:
- Order metrics become inflated by the number of tickets per order. If Order #1001 has 3 support tickets, any metrics for this order (like order value) will be counted 3 times.
- User metrics suffer even more inflation as they’re multiplied by the total number of tickets. If a user has 2 orders with 3 tickets each, user-level metrics (like lifetime value) will be counted 6 times in aggregate calculations.
For example, if the user Alice has 2 orders and each of these orders have 3 tickets, after joining users → orders → tickets, the result would look like:
Raw tables
users table
| user_id | user_name | user_age |
|---|---|---|
| 1 | Alice | 23 |
orders table
| order_id | user_id | order_total_items |
|---|---|---|
| 1001 | 1 | 5 |
| 2001 | 1 | 2 |
tickets Table
| order_id | ticket_id | ticket_time_to_first_response_mins |
|---|---|---|
| 1001 | A | 8 |
| 1001 | B | 62 |
| 1001 | C | 47 |
| 2001 | D | 5 |
| 2001 | E | 1 |
| 2001 | F | 89 |
Joined output
Step 1: First Join users to orders
| user_name | user_age | order_id | order_total_items |
|---|---|---|---|
| Alice | 23 | 1001 | 5 |
| Alice | 23 | 2001 | 2 |
Step 2: Join the result of step 1 to tickets
| user_name | order_id | ticket_id | user_age | order_total_items | ticket_time_to_first_response_mins |
|---|---|---|---|---|---|
| Alice | 1001 | A | 23 | 5 | 8 |
| Alice | 1001 | B | 23 | 5 | 62 |
| Alice | 1001 | C | 23 | 5 | 47 |
| Alice | 2001 | D | 23 | 2 | 5 |
| Alice | 2001 | E | 23 | 2 | 1 |
| Alice | 2001 | F | 23 | 2 | 89 |
Note that users and orders are duplicated but tickets are not, which means we can only safely apply aggregates to metrics on the tickets table.
Multiple one-to-many joins
Example: When you join users → orders AND users → tickets (both orders and tickets relate to users, but not directly to each other)
This creates the most problematic data situation, when you join multiple one-to-many relationships that branch from the same table but aren’t directly related to each other. In this scenario:
❌ EVERY aggregate metric gets inflated due to the cartesian product effect
- User metrics become massively inflated by the product of
orders×tickets. If a user has 5 orders and 10 support tickets, each user-level metric will be counted 50 times! - Order metrics get inflated by the number of tickets the user has.
- Ticket metrics get inflated by the number of orders the user has.
For example, if the user Alice has 2 orders and 3 tickets, after joining users to both orders and tickets separately, the result would look like:
Raw tables
users table
| user_id | user_name | user_credit_amount |
|---|---|---|
| 1 | Alice | 100 |
orders table
| user_id | order_id | order_total_items |
|---|---|---|
| 1 | 1001 | 5 |
| 1 | 2001 | 2 |
tickets Table
| user_id | ticket_id | ticket_time_to_first_response_mins |
|---|---|---|
| 1 | A | 8 |
| 1 | B | 62 |
| 1 | C | 47 |
The cartesian product - (every record is joined to every other record) of users, orders and tickets.
| user_name | order_id | ticket_id | user_credit_amount | order_total_items | ticket_time_to_first_response_mins |
|---|---|---|---|---|---|
| Alice | 1001 | A | 100 | 5 | 8 |
| Alice | 1001 | B | 100 | 5 | 62 |
| Alice | 1001 | C | 100 | 5 | 47 |
| Alice | 2001 | A | 100 | 2 | 8 |
| Alice | 2001 | B | 100 | 2 | 62 |
| Alice | 2001 | C | 100 | 2 | 47 |
Note that there is duplication in users, orders and tickets records. We cannot apply aggregates on any metrics without deduplicating records.
This creates the worst-case scenario where no aggregate metric (sum, count, avg) is safe without explicit deduplication techniques.
Handling fanouts
Fanout handling is an experimental feature currently only available in Lightdash Cloud. If you would like to use it, reach out to the Lightdahsh team.
Lightdash can automatically handle deduplicating metrics that are inflated due to fanouts if join relationships are specified in YAML as described in Defining join relationships, above.
For example:
Specifying a primary_key and the join relationship allows Lightdash to:
- Understand the intended row-level granularity
- Prevent metric inflation by deduplicating joined rows
Once you’ve included primary keys and a join relationship, Lightdash will add CTEs to the compiled SQL query that ensure metrics are not inflated.
Known limitations
There are a few situations where Lightdash doesn’t currently handle inflated metrics:
- Metrics that reference joined dimensions
- Complex sequential joins, e.g one-to-many, one-to-many and then a many-to-one
- Custom dimensions sometimes cause duplicate rows where they shouldn’t
Warnings
When fanout handling is enabled, Lightdash will show a warning in the UI for models with joins that probably result in fanouts (and therefore inflated metrics). To remove the errors, relationship needs to be defined in the join in YAML and the join key needs to be specified.