For installation instructions, see How to install the Lightdash CLI.
Dependencies
The Lightdash CLI requires Node, NPM, and the dbt core or dbt cloud CLI to be installed and available under thedbt command.
Known limitations when using dbt cloud CLI
Warehouse credentials dependency for some commands Affected commands:lightdash generate, lightdash preview and lightdash start-preview
These commands rely on the warehouse credentials from the active project, as the dbt Cloud CLI does not expose credentials directly. Ensure the project’s credentials have access to all development and staging schemas for a seamless experience.
Empty warehouse credentials for new projects
Affected commands: lightdash deploy --create
When using this command to create a new project that is not a preview, the warehouse credentials will not be populated automatically. Users must update the warehouse credentials manually in the project settings page after the project is created.
Global options
There are three global options that can be used with any Lightdash CLI command: version, help, and verbose.Version
--version or -V
Ignores the preceding command and shows the installed CLI version. Usually it’s used right after lightdash, like this:
- npm
- Homebrew
Help
--help or -h
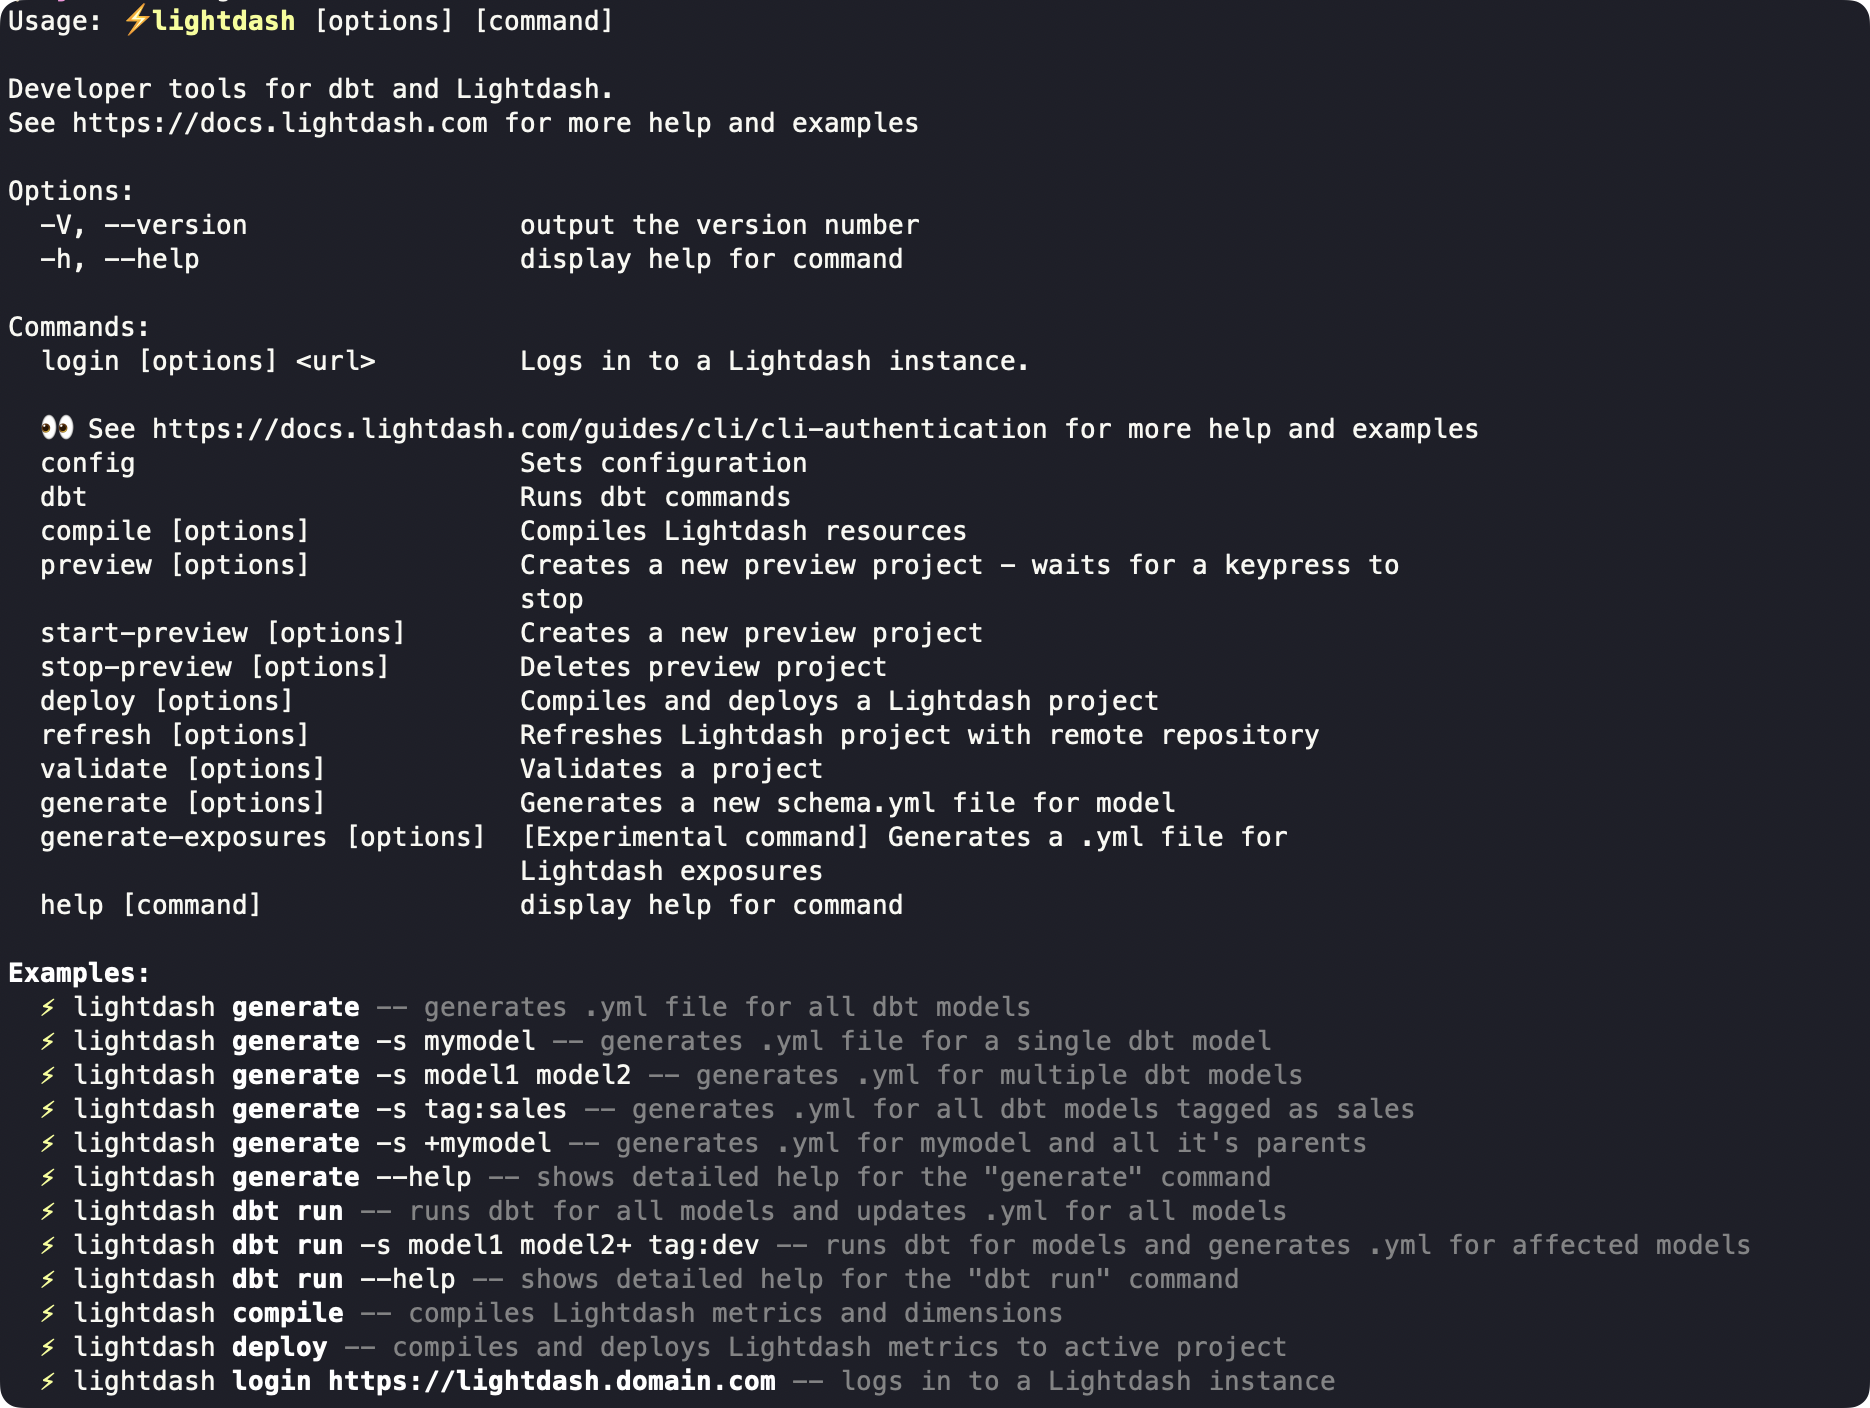
Tells you what the preceding command does and lists all command-specific options. You can view the Lightdash CLI help like this:
--help or -h option with a speific command:
Verbose
--verbose
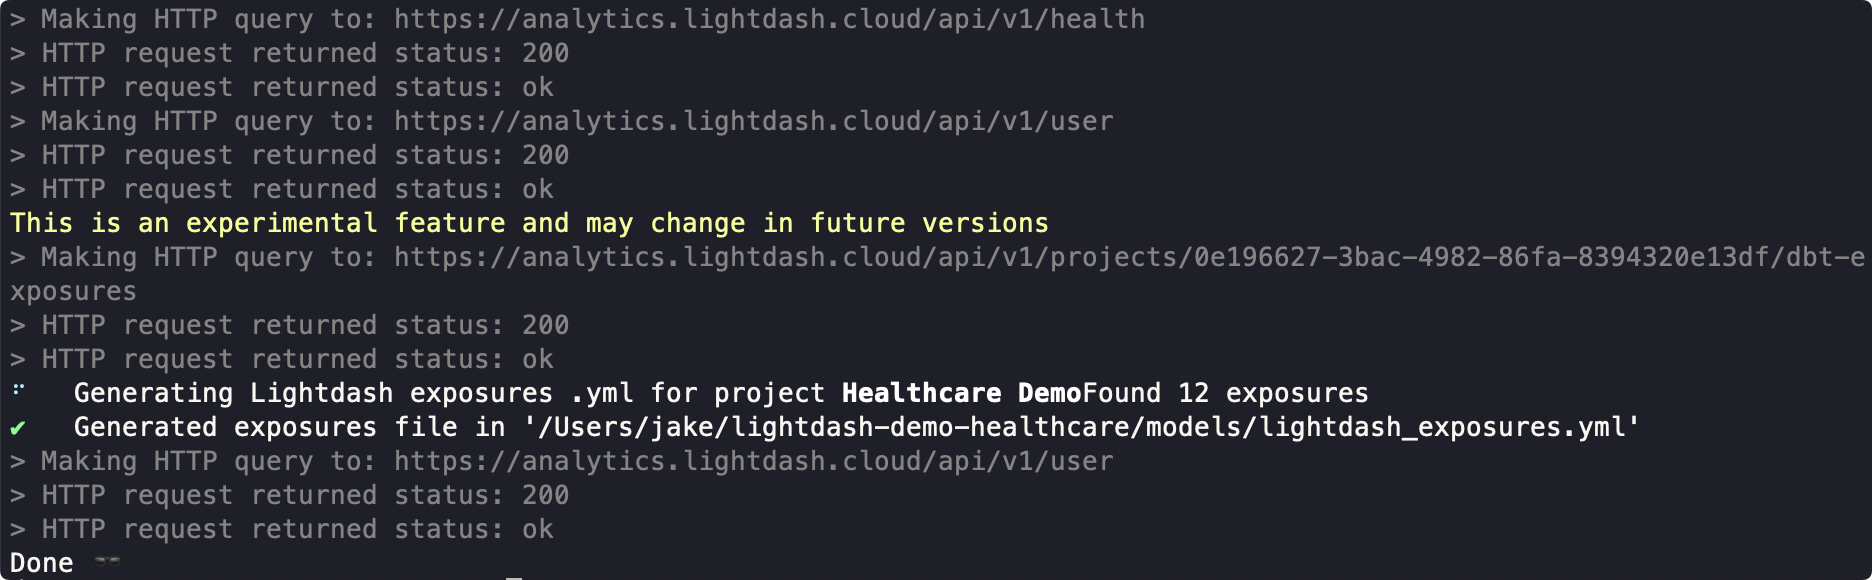
Defaults to OFF. When included, each step will print logs as it progresses through the command. For example, here’s a --verbose version of lightdash generate-exposures:
Commands
The table below includes a complete list of all commands available in the Lightdash CLI. For examples and command-specific options, click through the command in the table for docs, or install the Lightdash CLI and use the global help option.lightdash login
Log in to a Lightdash instance using email and password or a token.
[URL]- The URL for your Lightdash instance (see examples below)
--token <token>- For logging in with an access token (common for SSO users)
- Exclude this to log in with email and password
--project <project uuid>- Select a project by UUID after login (must be valid UUID)
--token to log in with email and password):
lightdash config set-project
Choose the project you’re developing in so the CLI knows which project content to look at for other commands like lightdash validate and lightdash preview. If your organization only has one project you won’t need to use this!
--name- Set the project non-interactively by passing an explicit project name
--uuid- Set the project non-interactively by passing an explicit project UUID
lightdash config get-project
Get the current active project that the CLI is configured to use.
lightdash validate, lightdash preview, and lightdash deploy.
lightdash config list-projects
List all non-preview projects in your organization.
lightdash config set-project.
lightdash compile
Compile Lightdash resources using your local project and database credentials. dbt gets compiled first, then your Lightdash explores. If you use dbt node selection to only compile a subset of models, Lightdash will also compile models joined to those models to ensure no field references are broken.
All standard dbt options work with lightdash compile.
Options:
--skip-dbt-compile- (default: false)
- Skip
dbt compileand deploy from the existing ./target/manifest.json
--skip-warehouse-catalog- (default: false)
- Skip fetch warehouse catalog and use types defined in the YAML
--no-warehouse-credentials- (default: false)
- Compile without any warehouse credentials. Skips dbt compile + warehouse catalog
--disable-timestamp-conversion [true|false]- (default: false)
- Snowflake only. Disable converting timestamps to UTC during compilation. Only use this if your timestamp values are already in UTC.
accounts dbt model, then your Lightdash explores:
dbt compile and warehouse catalog:
lightdash preview
Spin up a temporary preview project using your local project files and content (charts and dashboards) copied from your selected project.
All standard dbt options work with lightdash preview.
Options:
--name [preview name]- Custom name for the preview project. If a name is not provided, a unique, randomly generated name will be created
--start-of-week [number]- Specifies the first day of the week (used by week-related date functions)
- 0 (Monday) to 6 (Sunday)
--skip-dbt-compile- (default: false)
- Skip
dbt compileand deploy from the existing ./target/manifest.json
--skip-warehouse-catalog- (default: false)
- Skip fetch warehouse catalog and use types defined in the YAML
--no-warehouse-credentials- (default: false)
- Compile without any warehouse credentials. Skips dbt compile + warehouse catalog
--use-dbt-list [true/false]- (default: true)
- Use
dbt listinstead ofdbt compileto generate dbt manifest.json
--ignore-errors- (default: false)
- Allows deploy with errors on compile
--table-configuration [prod/all]- (default: all)
- If set to ‘prod’ it will copy the table configuration from the source project
--skip-copy-content- (default: false)
- Skip copying content from the source project
--combine-manifest <path-or-url>- Path or http(s) URL to an additional dbt
manifest.json. Models present in this file but missing from the preview-generated manifest are merged in so the preview reflects the full project even when dbt was only run on a subset of models. The preview-generated manifest always wins on conflicts. URLs (for example, a presigned S3 URL) are fetched at runtime so the manifest does not need to be downloaded first.
- Path or http(s) URL to an additional dbt
--use-batched-deploy- (default: false)
- Deploy explores in batches instead of a single request. Useful for large projects that exceed payload size limits
--batch-size [number]- (default: 50)
- Number of explores to include in each batch when using batched deploy
--parallel-batches [number]- (default: 1)
- Number of batches to upload in parallel when using batched deploy. Use with caution as higher values may overwhelm the server
--expires-in <hours>- (default: the upstream project’s configured default, or 720 if there is no upstream project)
- Number of hours until the preview project auto-expires. Values above the upstream project’s maximum preview expiration are silently capped to the maximum.
--disable-timestamp-conversion [true|false]- (default: false)
- Snowflake only. Disable converting timestamps to UTC. Applied and persisted when creating the preview project. When updating an existing preview, the flag is ignored with a warning and the saved project setting is used instead.
marketing:
lightdash start-preview
Create a persistent preview project using your local project files and content (charts and dashboards) copied from your selected project.
All standard dbt options work with lightdash start-preview.
Required argument:
--name [preview name]- Name for the preview project. If a preview project with this name already exists, it will be updated, otherwise it will create a new preview project.
--start-of-week [number]- Specifies the first day of the week (used by week-related date functions)
- 0 (Monday) to 6 (Sunday)
--skip-dbt-compile- (default: false)
- Skip
dbt compileand deploy from the existing ./target/manifest.json
--skip-warehouse-catalog- (default: false)
- Skip fetch warehouse catalog and use the types defined in YAML
--use-dbt-list [true/false]- (default: true)
- Use
dbt listinstead ofdbt compileto generate dbt manifest.json
--ignore-errors- (default: false)
- Allows deploy with errors on compile
--table-configuration [prod/all]- (default: all)
- If set to ‘prod’ it will copy the table configuration from the source project
--skip-copy-content- (default: false)
- Skip copying content from the source project
--combine-manifest <path-or-url>- Path or http(s) URL to an additional dbt
manifest.json. Models present in this file but missing from the preview-generated manifest are merged in so the preview reflects the full project even when dbt was only run on a subset of models. The preview-generated manifest always wins on conflicts. URLs (for example, a presigned S3 URL) are fetched at runtime so the manifest does not need to be downloaded first.
- Path or http(s) URL to an additional dbt
--use-batched-deploy- (default: false)
- Deploy explores in batches instead of a single request. Useful for large projects that exceed payload size limits
--batch-size [number]- (default: 50)
- Number of explores to include in each batch when using batched deploy
--parallel-batches [number]- (default: 1)
- Number of batches to upload in parallel when using batched deploy. Use with caution as higher values may overwhelm the server
--expires-in <hours>- (default: the upstream project’s configured default, or 720 if there is no upstream project)
- Number of hours until the preview project auto-expires. Values above the upstream project’s maximum preview expiration are silently capped to the maximum.
--disable-timestamp-conversion [true|false]- (default: false)
- Snowflake only. Disable converting timestamps to UTC. Applied and persisted when creating the preview project. When updating an existing preview, the flag is ignored with a warning and the saved project setting is used instead.
Re-running
lightdash start-preview refreshes the expiration. If the named preview already exists, expires_at is recomputed from the moment of the re-run using the same rules as a fresh preview (bounded by the upstream project’s default and maximum). Omitting --expires-in on a re-run resets the expiration to the upstream project’s default — a re-run is treated as confirmation that the preview is still in use.lightdash stop-preview
Shuts down a project that was created with .
This command does not support using dbt options.
Required argument:
--name [preview name]- Name of the preview project to be deleted.
lightdash deploy
Compiles and deploys the current project to your selected Lightdash Cloud project.
All standard dbt options work with lightdash deploy.
Options:
--create [project_name]- Create a new project. If a project name is not provided, you’ll be prompted for one on creation
--ignore-errors- (default: false)
- Allows deploy with errors on compile
--start-of-week [number]- Specifies the first day of the week (used by week-related date functions)
- 0 (Monday) to 6 (Sunday)
--skip-dbt-compile- (default: false)
- Skip
dbt compileand deploy from the existing ./target/manifest.json
--skip-warehouse-catalog- (default: false)
- Skip fetch warehouse catalog and use types defined in the YAML
--no-warehouse-credentials- (default: false)
- Compile without any warehouse credentials. Skips dbt compile + warehouse catalog
--use-dbt-list [true|false]- (default: true)
- Use
dbt listinstead ofdbt compileto generate dbt manifest.json
--combine-manifest <path-or-url>- Path or http(s) URL to an additional dbt
manifest.json. Models present in this file but missing from the deploy-generated manifest are merged in so the deploy reflects the full project even when dbt was only run on a subset of models. The deploy-generated manifest always wins on conflicts. URLs (for example, a presigned S3 URL) are fetched at runtime so the manifest does not need to be downloaded first.
- Path or http(s) URL to an additional dbt
--use-batched-deploy- (default: false)
- Deploy explores in batches instead of a single request. Useful for large projects that exceed payload size limits
--batch-size [number]- (default: 50)
- Number of explores to include in each batch when using batched deploy
--parallel-batches [number]- (default: 1)
- Number of batches to upload in parallel when using batched deploy. Use with caution as higher values may overwhelm the server
--disable-timestamp-conversion [true|false]- (default: false)
- Snowflake only. Disable converting timestamps to UTC. Only honored together with
--create; the value is persisted to the new project. When deploying to an existing project, the flag is ignored with a warning and the saved project setting is used instead.
production credentials from your local dbt profiles.yml:
lightdash refresh
Refreshes your hosted Lightdash project using the latest code from your linked Github repository. This is equivalent to pressing Refresh dbt in the UI as an admin.
This command does not support using dbt options.
lightdash deploy vs lightdash refresh
The two CLI commands above (lightdash deploy and lightdash refresh) are often confused. Here’s the quick difference:
Rule of thumb:
- Local dbt code you want to push →
deploy - Lightdash already points at a git repo and you just want it to pull the latest →
refresh
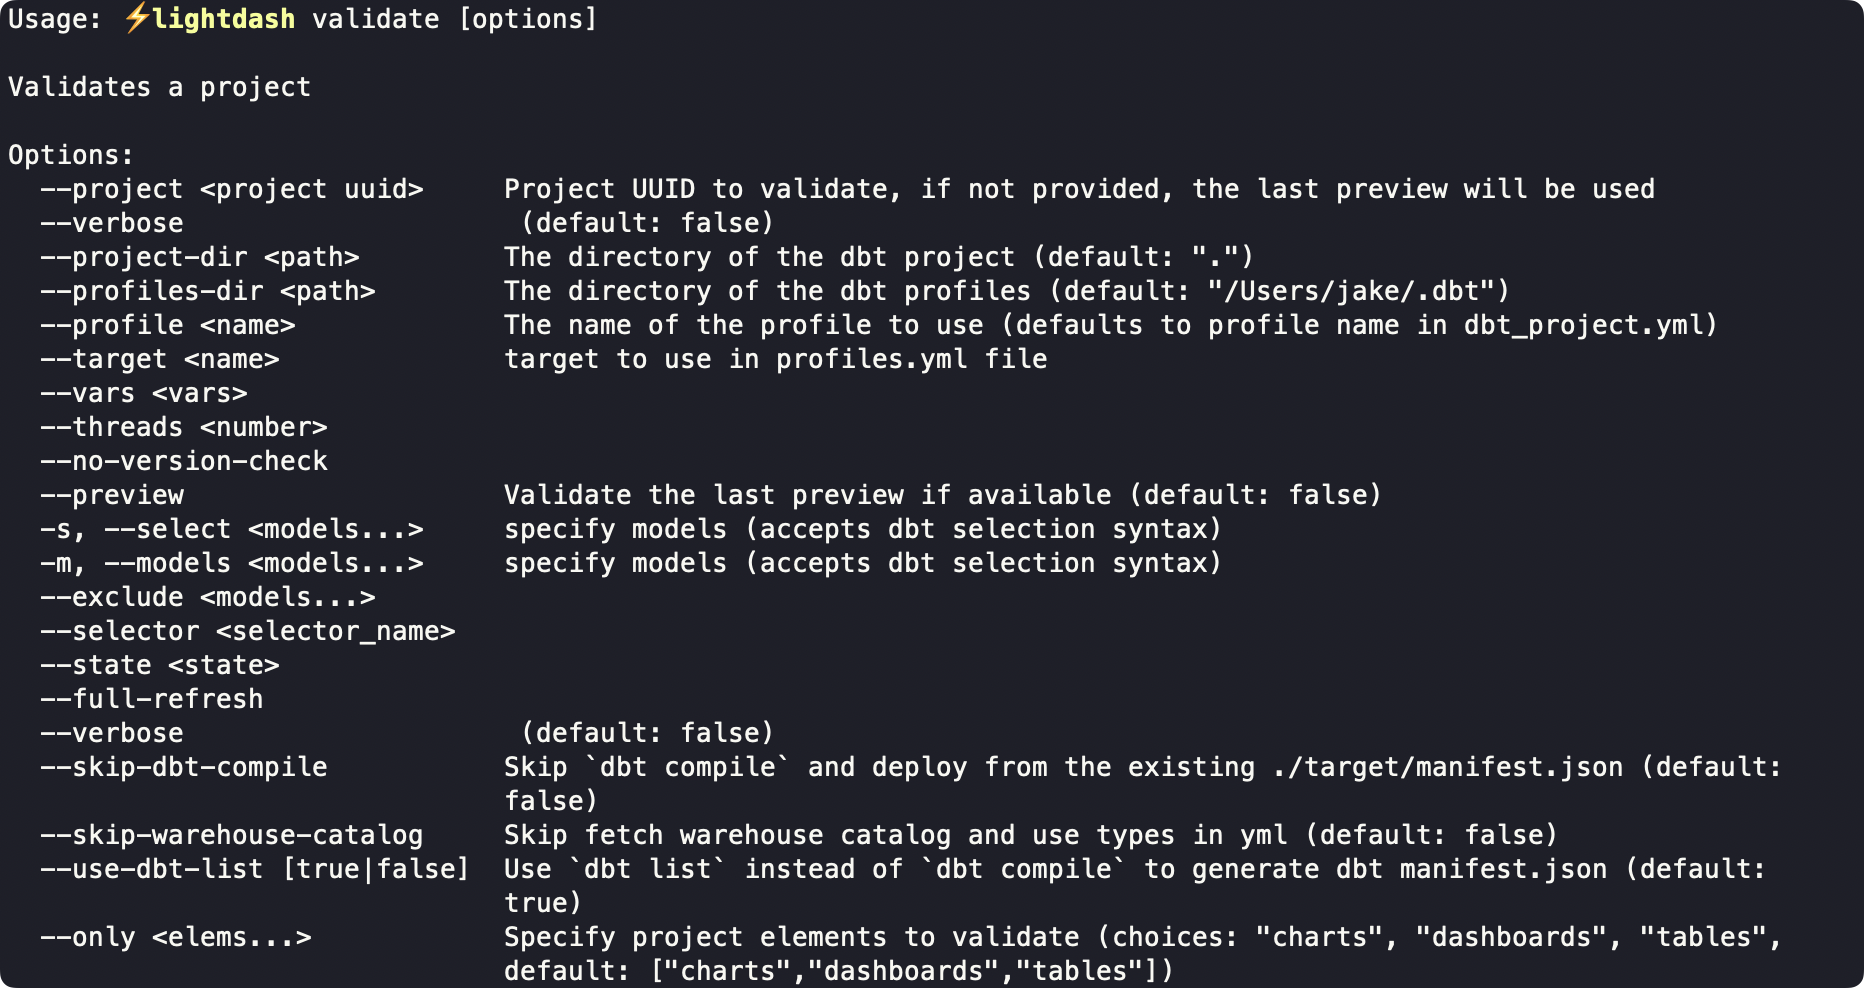
lightdash validate
Validates a project by comparing the content in your currently selected project against your local project files. Returns all charts and dashboards that have errors.
All standard dbt options work with lightdash validate.
Options:
--project [project uuid]- Project UUID to validate, if not provided, the last preview will be used
--preview- (default: false)
- Validate the last preview if available
--skip-dbt-compile- (default: false)
- Skip
dbt compileand deploy from the existing ./target/manifest.json
--skip-warehouse-catalog- (default: false)
- Skip fetch warehouse catalog and use types defined in the YAML
--use-dbt-list [true/false]- (default: true)
- Use
dbt listinstead ofdbt compileto generate dbt manifest.json
--only [elems...]- (default: [“charts”,“dashboards”,“tables”])
- Specify project elements to validate
--include-spaces <spaceSlugs...>- Only report chart and dashboard validation errors from these spaces. Matching cascades recursively into sub-spaces via parent space relationships, so passing a parent space slug also includes everything under it. Use the same
spaceSlugidentifiers that appear inlightdash downloadoutput. Space slugs aren’t unique — if the same slug exists in multiple spaces, all of them (and their sub-spaces) are matched. Mutually exclusive with--exclude-spaces.
- Only report chart and dashboard validation errors from these spaces. Matching cascades recursively into sub-spaces via parent space relationships, so passing a parent space slug also includes everything under it. Use the same
--exclude-spaces <spaceSlugs...>- Skip chart and dashboard validation errors from these spaces (and their sub-spaces, applied recursively). Everything else is reported. Mutually exclusive with
--include-spaces.
- Skip chart and dashboard validation errors from these spaces (and their sub-spaces, applied recursively). Everything else is reported. Mutually exclusive with
Notes on space filtering:
- Unknown slugs fail fast before the compile step with an actionable error listing the available slugs, so a typo in CI fails in about a second instead of after a full validation run.
- Spaces that aren’t visible to the credentials running the CLI (for example, private spaces the token can’t see) can’t be matched.
- Table-level errors are project-level and aren’t scoped to a space, so they’re never affected by these flags. Use
--only tables(or omittablesfrom--only) to control whether table errors are reported. - When errors are hidden by a space filter, the CLI prints an
(N errors in filtered-out spaces hidden)note. The exit code reflects only the visible errors, so filtered-out errors won’t fail CI.
archive space don’t fail CI:
lightdash generate
Generates a new schema.yml file or updates existing schema.yml for selected model(s). Use this command to auto-generate Lightdash-ready YAML schema files from your database columns so your dbt models appear as tables in Lightdash.
All standard dbt options work with lightdash generate.
Options:
-yor--assume-yes- (default: false)
- assume yes to prompts
--exclude-meta- (default: false)
- exclude Lightdash metadata from the generated .yml
--preserve-column-case- (default: false)
- preserve original casing of column names in generated schema files
--skip-existing- (default: false)
- skip files that already exist
lightdash generate-exposures
Generates a schema.yml file for Lightdash exposures.
This command does not support using dbt options.
Options:
--project-dir [path]- (default: ”.”)
- The directory of the dbt project
--output [path]- The path where the output exposures YAML file will be written
lightdash-exposures.yml in the current directory with all exposures in Lightdash:
lightdash dbt run
Runs dbt and then generates or updates schema.yml file(s) for models that have columns missing or changed from the existing schema.yml files.
Any dbt option that works with dbt run will also work with lightdash dbt run. That includes all the Lightdash dbt options, and more (see dbt run docs).
Options:
--exclude-meta- (default: false)
- exclude Lightdash metadata from the generated .yml
--assume-yesor-y- assume yes to prompts (default: false)
--assume-noor-no- assume no to prompts (default: false)
--preserve-column-case- (default: false)
- preserve original casing of column names in generated schema files
schema.yml file:
lightdash download
Downloads all charts and dashboards from your Lightdash project as code. A lightdash directory is created in your working directory and all of the charts and dashboards are written there as .yml files.
E.g. if you’re running this command inside your dbt directory (eg: /home/javi/dbt) then it will create a folder (/home/javi/dbt/lightdash).
You can make changes to the code and upload these changes back to your Lightdash project. Content that’s been downloaded as code can still be managed in the Lightdash UI.
Options:
--chartsor-c- select specific charts as code to download from your project. Use the chart SLUG, UUID or URL to specify the chart
--dashboardsor-d- select specific dashboards as code to download from your project. This will also download all charts in the dashboard as code. Use the dashboard SLUG, UUID or URL to specify the dashboard
--pathor-p- specify a custom path to a directory where you want the downloaded files to be written to. You can use the full path, or a relative path to a directory
--project <project uuid>- download all charts and dashboards from a specific project. You can find the project UUID for a project from a Lightdash URL. E.g. here, the project UUID is
123-project-uuidhttps://app.lightdash.cloud/projects/123-project-uuid/
- download all charts and dashboards from a specific project. You can find the project UUID for a project from a Lightdash URL. E.g. here, the project UUID is
--language-mapor-l- (default: false)
- generate
<item name>.language.map.ymlfor the downloaded charts and dashboards with all translatable text from charts and dashboards
--nested- (default: false)
- split downloaded content into sub-folders matching the spaces in your project
--strip-pivot-series- (default: false)
- strip per-value pivot series config from chart YAML so it’s portable across projects. Cartesian chart series that are tied to specific pivot field values are rewritten to reference only the underlying x/y fields, and duplicates collapsed into a single entry. Use this when the source project’s pivot values don’t exist in the target project (for example, when reusing chart YAML as a template), so the upload doesn’t fail or render with the original project’s hardcoded series. Only applies to regular charts; SQL charts and dashboards are unaffected.
--virtual-views <slugs...>- opt-in flag to download specific virtual views as code. Pass one or more virtual-view slugs. Each view is written to
lightdash/virtual-views/<slug>.yml. Virtual views are not included in a barelightdash download— use this flag or--include-virtual-viewsto opt in.
- opt-in flag to download specific virtual views as code. Pass one or more virtual-view slugs. Each view is written to
--include-virtual-views- (default: false)
- opt-in flag to download every virtual view in the project as code. Use
--virtual-views <slugs...>instead when you only want specific views.
--apps <appUuids...>- opt-in flag to also download specific data apps as code (enterprise only). Pass one or more app UUIDs to download just those apps — this is the only way to download apps that haven’t been added to a space. Each app is written to
lightdash/apps/<slug>/as a locally buildable project:lightdash-app.ymlmanifest, the app’ssrc/tree,package.json, a read-only.lightdash/context/snapshot of the project’s semantic layer, and agent skill files. The built output is not included — the server rebuilds it on upload.
- opt-in flag to also download specific data apps as code (enterprise only). Pass one or more app UUIDs to download just those apps — this is the only way to download apps that haven’t been added to a space. Each app is written to
--include-apps- (default: false)
- opt-in flag to download every data app in the project that has been added to a space (enterprise only), capped at the first 10. Use
--apps <appUuids...>to reach apps that aren’t in a space, or to download more than 10.
--apps-only- (default: false)
- download only data apps, skipping charts, dashboards, and space files (implies
--skip-charts --skip-dashboards --skip-spaces). Requires--apps <appUuids...>or--include-apps. Recommended for app-focused checkouts.
--skip-charts- (default: false)
- skip downloading charts (including SQL charts)
--skip-dashboards- (default: false)
- skip downloading dashboards
--organization- (default: false)
- switch to organization mode and download organization-scoped content (currently custom roles) instead of project content. Files are written to
lightdash/custom-roles/<role-slug>.yml. Requires organization admin permissions. Cannot be combined with project-content flags such as--charts,--dashboards,--project, or--nested.
/Users/katiehindson/lightdash/lightdash-analytics/
/Users/katiehindson/lightdash/lightdash-analytics/charts/ and /Users/katiehindson/lightdash/lightdash-analytics/dashboards and save the content to these new folders.
You can also use relative paths like:
lightdash upload
Uploads charts and dashboards that you’ve made changes to from the lightdash/ directory in your dbt project to your Lightdash project. To upload new content as code to your project, you need to use the option --force (see Options below).
If there have been changes made to a chart or dashboard in the application that is being uploaded from code, lightdash upload will overwrite the changes.
lightdash upload preserves empty dashboard filters — active filters with no values on operators that require values (for example, equals or greaterThan). These act as an “unset default” control: at runtime they render as is any value in the filter bar and do not override chart-level filters on the same field until a viewer picks a value. Value-less relative-date operators (inTheCurrent, notInTheCurrent) are compiled from settings.unitOfTime rather than values, so they are not treated as empty and continue to apply as before. See Empty default dashboard filters.--force- required to create new content as code that doesn’t exist in your Lightdash project yet — without it,
lightdash uploadonly updates existing content. Also required to apply destructive virtual view column changes (removing a column or changing its type).
- required to create new content as code that doesn’t exist in your Lightdash project yet — without it,
--chartsor-c- select specific charts as code to upload back to your project. Use the chart SLUG to specify the chart
--dashboardsor-d- select specific dashboards as code to upload back to your project. Use the dashboard SLUG to specify the dashboard
--pathor-p- specify a custom path to a directory where the files you want to upload are. You can use the full path, or a relative path to a directory
--project <project uuid>- upload all charts and dashboards from a specific project. You can find the project UUID for a project from a Lightdash URL. E.g. here, the project UUID is
123-project-uuidhttps://app.lightdash.cloud/projects/123-project-uuid/
- upload all charts and dashboards from a specific project. You can find the project UUID for a project from a Lightdash URL. E.g. here, the project UUID is
--skip-space-create- (default: false)
- Skip space creation if it does not exist
--include-charts- (default: false)
- Include charts updates when uploading dashboards
--public- (default: false)
- Creates new spaces as public instead of private
--validate- (default: false)
- Validate charts and dashboards after upload and display any validation errors
--nested- (default: false)
- expect content to be organized in sub-folders matching the spaces in your project (use this if content was downloaded with
--nested)
--virtual-views <slugs...>- specify virtual view slugs to upload from
lightdash/virtual-views/. Combine with--forceto apply destructive column changes.
- specify virtual view slugs to upload from
--skip-virtual-views- (default: false)
- skip uploading virtual views, even when
lightdash/virtual-views/contains files
--apps [appUuids...]- opt-in flag to also upload data apps as code (enterprise only). Bare
--appsuploads every app folder underlightdash/apps/. Pass one or more app UUIDs to upload just those apps. The CLI posts each app’ssrc/tree and returns immediately — the destination rebuilds the app in its sandbox and publishes a new version. The app shows abuildingstatus in the UI until the build finishes. Uploading to the same project appends a new version and applies any edits to the manifest’snameordescription; uploading to a different project prompts for confirmation (in non-interactive shells the app is skipped with an error unless you also pass--create-new) and creates a new app in the target. After any create, the CLI prints the new app’s URL and offers to retarget the locallightdash-app.yml(updatingappUuid,projectUuid, andversion) so future uploads update the new app.
- opt-in flag to also upload data apps as code (enterprise only). Bare
--create-new- (default: false)
- always create a new data app from the uploaded source instead of appending a new version to the app referenced by
lightdash-app.yml. Combine with--appsand--projectwhen copying an app to a different project or instance in a non-interactive shell.
--organization- (default: false)
- switch to organization mode and upload organization-scoped content (currently custom roles) instead of project content. Reads YAML files from
lightdash/custom-roles/and upserts each role by name — creating, updating, or reporting no change per file. Requires organization admin permissions. Cannot be combined with project-content flags such as--charts,--dashboards,--project, or--force. Uploads never delete roles.
lightdash/ directory to your Lightdash project.
/Users/katiehindson/lightdash/lightdash-analytics/
/Users/katiehindson/lightdash/lightdash-analytics/charts/ and /Users/katiehindson/lightdash/lightdash-analytics/dashboards and save the content to these new folders.
You can also use relative paths like:
lightdash/ directory to a specific project.
--force is passed.
lightdash/apps/.
lightdash/custom-roles/ back to the organization (requires org admin).
lightdash rename
Rename model or field names across all content in your Lightdash project. This command will do a full find and replace on a field or table so all references in chart fields, dashboard filters, table calculations, custom metrics, etc. can be changed at once.
Arguments:
--type- Specify what you’re renaming
- Accepted values:
fieldormodel
--from- The current name of the table or field you want to change (this is the slug from your YAML definition, i.e.
num_users)
- The current name of the table or field you want to change (this is the slug from your YAML definition, i.e.
--to- The new name you want to use (must match the new slug in your YAML for this field or table, i.e.
count_distinct_user_id)
- The new name you want to use (must match the new slug in your YAML for this field or table, i.e.
--project,-p- Project UUID to target a specific project
- (default: The most recent project you set with
lightdash config set-project)
--model,-m- The model to target for field renaming. This is only needed if the current field name is not unique in your project
--dry-run- List all content the rename action will change, no changes will be made
--list- List all charts and dashboards that were renamed after the command is complete
--assume-yes,-y- Assume yes to all prompts.
num_users to count_distinct_user_id.
users_mart_v1 to users.
count to count_distinct_order_id in the orders model and list all affected content when complete:
lightdash diagnostics
Shows diagnostic information about the CLI environment. This is useful for debugging issues with the CLI or sharing information with the Lightdash support team.
--dbt- Include dbt debug information in the output
--project-dir <path>- dbt project directory (used with —dbt flag)
--profiles-dir <path>- dbt profiles directory (used with —dbt flag)
--defer- dbt defer option (used with —dbt flag)
--no-defer- dbt no-defer option (used with —dbt flag)
- CLI version
- Node.js version and optimization status
- Authentication status (API key, server URL, organization, project)
- dbt debug output (if —dbt flag provided)
lightdash sql
Run a raw SQL query against your data warehouse using the credentials from your currently selected project. Results are exported to a CSV file.
<query>- The SQL query to execute
-o, --output <file>- Output file path for CSV results
--limit <number>- Maximum number of rows to return from the query
--page-size <number>- Number of rows per page (default: 500, max: 5000)
--verbose- (default: false)
- Show detailed output
lightdash lint
Validates Lightdash Code files (models, charts, dashboards) against JSON schemas. This command checks that your YAML files conform to the expected structure before you deploy.
-p, --path <path>- Path to a file or directory to lint
- (default: current directory)
--verbose- (default: false)
- Show detailed validation output including all validated files
-f, --format <format>- Output format:
cli(default) orjson(SARIF format) - (default: “cli”)
- Output format:
Examples:
Validate all Lightdash Code files in the current directory:
- Errors (
✗, red) — schema validation failures. The command exits with a non-zero status, failing CI. - Warnings (
⚠, yellow) — non-fatal issues that don’t block deployment but signal a configuration likely to behave unexpectedly. Warnings don’t change the exit code.
lightdash pre-aggregate-audit
Reports pre-aggregate hit/miss coverage for one dashboard or every dashboard in the project. Use it to find gaps in your pre-aggregate YAML or to gate CI on dashboard coverage.
--dashboard <uuid-or-slug>- Audit a specific dashboard. Required unless
--allis set.
- Audit a specific dashboard. Required unless
--all- Audit every dashboard in the project.
--project <uuid>- Override the active project. Falls back to
LIGHTDASH_PROJECT_UUID, then to the CLI config.
- Override the active project. Falls back to
--json- Emit machine-readable JSON instead of human-friendly text.
--fail-on-miss- Exit 1 if any eligible tile misses. Ineligible tiles do not trigger a failure.
--verbose- Include ineligible tiles (and their reason) in the human output.
dbt options
These are options from the dbt Core CLI that also work with some Lightdash CLI commands.dbt node selection
You can select a subset of your dbt models by using the following options on any Lightdash commands that support dbt options. Node selection:--select [models...]or-s [models...]--exclude [models...]--selector [selector_name]
dbt flags
These dbt flags work with Lightdash commands that support dbt options. Read the dbt docs on global config flags for details.--project-dir [path]--profiles-dir [path]--profile [name]--target [name]--no-version-check--state [state]--full-refresh--defer(works withlightdash previewandlightdash compile)
--defer
--defer is commonly paired with --state and --select state:modified+ to limit a preview to changed models. The behavior below is specific to how Lightdash builds the explore list and differs from a plain dbt build --defer.
--deferonly resolves Lightdash-joined upstream models against the prod state manifest. It does not promote arbitrary unmodified models from the state manifest into the preview as standalone explores. With--select state:modified+, the preview contains the modified models (compiled to the dev/CI schema), their downstream models, and any models referenced through Lightdash join configs (deferred to the prod relations). Standalonetag:lightdashmodels that are not joined to a modified model will not appear. This is the scope of the fix shipped in lightdash/lightdash#20672.- Do not pass
--favor-stateto preview workflows.--favor-statemakes selected nodes prefer the prod relation over the freshly built dev relation, which silently routes the modified model back to stale prod data — the opposite of the intent of a PR preview. - The comma in dbt’s
--selectisAND, notOR.--select 'tag:lightdash,state:modified+'resolves to “modified models that are also taggedlightdash”, which usually narrows to one or two explores rather than the broader set most users expect. Use space-separated arguments (--select tag:lightdash state:modified+) forOR.
dbt project variables
You can set dbt project variables in Lightdash commands that support dbt options. Read the dbt docs on project variables for details.--vars [vars]
dbt threads
You can set the number of threads for dbt in Lightdash commands that support dbt options. Read the dbt docs on threads for details.--threads [number]
Environment Variables
The Lightdash CLI supports various environment variables that can be used to configure its behavior. These are especially useful in CI/CD environments where you want to avoid interactive prompts or need to set credentials programmatically.Core Lightdash Configuration
-
LIGHTDASH_API_KEY- API access token for authentication
- Overrides the API key stored in the config file (
~/.config/lightdash/config.yaml) - Useful for CI/CD pipelines where you don’t want to store credentials in files
-
LIGHTDASH_URL- Lightdash server URL (e.g.,
https://app.lightdash.cloud) - Overrides the server URL in the config file
- Lightdash server URL (e.g.,
-
LIGHTDASH_PROJECT- Project UUID to use for CLI commands
- Overrides the project UUID in the config file
- Useful when you want to target a specific project without using
--projectflag
-
LIGHTDASH_PROXY_AUTHORIZATION- Proxy authorization header for proxied access
- Use this if your Lightdash instance is behind a proxy that requires authentication
CI/CD Environment
CI- Set to
CI=trueto disable interactive prompts and run commands non-interactively in CI/CD environments - When enabled, the CLI will:
- Silence all interactive prompts (including confirmation dialogs)
- Assume default values or fail if required input is missing
- Skip certain version checks
- Adjust behavior for non-interactive execution
- Automatically detected by most CI/CD platforms (GitHub Actions, GitLab CI, CircleCI, etc.)
- Usage: Prefix any Lightdash command with
CI=trueto silence prompts:
- Set to
dbt Configuration
These environment variables are passed through to dbt and can be used to configure dbt behavior:-
DBT_PROJECT_DIR- Directory of dbt project
- Default: current directory (
.) - Can also be set using
--project-dirflag
-
DBT_PROFILES_DIR- Directory of dbt profiles
- Default:
~/.dbt - Can also be set using
--profiles-dirflag
Example: Using Environment Variables in CI/CD
Here’s an example of how to use environment variables in a GitHub Actions workflow:LIGHTDASH_API_KEYis stored as a GitHub secret and passed to the CLILIGHTDASH_URLspecifies which Lightdash instance to connect toLIGHTDASH_PROJECTspecifies which project to deploy toCI=trueensures the CLI runs in non-interactive mode