

Available to all Lightdash Cloud users. Self-hosted organizations need an Enterprise license and must enable MCP.
Connect a client
Lightdash generates the server URL and configuration for your instance and your client. Open Settings → MCP → Connect, pick a client, and copy what it gives you: a command, a config file, or the server URL.1
Open Settings → MCP → Connect
Any Lightdash user can open it. On a self-hosted instance, it uses your own domain.
2
Pick your client and copy the configuration
Choose Claude Desktop, Claude Code, Codex, Cursor, or VS Code. For ChatGPT or another client that isn’t listed, choose Other clients for the server URL and the Streamable HTTP and OAuth setup steps.
3
Authenticate
Connect from your client, sign in to Lightdash in your browser, and approve access. To confirm it worked, ask the assistant which Lightdash tools it has, as in Verifying your MCP connection.
Manual setup
Every client needs the MCP server URL for your instance and a way to authenticate. Interactive clients use OAuth; headless integrations can use a personal access token. Use this section when you want a client-specific walkthrough, when you’re configuring a client without opening Lightdash, or when you’re building your own integration.Find your instance name
Your instance name is the subdomain of the URL you use to open Lightdash in your browser. Open Lightdash, look at the address bar, and take the part before.lightdash.cloud:
For most Lightdash Cloud users the instance name is
app or eu1. That’s expected, not a placeholder you need to change. Only dedicated instances have a company-specific name like acme.https://<your-lightdash-host>/api/v1/mcp instead. See MCP for self-hosted instances.
Claude.ai and Claude Desktop
Set up MCP in the Claude.ai web app, and it will automatically sync to your Claude Desktop app after restart.Setup instructions
Setup instructions
-
Access Settings in Claude.ai
Navigate to your profile menu (bottom-left corner) and select Settings.
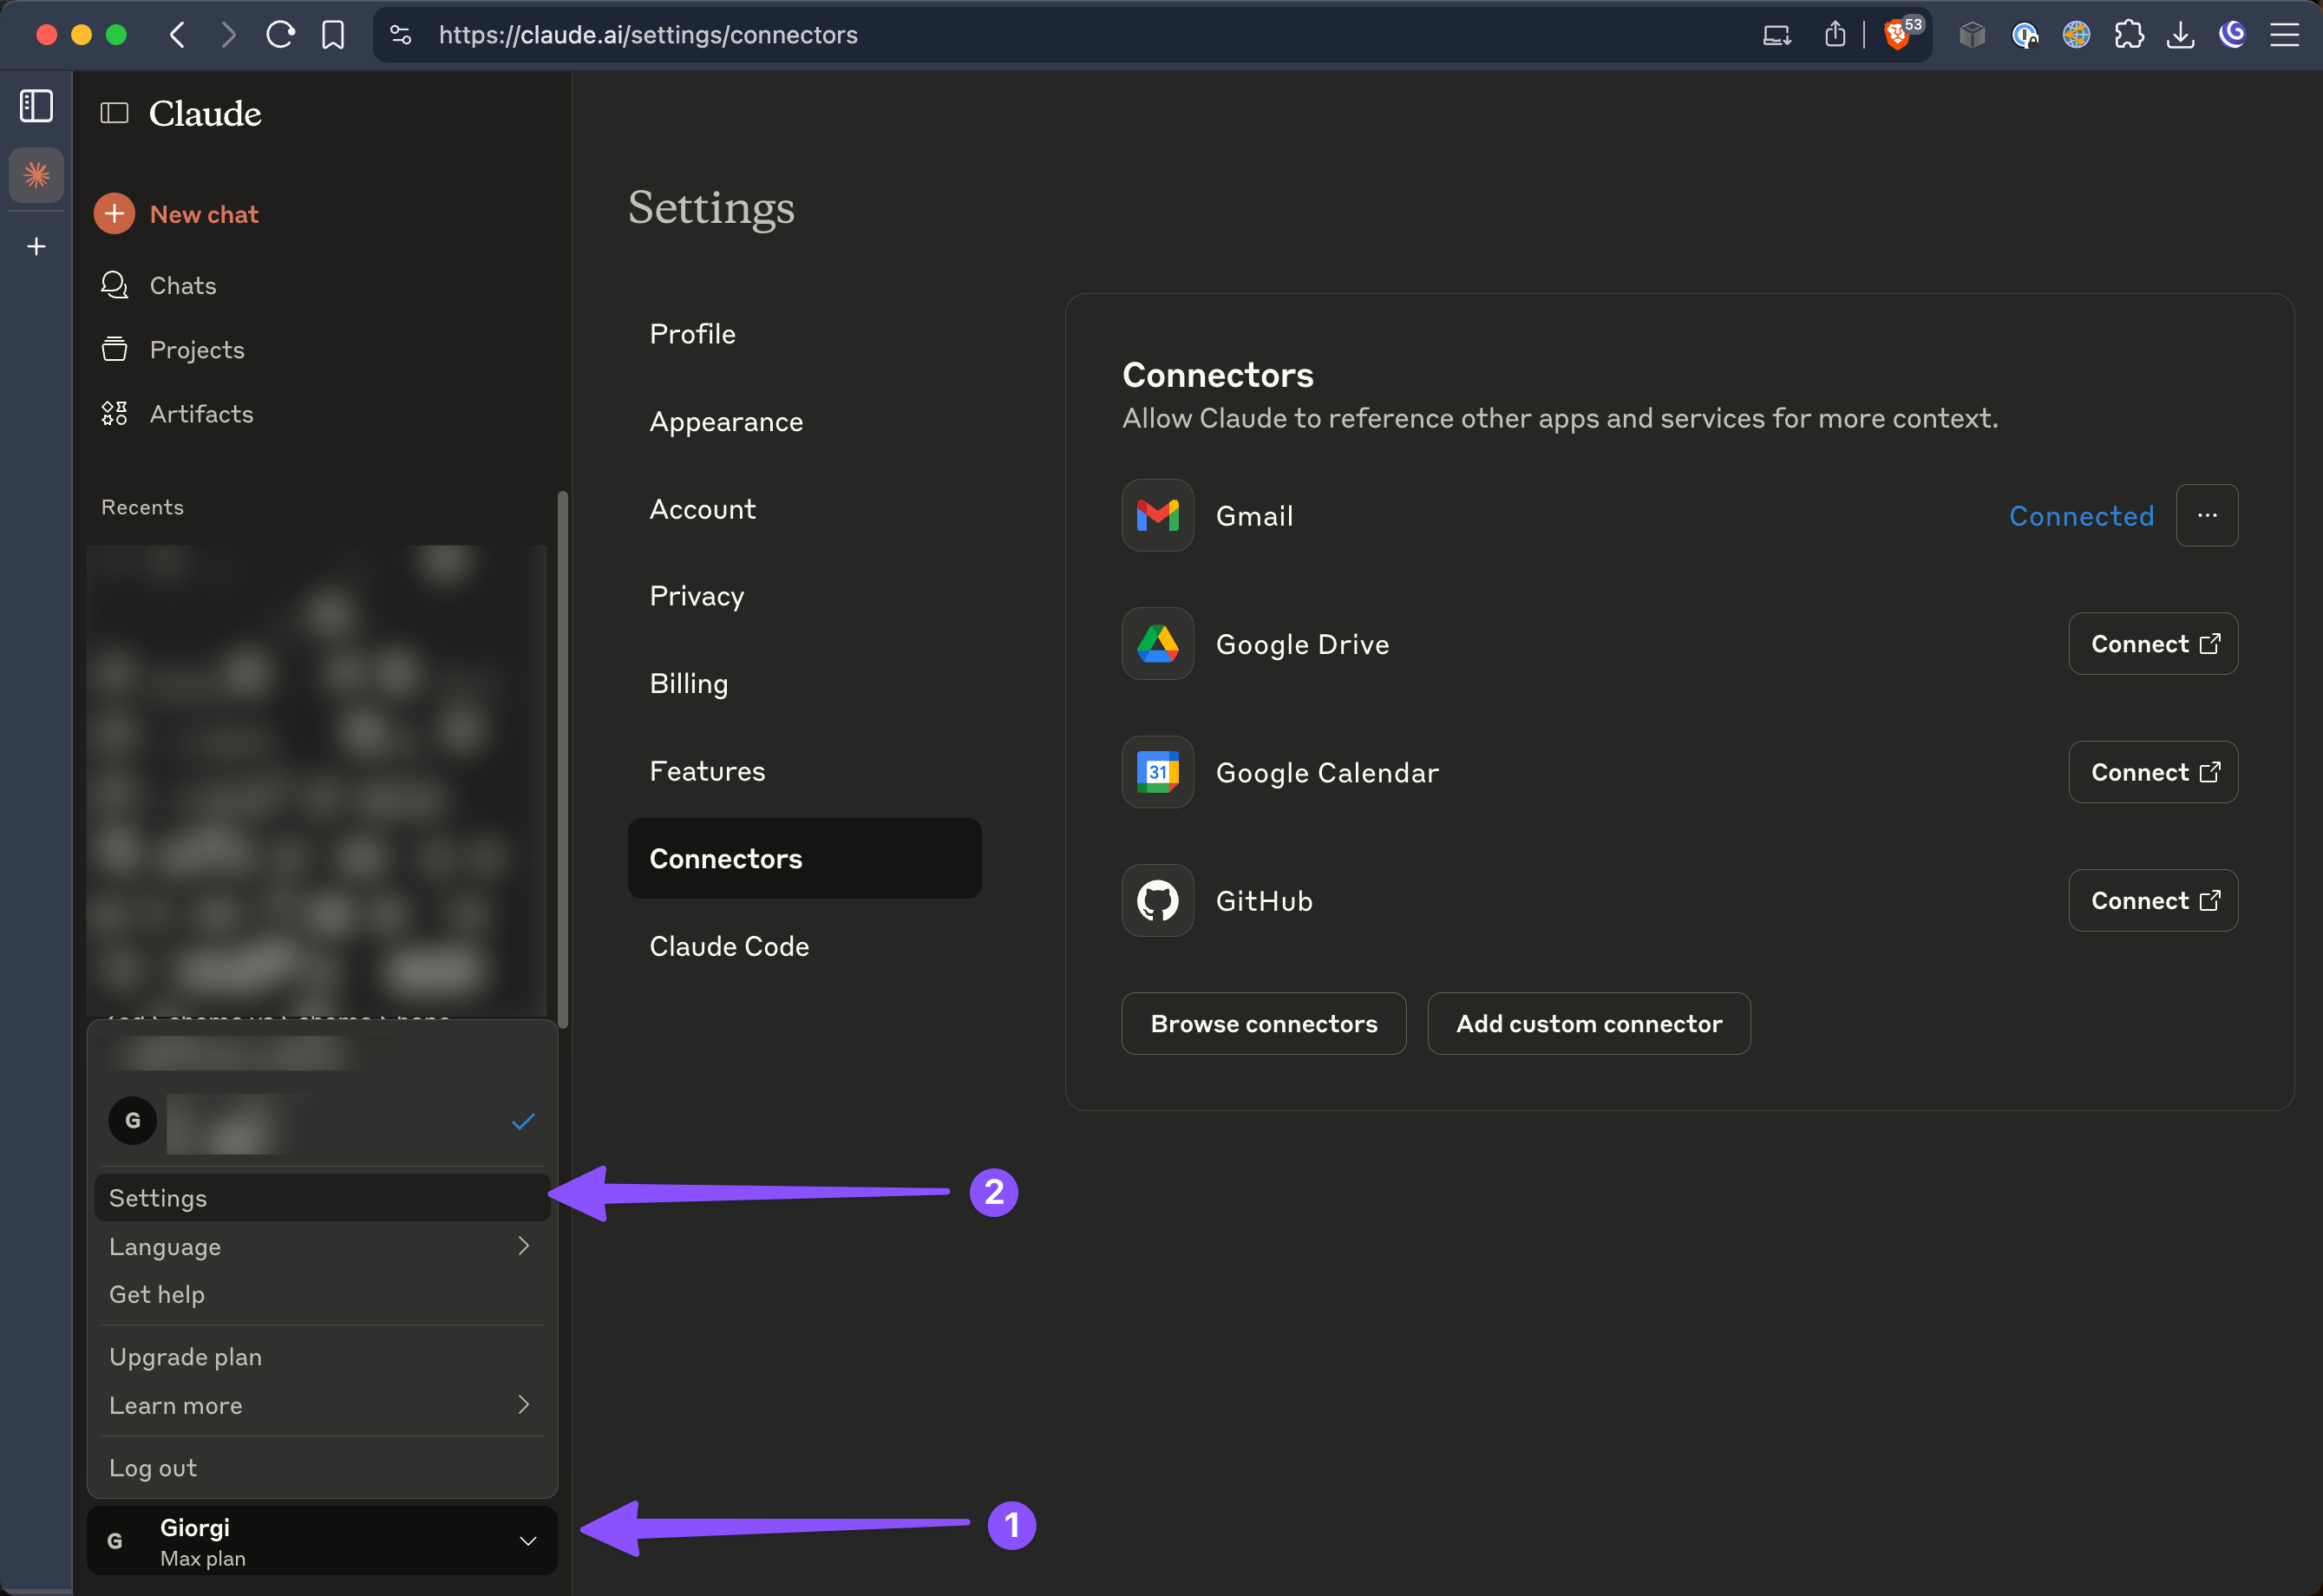
-
Add Custom Connector
In the Settings menu, select “Connectors” from the sidebar, then click “Add custom connector”.
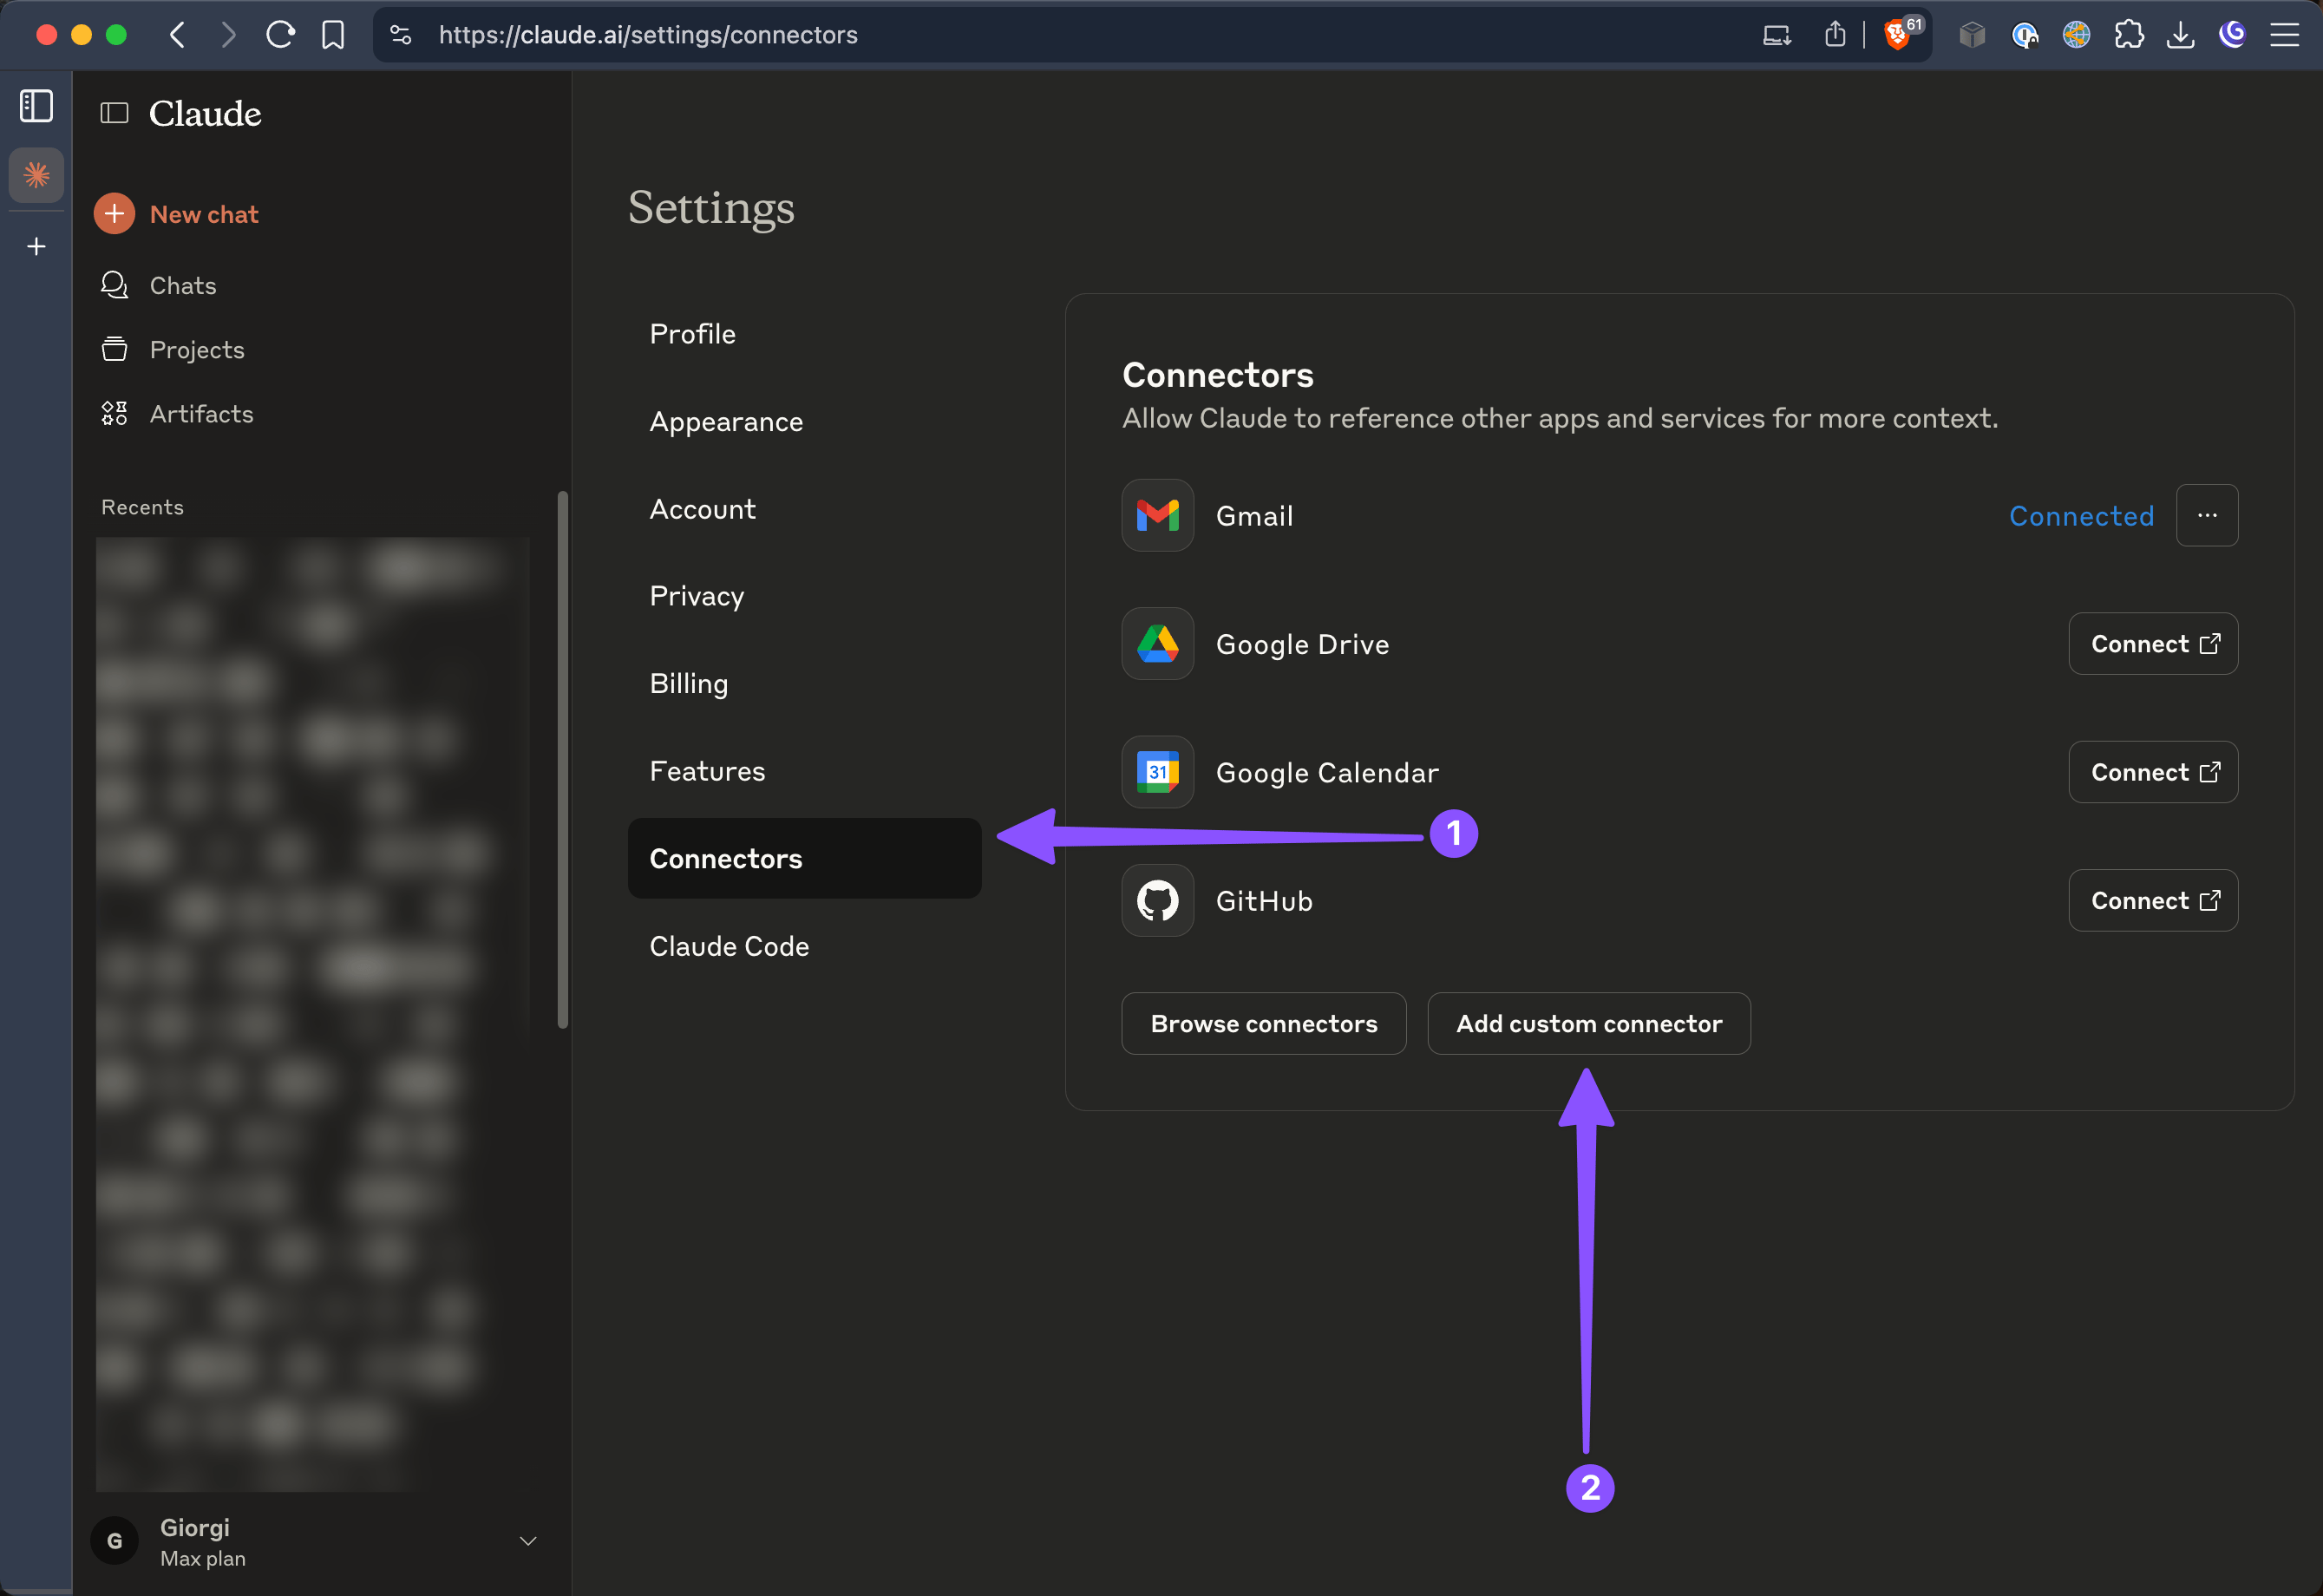
-
Configure Connection
Fill in the connection details with your Lightdash instance information.
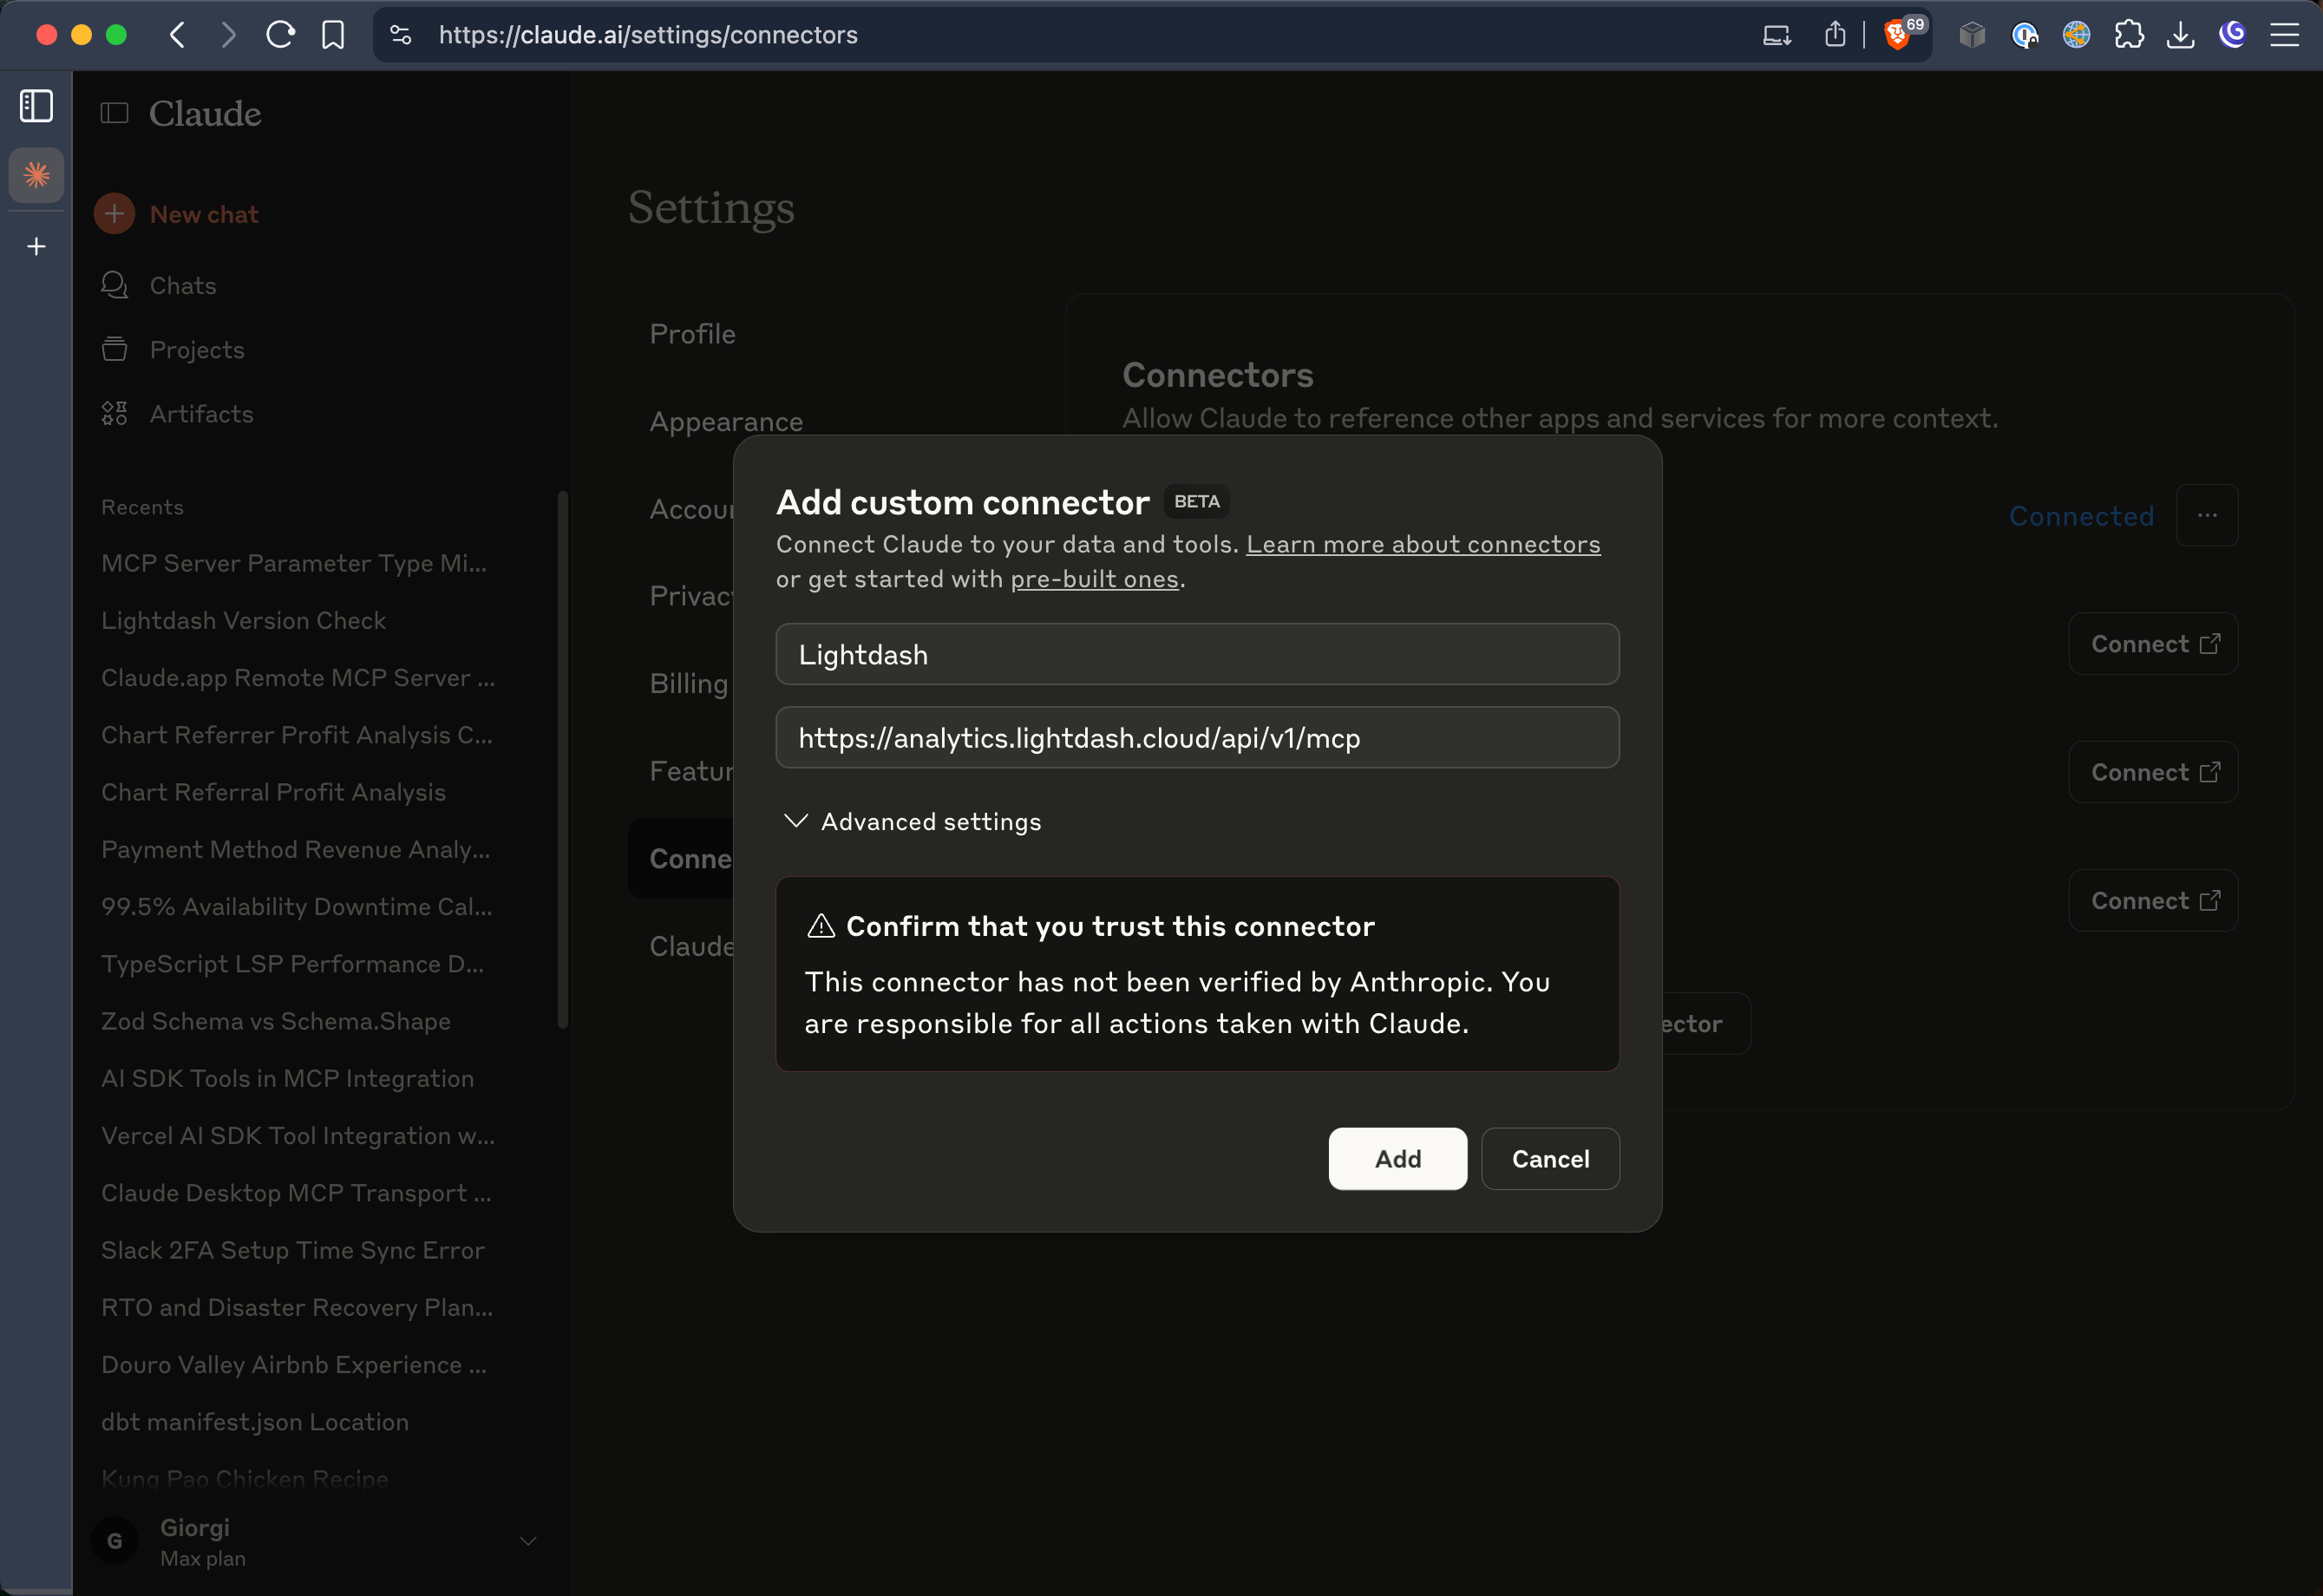
- Name: Lightdash (or any name you prefer)
- URL:
https://<your_instance_name>.lightdash.cloud/api/v1/mcp(commonlyapporeu1, see Find your instance name)
-
Connect and Authenticate
Click the “Connect” button to initiate the authentication process.
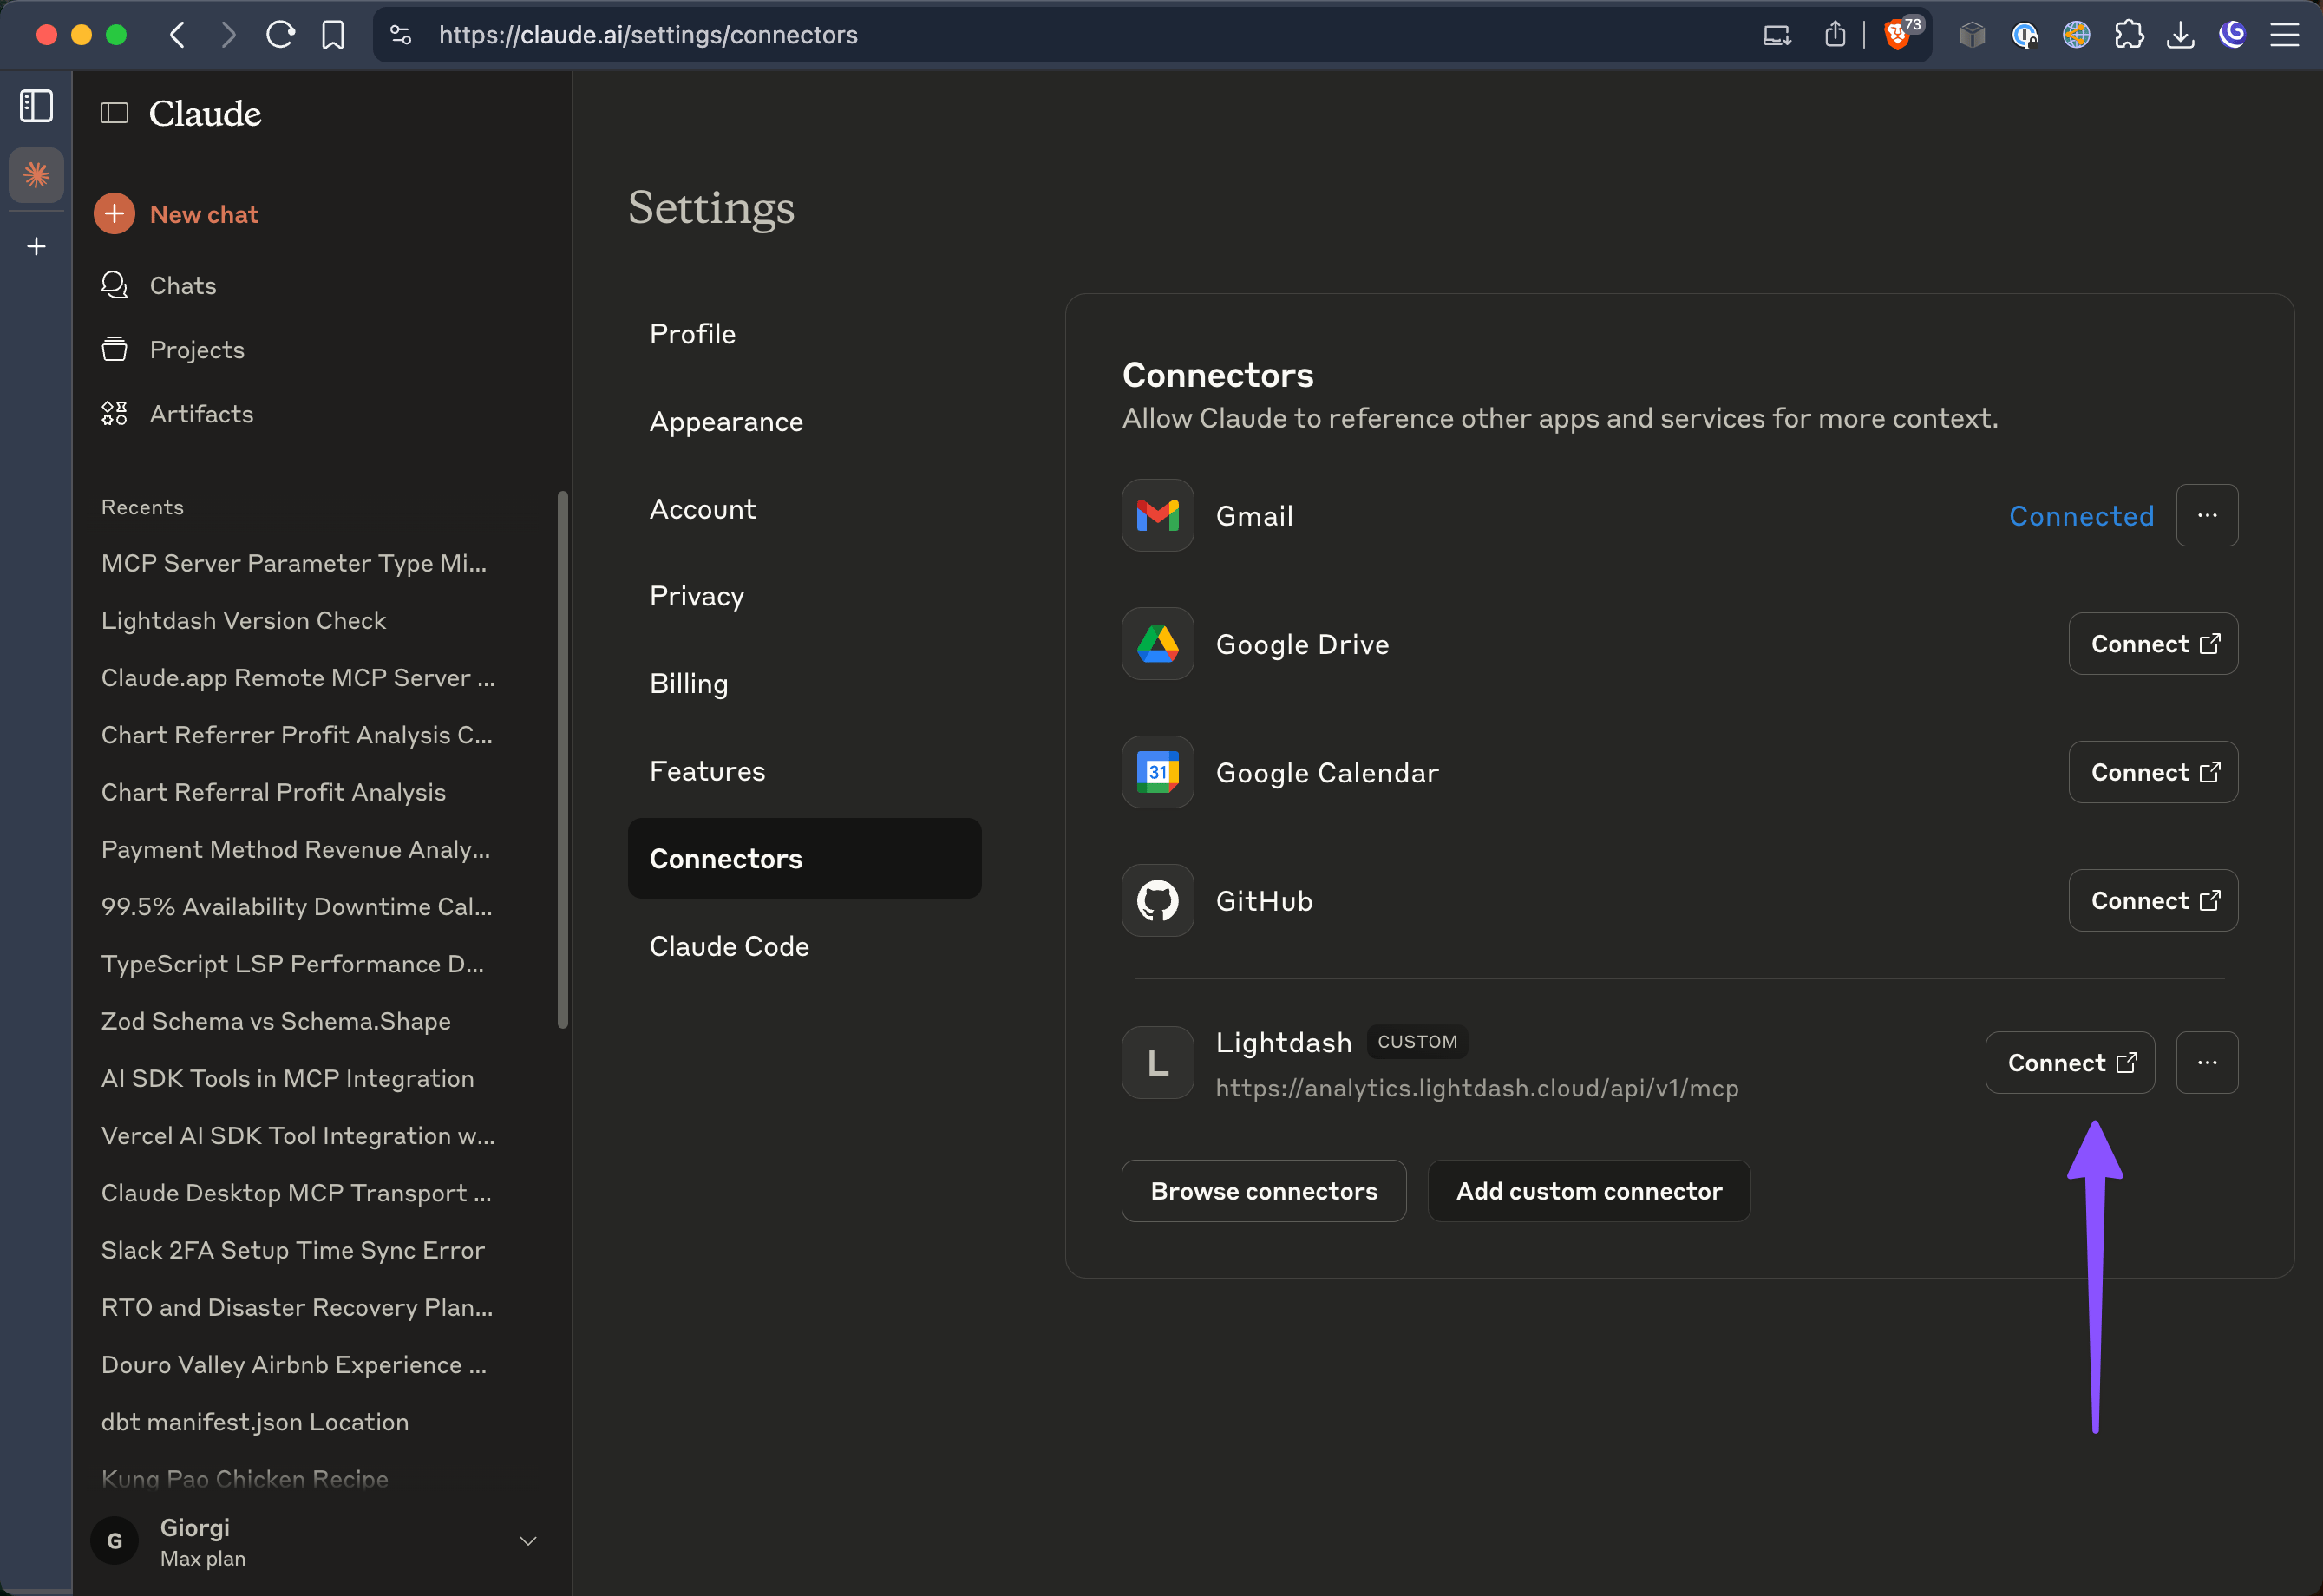
-
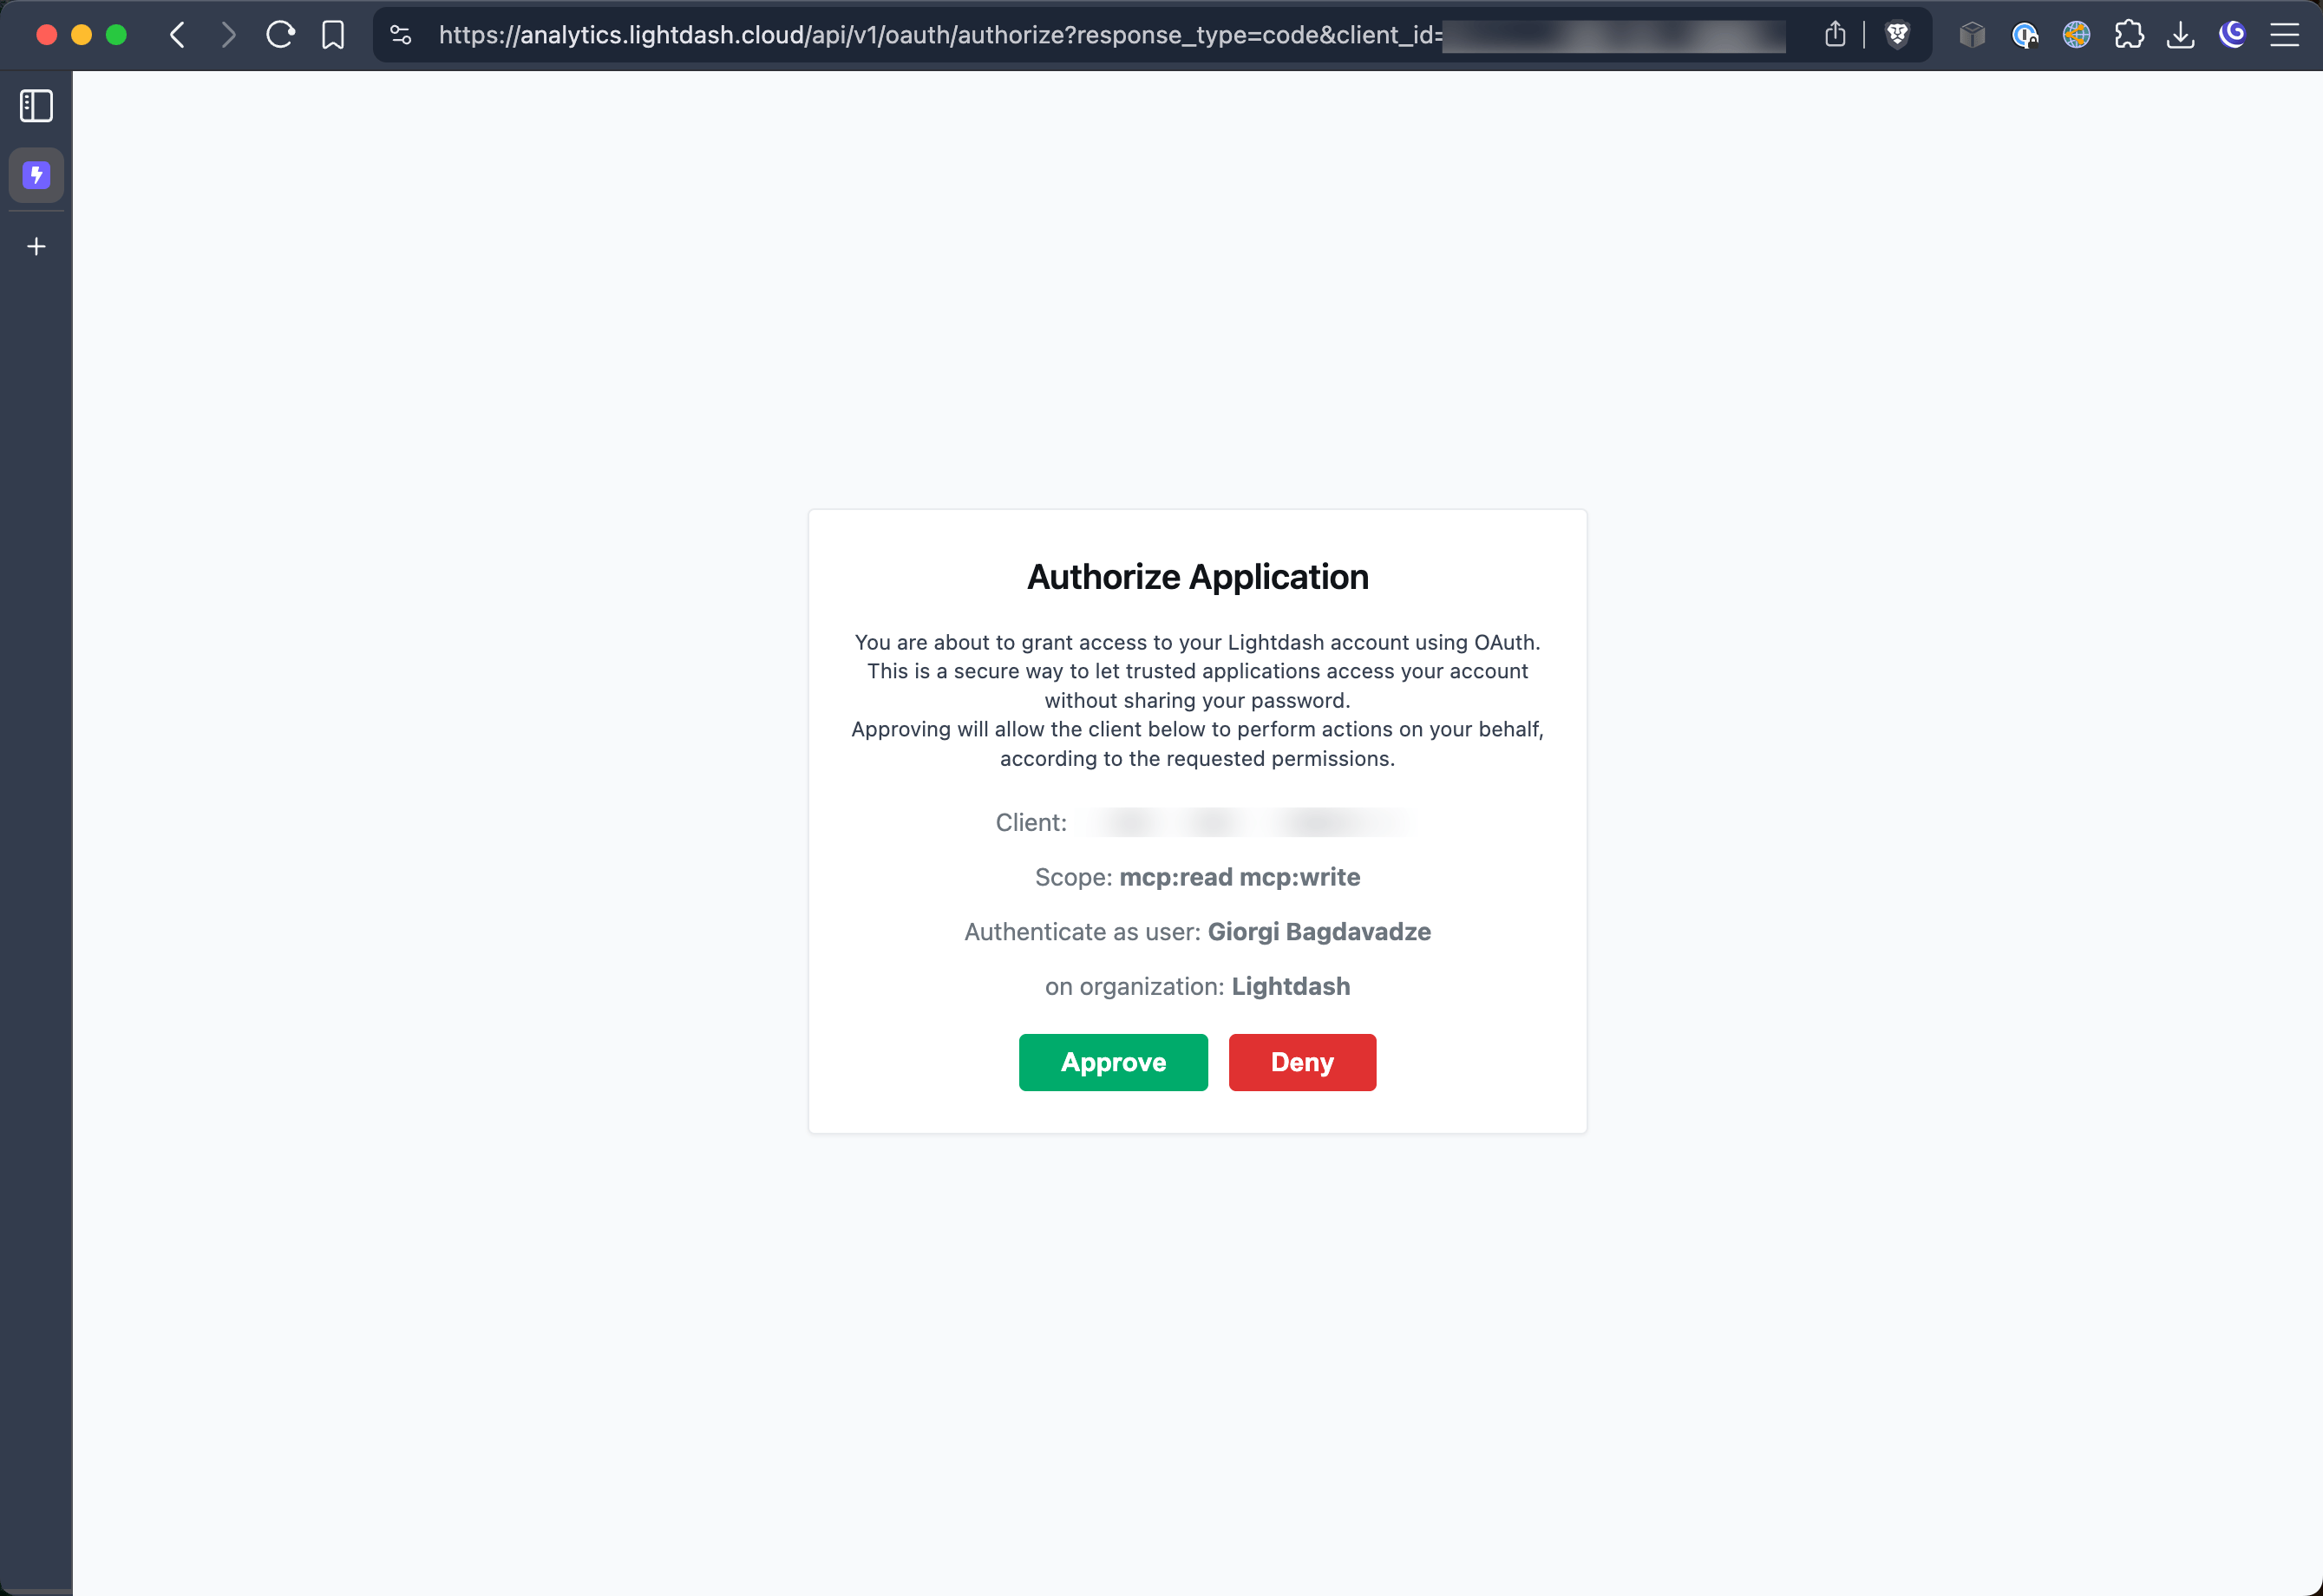
Complete OAuth Flow
Log in to your Lightdash account and approve the connection when prompted.
-
Configure Permissions (Optional)
Optionally configure which MCP tools Claude can access and set any additional permissions.
Claude lists each tool by its title rather than its tool name, for example Run metric query for
run_metric_queryand Run SQL forrun_sql. Set permissions against the titles exactly as Claude shows them.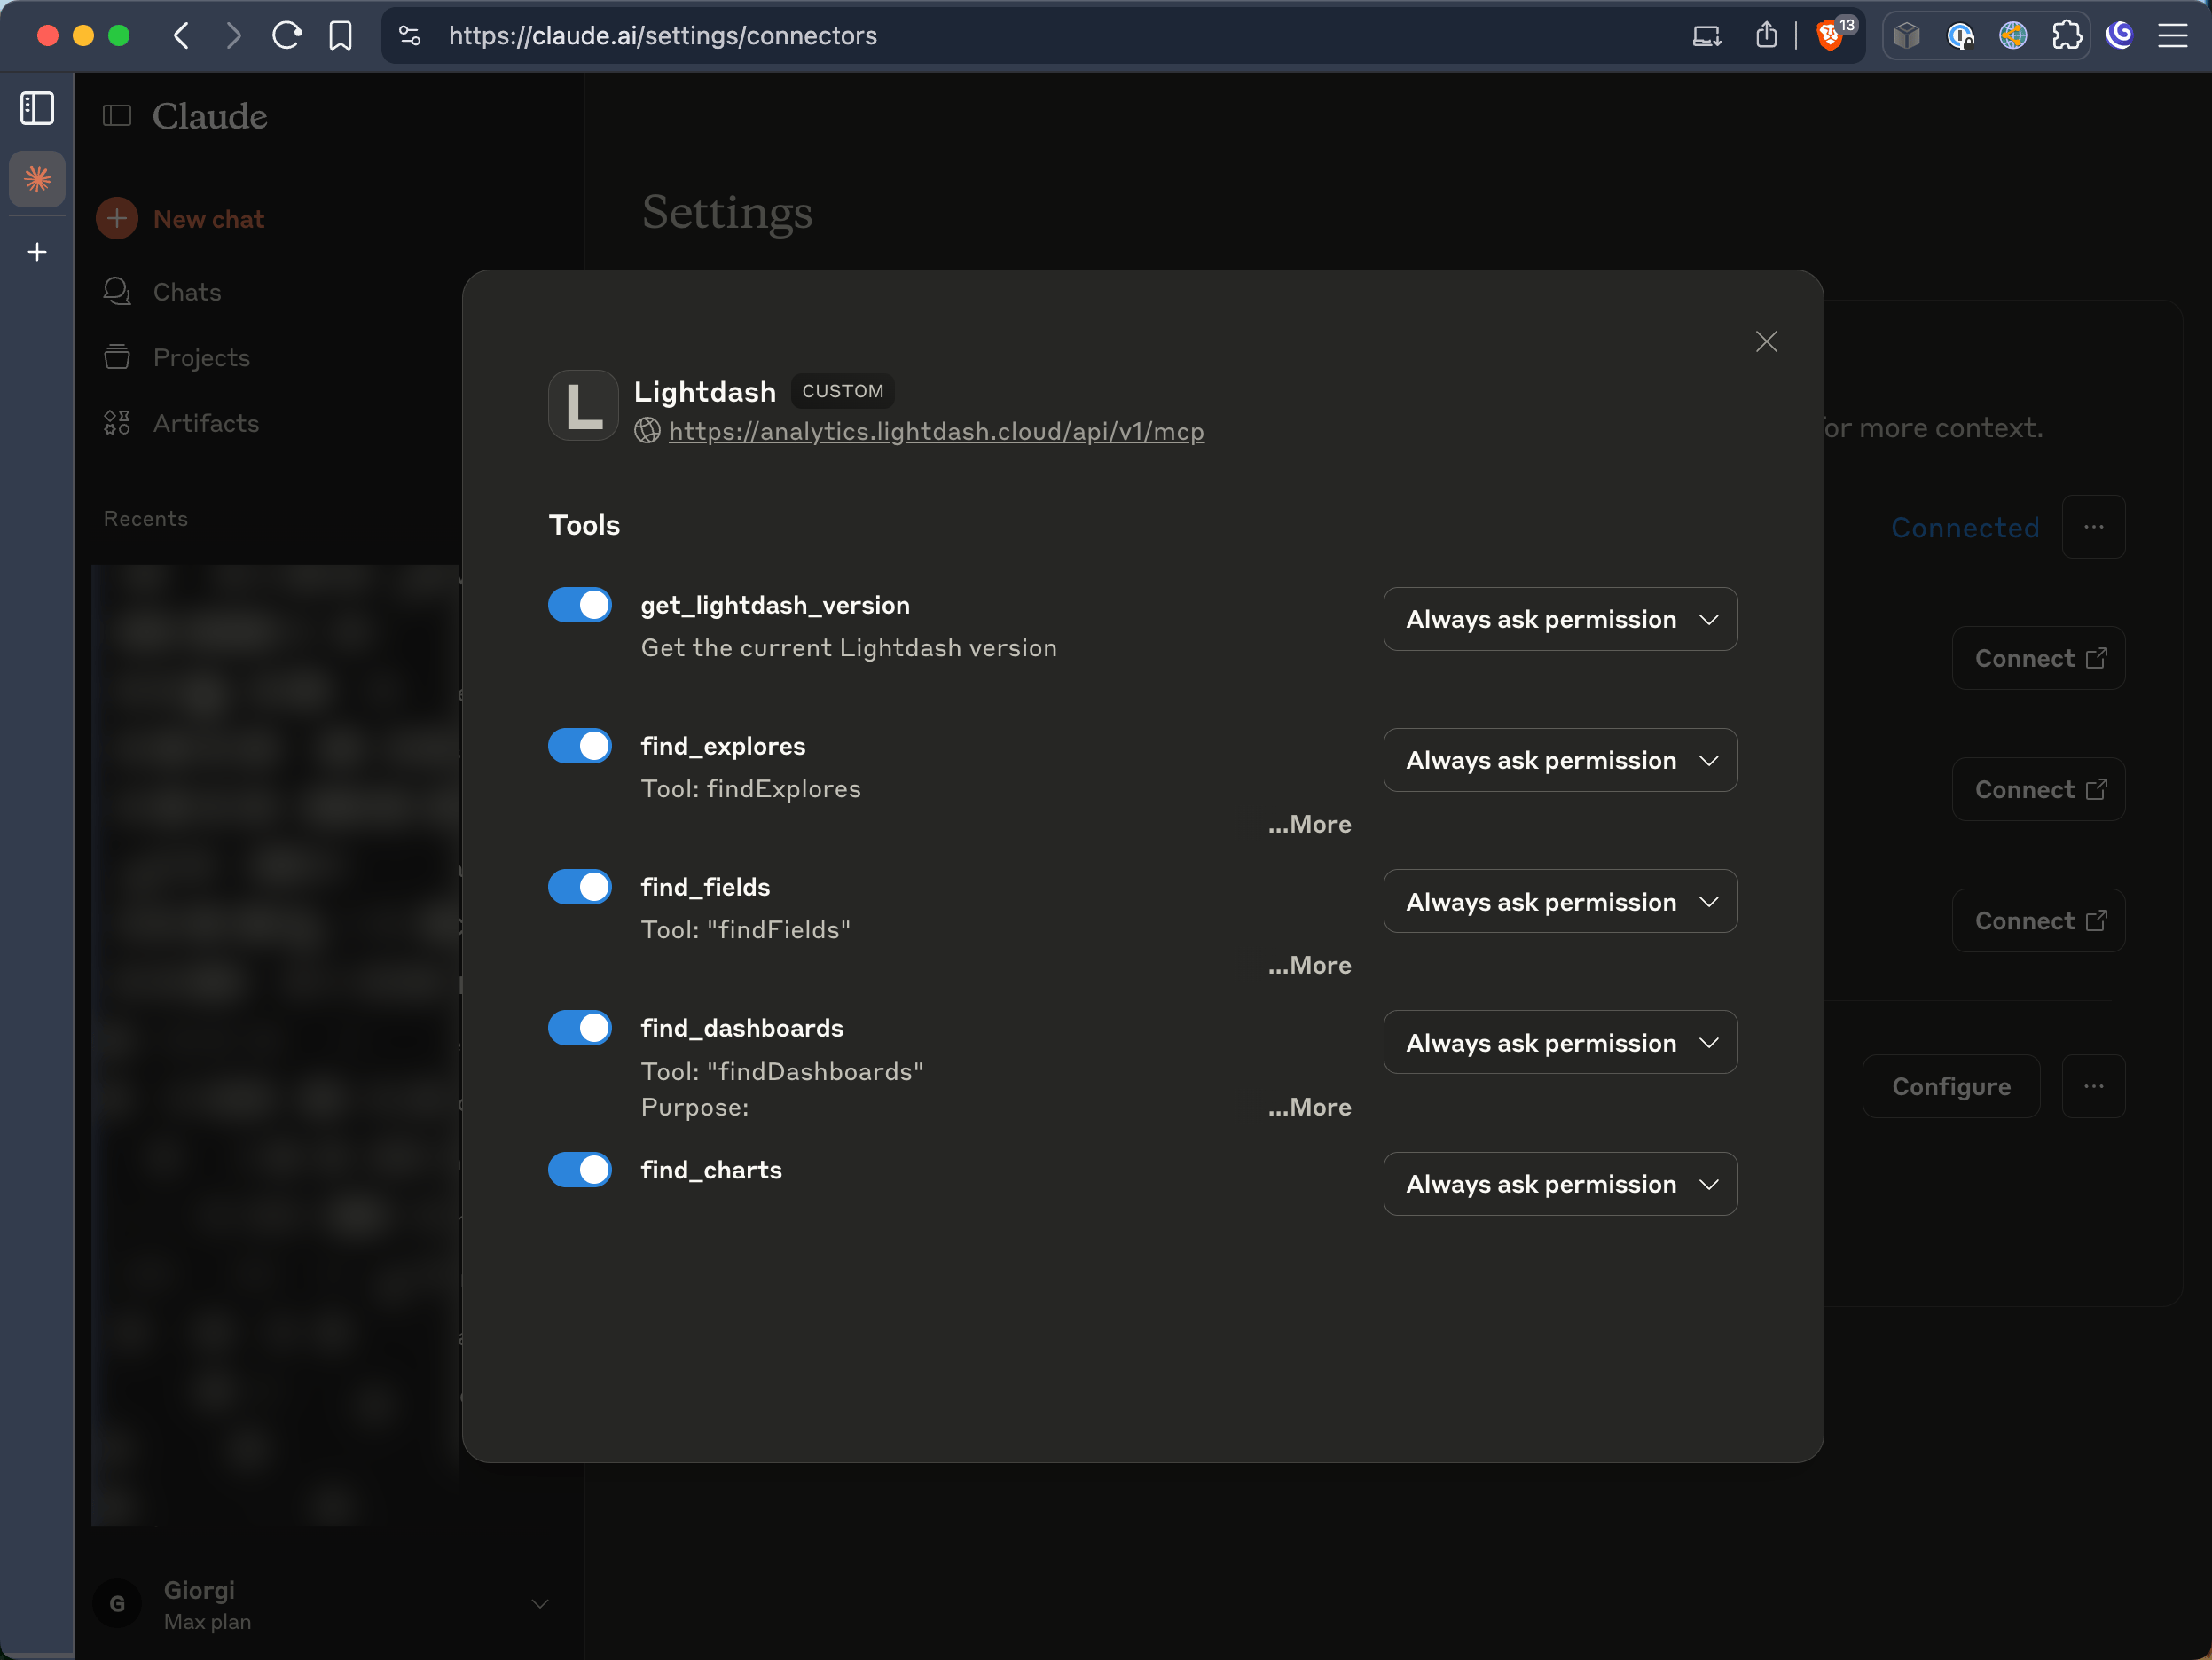
ChatGPT
ChatGPT connects to remote MCP servers through custom connectors.Setup instructions
Setup instructions
-
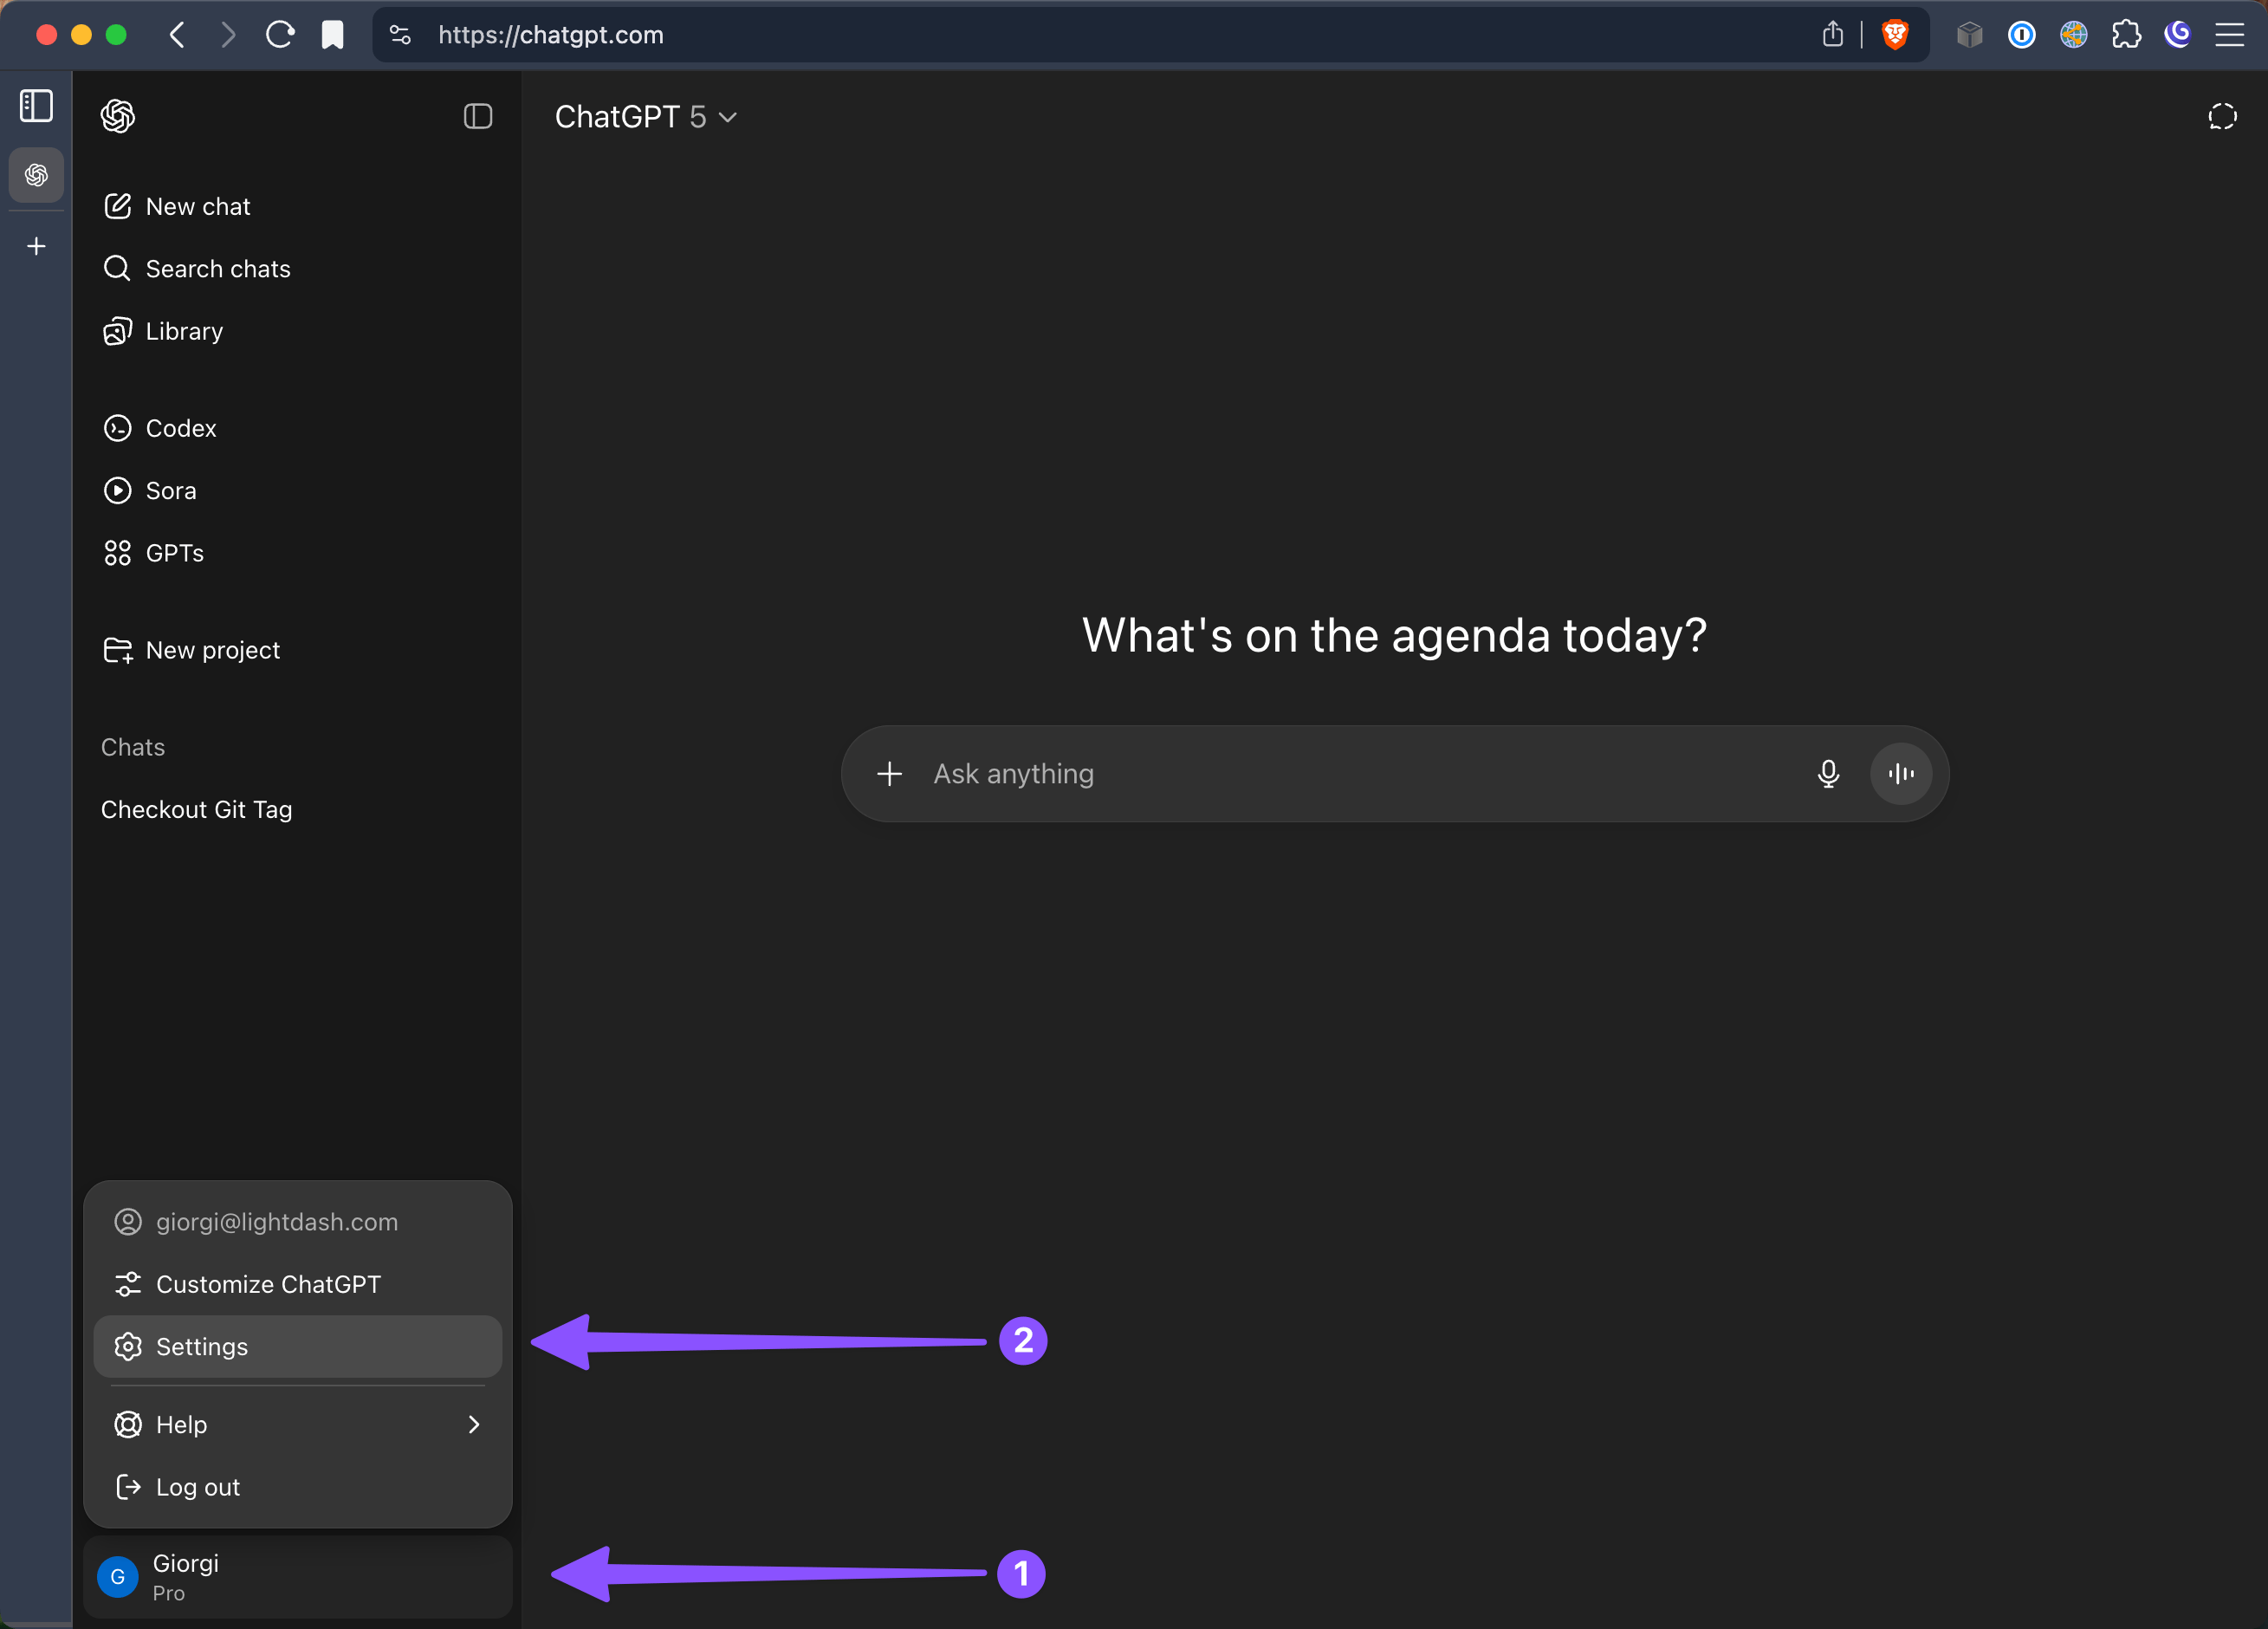
Open ChatGPT settings
Open your profile menu and select Settings.
-
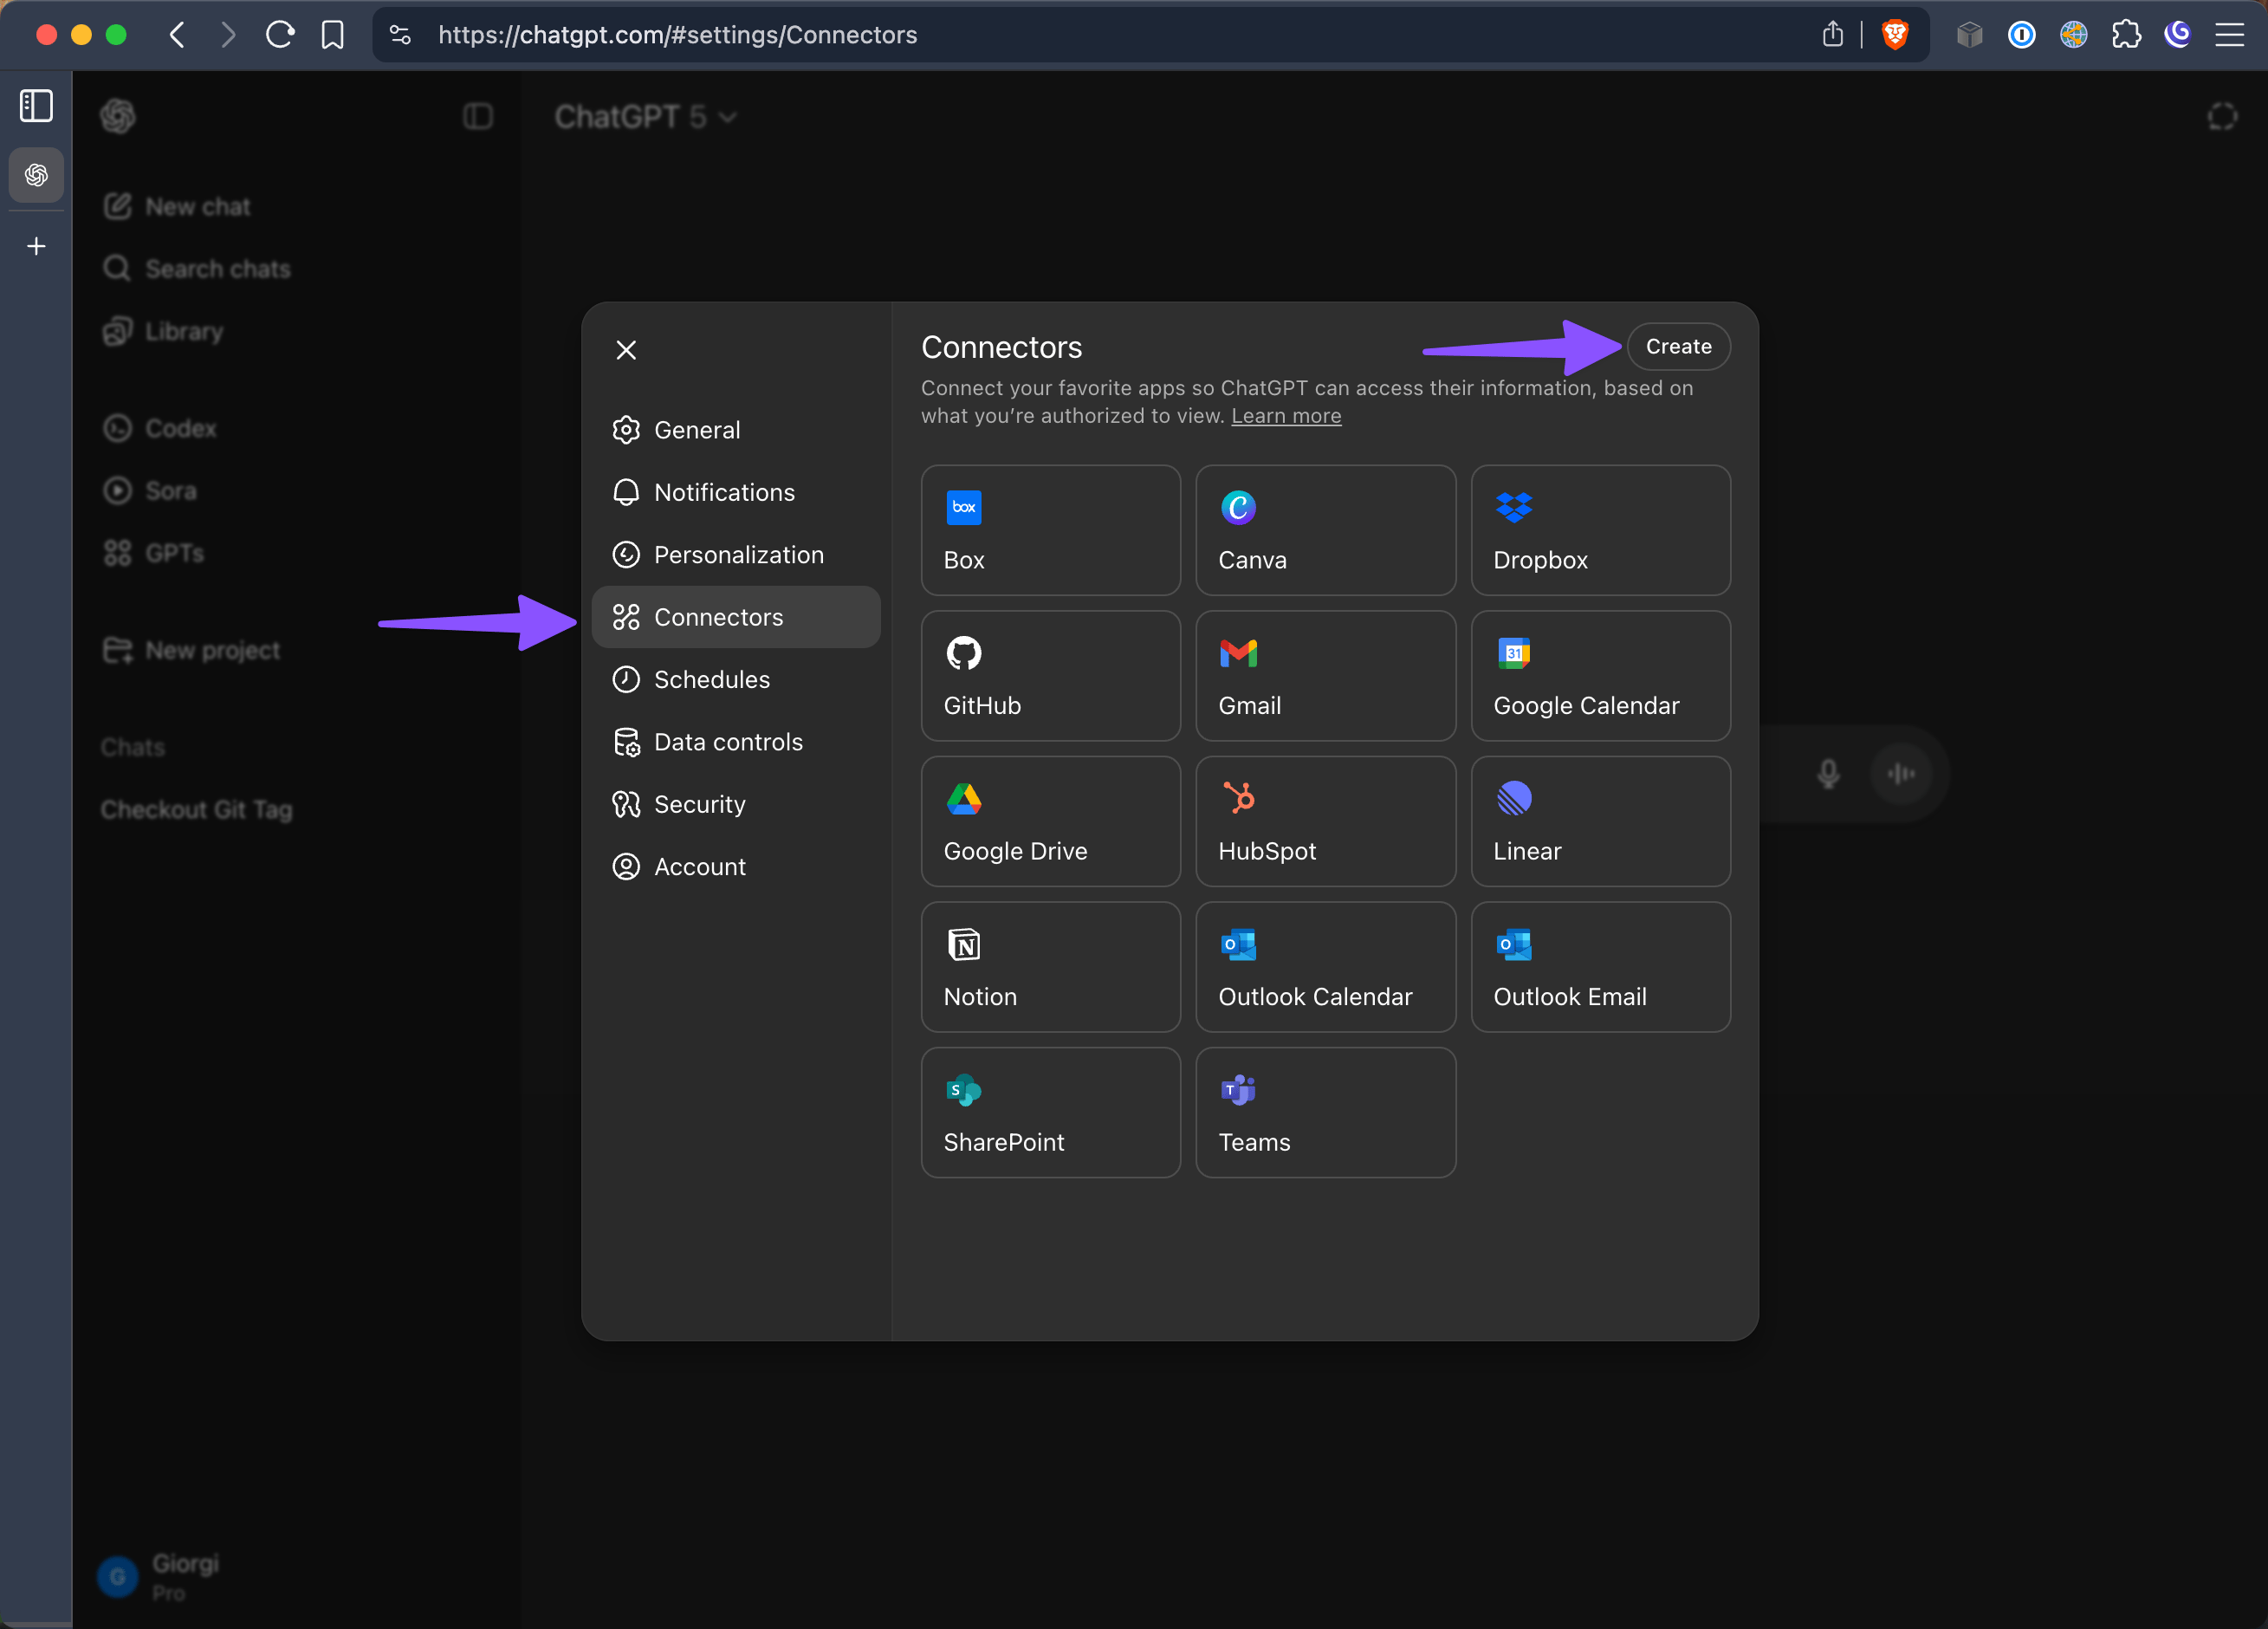
Create a connector
Select Connectors, then click Create.
-
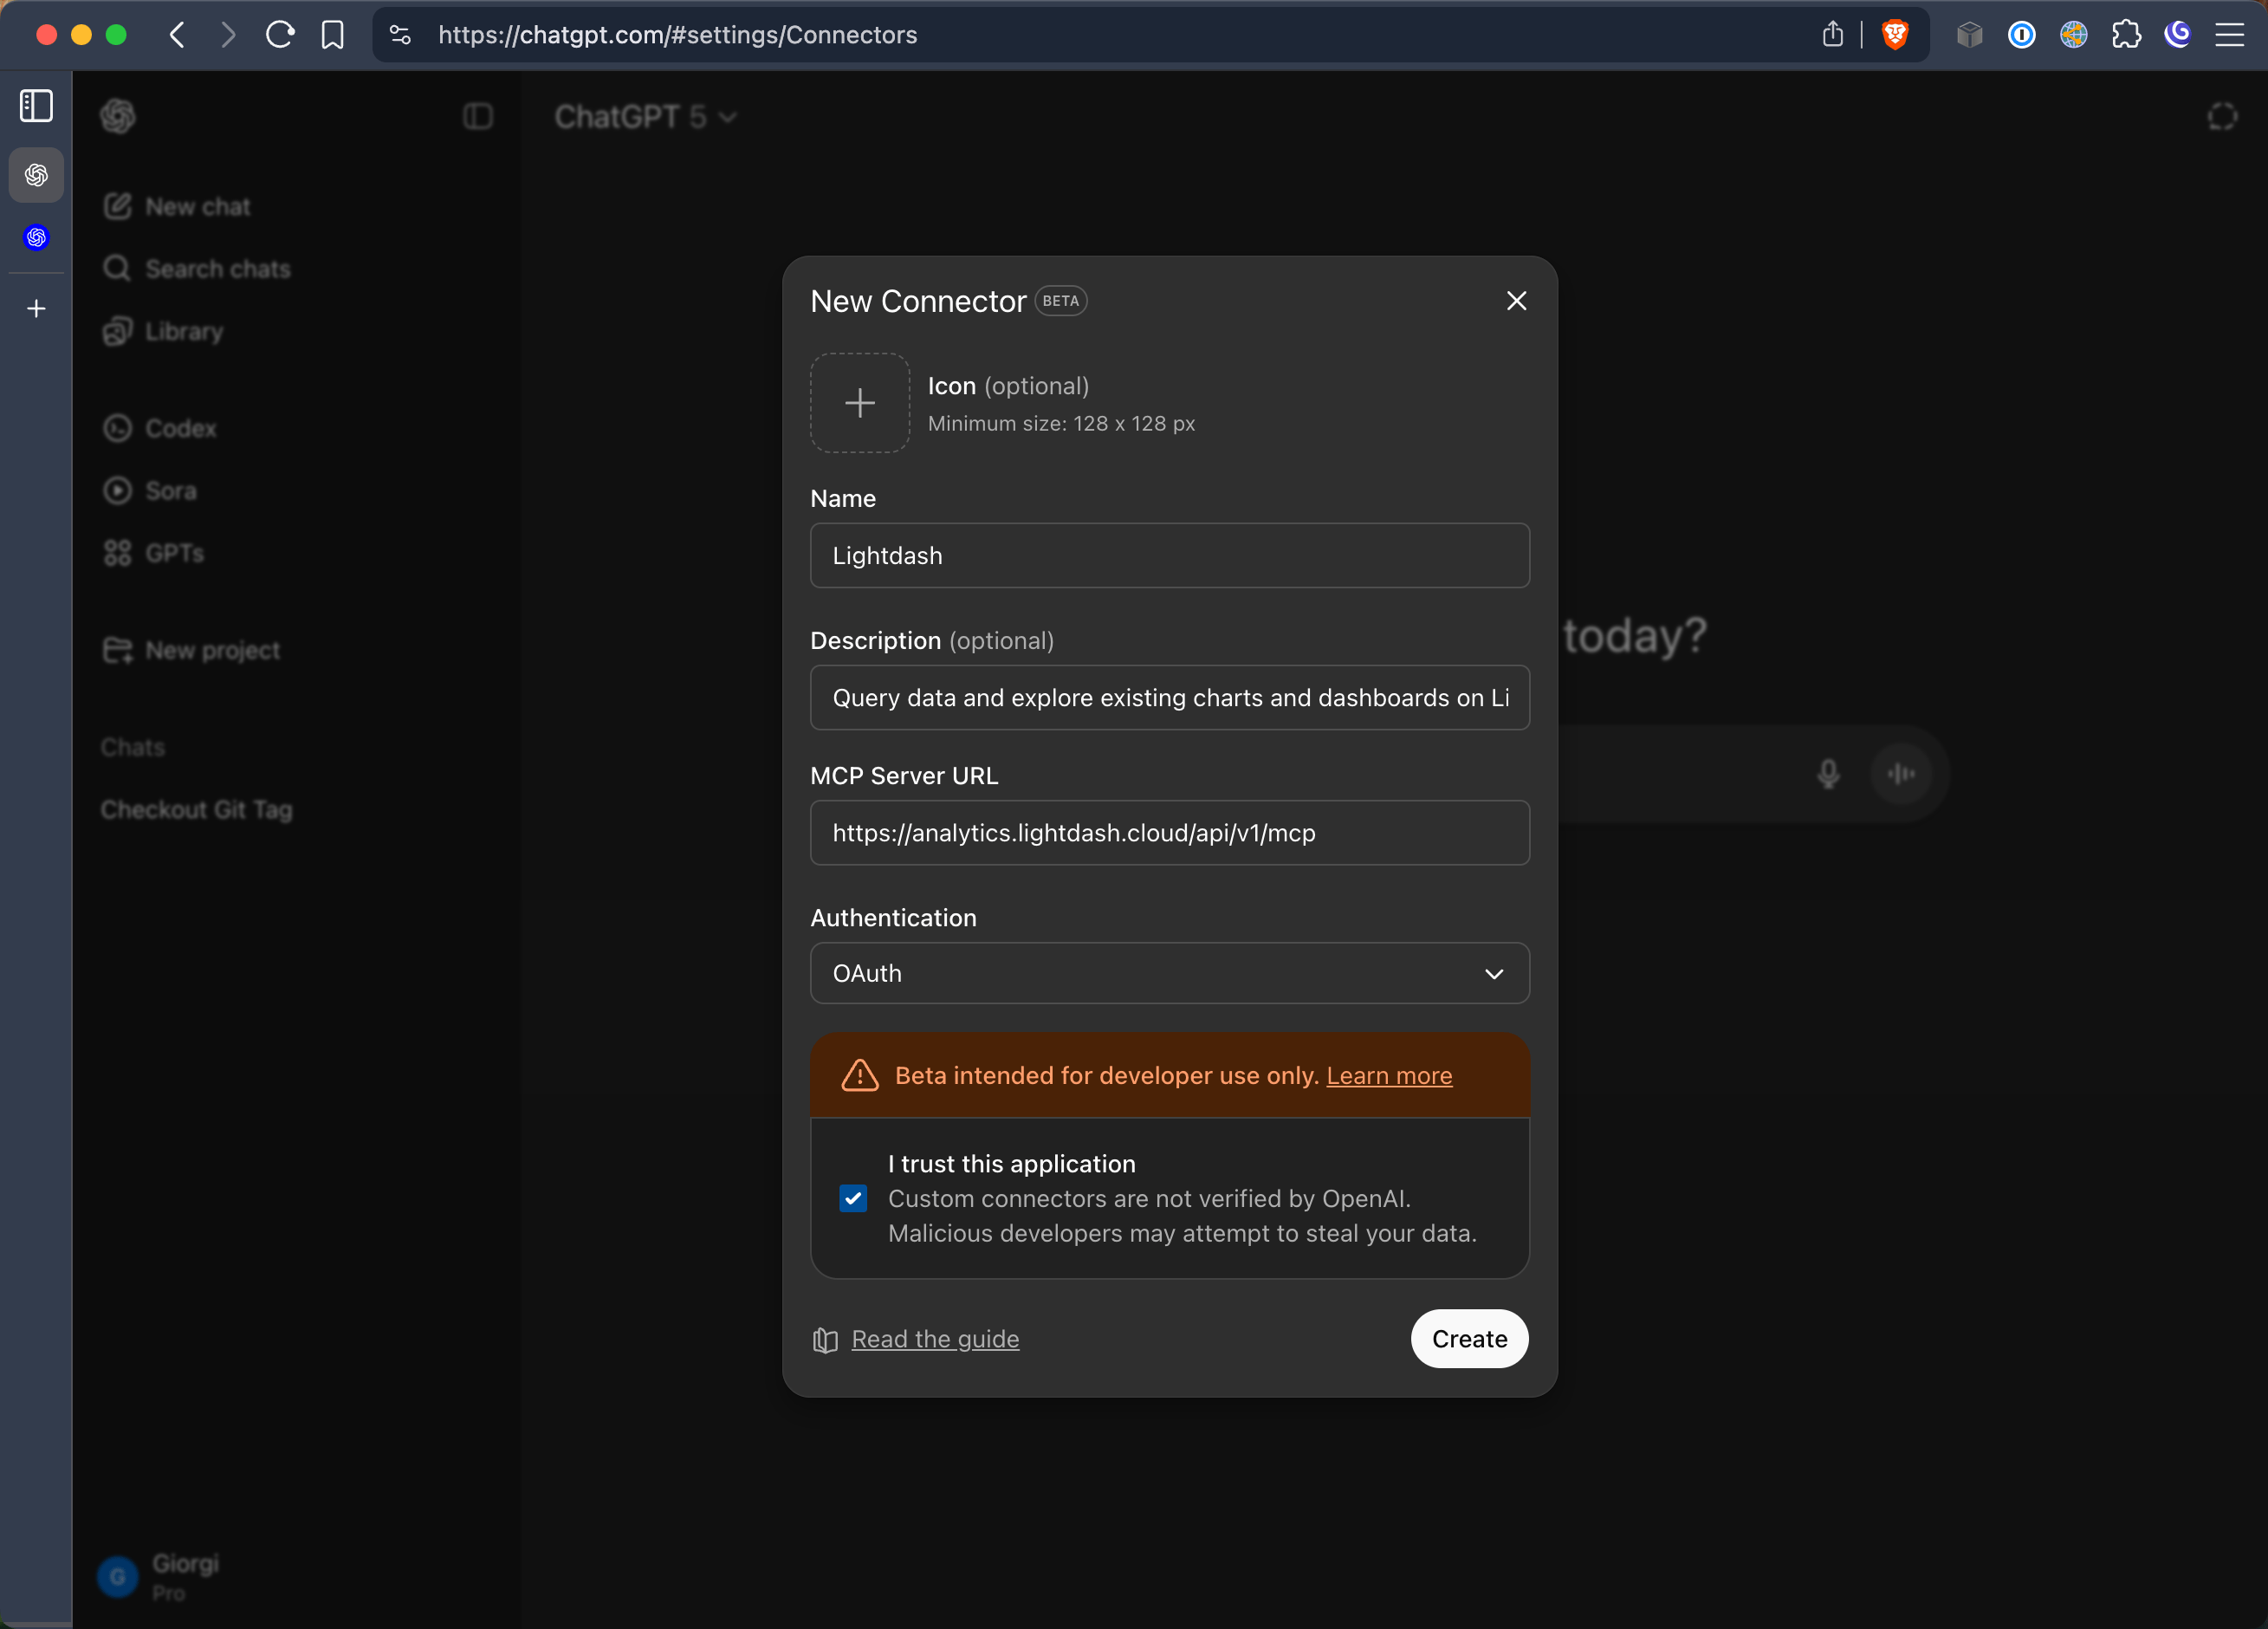
Configure the connector
Enter the connection details, confirm that you trust the application, then click Create.
- Name: Lightdash
- Description: Query data and explore existing charts and dashboards in Lightdash
- MCP server URL:
https://<your_instance_name>.lightdash.cloud/api/v1/mcp - Authentication: OAuth
-
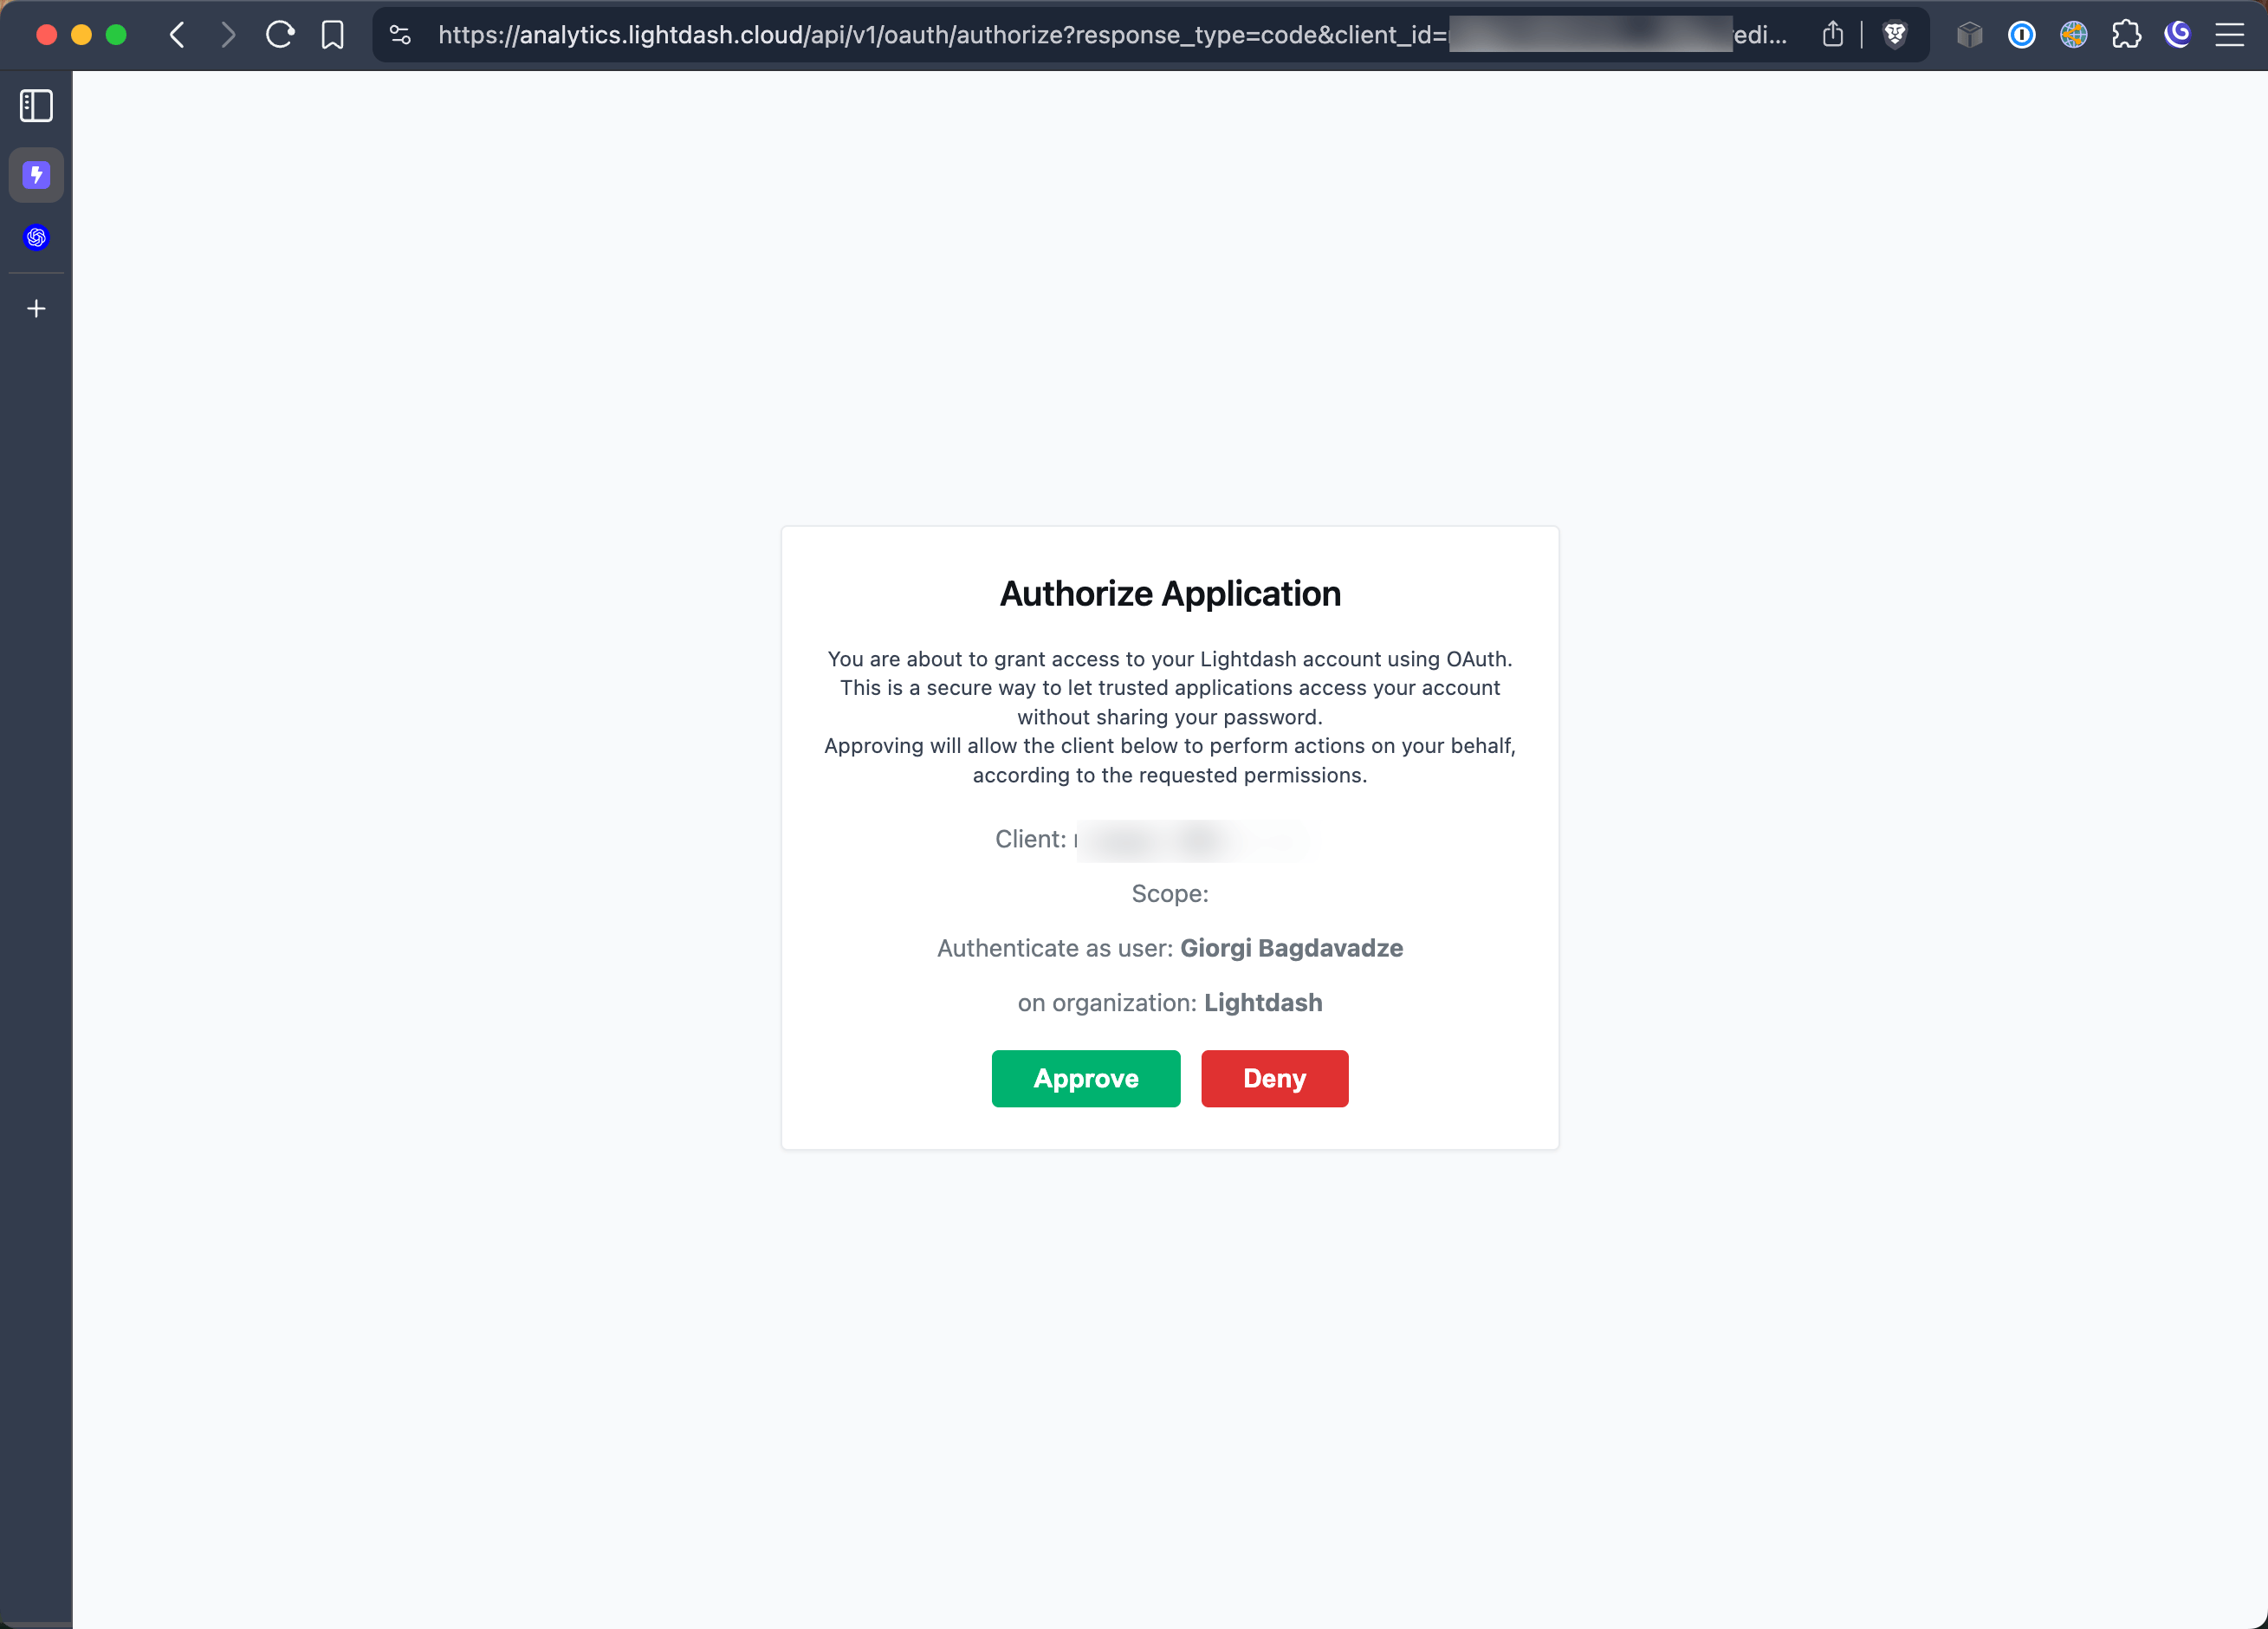
Approve access
Sign in to Lightdash and approve the connection.
Claude Code
For developers using Claude Code CLI:<your_instance_name> with your actual Lightdash instance name (commonly app or eu1, see Find your instance name).
Setup instructions
Setup instructions
-
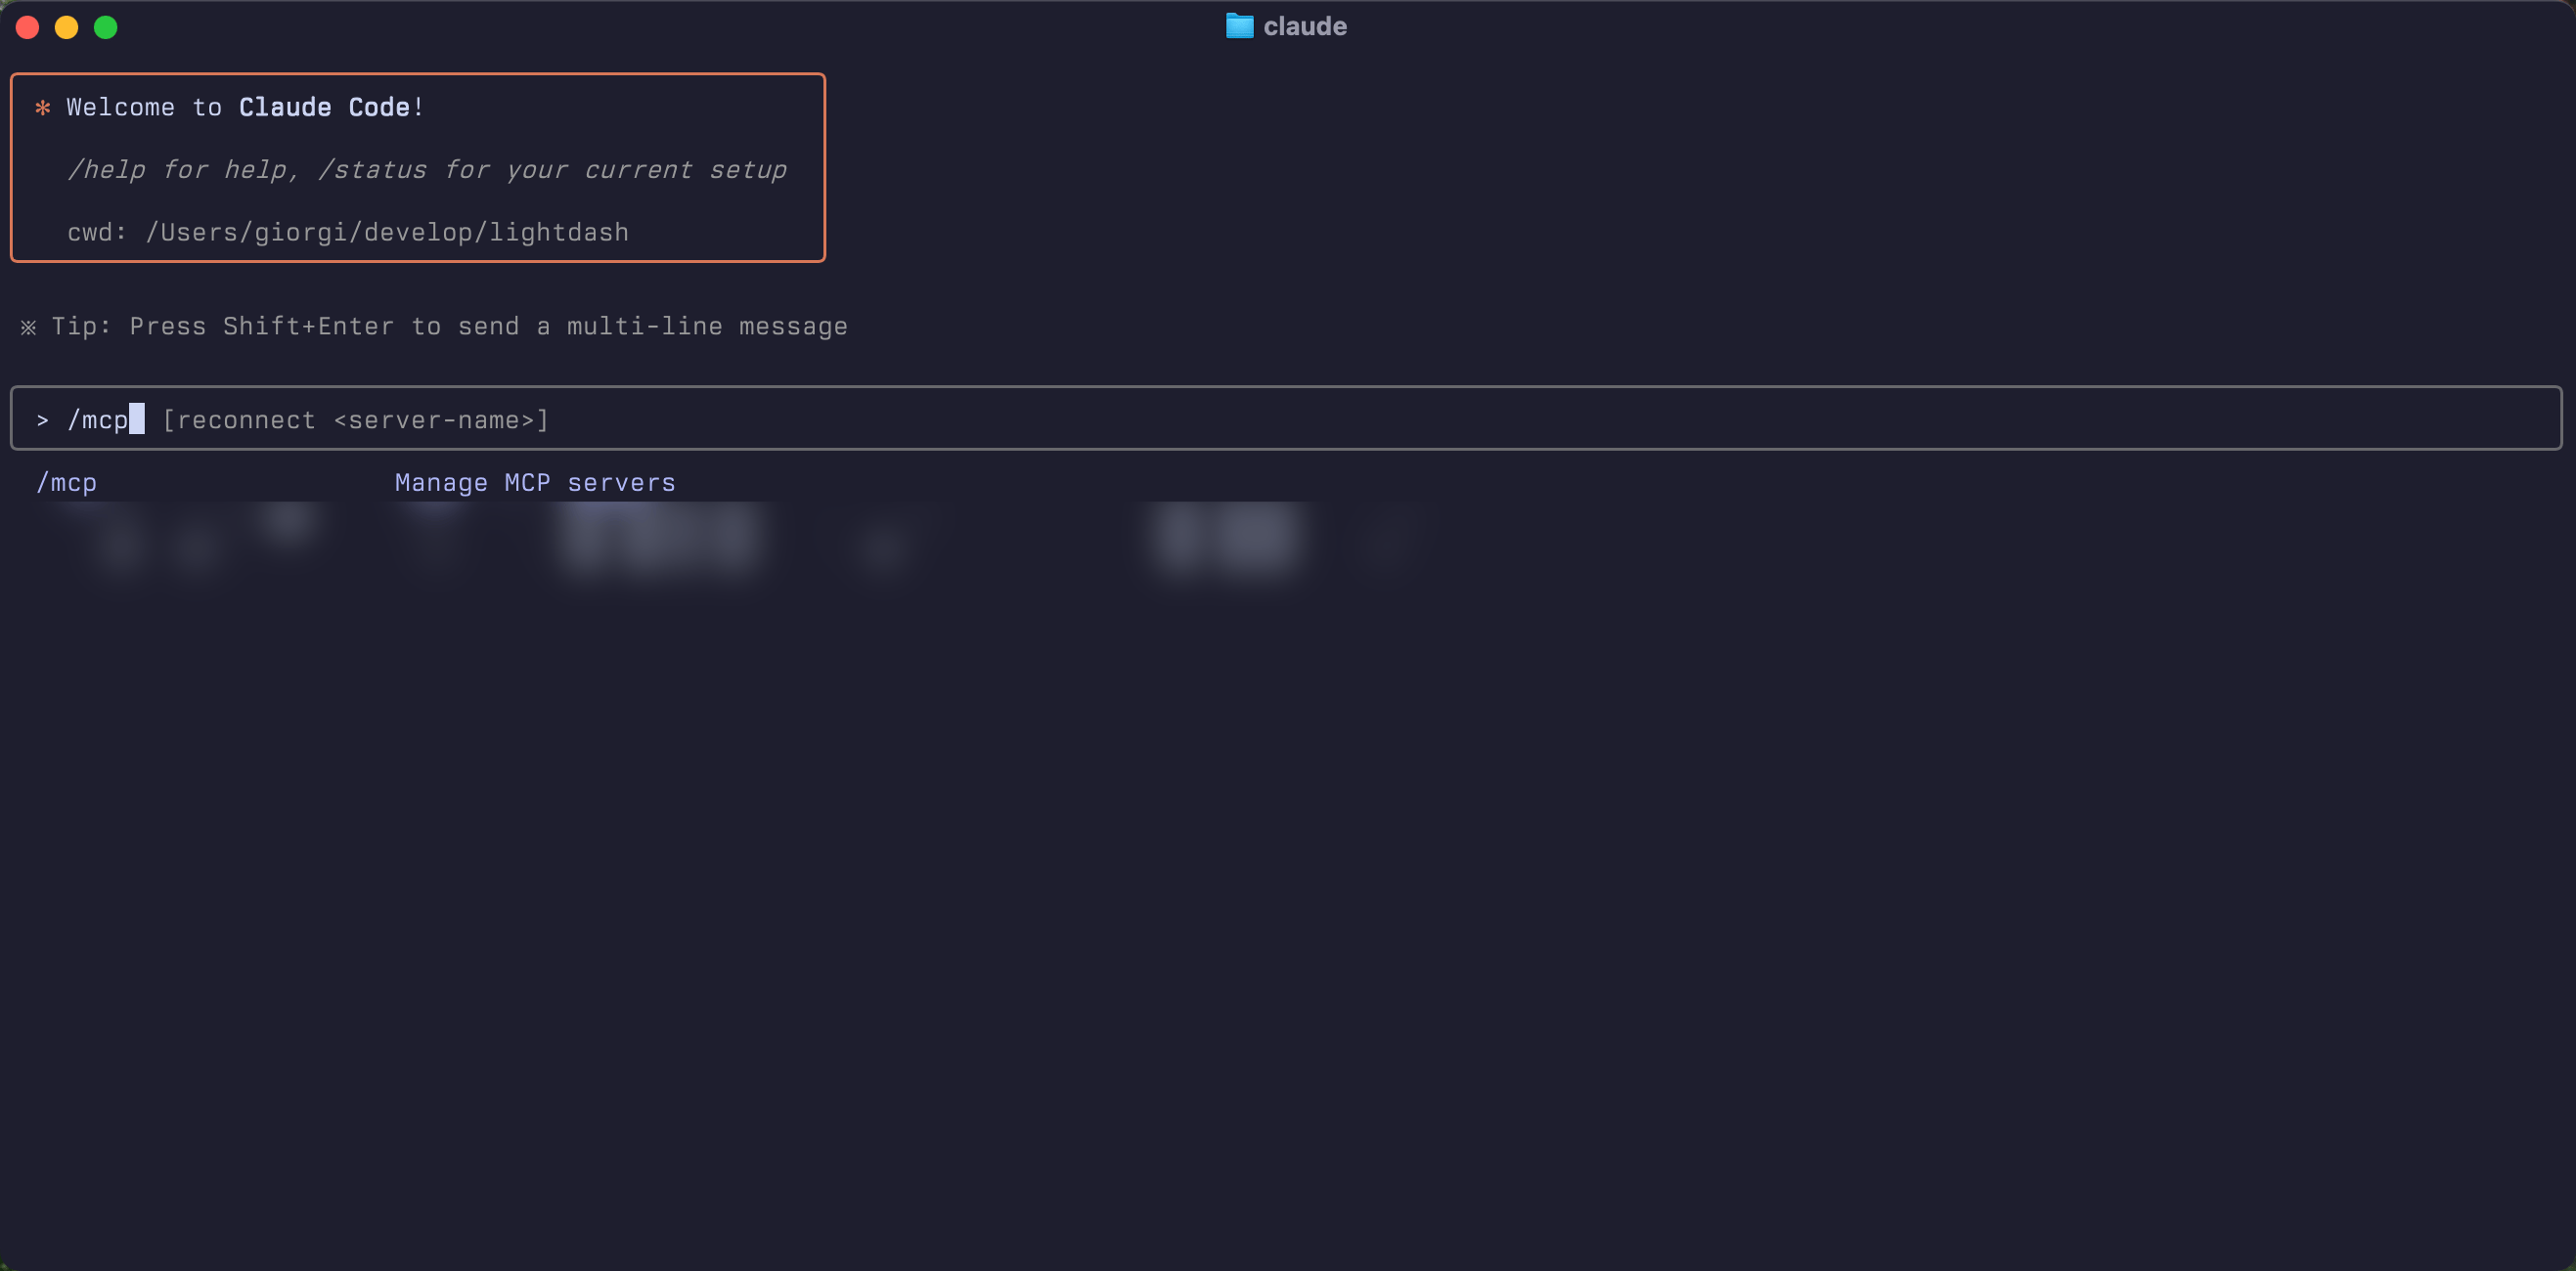
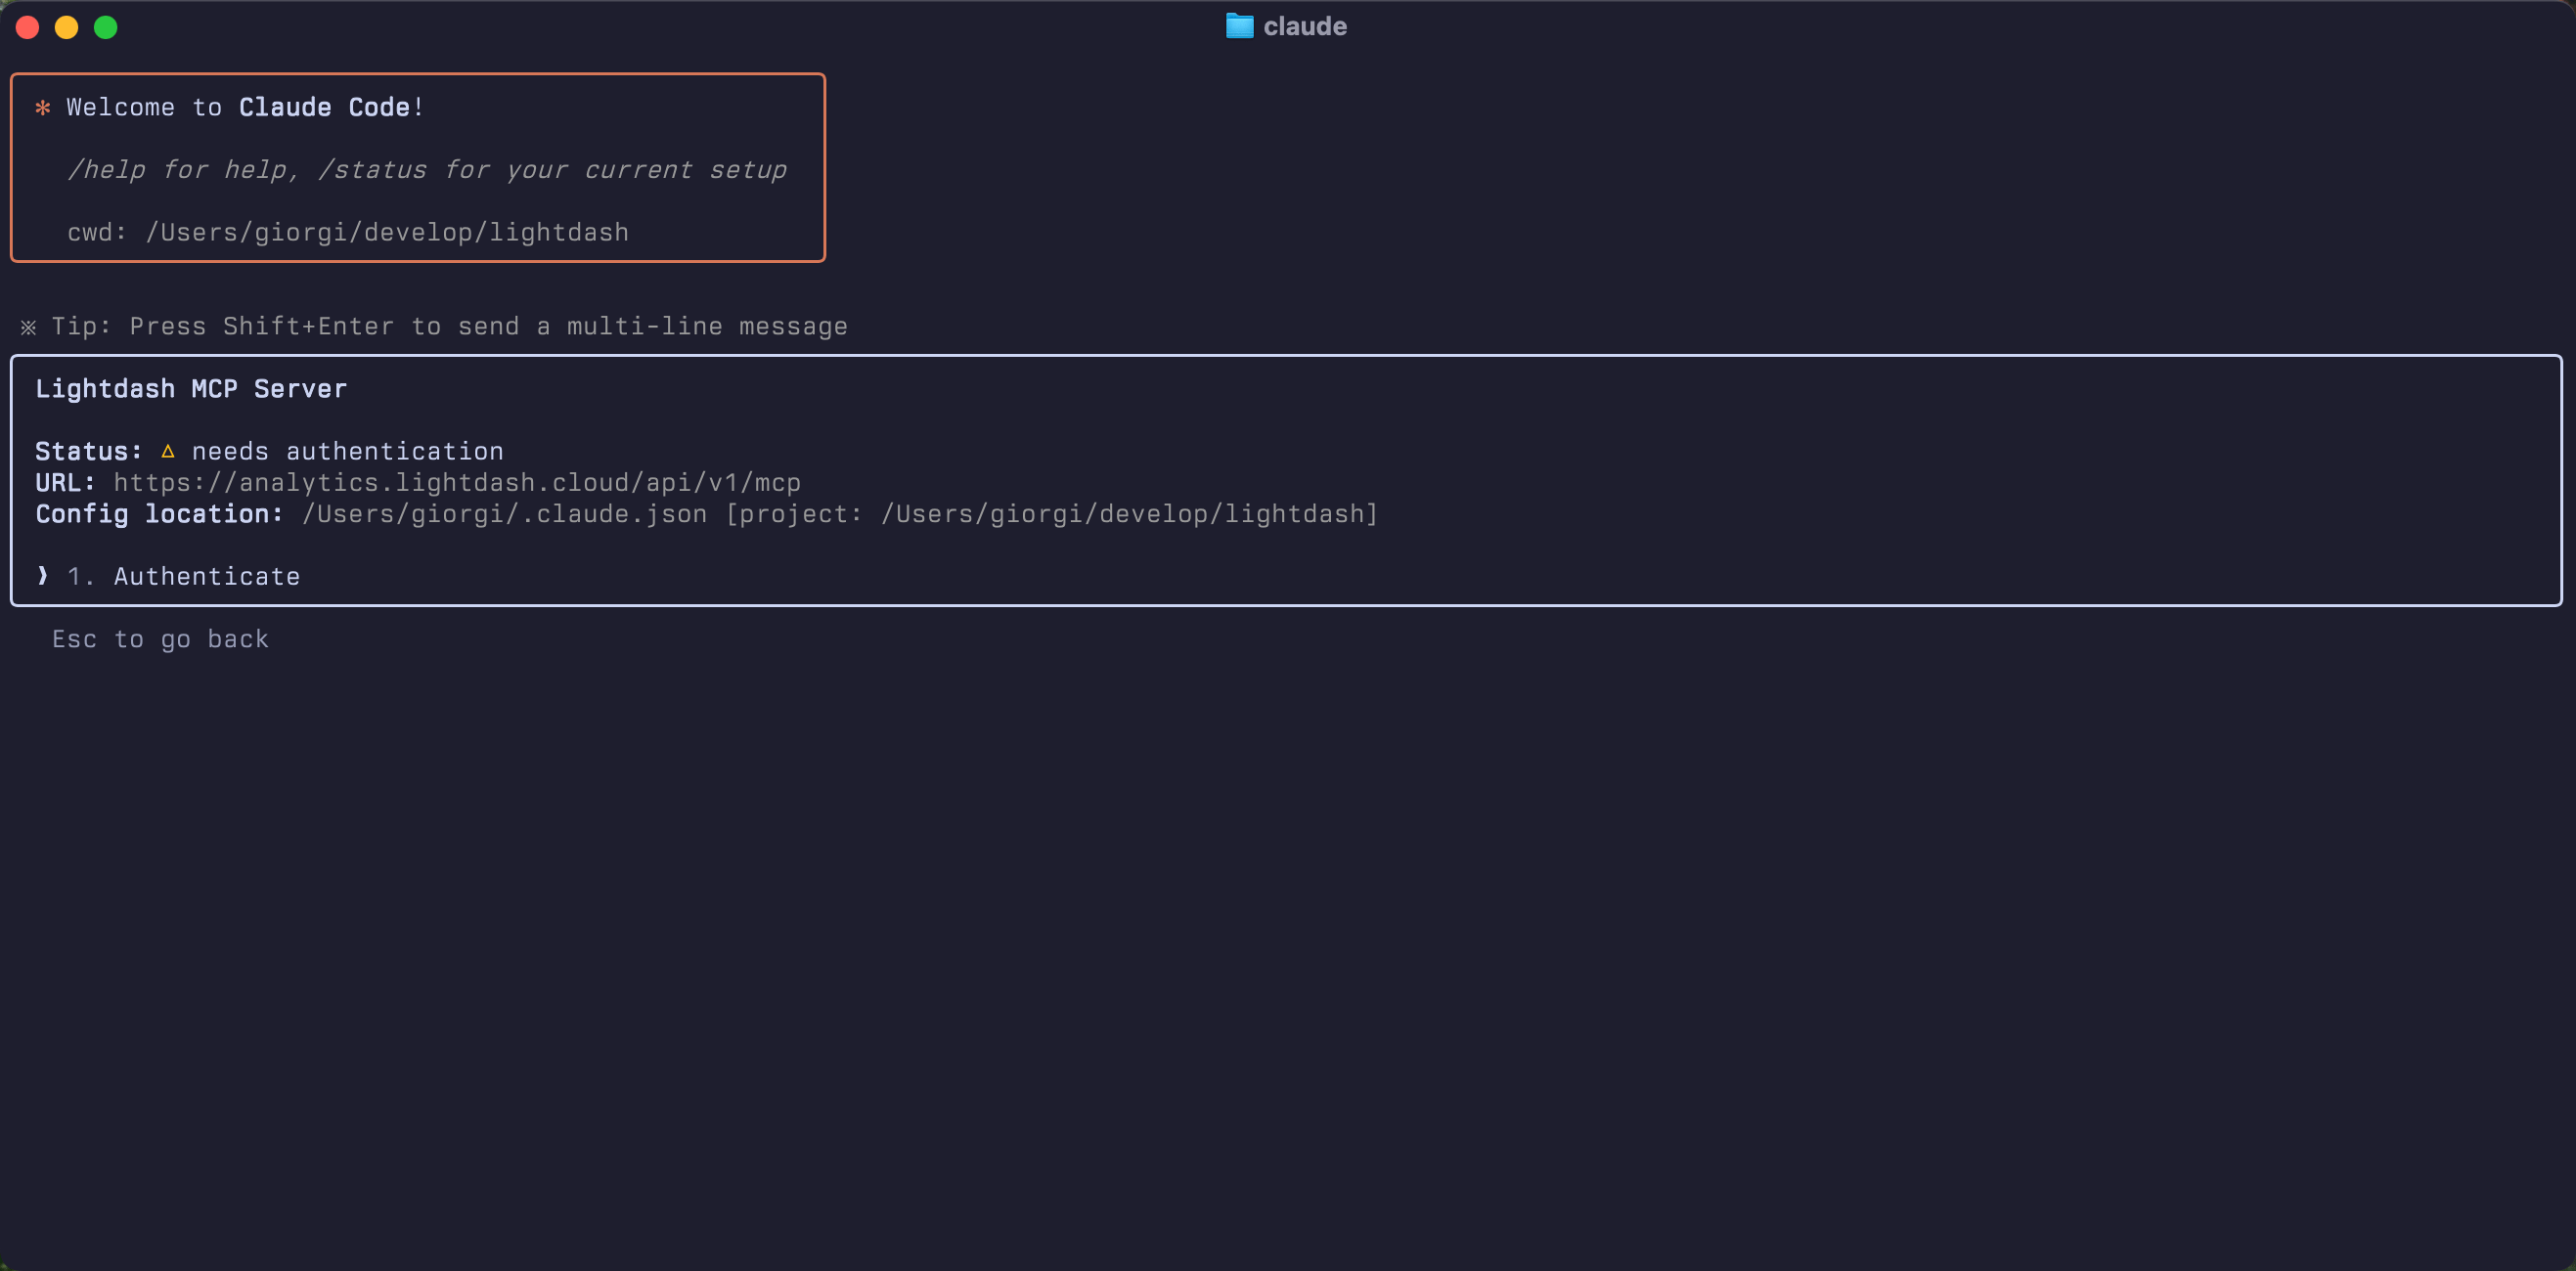
Use the /mcp command in Claude Code
-
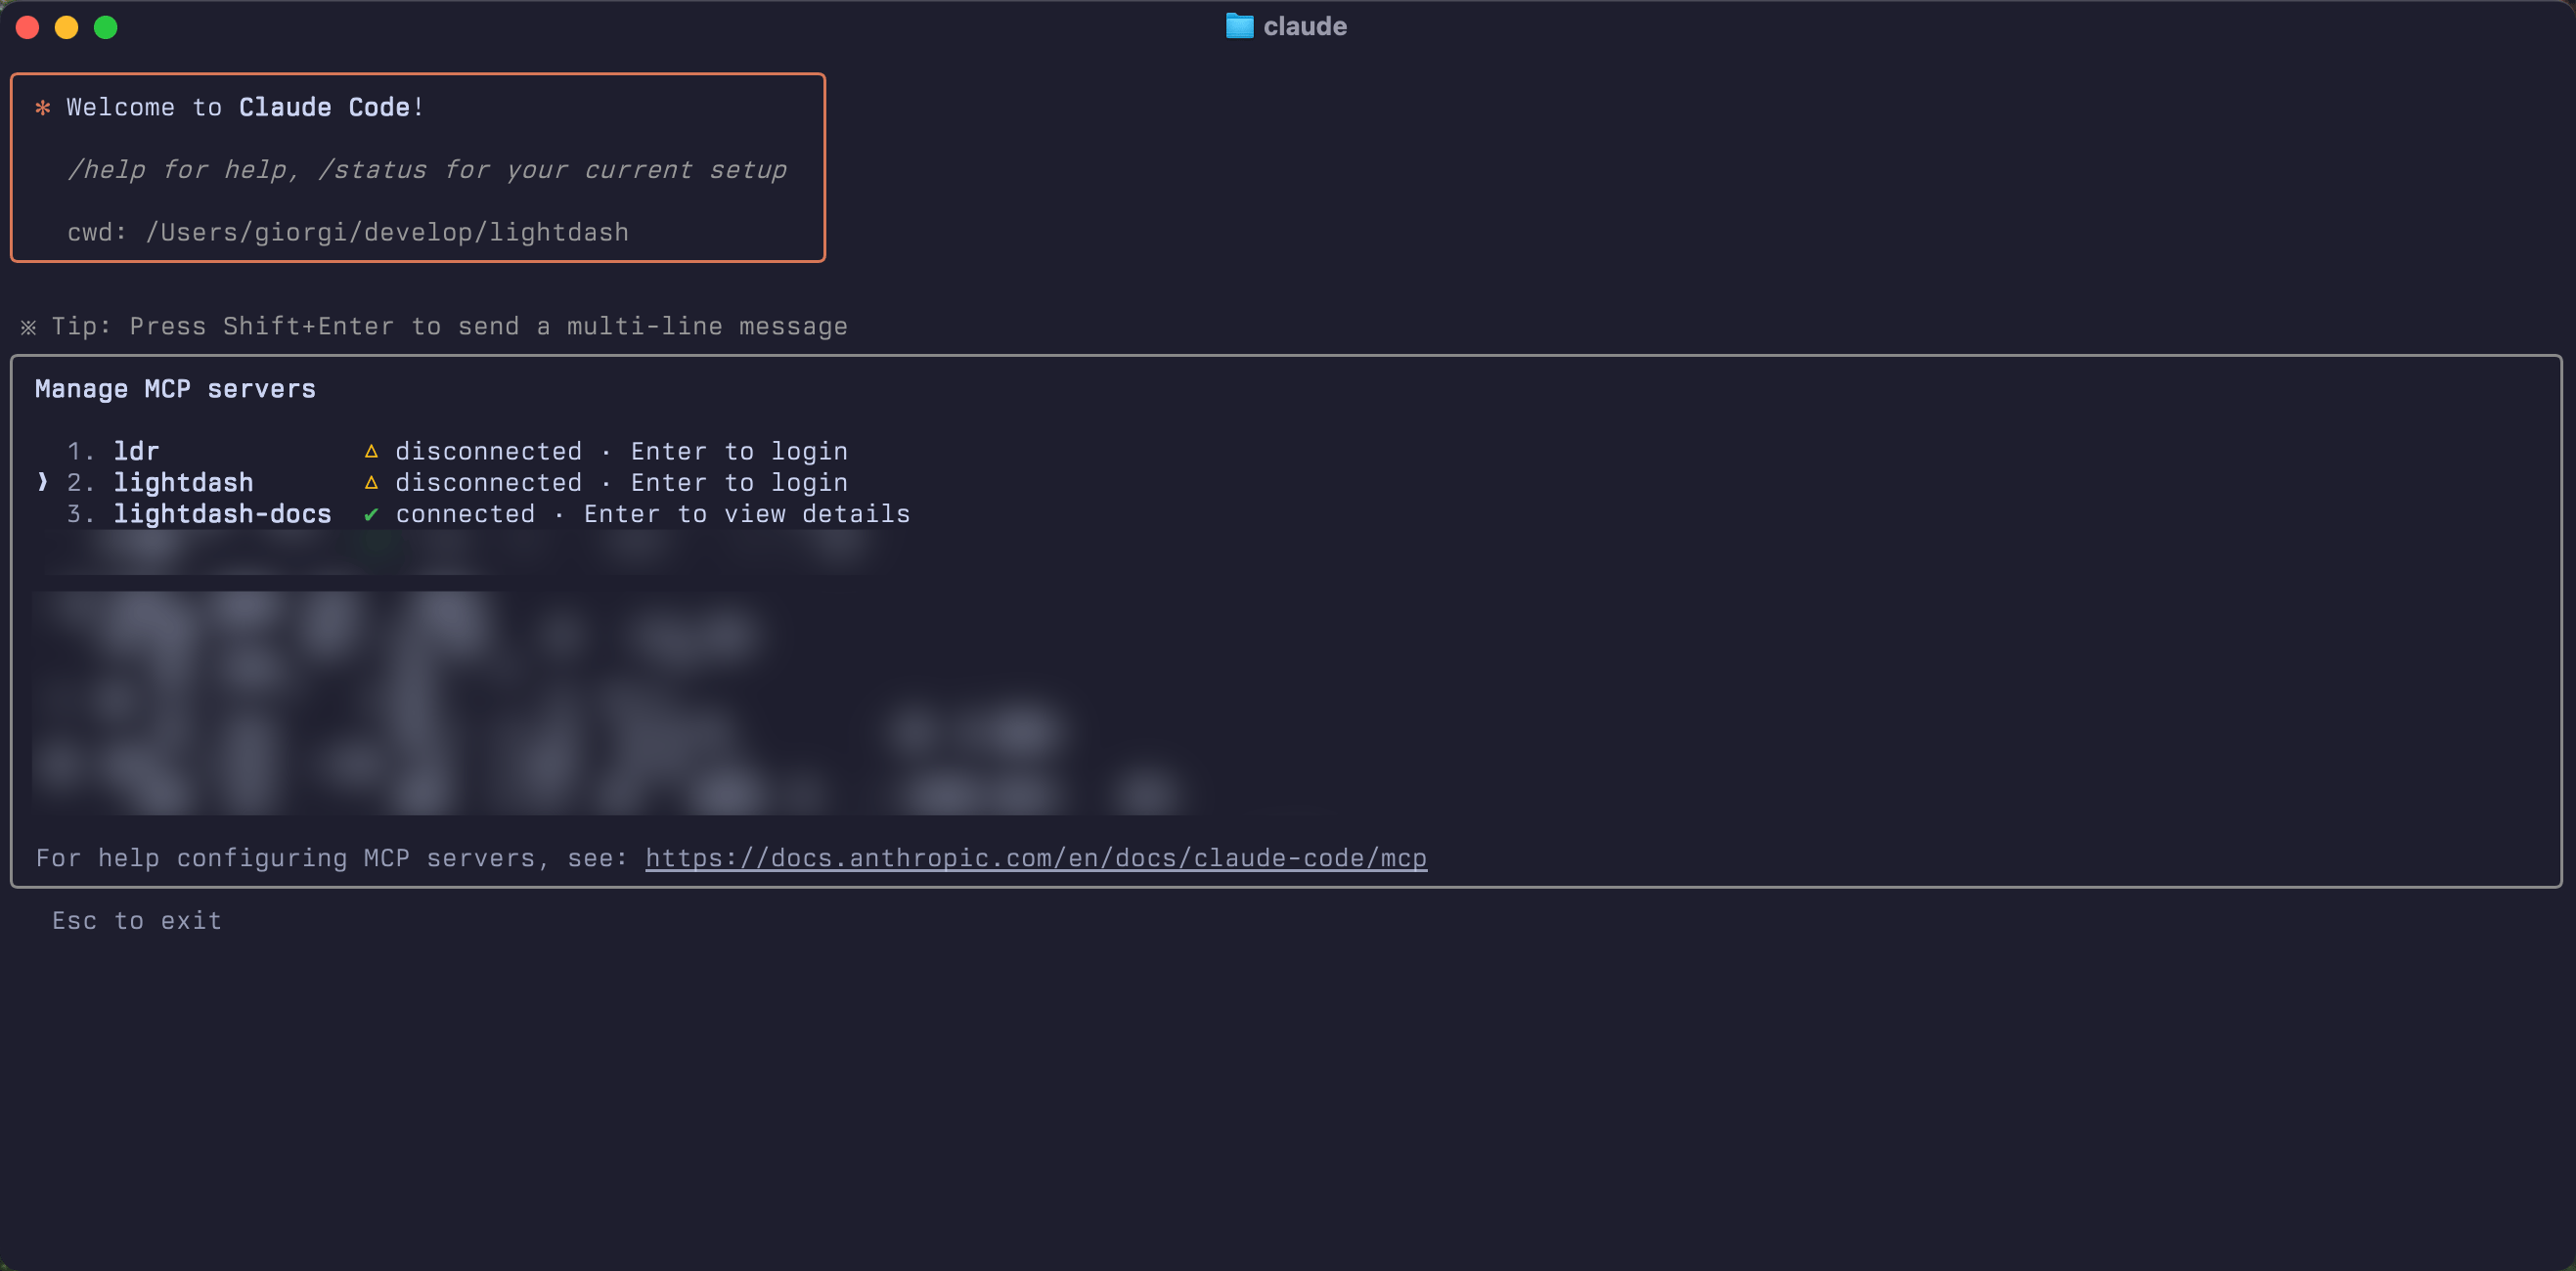
Select Lightdash from the list
-
Authenticate with Lightdash
-
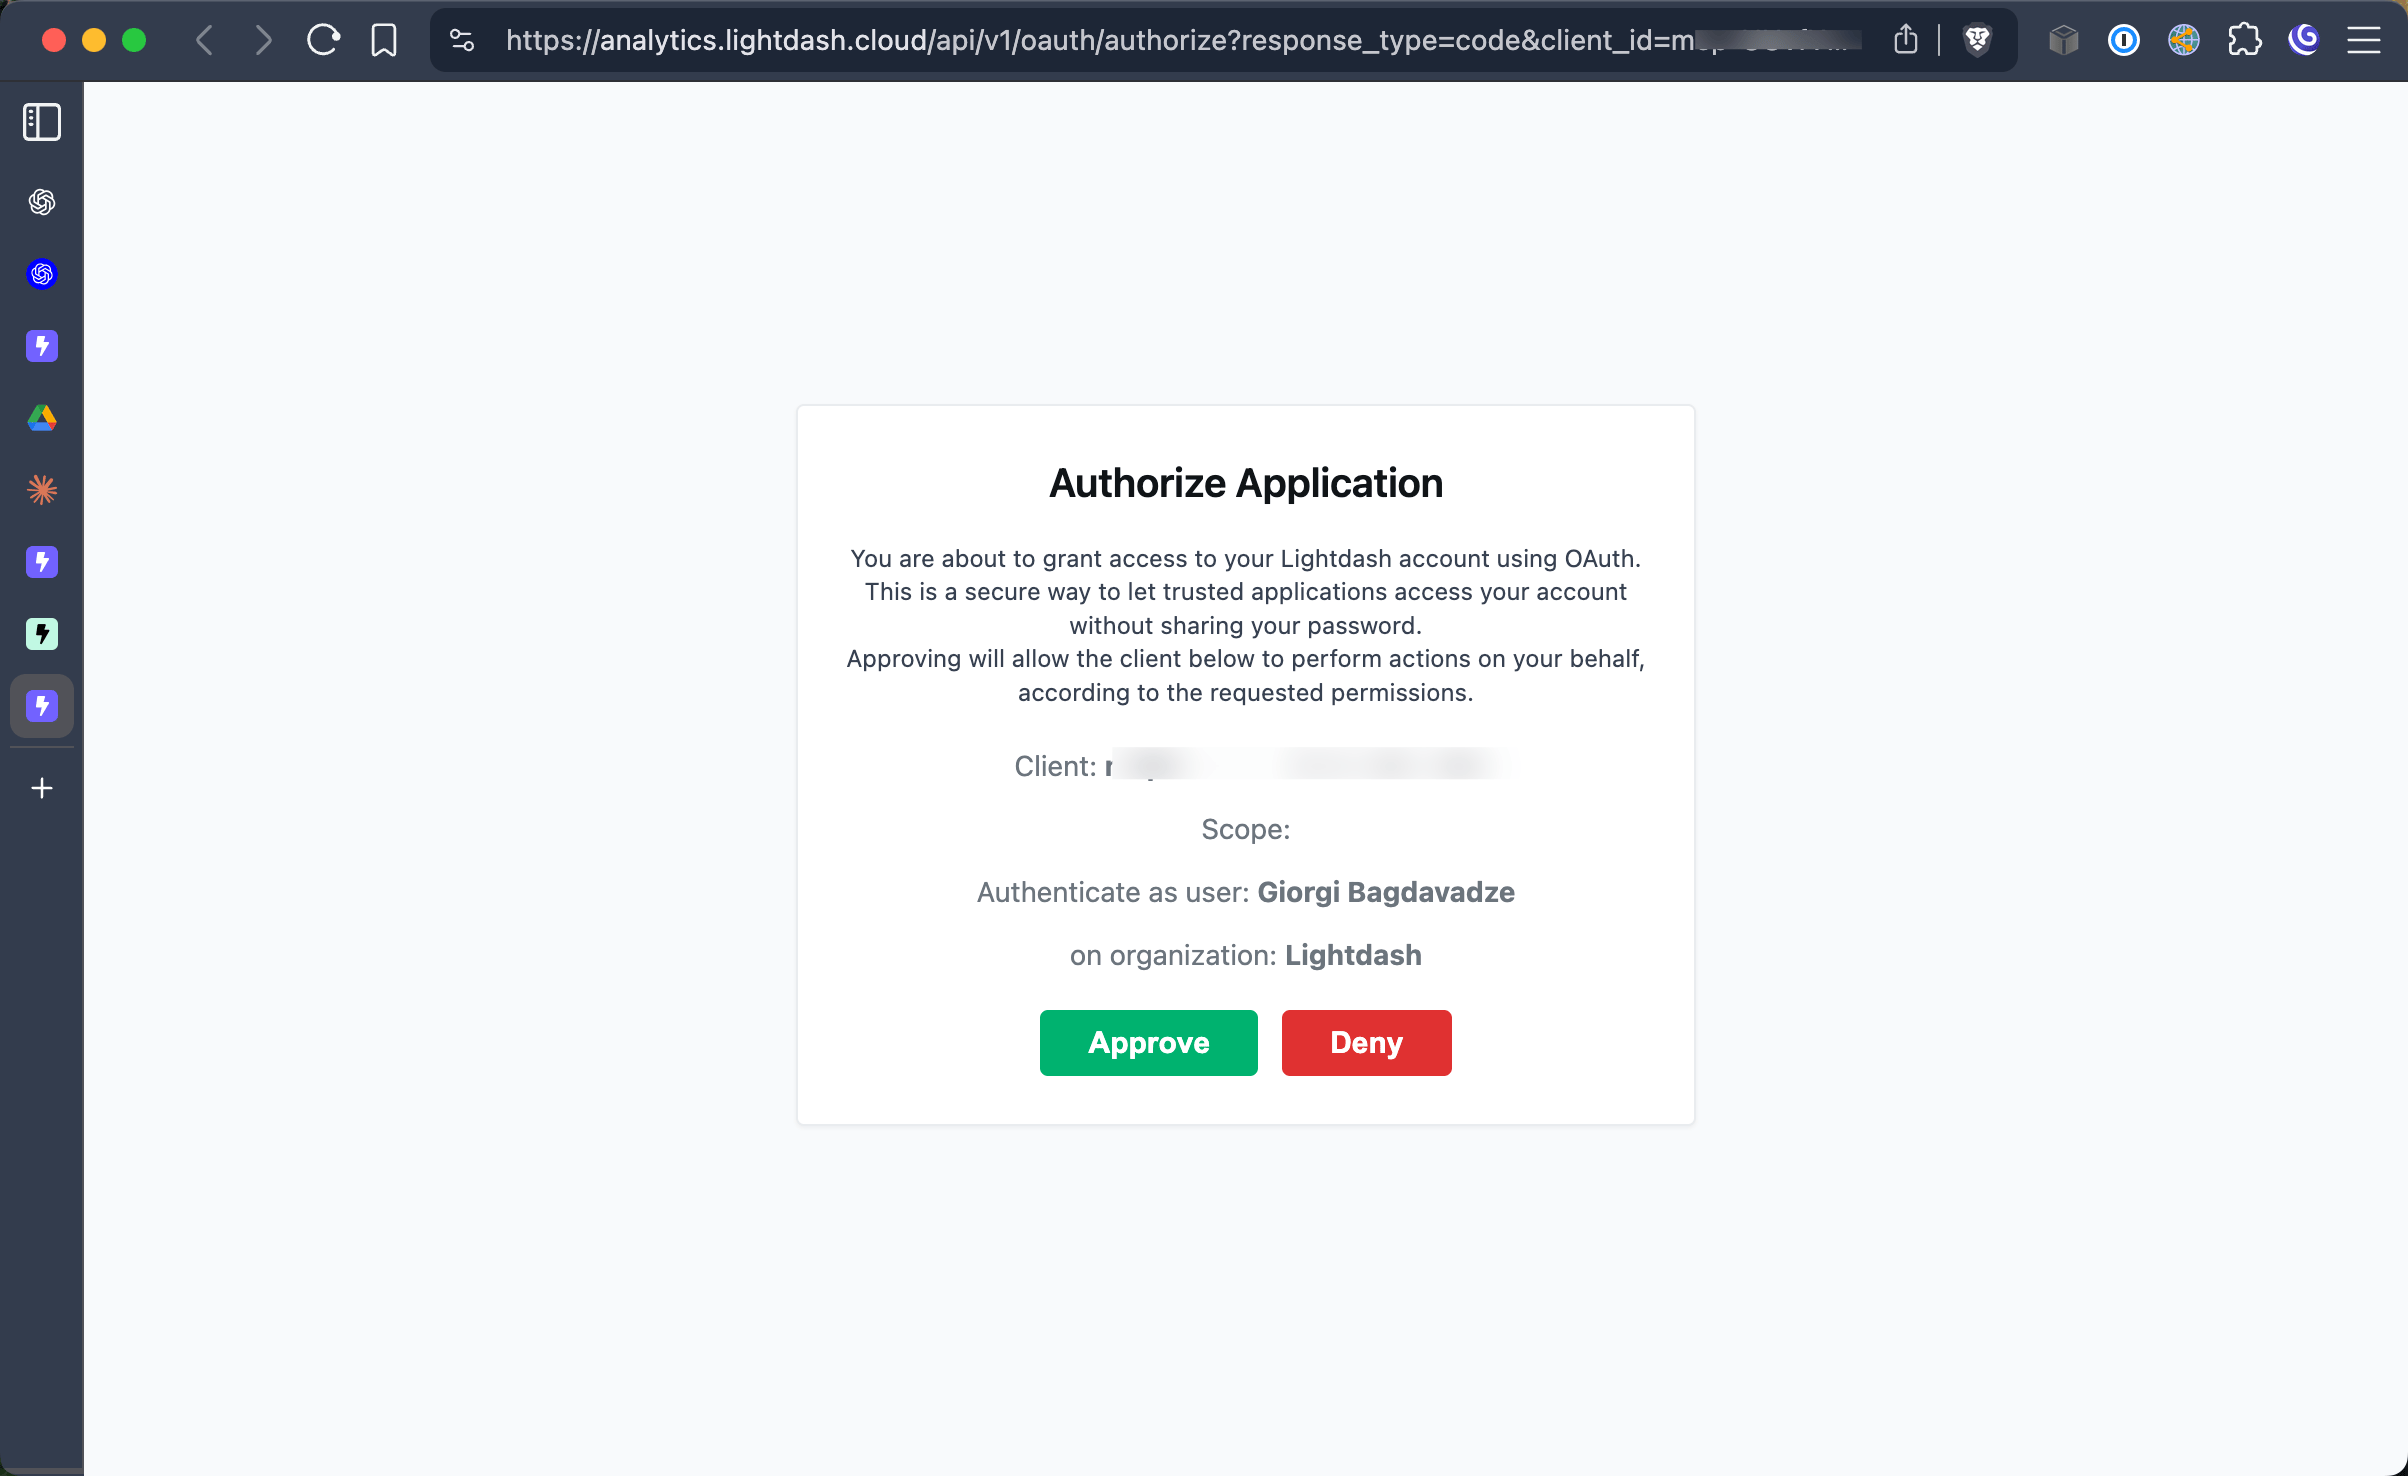
Complete OAuth Flow
-
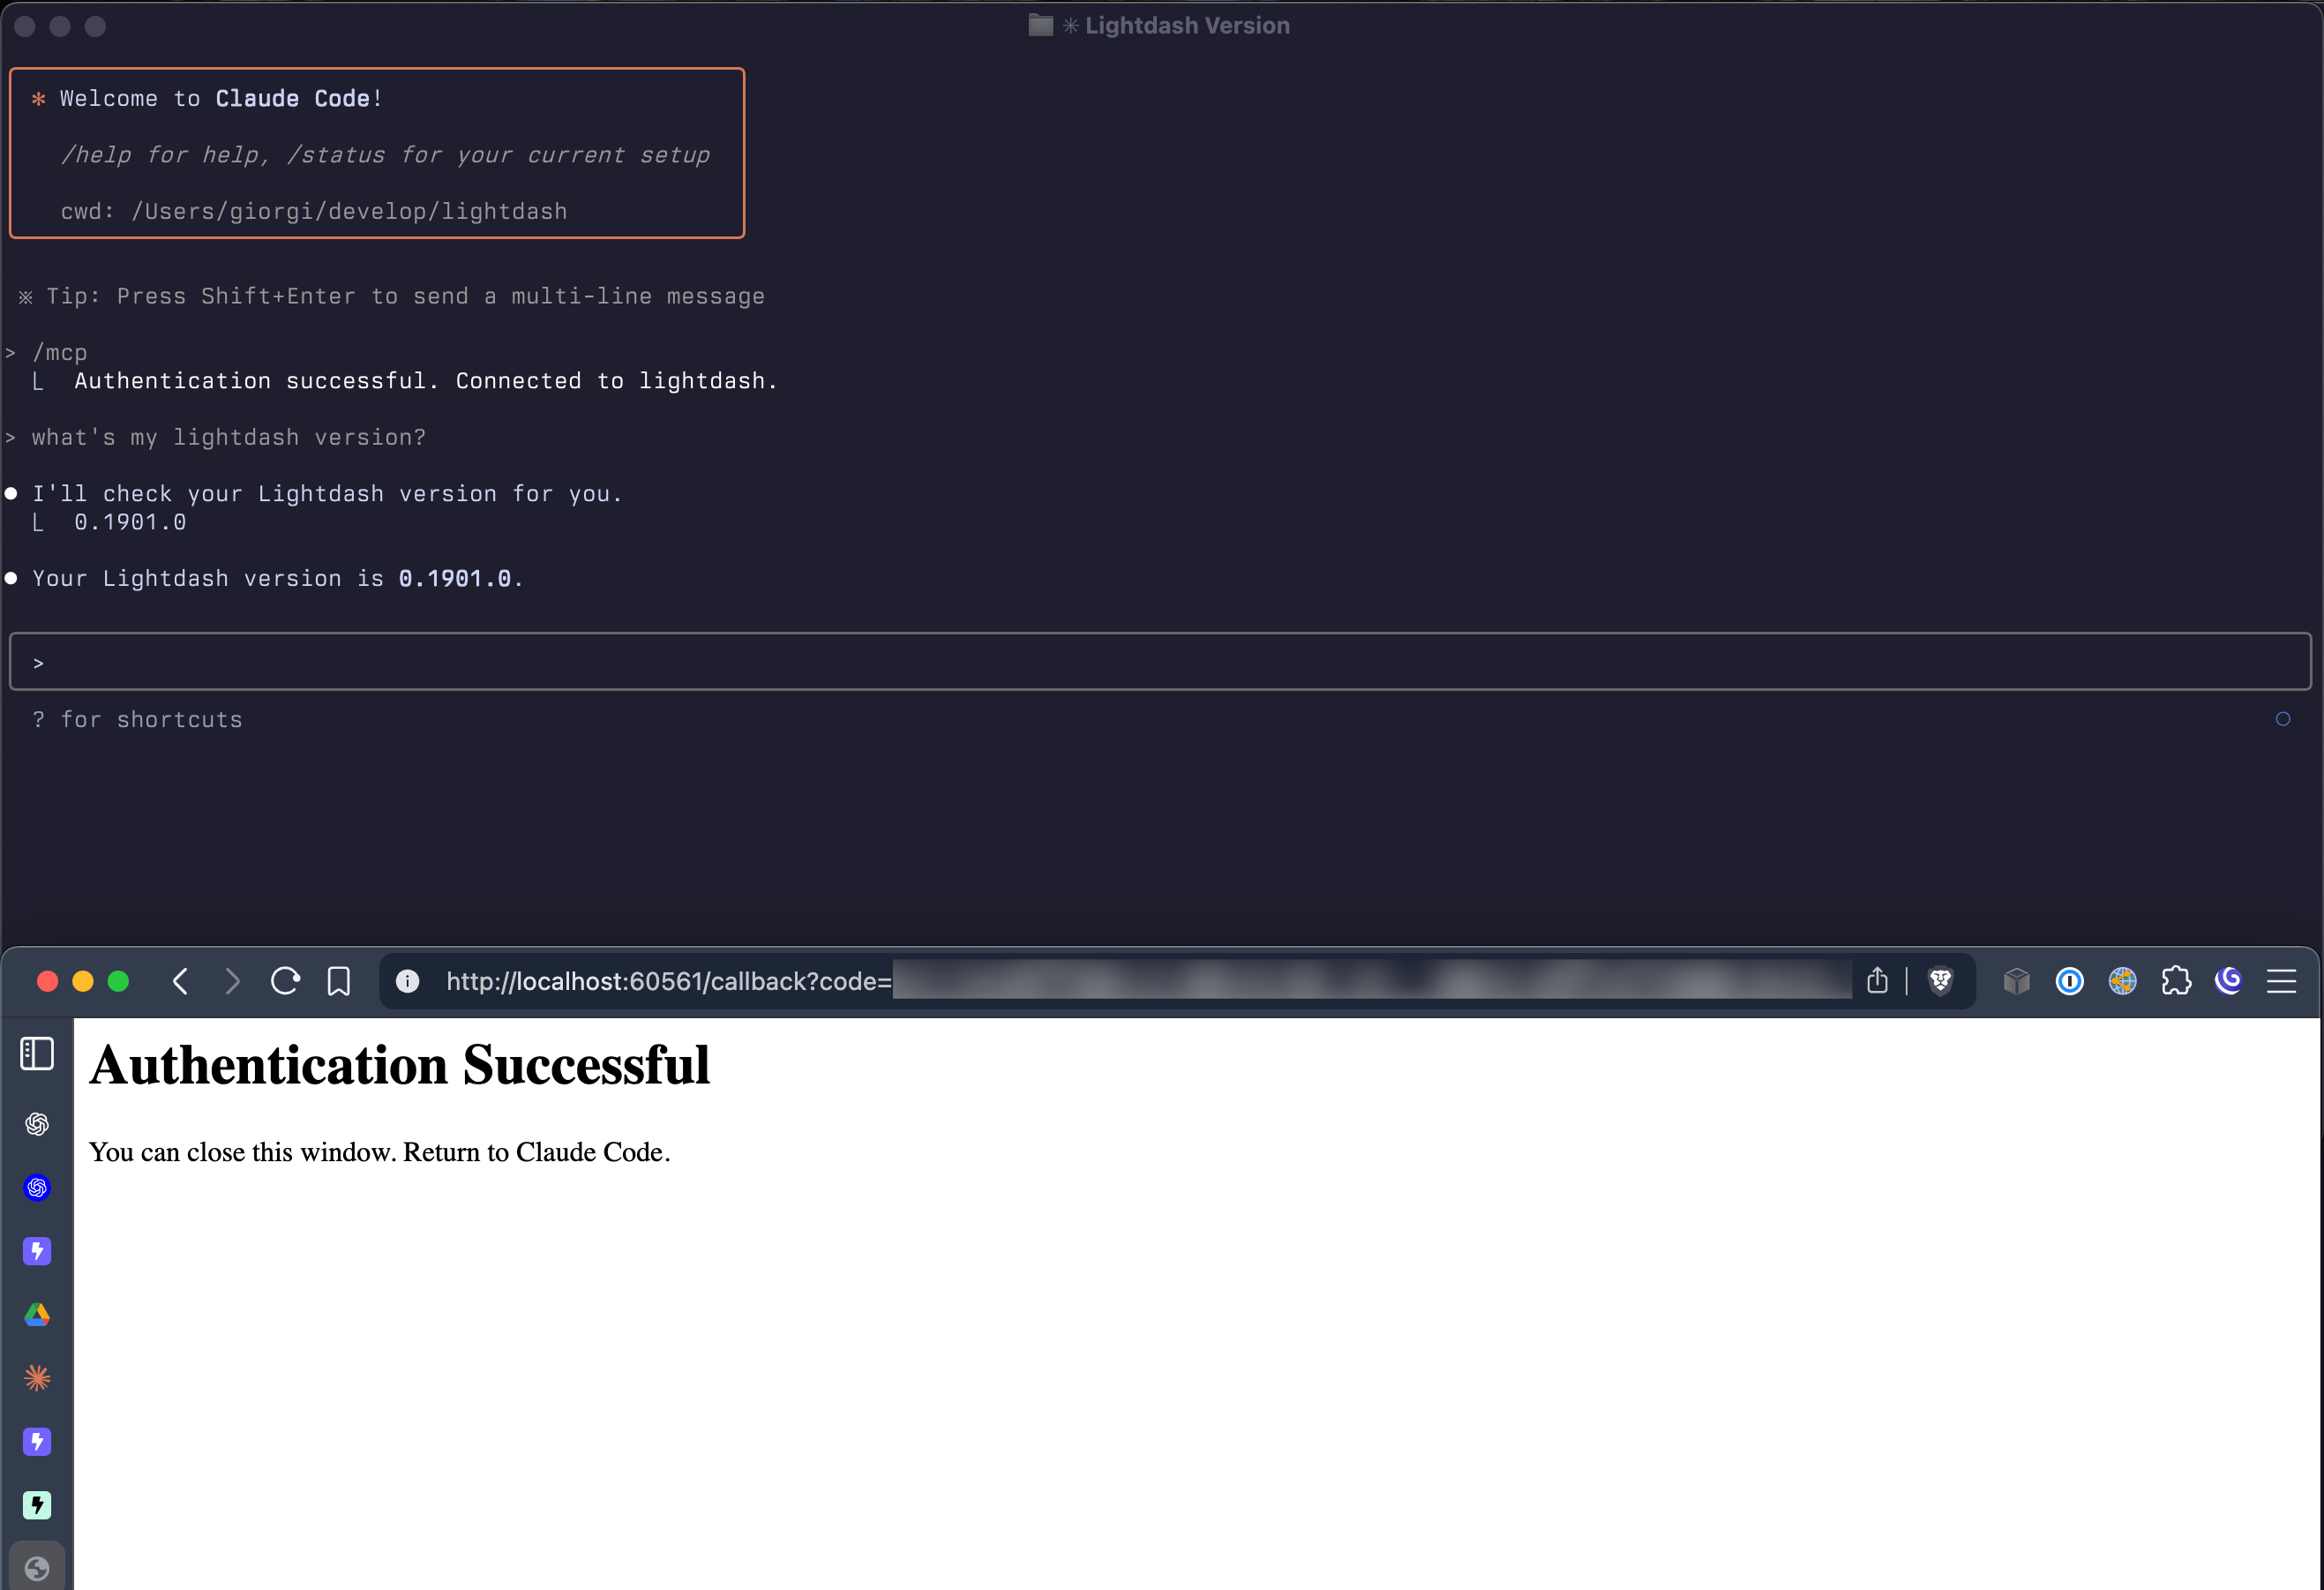
Start using MCP
Codex
Add the server and start the sign-in flow from your terminal:<your_instance_name> with your actual Lightdash instance name. Sign in to Lightdash in your browser, approve access, then start a new Codex session.
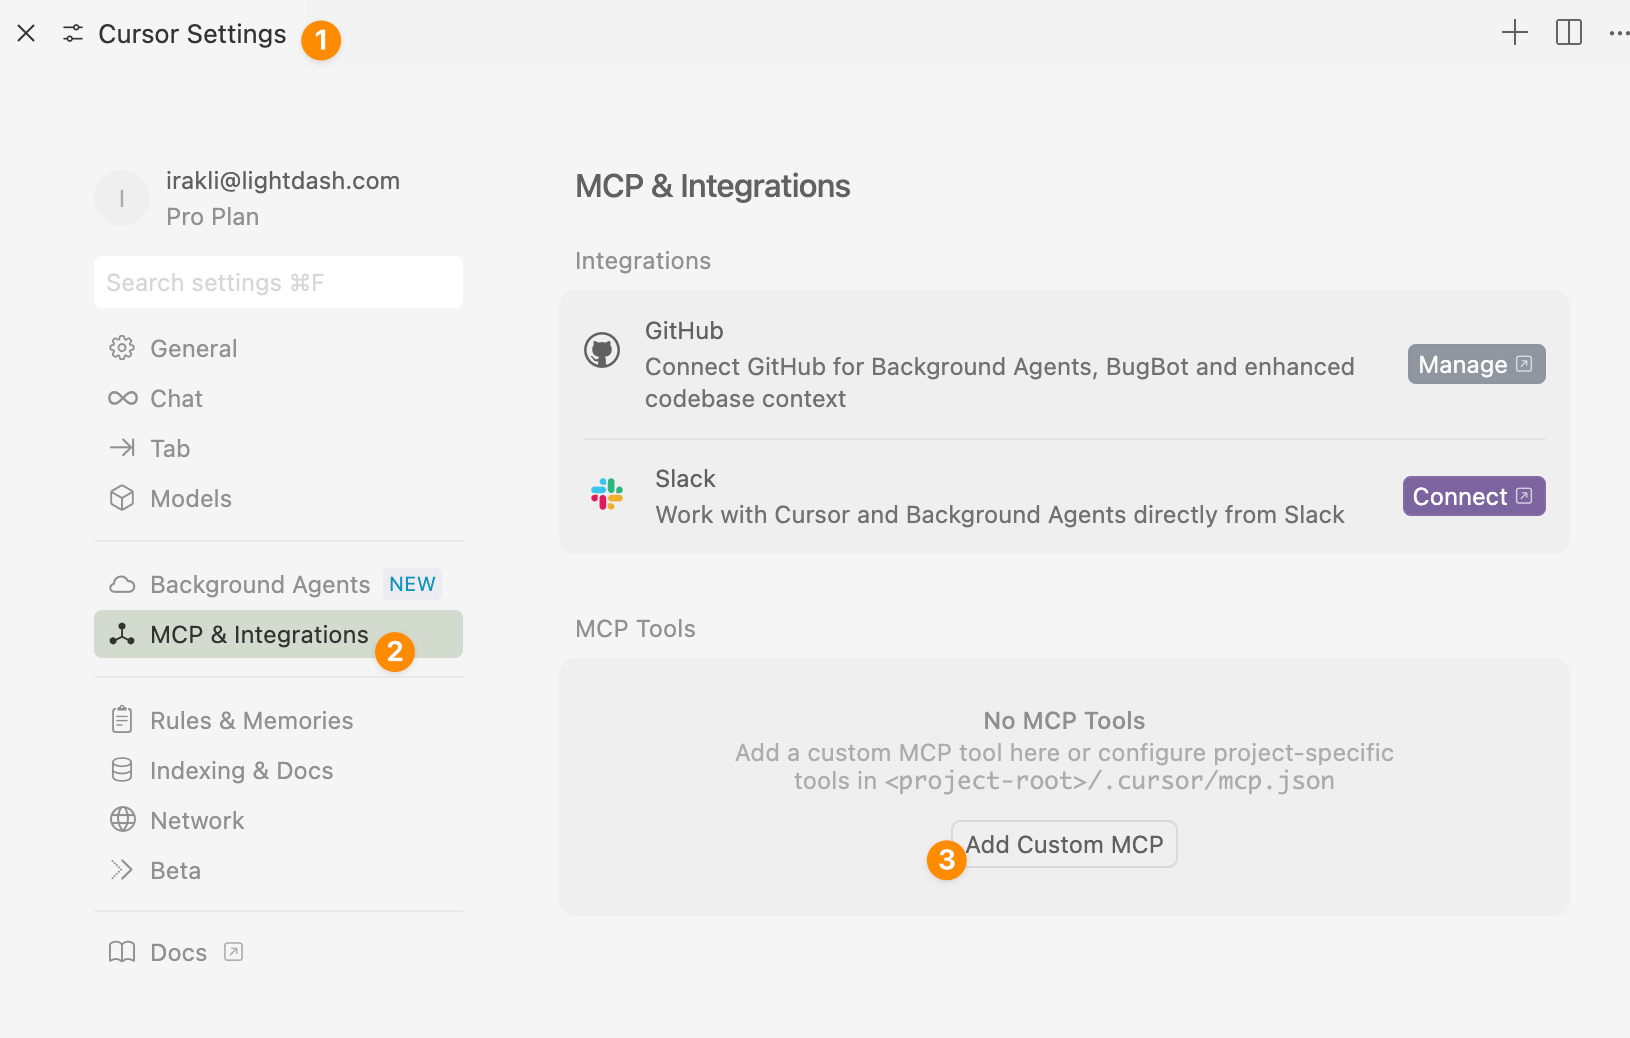
Cursor
Add the server to your project’s.cursor/mcp.json:
VS Code
Add the server to your project’s.vscode/mcp.json:
Custom integrations
If you’re building your own agents or automated workflows, you can integrate directly with Lightdash MCP:- Transport: Lightdash MCP exposes a Streamable HTTP transport endpoint at
https://<your_instance_name>.lightdash.cloud/api/v1/mcp - Debugging: Use
@modelcontextprotocol/inspectorto inspect and debug the MCP connection - Authentication: For interactive setups use OAuth 2.0. For headless agents and automated workflows, you can authenticate with a Personal Access Token by passing it in the
Authorizationheader — bothAuthorization: ApiKey ldpat_<redacted>andAuthorization: Bearer ldpat_<redacted>are accepted on the MCP endpoint and resolve to the same PAT authentication path. TheBeareralias is accepted only on the MCP endpoint. UseBearerwhen your MCP host only supports staticBearertokens (for example, Claude managed agents and other third-party MCP hosts that don’t let you choose a custom auth scheme); useApiKeyfor direct HTTP clients where you can set the scheme yourself, since it makes it explicit that the token is a Lightdash PAT. Create the token under Settings → Personal access tokens for the user whose permissions and attributes you want the integration to use. Service account tokens are also supported on plans that include them. On a self-hosted instance withDISABLE_PAT=true, the MCP endpoint refuses personal access tokens too, while OAuth and service account tokens keep working; to limit tokens to some organization roles instead, setPAT_ALLOWED_ORG_ROLES(see environment variables). - Redirect URIs: A wildcard in a registered redirect URI matches only a port, a path, or one leftmost subdomain label, for example
https://*.example.com/callback. Lightdash refuses a redirect URI that has a user name, a password or a backslash. When the agent identity feature flag is on, stricter rules apply. See OAuth with agent identity on. - Documentation: See the MCP specification for implementation details
- Pin a project (optional): pass
X-Lightdash-Project: <project-uuid>to scope the MCP session to a specific project. See details below. - Pin an agent (optional): pass
X-Lightdash-Agent: <agent-uuid>to scope the MCP session to one AI agent and its project. See details below. - Override user attributes per request (optional): pass
X-Lightdash-User-Attributes: <json>to override the authenticated user’s attributes for that request (useful for row-level security when an agent acts on behalf of different end-users). See details below.
OAuth with agent identity on
When the agent identity feature flag is on, the Lightdash OAuth server is stricter. A custom OAuth client must:- Send the
resourceparameter set to the MCP URL, for examplehttps://<your_instance_name>.lightdash.cloud/api/v1/mcp. Each token is for the Lightdash API or for MCP, and one audience refuses the other’s tokens. Withoutresource, the token is for the API, so the MCP endpoint refuses it. - Register exact redirect URIs. Only an http loopback redirect (
localhost,127.0.0.1or[::1]) can use a different port. Allowed schemes are https, http on a loopback host, reverse-DNS native schemes such ascom.example.app, andcursor,vscode,vscode-insiders,windsurfandlightdash. Dynamic client registration refuses wildcards, except for the loopback port. - Use PKCE with
S256. - Send the token in the
Authorizationheader. Lightdash refuses a bearer token in the query string.
iss parameter (RFC 9207).
Pin a project with the X-Lightdash-Project header
By default, MCP clients call get_context to see the projects you can access, then pass a project UUID to each tool that works with project data. If you’re building an integration that should always operate against a single project, you can pre-select the project by sending the X-Lightdash-Project header on every request to /api/v1/mcp.
When the header is set:
- Tools run against the project in the header, and a tool call for any other project is refused.
get_contextreports this project asactiveProject. - The
list_projectstool is hidden fromtools/list, so the AI assistant isn’t steered toward another project. - Access to the project is still enforced by your user, API key, or service account’s permissions — the header can’t be used to access projects the caller can’t already see.
/projects/<projectUuid>/...).
X-Lightdash-Agent, an invalid value is rejected with a 400 error instead. Permissions are always checked against the resolved project, so a header for a project the caller can’t view will return a “no access” error.
Pin an agent with the X-Lightdash-Agent header
To lock an integration to one AI agent, send the X-Lightdash-Agent header with the agent’s UUID on every request to /api/v1/mcp. The agent’s project becomes the pinned project, so you don’t need to send X-Lightdash-Project as well.
When the header is set:
- Every tool that works with project data runs with the agent’s scope, as if the AI assistant had passed the agent’s
agentUuid(see Agent context). A tool call for a different agent is refused. - The agent’s project is pinned the same way as with
X-Lightdash-Project: a tool call for any other project is refused, andlist_projectsis hidden. route_agentandlist_agentsreturn only the pinned agent, andget_contextreports it asactiveAgent.- The agent’s instructions are added to the server instructions that the client receives when it connects.
- Access is still enforced: the caller must have access to the agent and be able to view its project. The header can only narrow what the caller can already reach.
/projects/<projectUuid>/ai-agents/<agentUuid>).
400 error when the header isn’t a valid UUID, when no agent has that UUID, or when the request also pins a different project. It fails with a 403 error when AI agents or agents over MCP aren’t enabled for your organization, or when the caller can’t access the agent or view its project.
Override user attributes with the X-Lightdash-User-Attributes header
The X-Lightdash-User-Attributes header overrides the authenticated user’s Lightdash user attributes for that specific MCP request. This is designed for agents that act on behalf of multiple end-users with row-level security: one PAT (or service account) user handles all requests, and per-request RLS scoping is applied via the header.
The PAT or service account user must have the org admin role to use this header. Non-admins will receive a ForbiddenError.
The header value must be a JSON object where each value is either a string or an array of strings. For example:
{"user_id": "abc123"}{"user_id": ["abc123", "def456"]}
X-Lightdash-User-Attributes header programmatically on each request.
Network requirements
If your organization uses a corporate firewall, VPN, or internet security tool, the following domains must be allowlisted for MCP to work correctly:
If you’re having trouble, try opening Claude in an incognito or private browser window to rule out browser extensions such as ad blockers that may be blocking these domains.
Turn MCP access on or off
Organization admins can turn MCP on or off for the whole organization with Allow MCP access in Settings → MCP → General. It’s on by default. Turning it off blocks all MCP clients, including connected ones, and disables the other MCP settings. Settings → MCP → Connect always shows. General and Analytics show only when AI features are enabled for your organization (on a self-hosted instance, enable AI Analyst). General needs an organization admin or developer role. Analytics also shows to people who can manage agents in at least one project.What it can do
Core capabilities
MCP provides AI assistants with powerful tools to interact with your Lightdash data:Project management
- List projects - View all accessible projects in your organization
- Set active project - Switch context between different projects (required before accessing any data). Accepts an optional
tagsarray to filter the explores and fields visible in the session to those matching the given tags — the same tag-based filtering used by AI agents, but available directly in an MCP session without needing an agent. Useful when tags work in the Lightdash UI but you also want to scope an MCP session to a specific domain (e.g.,["sales"]). - Get current project - Check which project is currently active
Data exploration
- List explores - See all available data models in the current project at a glance
- Find explores - Search for relevant data models using natural language (e.g., “customer orders”)
- Find fields - Search for specific metrics and dimensions by business terms (e.g., “total revenue”, “order date”)
- Search field values - Look up valid values for a field, useful for building filters
- Find content - Search for existing spaces, charts, and dashboards by name or description. Results include space breadcrumbs and direct links. Optionally scope the search to a single space (and its descendants) by passing a space slug.
- List content - Browse accessible content as a hierarchy. By default it returns root-level spaces; pass a space slug to list the charts, dashboards, and nested spaces directly inside that space. Use this when you want the agent to walk space → content rather than search by keyword.
- List verified content - Discover charts and dashboards that admins have marked as verified, so agents can reference trusted, canonical patterns when building new content. If you want your agent to prefer verified patterns, ask it to in your prompt (e.g. “Use verified charts as the reference for any new chart you build.”).
Query execution
- Run metric query - Execute queries using your semantic layer’s metrics and dimensions. Completed results include a best-effort
exploreUrlso you can open the query in Lightdash to keep exploring. - Render chart - Render a visualization (tables, bar charts, line charts, pie charts, and more) for a completed metric query result in MCP App-capable clients (e.g., Claude). Call this after a metric query finishes when you want a visual chart; the query is not re-executed. It can also render with one of the project’s custom chart types. SQL Runner results are not supported by
render_chart. - Run SQL - Execute arbitrary SQL queries directly against the project’s data warehouse. Useful for ad-hoc analysis or queries that don’t fit the explore-based model. Returns up to 500 rows by default (configurable up to 5,000). Completed results include a best-effort
sqlRunnerUrlso you can open the compiled SQL in SQL Runner. - Get query result - Poll for the result of a long-running query.
run_metric_queryandrun_sqleach wait about 50 seconds for the query to finish; if it hasn’t, the response has noexploreUrl(orsqlRunnerUrl) yet — just aqueryUuidto poll. Callget_query_resultwith thatqueryUuiduntil the warehouse completes the query — so long queries don’t time out the session. The completed (done) response includes the same best-effortexploreUrl(orsqlRunnerUrlforrun_sqlqueries) as a synchronously-completed call.
manage SqlRunner permission, which Developers and Admins have by default and custom roles can add. Without it, run_sql doesn’t appear in your client’s tools list at all, rather than returning a permission error when called. The SQL is executed directly against your warehouse, so use the appropriate SQL dialect for your connection (e.g., PostgreSQL, BigQuery, Snowflake). Lightdash runs the query as soon as the tool is called; any confirmation step comes from your MCP client’s own tool-approval setting.
Query response shapes (for developers)
Query response shapes (for developers)
When you call Example usage:Notes:
run_sql from a custom MCP client or live artifact, the tool returns both a CSV text payload and a structuredContent object. Prefer structuredContent.result.rows over parsing the CSV — values arrive as JSON-serializable primitives (numbers, strings, booleans, ISO date strings, or null), so you don’t need parseFloat or parseInt on numeric columns.Response envelope:- Empty results still return
structuredContent.resultas{ status: "done", rows: [], columns, rowCount: 0, sqlRunnerUrl }— distinct from a parse failure. sqlRunnerUrlis best-effort and may benullif the share link cannot be created. It points to the compiled SQL that was executed, which may differ slightly from the SQL you submitted.- On error, the response has
isError: trueandcontent[0].textcontains the error message;structuredContentis omitted. content[0].textcontinues to carry the raw CSV, so existing clients that parse the text payload keep working.
run_metric_query or get_query_result call for a metric query also pairs CSV text with structuredContent.result, which holds status: "done", the queryUuid, the rows, the fields (field definitions keyed by field ID) and the best-effort exploreUrl. A client that can’t display render_chart can draw its own chart from rows and fields.Editing content
MCP can read, create, and edit Lightdash charts and dashboards using the same content-as-code payloads that the Lightdash CLI uses. This lets agents make targeted edits to existing content or build new charts and dashboards directly in a conversation, without downloading YAML files locally.- Read content (
read_content) - Fetch a chart or dashboard as JSON by slug. Call this before editing so the agent can see the current state. - Edit content (
edit_content) - Apply an RFC 6902 JSON Patch to an existing chart or dashboard, then validate and persist. Use this for surgical changes (e.g. rename a field, add a filter, swap a chart color) without rewriting the whole object. - Create content (
create_content) - Create a new chart or dashboard from a full chart-as-code or dashboard-as-code object. Returns the persisted slug and URL.
download and upload commands, so the user driving the MCP session needs the same access required to manage that content in Lightdash.
Wherever documents are enabled (every Lightdash Cloud organization), the same three tools also handle them:
read_contentreturns the document’s ordered cells (Markdown and chart-as-code charts) and its currentversionUuid.create_contentwithtype: "document"takes a name, slug, description, space slug, and the ordered cells.edit_contenttakes adocumentEditinstead of a JSON Patch. Either replace the whole content, passing theversionUuidyou read asbaseVersionUuidand every cell to keep, or update the name, slug, or description on their own. If someone saved the document after you read it, the edit is rejected; read it again and retry. Each content edit saves a new version.
Editing project models
MCP exposes AI writeback — editing the dbt or native Lightdash YAML project that backs the active Lightdash project and opening a pull request with the change — to any MCP client. Ask the assistant to rename a metric, add a dimension, edit field SQL, or fix a YAML description; the assistant calls the tools below and hands back a pull request URL when the run finishes. The AI writeback prerequisites — supported Git host, repository access, and project Developer permission — apply to the MCP surface too.- Run AI writeback (
run_ai_writeback) - Start a writeback run against the active project’s repository from a natural-language prompt. The repository, project directory, and semantic layer format are resolved server-side from the saved connection — you don’t specify them. Returns immediately with anaiWritebackRunUuid. - Get AI writeback status (
get_ai_writeback_status) - Poll a writeback run by id. Returns the current pipeline stage while the run is in flight, and the pull request URL (or an error message) once it reaches a terminal state.
How the async flow works
A writeback run typically takes a few minutes — longer than most MCP transports will hold a connection open — sorun_ai_writeback enqueues the run to a background worker and returns immediately with a run id. The caller then polls get_ai_writeback_status for the outcome. See How it works for what the run itself does.
Polling has no session affinity — you can call get_ai_writeback_status from a different MCP session or a different API token, as long as the caller has view access to the project the run belongs to. This makes the pair usable from short-lived automations and shell scripts, not just interactive chat clients.
The in-product AI writeback chat card is unaffected by this split: the chat continues to auto-update once the background run finishes, without you polling anything.
run_ai_writeback — start a run
Parameters
prompt(string, required) — A clear, self-contained description of the change to make to the dbt project (for example, “Add atotal_revenuemetric to the orders model as the sum of amount”). When the project has more than one dbt source, name the intended source in the prompt itself (for example, “In the marketing dbt project, …”) — the run reports the available sources back throughget_ai_writeback_statusif it can’t tell which one you meant.
structuredContent)
get_ai_writeback_status — poll for the result
Parameters
aiWritebackRunUuid(UUID, required) — The id returned byrun_ai_writeback.
structuredContent)
statusis either"pending"(not yet picked up by a worker), an in-progress pipeline stage (for example,"sandbox","agent", or"pull_request"), or a terminal value:"ready"(finished — checkprUrl) or"error"(finished — checkerrorMessage).prUrlis set oncestatusis"ready"and the agent changed at least one file. If the agent decided no change was needed,statusis still"ready"butprUrlisnull.errorMessageis set oncestatusis"error". This also covers the “more than one dbt source” case — the message lists the available sources so the caller can re-runrun_ai_writebacknaming the intended one in the prompt.
create_content and edit_content are not registered for any MCP client in the organization. Reading content over MCP is unaffected.
When content changes are allowed, the two tools are also registered only for callers who can save content in the project. This is the same check as the Save button in the Lightdash app: the caller’s role must let them create charts or dashboards, and they must either be able to create spaces or have editor access to at least one space in the project. The check runs at tool registration, so users who can’t save content don’t see these tools in the tools list. For example, an Interactive Viewer with editor access to a space gets create_content and edit_content.
Project, space, and content-level checks still run at invocation time on top of the registration gate.
This is independent of the per-agent Allow agent to manage Lightdash content toggle described in Creating and editing content. That toggle only controls whether one agent can create or edit content in its own chats, in the Lightdash app and Slack. It has no effect on create_content or edit_content called directly over MCP. A user with no access to any agent can still create and edit charts and dashboards over MCP, as long as the org-wide setting above is on and they can save content in at least one space in the project.
When prompting an agent to build content, ask it to use verified content as a reference. The agent can call find_content and read_content on a verified chart, then use that JSON as the template for create_content, so what it saves follows the patterns your team has already approved.
Example prompt: “Read the weekly-revenue chart, then create a copy called weekly-revenue-by-region that adds customers_region as a pivot dimension.”
The assistant will call read_content to fetch the source chart, modify the JSON to add the pivot, and call create_content to save the new chart — returning a link to open it in Lightdash.
Data app builds
MCP can build data apps — interactive applications generated from a brief on top of the active project’s semantic layer — from any MCP client. Ask the assistant to build an app, wait a few minutes while it builds, then iterate on it with follow-up briefs. Each build adds a version to the app.- Generate data app (
generate_data_app) - Start building a new app from a name and a brief. Optionally start from an existing dashboard or saved charts, pick a starter template, or apply a theme. - Iterate data app (
iterate_data_app) - Build a new version of an existing app from a follow-up brief. The app keeps its name, slug, and theme unless you ask for a different theme. - List data app themes (
list_data_app_themes) - List the organization’s themes so the assistant can apply one when it builds. - Get data app build status (
get_data_app_build_status) - Check how a build is going, and get the app’s URL once it’s ready. The assistant checks this for you while the build runs.
read_content, or keep iterating.
An app built over MCP is created as the calling user’s personal app: at the project root, in no space, visible only to them until they move it into a space from the Lightdash UI. This mirrors what the in-product AI agent does.
What enables these tools. The data app tools only appear in the tools list when both of these are true:
- Data apps are enabled for your organization.
- The caller can create data apps in the active project.
- “Build a data app called Revenue Overview that shows monthly revenue and the top 10 customers, then tell me when it’s ready.”
- “Add a region filter to the Revenue Overview app.”
Chart types
MCP can build and use custom chart types, the reusable visualizations Chart Studio builds for a project, from any MCP client. Ask the assistant for a chart the built-in chart types can’t draw, wait a few minutes while it builds, then iterate on it with follow-up briefs. Each build adds a version to the chart type.- List custom chart types (
list_custom_chart_types) - Browse the project’s chart types, including ones installed from the chart library, newest first. - Find custom chart types (
find_custom_chart_types) - Search the project’s chart types by name and description, or fetch one by slug. Each result has the chart type’s inputs, display options, and a link to it in Chart Studio, so the assistant can reuse a chart type that fits before building a new one. - Create custom chart type (
create_custom_chart_type) - Start building a new chart type from a name and a brief. Optionally share the first rows of a completed metric query as sample data, or apply a theme. The sample rows only guide the build; they don’t tie the chart type to that query. - Iterate custom chart type (
iterate_custom_chart_type) - Build a new version of an existing chart type from a follow-up brief. The chart type keeps its inputs, so charts that already use it keep working.
- Render a query with it -
render_chartdraws a completed metric query with the chart type, binding the query’s fields to the chart type’s inputs. Like other rendered charts, it only displays in MCP App-capable clients. - Save a chart with it -
create_contentsaves a chart that uses the chart type, with the same field mapping. The saved chart behaves like one built in the Explorer.
list_custom_chart_types and find_custom_chart_types appear in the tools list when chart types are enabled for your organization and the caller can explore data in the active project. create_custom_chart_type and iterate_custom_chart_type appear when Chart Studio is available and the caller can build chart types in the active project.
Example prompts:
- “Show monthly revenue by product category as a calendar heatmap. Build a chart type for it if we don’t have one.”
- “Render the last query with the Calendar Heatmap chart type.”
- “Add a color legend to the Calendar Heatmap chart type.”
Scheduled deliveries
- Create scheduled delivery (
create_scheduled_delivery) - Schedule an existing chart or dashboard to Slack, email, or another supported destination on a cron schedule. Point the tool at the content by slug and pass the schedule and recipients — the delivery is created against the active project using the caller’s permissions.
create_scheduled_delivery only appears in the tools list when both of these are true:
- Allow content changes via MCP is on (Settings → MCP → General).
- The caller’s role holds the
create:ScheduledDeliveriesscope.
create:ScheduledDeliveries by default: Interactive Viewers, Editors, Developers, Admins. Viewers do not. Custom roles must add the scope explicitly.
Example prompt: “Set up a scheduled delivery of the weekly-ecom-orders chart to #analytics-updates in Slack every Monday at 9am.”
The assistant will call create_scheduled_delivery with the chart’s slug, the cron schedule, and the Slack destination — mirroring the AI agent createScheduledDelivery tool but exposed to any MCP client.
Agent context
- Route agent (
route_agent) - Automatically select the best agent for a user prompt within a project. This is the preferred way to pick an agent — it mirrors the AI Router experience in the Lightdash app, so MCP sessions get the same automatic agent selection. - List agents (
list_agents) - Discover available AI agents and their areas of expertise
agentUuid to the tools it calls. Without an agentUuid, tools use the full project. To lock an integration to one agent, pin it with the X-Lightdash-Agent header.
These tools are covered in detail in the Using AI agent context section below.
When a tool call passes an agentUuid, the agent’s scope applies to that call: data exploration is limited to the agent’s explores, and content tools (find, list, read, create, and edit) only see spaces the agent has access to.
Skills
Lightdash ships built-in skills (such asdeveloping-in-lightdash) that give AI assistants guidance for working with Lightdash — for example, conventions for writing dbt models, charts, and dashboards. These skills are exposed as MCP resources, which most clients consume automatically.
Your organization’s custom agent skills are available through the same MCP connection. When an AI agent is active in the session, MCP exposes the custom skills attached to that agent. Without an active agent, it exposes the organization skills the caller has permission to view.
For MCP clients that don’t read resources directly (e.g. Claude Code), three fallback tools let the assistant discover and load the same content:
- List skills (
list_skills) - Return the available built-in and custom skills along with their supporting resource files - Read skill (
read_skill) - Read the mainSKILL.mdinstructions for a skill by name (e.g.developing-in-lightdash) - Read skill resource (
read_skill_resource) - Read a supporting resource file for a skill by name and resource path (e.g.resources/dashboard-best-practices.md)
list_skills to discover what’s available and then load the skill content it needs. If your client already supports MCP resources, you can ignore these tools; both paths return the same content.
Skill resources via MCP (for developers)
Skill resources via MCP (for developers)
The Lightdash MCP server exposes built-in and custom skills as MCP resources, so any MCP-compatible client can discover and load them at runtime — no CLI install required.The server advertises support via the
io.modelcontextprotocol/skills extension capability returned from initialize. Clients that don’t recognize the extension can still list and read the resources directly.Available resources:Example: list and read a skill via JSON-RPC
Example conversations
Here are some examples of how you can interact with AI assistants using MCP:Example 1: Verifying your MCP connection
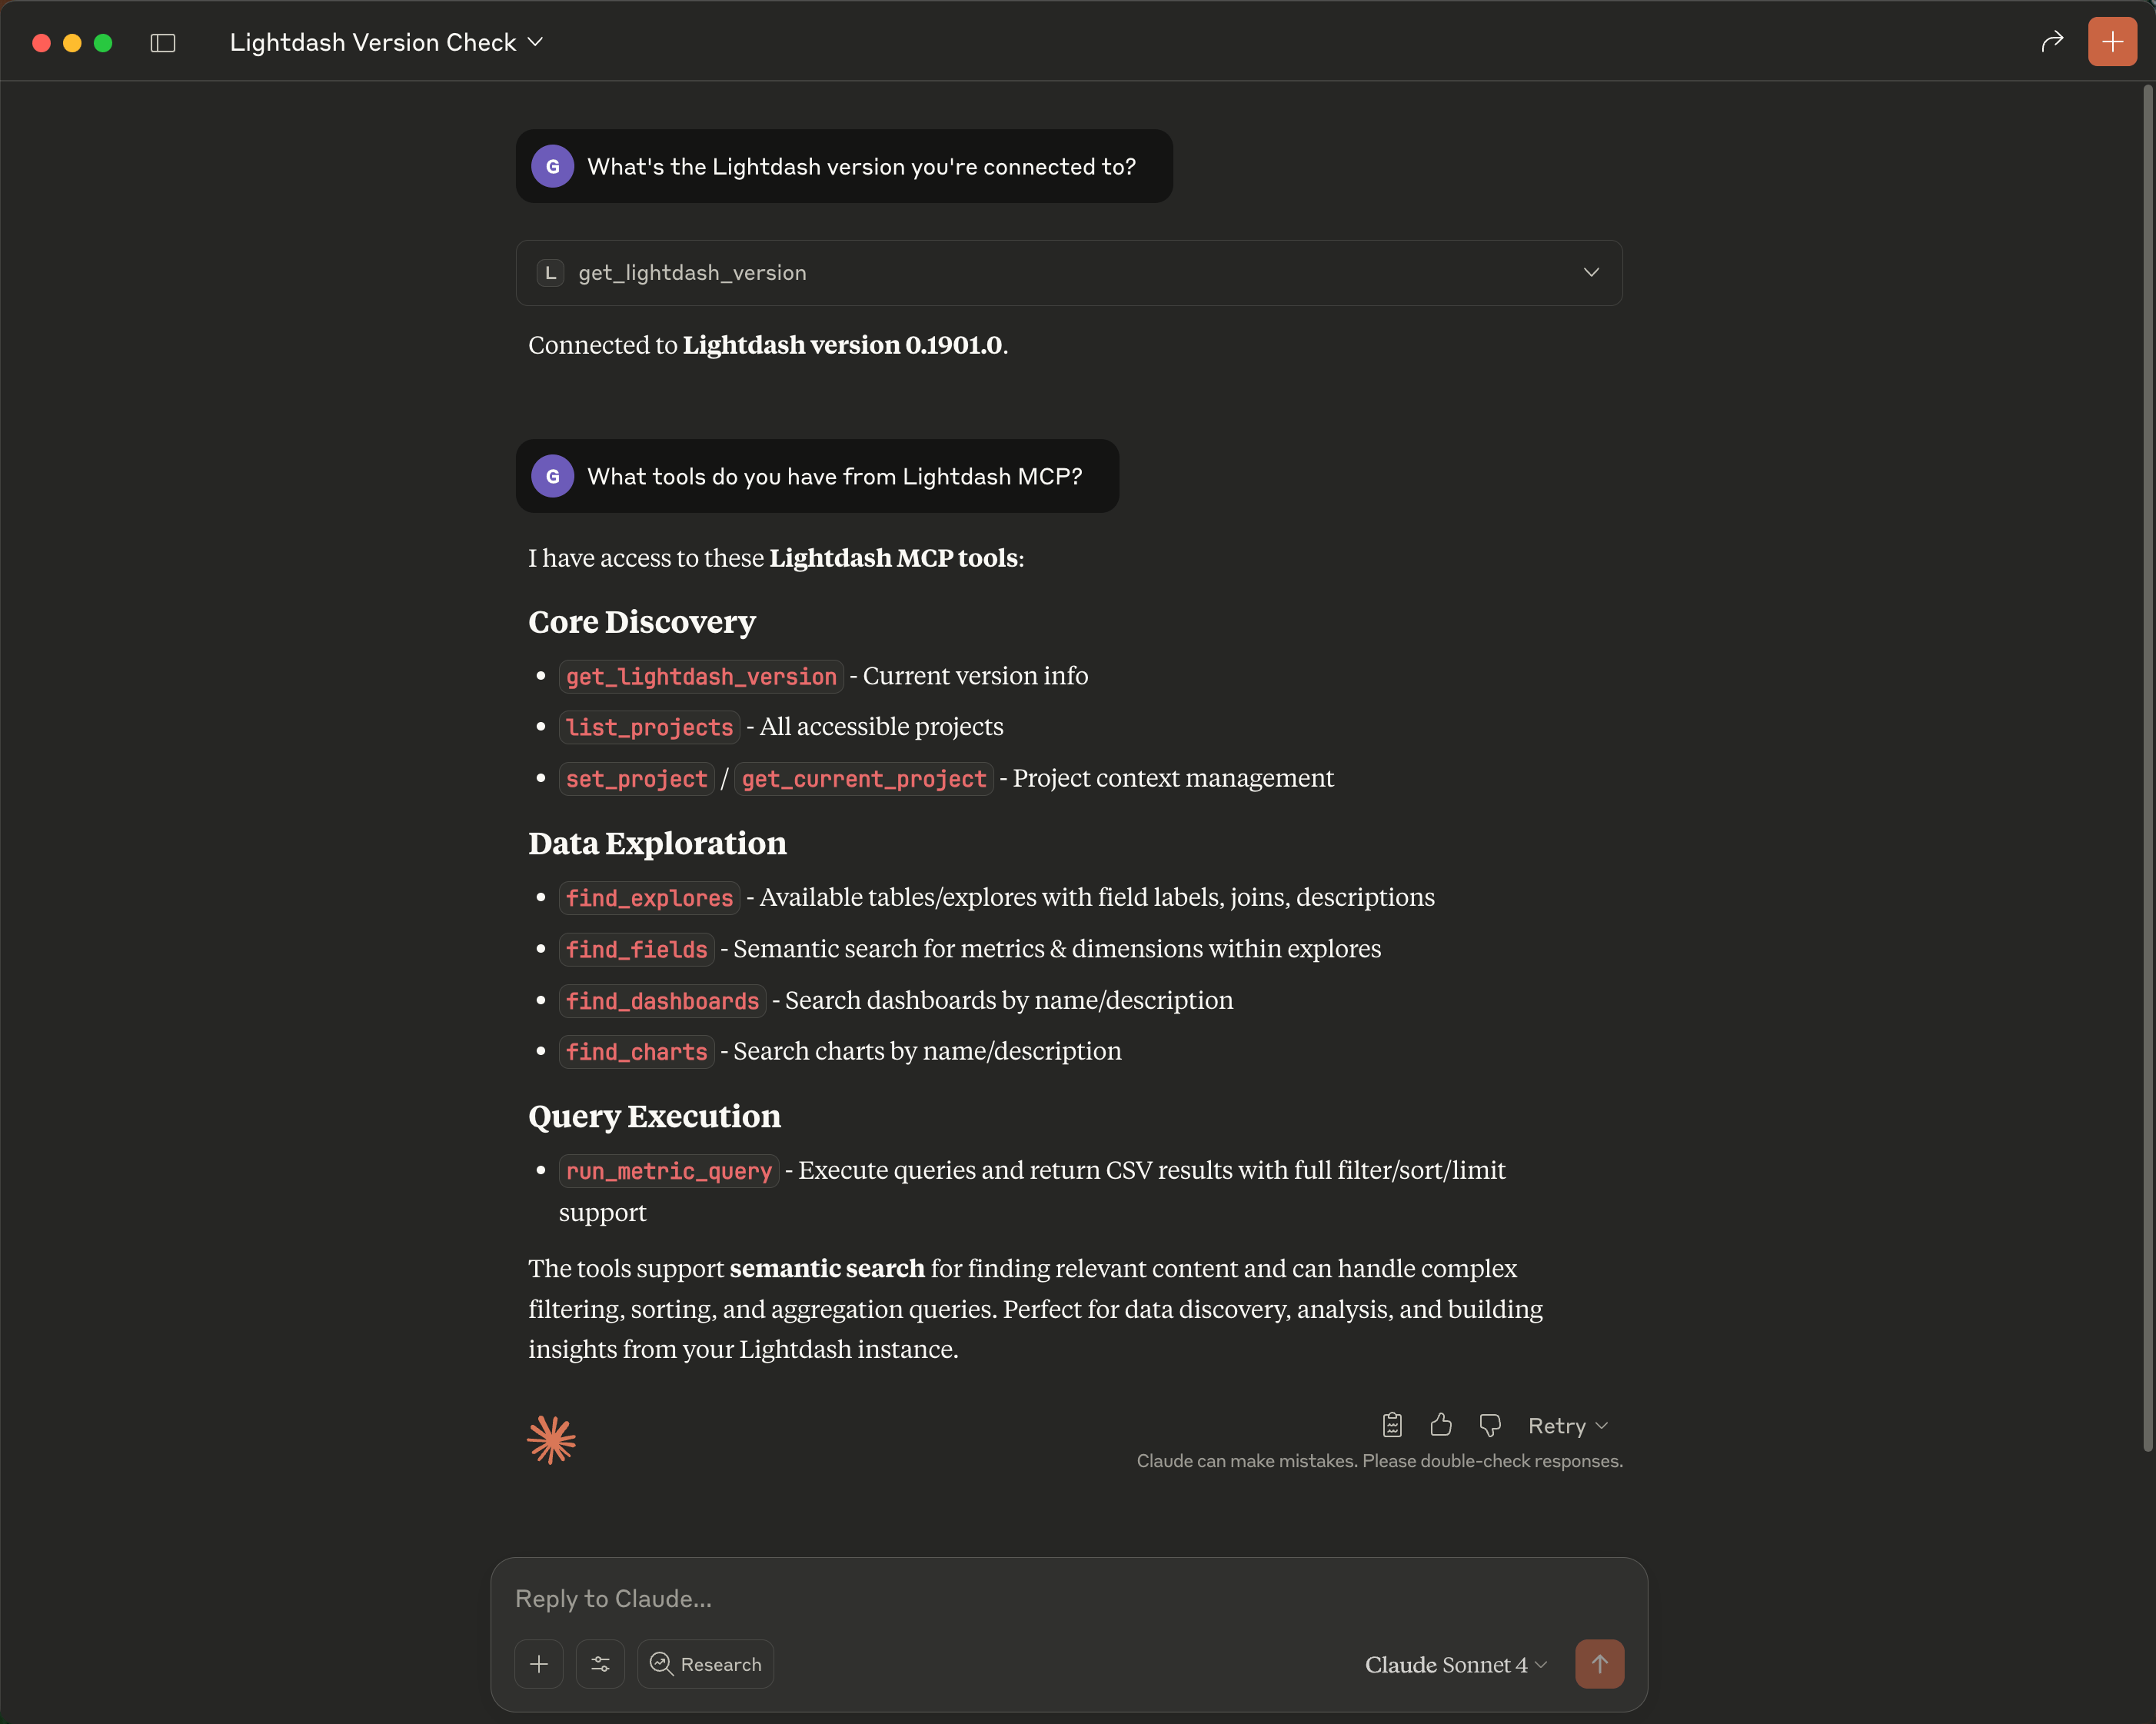
After connecting, verify that the MCP integration is working by asking your AI assistant to list available tools. Prompt: “What Lightdash tools do you have access to?” The assistant will confirm the connection and list the available MCP tools, such aslist_projects, grep_fields, run_metric_query, run_sql, and others. This is a quick way to verify that authentication succeeded and the MCP server is reachable.
See screenshot
See screenshot
Example 2: Setting up a project and finding dashboards
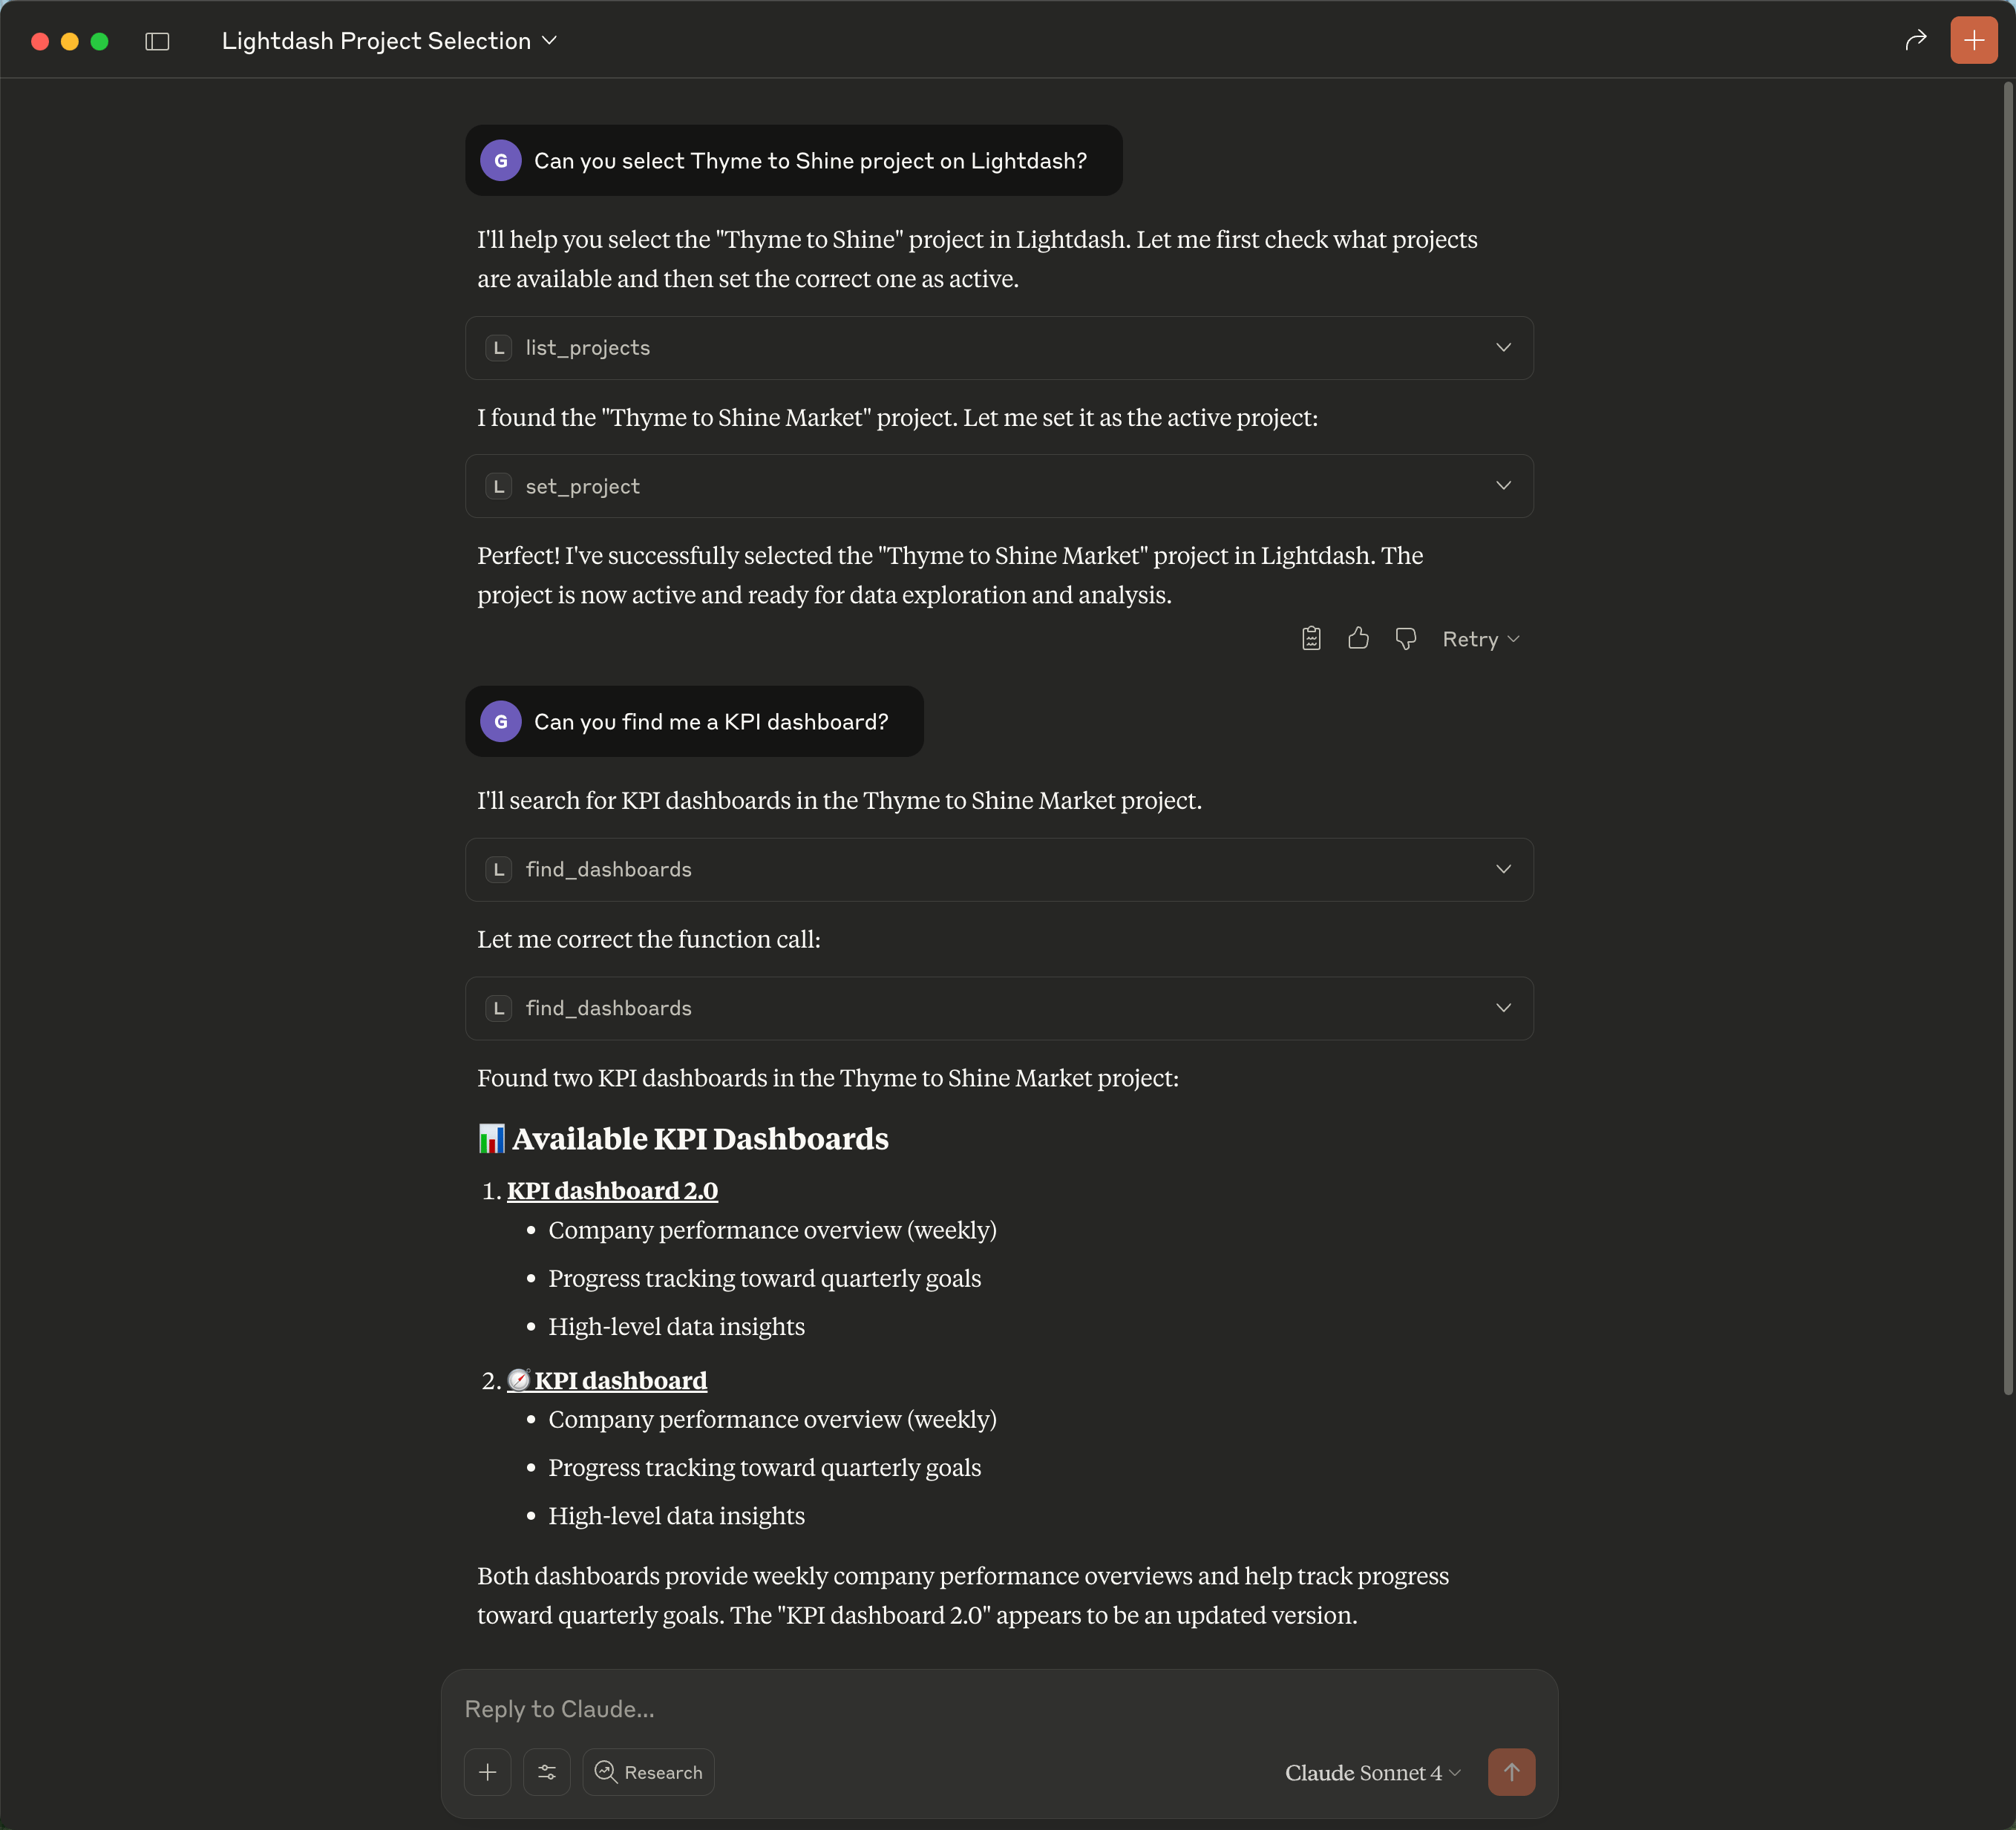
Before querying data, the assistant needs to know which project to use. Then you can search for existing dashboards and charts. Prompt: “What projects do I have access to? Set the Jaffle Shop project, then show me all dashboards related to revenue.” The assistant will:- Call
list_projectsto show your available projects - Use the “Jaffle Shop” project’s UUID in the next calls
- Call
find_contentwith your search term to find matching dashboards and charts
See screenshot
See screenshot
Example 3: Exploring data and running a metric query
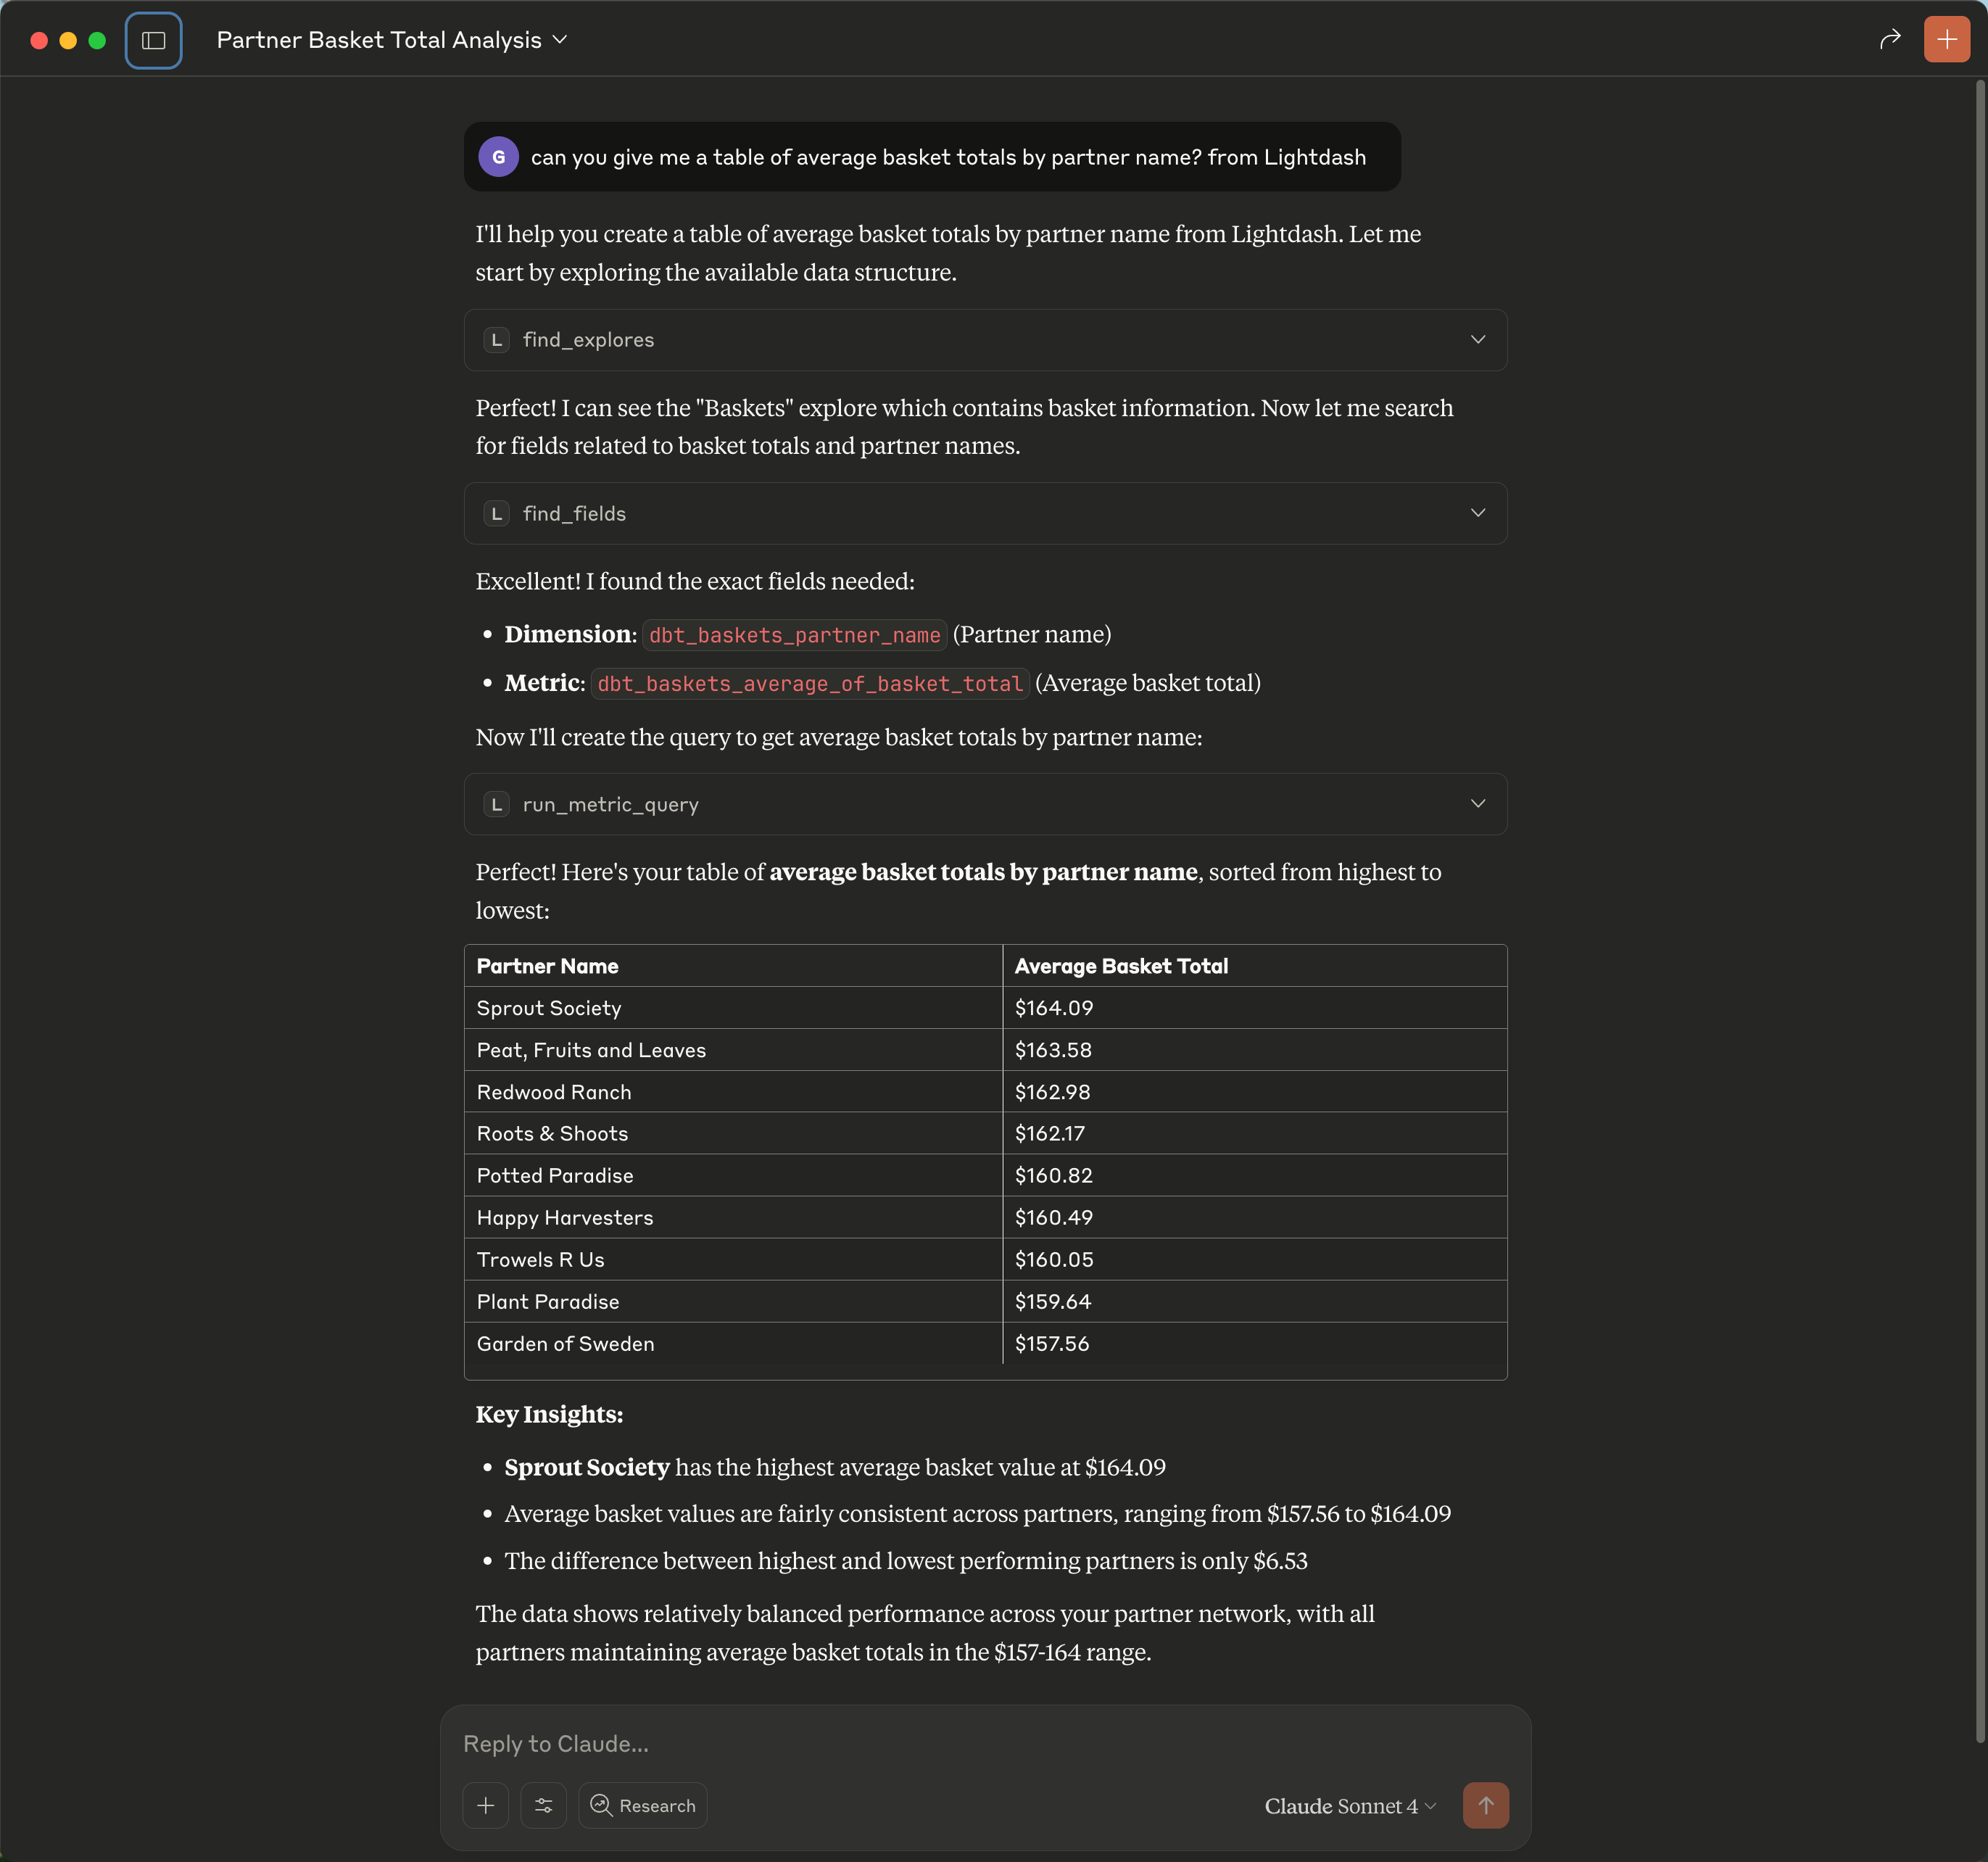
Once a project is active, you can explore data models and run queries using your semantic layer. Prompt: “What metrics do we have for orders? Show me total revenue by month for the last 6 months as a bar chart.” The assistant will:- Call
grep_fieldsto search for order-related metrics and dimensions (e.g.,orders_total_revenue,orders_order_date) - Call
run_metric_querywith the appropriate explore, metrics, dimensions, filters, and sort order to fetch the data and render a visualization
See screenshot
See screenshot
Using AI agent context
If your organization has Lightdash AI agents configured, you can reuse their configuration in your MCP sessions — so you get consistent guidance regardless of where you’re working. Organization admins enable these tools with Enable agents over MCP in Settings → MCP → General. While agent permissions are available to your organization, admins change this setting on Organization settings → Agents.How is this different from Lightdash AI agents?
Lightdash AI agents are a fully managed experience inside Lightdash and Slack. They handle everything end-to-end: interpreting your question, picking the right data, running queries, and presenting results. With MCP, you can use Lightdash data in other contexts, but the AI assistant driving an MCP session doesn’t have the same specialized tuning that Lightdash AI agents provide out of the box. Agent context via MCP bridges that gap: it brings your agents’ domain knowledge into any MCP session.What you get from agent context
When you activate an agent in your MCP session, your AI assistant receives:- Specialized content: only the data models relevant to that agent’s domain
- Verified answers: curated example queries that demonstrate correct usage of the data model
- Custom instructions: domain-specific rules like “Always filter orders by status = ‘completed‘“
Example workflow
- Choose your project —
get_contextlists the projects you can access - Let the router pick an agent with
route_agent— pass the user’s prompt and Lightdash returns the best-fit agent. Uselist_agentsonly when you want to inspect candidates or pick one manually. - Ask your questions — the AI assistant passes the agent’s
agentUuidto its tool calls, so the agent’s context guides queries
X-Lightdash-Agent header.
route_agent chooses between agents the user can already access — it never widens permissions. If only one agent is accessible, it activates that agent directly; if none are accessible, it returns an error so the assistant can fall back to the unscoped project context.
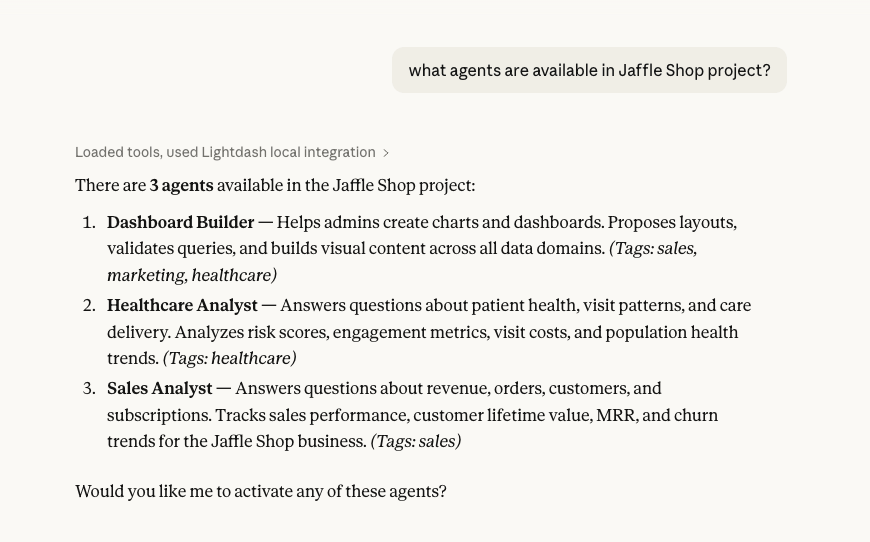
Prompt: “What AI agents are available?”
See screenshot: listing agents
See screenshot: listing agents
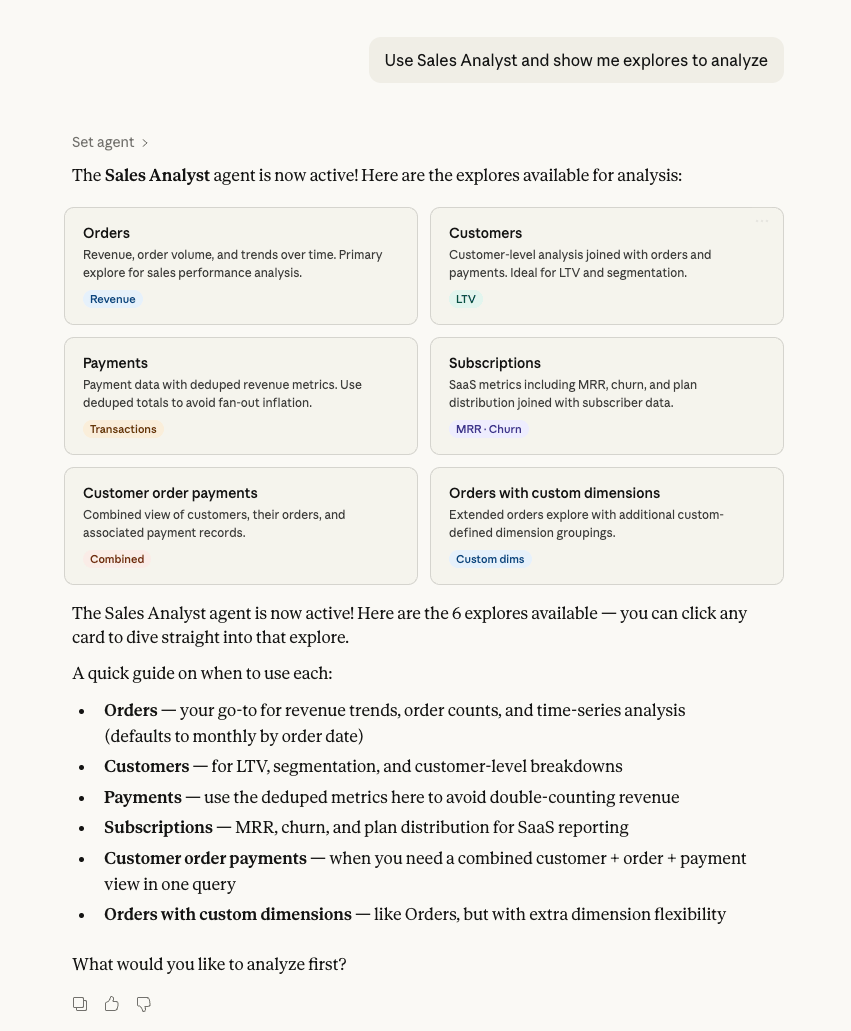
See screenshot: setting agent and viewing explores
See screenshot: setting agent and viewing explores
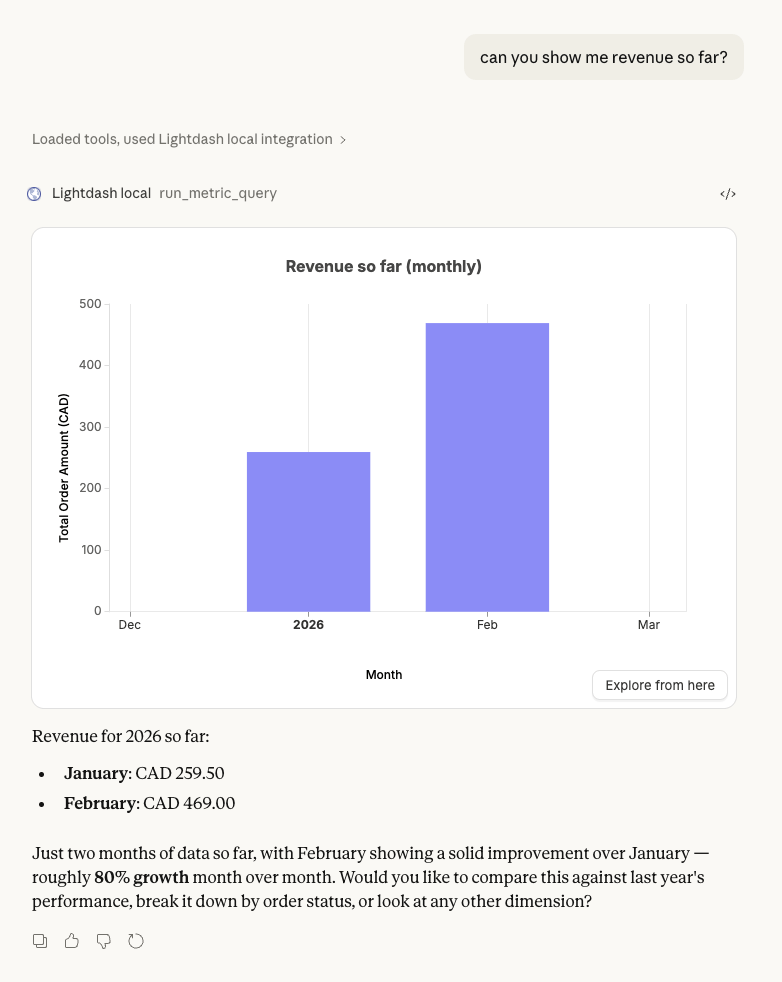
orders explore, include a monthly time dimension, and format values in CAD — all without you specifying these details, because the agent’s instructions guide the query.
See screenshot: querying with agent context
See screenshot: querying with agent context
Built-in prompt
The Lightdash MCP server includes a built-inlightdash-analyst prompt with guidelines for querying data effectively. MCP clients that support prompts can use this automatically, so you don’t need to configure custom instructions manually.
When an AI agent is active, the prompt automatically adapts to include the agent’s context.
Best practices
To get the most value from MCP, ensure your Lightdash data is well-organized and documented. See our Effective analytics with agents for detailed recommendations on:- Organizing and naming your data models
- Writing effective documentation and AI hints
- Optimizing for AI assistant performance
- Security and permissions considerations
Lightdash Docs MCP
In addition to the Lightdash data MCP above, we also offer a Docs MCP endpoint that gives AI coding agents access to the complete Lightdash documentation. This is free for everyone—including open source users and all cloud tiers.Benefits
The Docs MCP helps AI agents:- Understand Lightdash concepts, configuration, and best practices
- Generate accurate YAML configurations for metrics and dimensions
- Troubleshoot issues using official documentation
- Stay up-to-date with the latest Lightdash features
Setup
The Docs MCP endpoint is available athttps://docs.lightdash.com/mcp. Add it to your AI coding tool:
- Cursor
- Claude Code
- Windsurf
Add to your
.cursor/mcp.json:Availability
The Docs MCP is free for everyone:- Open source users
- Cloud Pro
- Cloud Enterprise
FAQ
Q: Does Lightdash MCP store my data or query results? A: No, Lightdash MCP does not store any query results, conversation responses, or data. MCP acts as a bridge that allows AI assistants to access your Lightdash metadata and execute queries in real-time. The MCP consumer (your AI assistant) is responsible for any data storage. Depending on which AI assistant you use, data might be shared with third parties according to their privacy policies. Q: Can multiple team members use MCP? A: Yes, each team member can set up their own MCP connection with their individual Lightdash credentials. Each connection respects that user’s specific permissions and access controls. Q: Can MCP modify my data or dashboards? A: MCP can create and edit Lightdash charts and dashboards via the content-as-code tools, can build custom chart types, and can create scheduled deliveries, when your user account has the required permissions. MCP cannot modify your underlying warehouse data — query execution is read-only (metric queries and SQLSELECT only). All write operations respect your existing Lightdash permissions and project access controls, and each write tool is only registered for users whose role grants the corresponding scope.
Q: Claude returns data as text but no visual chart is displayed. What’s wrong?
A: Claude uses the domain claudemcpcontent.com to render visual content from MCP connectors. If this domain is blocked by your corporate firewall, VPN, internet security tool, or a browser extension (like an ad blocker), Claude will fall back to text-only output. See Network requirements above for the full list of domains to allowlist.