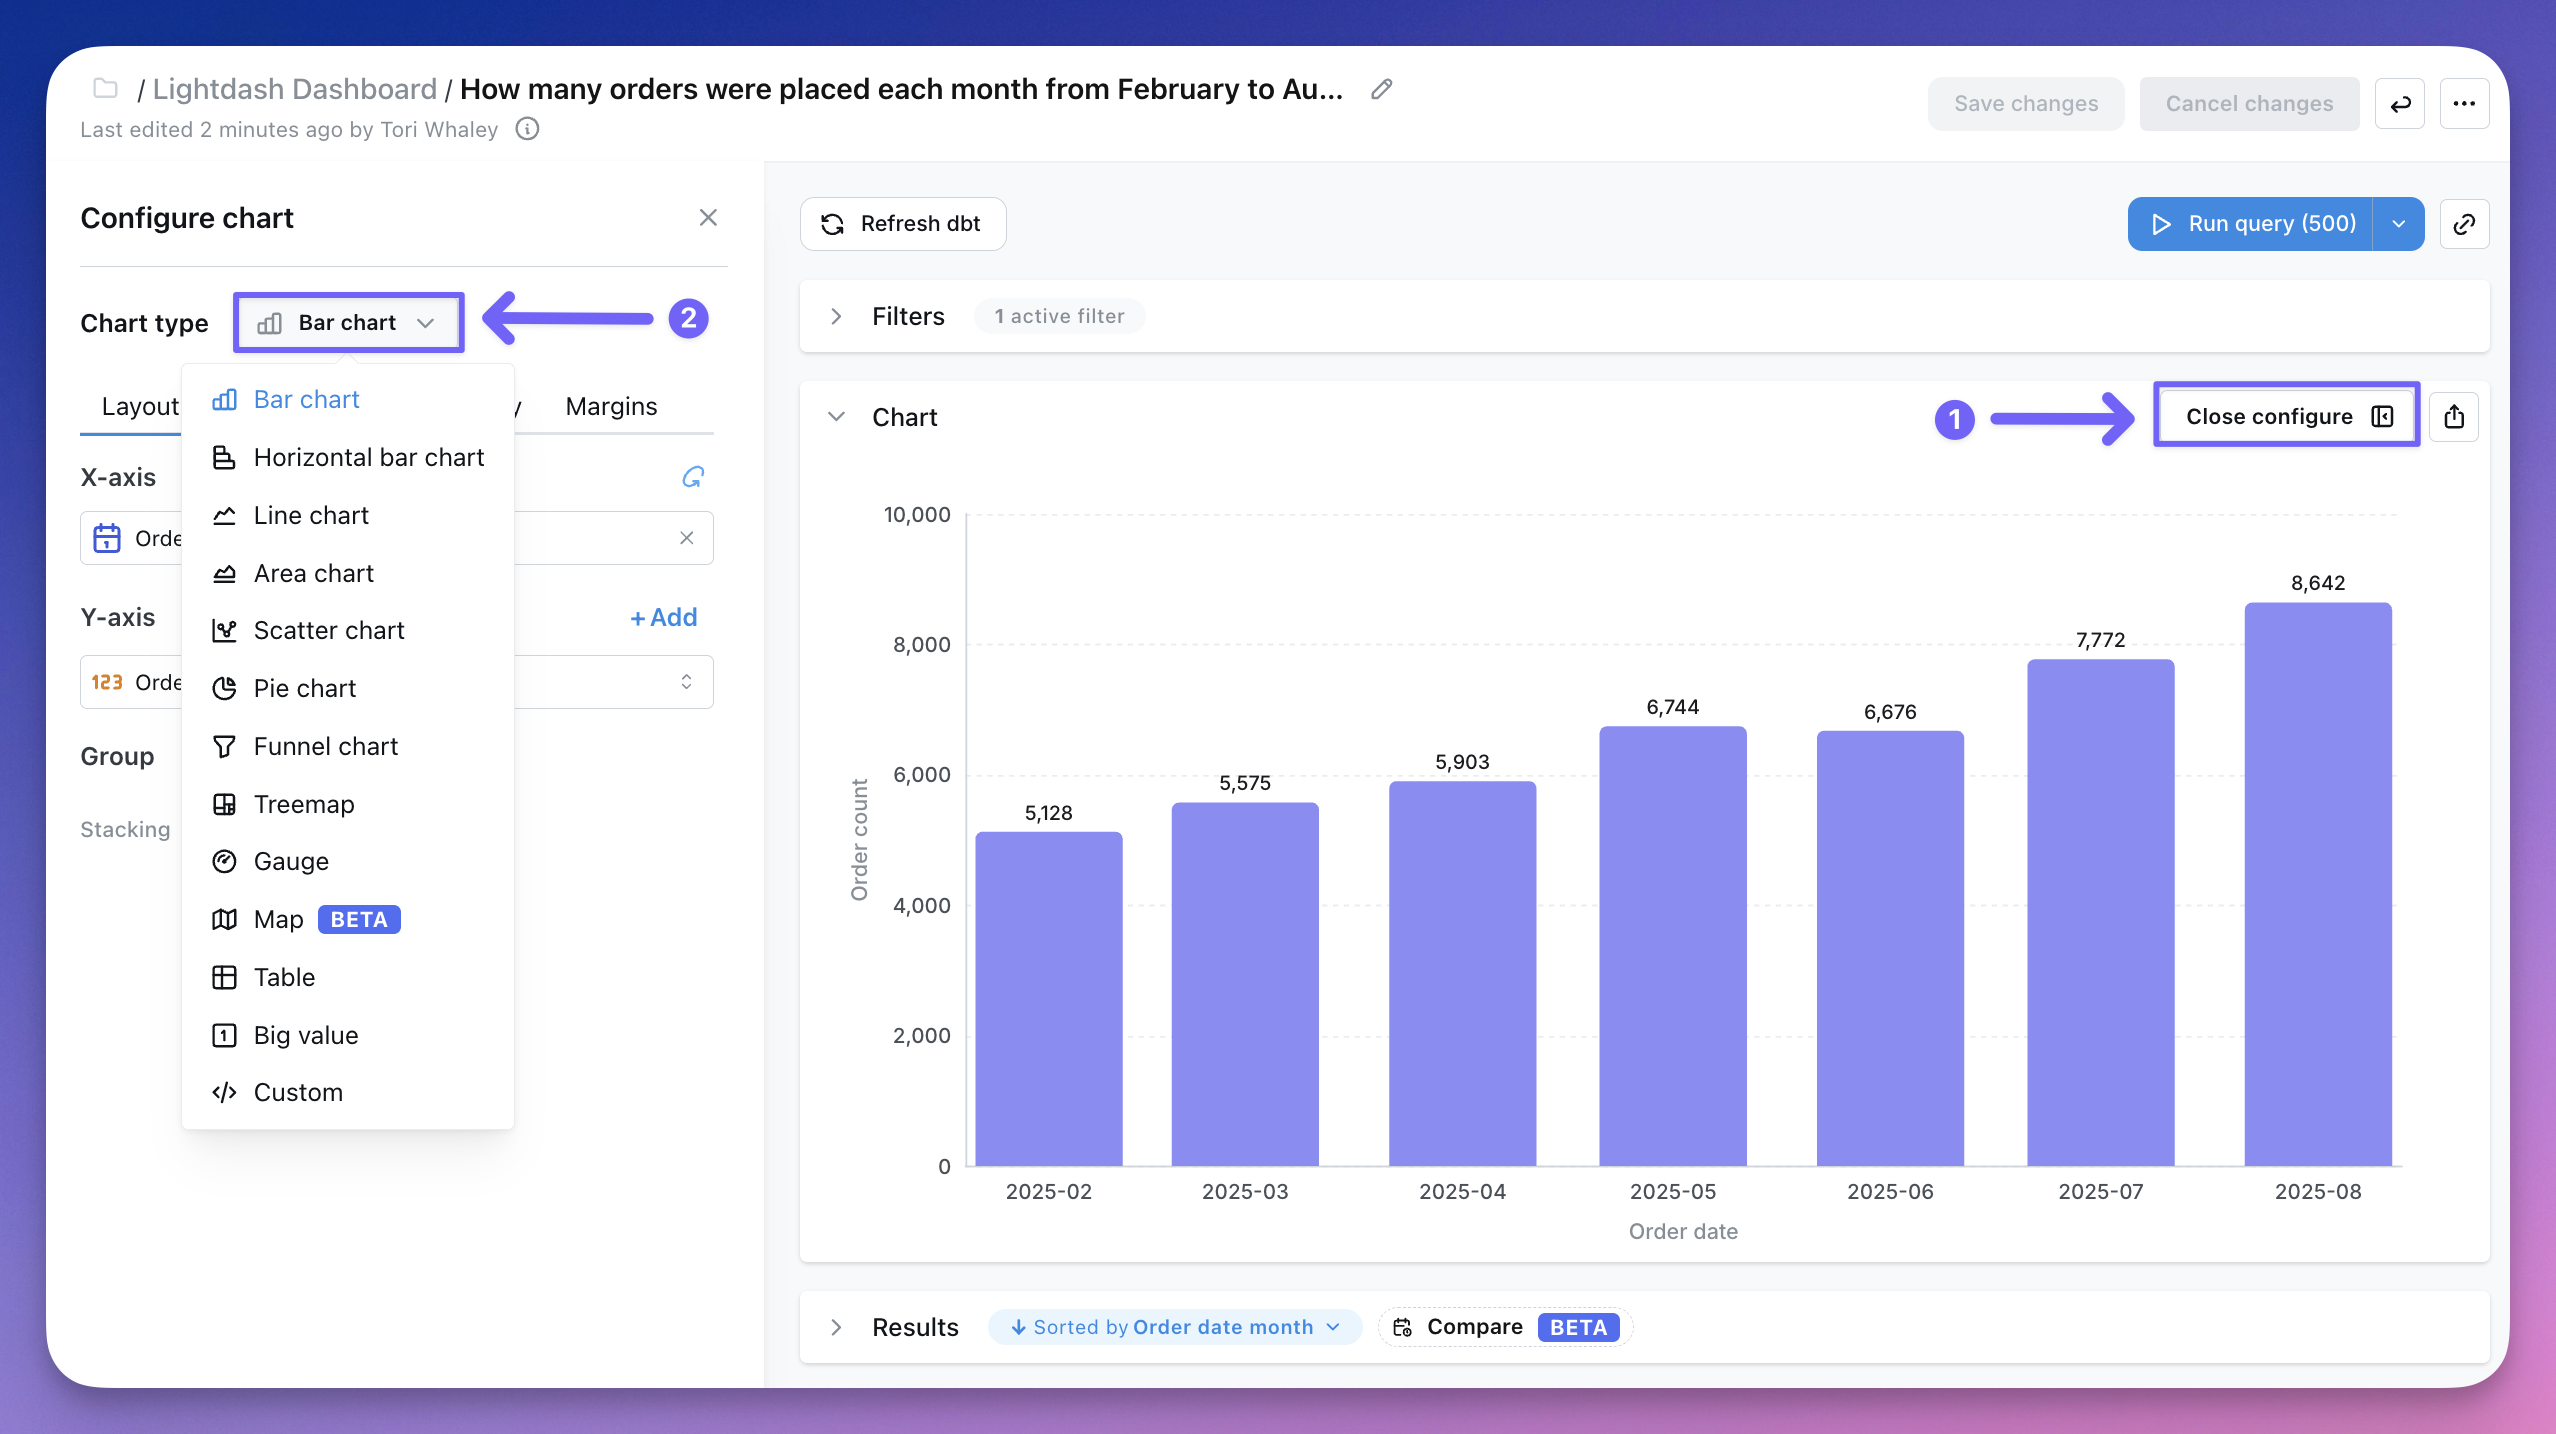
- Bar chart
- Horizontal bar chart
- Line chart
- Area chart
- Mixed chart
- Scatter chart
- Pie chart
- Funnel chart
- Treemap chart
- Table
- Big value
- Custom chart

Chart types and options
Bar chart

- compare things between different groups (e.g. the number of orders you have by product type)
- track how a number changes over time if you have a smaller number of x-axis values (e.g. number of new users per month over a year).
Stacked bar chart

- the focus of the chart is to compare the totals and one part of the totals. It’s hard to compare bars if they don’t start at the same baseline. So, if you’re trying to build a chart to compare multiple parts of your total with each other, consider keeping your bar chart unstacked!
- you’re trying to show the parts of multiple totals. If you only want to show parts of one total, consider an unstacked bar chart instead. If you only want to communicate one part of one total, consider if you should be using a big value chart instead.
100% Stacked Bar Chart

column_i_want_to_group_by
, then in your chart configuration choose your x-axis, group dimension, and the new table calculation as your y-axis.
100% Stacked Bar Charts are useful when you need to visualize how the composition of a metric changes over time, or how the composition changes across different groups.
Horizontal bar chart

- you’re trying to group a number by something with a lot of possible values.
- your groups have really long label names.
Line chart

- you have small changes between your values. The y-axis of a line chart doesn’t need to start at zero. This means that your y-axis can be stretched to show the tiny differences.
- you have lots of x-axis values. In this case, line charts are better to use than bar charts.

Area chart

- you want to show how values develop over time. If you want to show how values differ in different categories, consider a (stacked) bar, or horizontal bar chart instead.
- the total is as important as its parts. If the total (= the height of all your stacked areas) is not important, consider a line chart instead. Many readers will have an easier time understanding a line chart than an area chart.
- there are big differences between your values. If the differences between your values are very small, consider a line chart instead. Compared to an area chart, the y-axis of a line chart doesn’t need to start at zero. This means that your y-axis can be stretched to show the tiny differences.
- you’re showing multiple series over time. If you just want to show one value over time, also consider a line chart instead; especially if you don’t want your y-axis to start at zero. If you only have a few dates, you can also consider using a column chart. In both cases, labelling will be better.
- you have many data points. If you have less than ten or so data points, consider a stacked bar chart instead.
Mixed chart

series
tab of the Configure
space.

Scatter chart


Pie chart

donut
toggle to switch between a traditional pie and donut chart.
Funnel chart


Data orientation
switch to specify which orientation you would like to use.
When rows
is selected, each row of your data represent one step. The first column in the data will be treated as the labels for the steps, and you can choose which numeric column to treat as the value of the step.
When columns
is selected, you should have a numeric column for each step you want to display. Only the first row of data will be represented and the column names will be used as the step labels. Non-numeric columns will be ignored.
Treemap chart
Treemaps show parts of a whole using nested rectangles. Each rectangle’s size represents the value of a metric, and dimensions define how the data is grouped and nested. You can use a single dimension or multiple and they will work as described below. One dimension: Each category becomes a rectangle, sized by the metric value.


- You want to compare proportions across categories
- You’re visualizing hierarchical data
- Space is limited and you want a compact alternative to bar or pie charts
- Dimension hierarchy tells Lightdash how to group or nest the dimensions.
- Size metric determines how large each section of the treemap chart is.
- Color metric allows you to set a color scale for Highlighting each section of the treemap.
- Minimum section size determines when to start hiding sections, anything smaller than this size can be shown by zooming in.
- Max leaf depth allows you to choose when a user needs to start drilling into sections to see the next tier, default value is 2.
Table

- Renaming the columns in your table.
- Showing and hiding the columns in your table.
- Showing and hiding the table name from the column labels.
- Showing and hiding the totals for your columns.
- Pivoting by a column.
- Transposing your table (a.k.a. pivoting your metrics)
- Locking a column from scrolling in your table.
- Adding conditional formatting to your cells.
- Rows: When a field is chosen for the row area, all of the unique values for that field are populated as values in the rows of your table.
- Columns: When a field is chosen for the column area, all of the unique values for that field are populated as values in the columns of your table.
- Metrics: If you have metrics in your table, then each metric cell shows the summarized information for a given row + column combination.

Pivot tables
Pivot tables allow you to summarize larger sets of data in table visualizations by moving row values into columns. They’re also helpful to identify trends between two dimensions in your data using a table visualization. To add a pivot in your table, move a dimension to thecolumn
section of your table configuration. This will change the dimension from having its values populate the rows values of your table, to having it populate the column values of your table.

show metrics as rows
in the table configuration.

Totals
You can add column totals or row totals (in pivot tables) to your tables by selectingShow column totals
or Show row totals
in the chart configuration panel. The column totals in your results and table visualizations are calculated using the underlying data from your table, not only the values that are visible in the table.
Totals are not calculated for table calculations. Also, in pivot tables, totals are only shown for
count
and sum
metric types.Incorrect totals
Why are my totals lower? When using thecount_distinct
metric type, you can sometimes get totals that are smaller than if you sum up the values seen in the table.
For example, if you count the distinct number of devices that viewed pages on our website each month, it would look something like this:

Anonymous device count
column, the value you get is much higher than the total shown in the table. This is because the same device can view pages on our website across many months. So, when you add up the values in the table, you’ll be counting some devices more than once.
Lightdash uses a SQL query to calculate the distinct number of devices across all of the months so we avoid double-counting devices.
Why are my totals higher?
There are two reasons why this could be happening:
- You’ve set a row limit in your query that’s truncating the results. If the number of possible results from your query is larger than the row limit you’ve set, Lightdash will calculate the totals using all of the results (including the rows that have been removed from your table because of the limit).
- You’re using metric or table calculation filters. When you use metric or table calculation filters, the totals are calculated before the filters are applied.
This calculation isn’t a “true” total when you’re using metrics types that are
count_distinct
!Subtotals
You can add subtotals to your tables by selectingShow subtotals
in the chart configuration panel.

Freeze columns
If you have a wide table, you may want some columns to be locked to the left while you’re scrolling. Click on the lock icon beside the column(s) you want to keep pinned to the left of your table visualization to lock them in place.
Conditional formatting
Sometimes it’s helpful to highlight certain values in your tables when they meet a specific condition. You can set up conditional formatting rules by going to the Configure tab, then Conditional Formatting.
Highlighting cells
When you add a new rule, you’ll first need to pick which column should be highlighted and the type of rule you’d like to apply (Single or Range). There are three ways to compare data for each role:- Values compares the chosen field to manual input values.
- For example, color the
Profit
column red when a row is less than $10,000
- Field compares the chosen field to another field in your results.
- For example, color the
Revenue
column green when it is greater than theTarget revenue
column.
- Field values compares another field in your results to manual input values, then formats your chosen field.
- For example, color the
Partner name
column orange when theTotal orders
column is greater than 1,000.
Color ranges
To use color ranges for your rules, select Range under Conditional Formatting. You can choose specific minimum and maximum values, or you can automatically set them based on the values in your results.
Big value

- Selecting which field you want to use for your Big value.
- Updating the label below the Big value value.
- Adding a comparison to the previous row
- Show raw value or percentage change
- Show red or green for positive or negative change
- Label your comparison value
Configure your charts
Most chart types have very similar configuration options, so we put them all together below.Layout
This is where you can pick the columns from your results table that you want to plot on your x and y axes or that you want to group by. You can group by up to 3 fields in your chart. For bar charts, this is also where you have the option to stack your bars, or leave them unstacked (grouped).
Series
The series tab is where you can adjust how your chart shows each data series. A data series is a set of related data points plotted on a chart. For example, the number of new users created each day over a set of dates is a series. In a bar chart, a series is represented by bars of the same color; in a line chart, a series is represented by a single line. You can see a list of the series for your chart in the Series menu, and on the chart legend.
- Set the chart type for each series
- Change series labels or colors
- Put series on a left or right y-axis
- Show value labels or group totals on data points
- Hide a series from your chart
Axes
In this section you have options to:- Override the default text for your axes labels
- Adjust sort order of your x-axis
- Rotate x-axis labels
- Set the min and max axis values for your y-axes (or keep the default auto y-axis range)
- Show x-axis and y-axis grid lines

Display
This tab is where you’re able to control the legend, reference lines, and custom tooltips in your chart.Reference lines
You can add reference lines to your charts to easily visualize goals or thresholds.
+ Add
under Display -> Reference lines.
You have these options in the settings:
- Select a field you want to linke to your reference line (Page views in the image above)
- Set a static value (50,000 in the image above)
- Add a label (
Halfway to our goal!
in the image above) - Change the line color (green in the image above)
Most reference lines are static values, but you can also use these key words to plot a dynamic value:
min
, max
, median
, average
.That way your reference line will automatically update to the global min, max, median, or average of the field you selected. See image below for examples.
If your reference line label is cropped off your chart, try adjusting your right margin.
Legend
You can add and adjust the legend in your chart to help people understand what data’s been plotted.- Show or hide the legend
- Adjust the position of the legend on your chart
- The values in
position
are the coordinates of the legend on your chart. They can either be numbers or percent. We suggest using %. - If you want the position to be in the bottom right, you would set: Right = 0%, Bottom = 0%. For the legend to be in the middle of the chart, you’d set: Top = 50%, Left = 50%.
- The values in
- Set your legend to scroll (if you have so many groups that they overlap your chart)
- Orient the values in your legened to form a list vertically, or horizontally

Margins
The Margin tab is where you’re able to add or remove margin around the grid. Removing margin means that your chart will fill more of the space in the chart tab. Adding margin will shrink your chart into a smaller space. You can either add numbers (e.g. 50) or percent values (e.g. 50%) to the margin settings listed. The default margin is set totop
= 70, bottom
= 30, left
= 5%, right
= 5%
