Cloud Enterprise
Custom roles are only available on Lightdash Enterprise plans.For more information on our plans, visit our pricing page.
Overview
Lightdash provides two types of roles:- System roles: Pre-defined roles (like Admin, Developer, Viewer) with a standard set of scopes. For more information about what these roles can do, check our default system roles permission matrix.
- Custom roles: User-defined roles where you can select specific scopes to match your exact requirements
How additive permissions work
Custom roles operate at the project level and can only grant additional permissions on top of what the user’s organization role already provides. They cannot restrict or override org-level permissions. For example, Organization Editors, Developers, and Interactive Viewers all have the “Manage Google Sheets” permission by default. If you create a custom project role with “Manage Google Sheets” toggled off, users with any of those org roles will still be able to export to Google Sheets because the permission comes from their org-level assignment.Restricting permissions with custom roles
To use custom roles to restrict what users can do in a specific project, you need to start from a lower org-level role:- Downgrade users to Organization Viewer or Organization Member. Neither of these roles includes permissions like Google Sheets export, explore access, or scheduled deliveries.
- Create a custom project role with only the specific permissions you want to grant (e.g., explore data, view dashboards, schedule Slack/email deliveries).
- Assign the custom role to those users or groups at the project level.
Creating Custom Roles
Access Custom Roles Settings
- Navigate to Settings → General Settings → Custom Roles
- You’ll see a list of existing custom roles in your organization
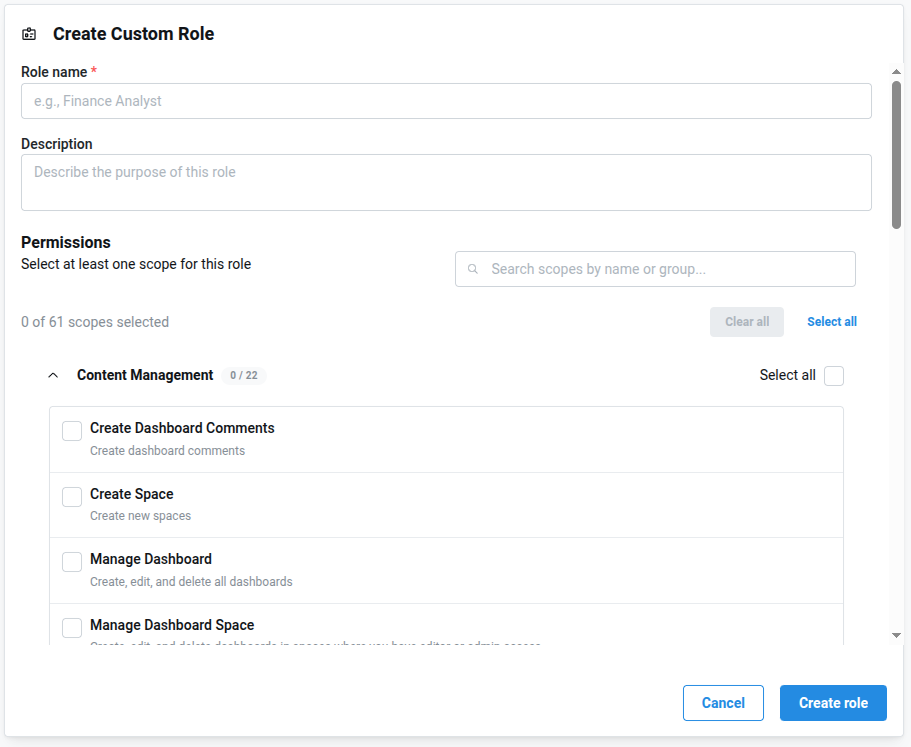
Create a New Role from Scratch
- Click Create New Role
- Enter a Role Name (e.g., “Marketing Analyst”, “Finance Viewer”)
- Add an optional Description to explain the role’s purpose
- Select the specific scopes (permissions) you want to include:
- View permissions: Allow users to see content (dashboards, charts, spaces)
- Create permissions: Allow users to create new content
- Manage permissions: Allow users to edit, delete, or administer content
- Click Save to create the role
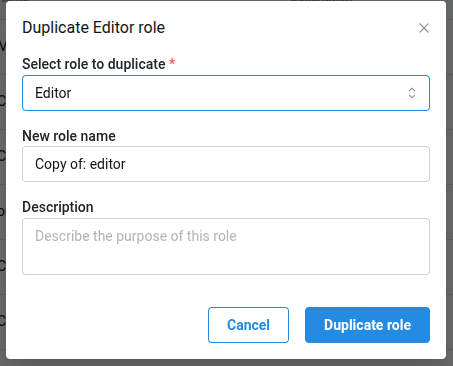
Duplicate an Existing Role
If you want to create a role similar to an existing one:- Find the role you want to duplicate (system role or custom role)
- Click the ⋯ menu next to the role
- Select Duplicate Role
- Enter a new name for the duplicated role
- Modify the scopes as needed
- Click Save
Assigning Custom Roles
Custom roles are assigned at the project level to provide granular access control:Assign to Users
- Go to Project Settings → Access
- Find the user you want to assign a role to
- Select the custom role from the dropdown
- The user will now have the permissions defined in that custom role for this project
Assign to Groups
- Go to Project Settings → Access
- Find the group you want to assign a role to
- Select the custom role from the dropdown
- All members of the group will inherit the custom role permissions for this project
Scope reference
Content-as-code scopes
Three scopes control access to content as code, the CLI workflow for managing charts and dashboards as YAML files. They form a read → write → narrow-write ladder. Download content as code (view:ContentAsCode) lets a user pull existing charts and dashboards as YAML via lightdash download. It does not allow pushing changes back. This is the common “let people pull templates” grant.
Upload content as code to own previews (manage:ContentAsCode@self) is a narrow upload right: users can run lightdash upload only against preview projects they created themselves. This is the intended day-to-day scope for non-Developer users in CI/CD-style workflows where they need to validate their own preview but shouldn’t push to shared projects. Pair it with view:ContentAsCode so they can still pull from shared projects.
Download and upload content as code (manage:ContentAsCode) grants both download and upload across any project the role applies to. Users with this scope can run lightdash upload to overwrite charts and dashboards in the project. This implies view:ContentAsCode and the @self upload right.
Use download-only to let a user pull production YAML for local development, diffing, or inspection without giving them the ability to overwrite production content. Combine with a controlled promotion path (e.g., CI/CD running with a service account that holds the manage scope) so writes only land via the pipeline.
Restrict developers to preview uploads (agentic development workflow)
A common pattern for agentic development of dashboards and content as code is to let developers iterate freely on their own preview projects while preventing directlightdash upload to production. Promotion to production then happens through a reviewed CI/CD pipeline instead of an individual’s CLI, or through promoting content in the UI.
To set this up:
- Clone the built-in Developer role to create a custom role (for example,
Developer (no prod upload)). - Remove the Download and upload content as code (
manage:ContentAsCode) scope from the cloned role. - Add the Download content as code (
view:ContentAsCode) and Upload content as code to own previews (manage:ContentAsCode@self) scopes. - Assign the custom role to the user at the project level on the production project.
- Run
lightdash downloadagainst the production project to pull YAML for local editing. - Run
lightdash previewandlightdash uploadagainst their own preview projects to validate changes. - Receive a
403when attemptinglightdash uploadagainst the production project — production writes must go through the promotion pipeline.
Preview-edit scopes
Four@self scopes let a user edit content only inside preview projects they created themselves, without granting any edit rights in production:
- Manage dashboards in own previews (
manage:Dashboard@self) - Manage saved charts in own previews (
manage:SavedChart@self) - Manage spaces in own previews (
manage:Space@self) - Explore and query data in own previews (
manage:Explore@self)
- The user is view-only in the production project.
- They create a preview project from production — content and access are copied across.
- Inside their own preview they can freely create, edit, and delete dashboards, charts, and spaces, and use the Explorer to build new charts.
- A reviewer with the appropriate rights promotes the changes back to production.
@self modifier, granting manage:Dashboard (or the chart/space/explore equivalents) would also grant those rights in the production project. With @self, the rule only takes effect when both conditions hold:
- The project is a preview project.
- The current user is the user who created that preview.
These scopes still respect space access. A
manage:Dashboard@self or manage:SavedChart@self grant only applies inside spaces the user can already see (public spaces, or private spaces they’re a member of). manage:Space@self lets the user create new spaces and manage spaces they can see, but does not expose private spaces they weren’t a member of in production. manage:Explore@self is project-wide inside the preview, matching how Explore works elsewhere.Let view-only users build in their own previews
To set up the “view-only in production, edit freely in own preview” workflow:- Downgrade the user’s org role to Viewer, Interactive Viewer, or Member so production rights come from the project-level role.
- Create a custom role (for example,
Preview Builder) with:- The view scopes the user needs in production (e.g.
view:Dashboard,view:SavedChart,view:Space,view:Project). create:Projectso they can create preview projects.- All four preview-edit scopes:
manage:Dashboard@self,manage:SavedChart@self,manage:Space@self,manage:Explore@self.
- The view scopes the user needs in production (e.g.
- Assign the custom role to the user at the production project level.
SQL-related scopes
Three scopes control different SQL-authoring features. They are independent — granting one does not grant the others. Manage Sql Runner controls access to the SQL Runner, which lets users write and run ad-hoc SQL queries directly against your data warehouse. It also controls the ability to create virtual views and write back dbt models from SQL Runner queries. Manage Custom Sql (description: Save SQL charts) controls the ability to save the output of a SQL Runner query as a saved chart. Users with this scope can save SQL charts; without it, they can still run queries in SQL Runner but cannot persist the output. This scope does not grant access to custom SQL dimensions in Explore. Manage Custom Fields (description: Create and edit custom dimensions) controls the ability to create and edit custom SQL dimensions inside the Explore view. Custom SQL dimensions let users add calculated fields to an existing table using raw SQL. This scope does not grant access to the SQL Runner.Troubleshooting
Custom role doesn’t restrict a permission (e.g., Google Sheets export)
Custom roles can only add permissions—they cannot remove permissions granted by the user’s organization role. If you toggled off a scope in a custom role but the user still has access, their org role is granting that permission. To fix this: Downgrade the user’s org role to Viewer or Member, then use a custom project role to grant only the specific permissions they need. See Restricting permissions with custom roles above.Users can’t see expected content
- Verify the custom role includes the necessary view scopes
- Check that the role is assigned at the project level where the content exists
- Remember that organization-level permissions may override custom role limitations
Role Changes Not Taking Effect
- Users may need to refresh the page for role changes to take effect
- Verify the role was saved successfully and assigned to the correct users/groups
Managing Existing Custom Roles
Edit a Custom Role
- Go to Settings → General Settings → Custom Roles
- Click on the role you want to edit
- Modify the name, description, or scopes
- Click Save - changes will apply to all users and groups assigned this role
Delete a Custom Role
- First, ensure no users or groups are assigned this role
- Go to Settings → General Settings → Custom Roles
- Click the trash icon next to the role
- Confirm the deletion
Deleting Roles: Once deleted, a custom role cannot be recovered. You can’t remove a role that is currently assinged to users or groups.