

- Sales region
- Department
- Can view PII
- Can view financial data
- Define the user attribute, users can only have user attributes that are explicitly created by admins
- Set the user attribute value per user.
Managing user attributes
Creating user attributes
User attributes can be created by navigating to Organization Settings > User Attributes and clicking on theAdd attribute button. This will create a new user attribute but it will not be assigned to any user.Assigning user attributes to users and groups
User attributes can be assigned to users or groups by navigating to Organization Settings > User Attributes and clicking on the user attribute you’d like to assign. Select a user by email address, or a group by group name and set their value. Each user, group, and default supports multiple values. When you reference the attribute in SQL orrequired_attributes / any_attributes, Lightdash treats all assigned values as a set — see How user and group attribute values interact.
Setting a default value for your user attribute
You can add one or more default values that will be applied to all users who don’t have their own value defined in this user attribute.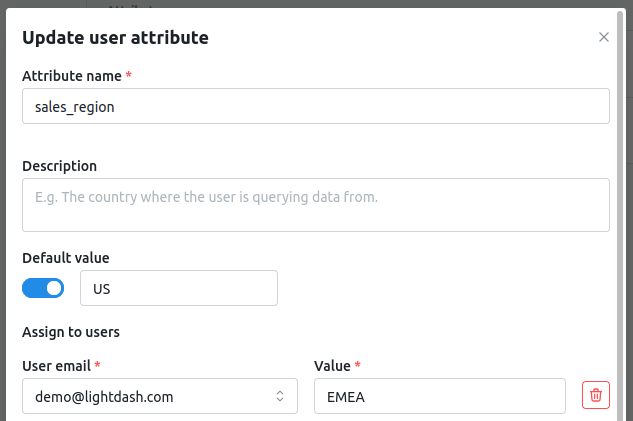
Using user attributes in Lightdash
There are several places in Lightdash where you can customise behaviour based on user attributes.Where can I reference user attributes?
User attributes can be used in these specific contexts within the model.yaml file:sql_filter:- For row filtering at the model levelrequired_attributes:- For table, column, and metric access control (AND logic - all conditions must match)any_attributes:- For table, column, and metric access control (OR logic - at least one condition must match)sql_on:- For filtering joins
- Chart and dashboard filter values - Filter charts and dashboards dynamically based on the logged-in user
User attributes cannot currently be referenced inside
sql: tags within the model YAML files.${lightdash.attributes.my_attr_1}- a user attribute calledmy_attr_1- (optional)
ldas an alias forlightdash - (optional)
attributeorattras an alias forattributes
- (optional)
${lightdash.user.<intrinsic_attribute>}- reference anintrinsic_attributeof the current Lightdash user- (optional)
ldas an alias forlightdash - available intrinsic user attributes:
email
- (optional)
The user email attribute is only available when the email is verified.This is a security measure to prevent users from creating/updating an account with any email they don’t own and gain access to data they shouldn’t see.If the user email is not verified you will get the following error:
Using user attributes in chart and dashboard filter values
You can reference user attributes directly in chart and dashboard filter values to create dynamic filters based on the logged-in user. This is useful for creating charts and dashboards that automatically filter to show only data relevant to the current user. To use a user attribute in a filter value, enter one of the following references:${lightdash.user.email}- The logged-in user’s email address${lightdash.attribute.<attribute_name>}- A custom user attribute value
sales_rep_email is equal to ${lightdash.user.email}. When the chart runs, the filter value will be replaced with the actual email of the logged-in user.
The same references work on dashboard filters, so a single dashboard can be shared with many users and each will only see the rows relevant to them.
If a referenced attribute is not set for the current user, the query returns a Forbidden error.
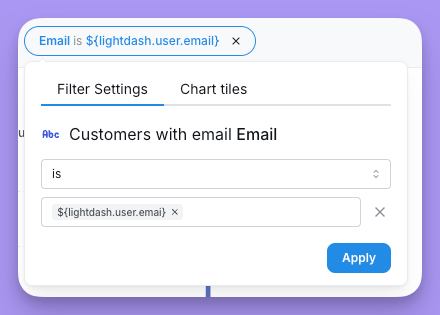
${lightdash.attribute.country} to filter data based on a user’s assigned region or department.
Row filtering with sql_filter
Row-level security (RLS) in Lightdash is implemented using the sql_filter property combined with user attributes. This allows you to restrict which rows each user can see based on their attributes.
To reference a user attribute in your sql, use the special lightdash reference${lightdash.attributes.<attribute_name> }. You should use the IN operator since the attribute might have multiple values.
For example, if you have a user attribute called sales_region you can use it in your sql like this:
Column filtering with required_attributes
You can use user attributes to limit some dimensions to some users.
Users without access to this dimension will not see it, or the metrics defined under that column unless those metrics set their own attributes. Model-level metrics that reference the column are not hidden — see metric access control.
is_admin attribute true can use the salary dimension on user table.
Forbidden error. Metrics defined under this column’s metrics are hidden and blocked the same way, unless they set their own attributes.
You can add multiple attributes for a single dimension. There are two ways to do this:
Multiple attributes joined with AND.In the example below, only users withis_admin: "true" AND team_name: "HR"have access to thesalarydimension in Lightdash.
Multiple attribute values joined with OR.In the example below, users withteam_name = 'HR' OR team_name = 'C-Suite'have access to thesalarydimension in Lightdash.
Column filtering using
required_attributes does not take into account intrinsic attributes of a user - email.Metric access control
Metrics acceptrequired_attributes and any_attributes, with the same AND and OR logic as dimensions. Where a metric is defined changes what it inherits:
- Model-level metrics, defined under the model’s
metrics, use only their ownrequired_attributesandany_attributes. They inherit nothing from the columns they reference: a model-level metric whosesqlreads a restricted column stays visible unless you set attributes on the metric or the table. - Column-level metrics, defined under a column’s
metrics, inherit therequired_attributesandany_attributesof that column’s dimension. Setting either key on the metric replaces the inherited value for that key; the other key is still inherited.
is_finance: "true" can see the salary column, total_salary, and payroll_per_head. average_salary replaces the inherited rule, so any user with role set to finance or manager can see it.
Column filtering with any_attributes
While required_attributes uses AND logic (all conditions must match), any_attributes uses OR logic — a user only needs to match at least one of the conditions to access the dimension.
In the example below, users with department = "sales" OR department = "finance" OR role = "analyst" can see the revenue dimension.
any_attributes is a separate condition. The user needs to satisfy any one of them. Array values on a single key (like ["sales", "finance"]) mean any of those values is accepted for that key.
Combining required_attributes and any_attributes
You can use both required_attributes and any_attributes together. When both are set, both checks must pass:
- All conditions in
required_attributesmust match (AND) - At least one condition in
any_attributesmust match (OR)
access_level = "2" AND (department = "sales" OR department = "finance").
Column filtering using
any_attributes does not take into account intrinsic attributes of a user - email.Table filtering with required_attributes
You can use user attributes to limit some tables to some users.
In the example below, only users with is_admin attribute true can use the payments table. Users without access to this table will not see it on the tables page or the explore page when joined to other tables.
Table filtering using
required_attributes does not take into account intrinsic attributes of a user - email.Table filtering with any_attributes
You can also use any_attributes at the table level with OR logic. In the example below, users with department = "sales" OR department = "finance" OR role = "analyst" can access the payments table.
required_attributes and any_attributes on the same table. Both checks must pass — see combining required and any attributes for details.
Table filtering using
any_attributes does not take into account intrinsic attributes of a user - email.Filtering joins with sql_on
If you’re joining a table, you can also customise the rows that are returned
You can use user attributes to filter the rows returned by a join. This is useful if you want to restrict the data returned from the joined table. To reference a user attribute in your sql, use the special lightdash reference${ lightdash.attributes.<attribute_name> }. For example, if you have a user attribute called sales_region you can use it in your sql like this:
Current limitations
User attributes are enforced by the semantic layer, so they apply to every query built from an explore: Explore, charts and dashboards, and AI agents answering in their default (semantic) mode. Anything that runs raw SQL against the warehouse runs outside the semantic layer, andsql_filter, required_attributes and any_attributes do not apply to it:
- The SQL Runner
- SQL mode in an AI agent conversation
- The Run SQL tool of the Lightdash MCP server
- Hand-written SQL inside a semantic query: custom SQL dimensions, custom SQL metrics, and SQL table calculations. They’re pasted into the query as written, which is why authoring them needs
manage:CustomFieldsormanage:CustomSqlTableCalculations.
manage:SqlRunner for the first three, manage:CustomFields or manage:CustomSqlTableCalculations for the last. A user without those cannot run raw SQL from any of them, whatever an agent’s instructions say. If someone needs raw SQL and warehouse-enforced permissions at the same time, require personal warehouse credentials on the project so their queries run as their own warehouse user, and put the restrictions in the warehouse.
Scheduler deliveries will run against the user who created the scheduled delivery, be careful when sharing required attributes with other users.
Demo: filtering a chart based on user attributes
The following video gives you a full demo for how to use user attributes to filter chart results.How user and group attribute values interact
Users can be assigned attributes, but you can also assign groups attributes. So, if a user is assigned an attribute value, but they’re also part of a group that’s been assigned a value for the same attribute, what happens?Column filtering
If the required attributes match any of the user’s group or user attribute values, then the user has access to the column. For example, if a user is part of a group with the attribute valuekiwi, another group with the attribute value orange, and they’ve also been assigned as a user to the attribute value coconut.
tropical_fruits_column will be visible to them because coconut is listed in their attribute values ['kiwi','orange', 'coconut'].
Row filtering
The template reference will be replaced by an array of the user’s group or user attribute values. Let’s walk through an example:${lightdash.attributes.fruit} will be replaced with 'kiwi','orange','coconut'. The final SQL will be my_model.fruit IN ('kiwi','orange','coconut)