

SCIM Integration is only available on Lightdash Enterprise plans.For more information on our plans, visit our pricing page.
Summary
SCIM (System for Cross-domain Identity Management) is an open standard protocol for automating user provisioning. Lightdash supports any identity provider (IdP) that implements the SCIM 2.0 standard, including Azure, Okta, OneLogin, and others. This document describes the steps required to integrate SCIM into your Enterprise instance, allowing your IdP to manage users and groups within your organization. If you are self-hosting Lightdash, see SCIM self-hosting for the environment variables to set, including the requiredAUTH_ENABLE_OIDC_TO_EMAIL_LINKING companion when combining SCIM with SSO.
SCIM Setup within Lightdash
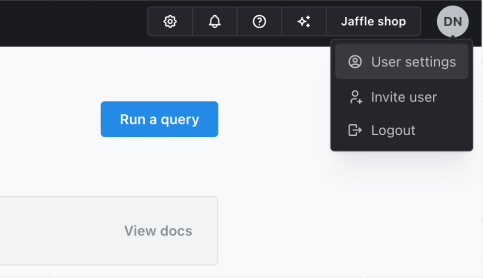
- Sign into your Lightdash instance, click your initials at the top-right, and select User Settings.
- In the sidebar, select SCIM Access Tokens.
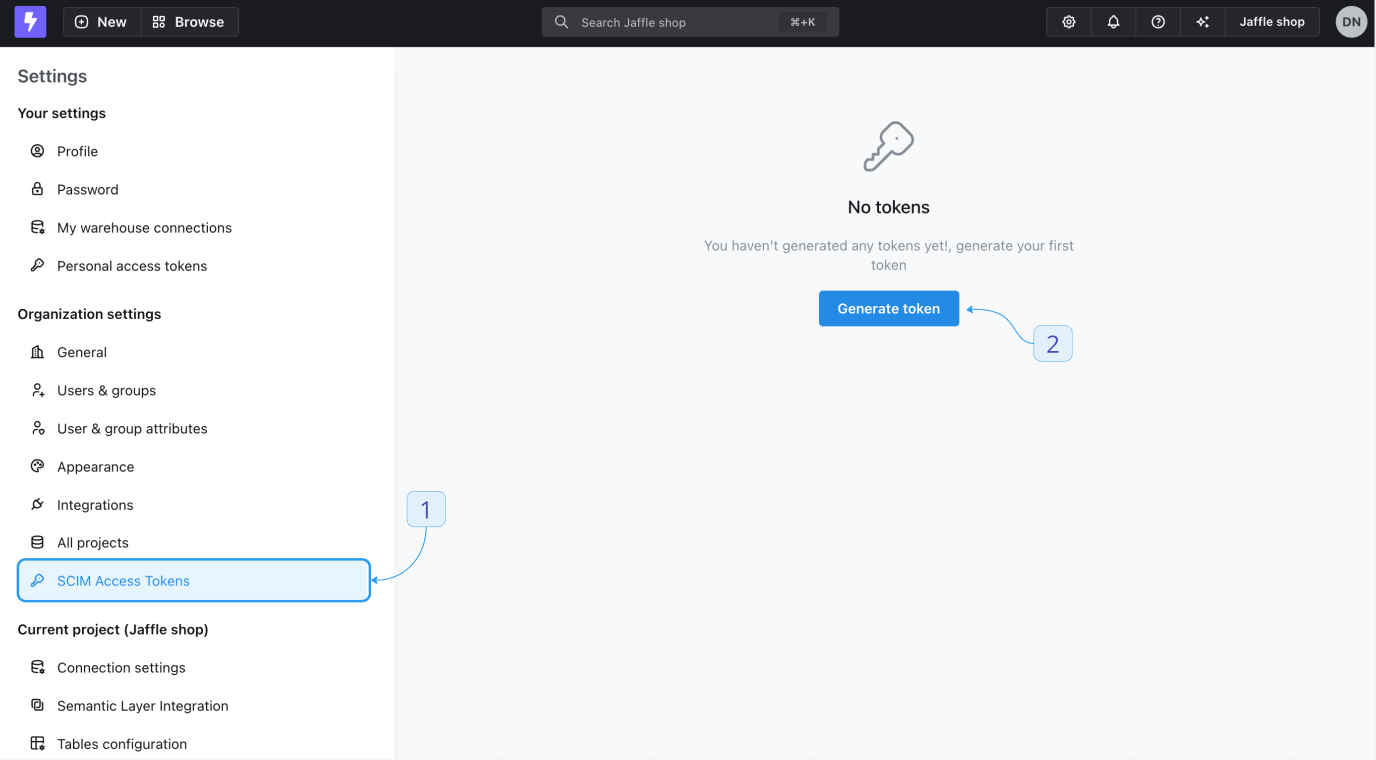
- Click Generate new token.
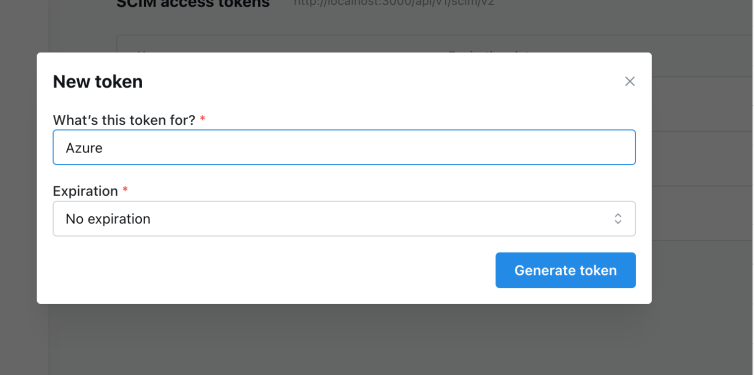
- Give it a name and an optional expiration date.
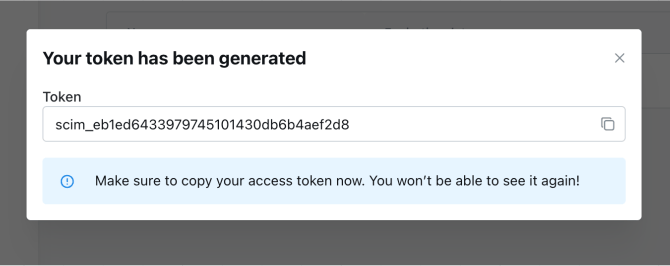
- Once generated, copy and save it in a safe place, as it cannot be viewed again once the modal is closed.
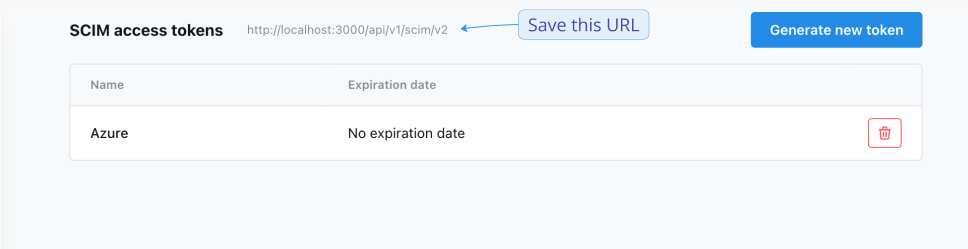
- Note: Now you will also be able to see your SCIM URL at the top of the page. You will need this when connecting an external SCIM service, such as Okta or Azure.
Integration guides
Okta
Okta
You’ll need administrative permissions to configure SCIM for your organization
Step 1 - Add or Create Application in Okta
You can skip this step if you have Okta SSO already configured. An application will already be present.
- Visit your Okta account and sign in.
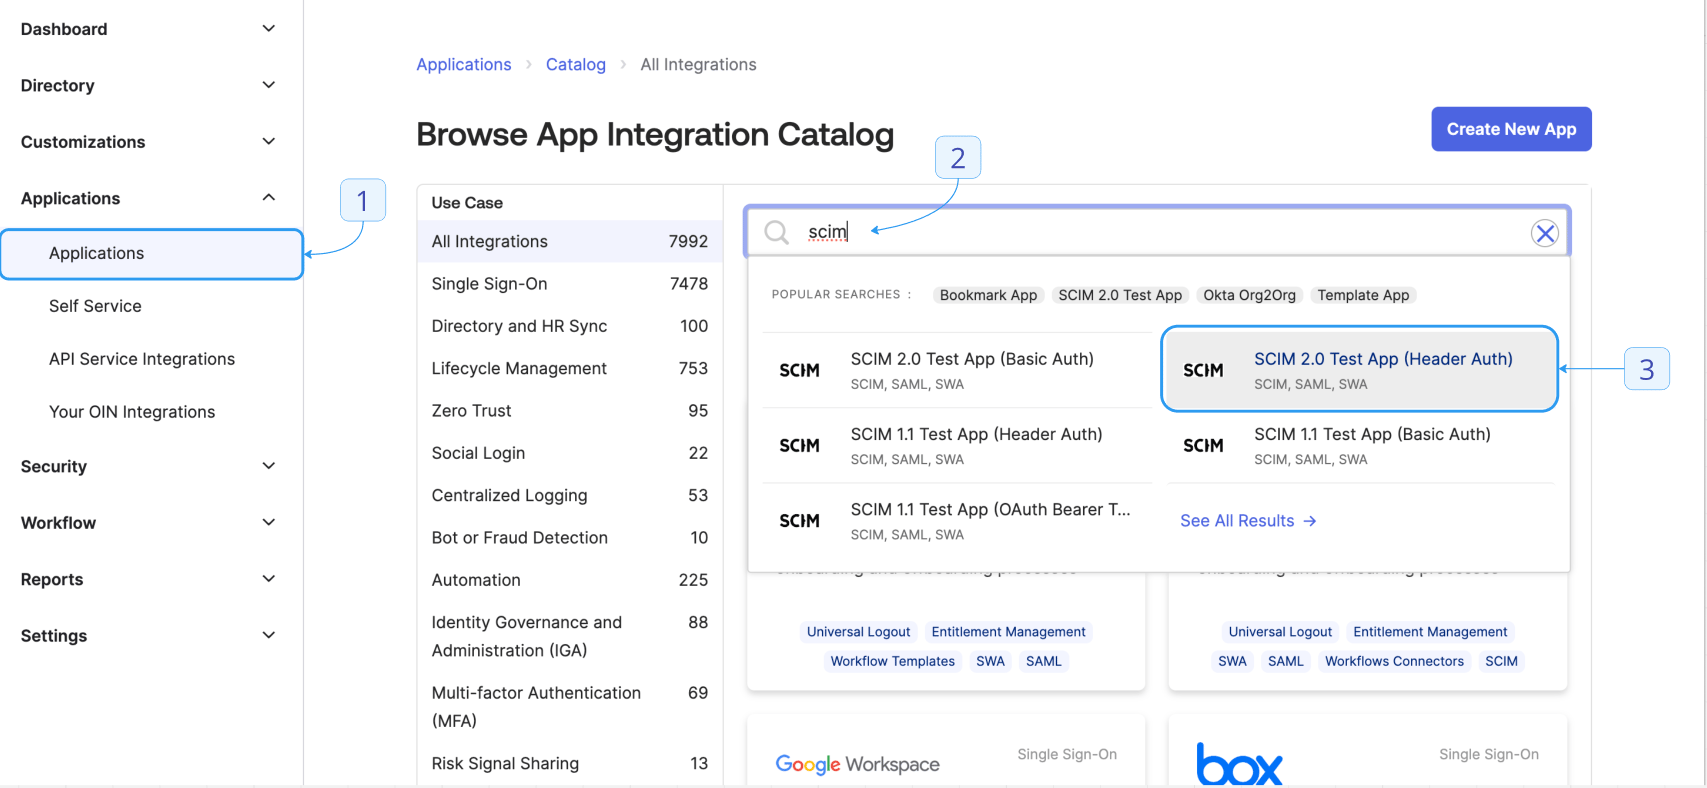
- In the sidebar, click Applications > Browse App Catalog.
- Search for “SCIM” and select SCIM 2.0 Test App (Header Auth).
- Click + Add Integration.
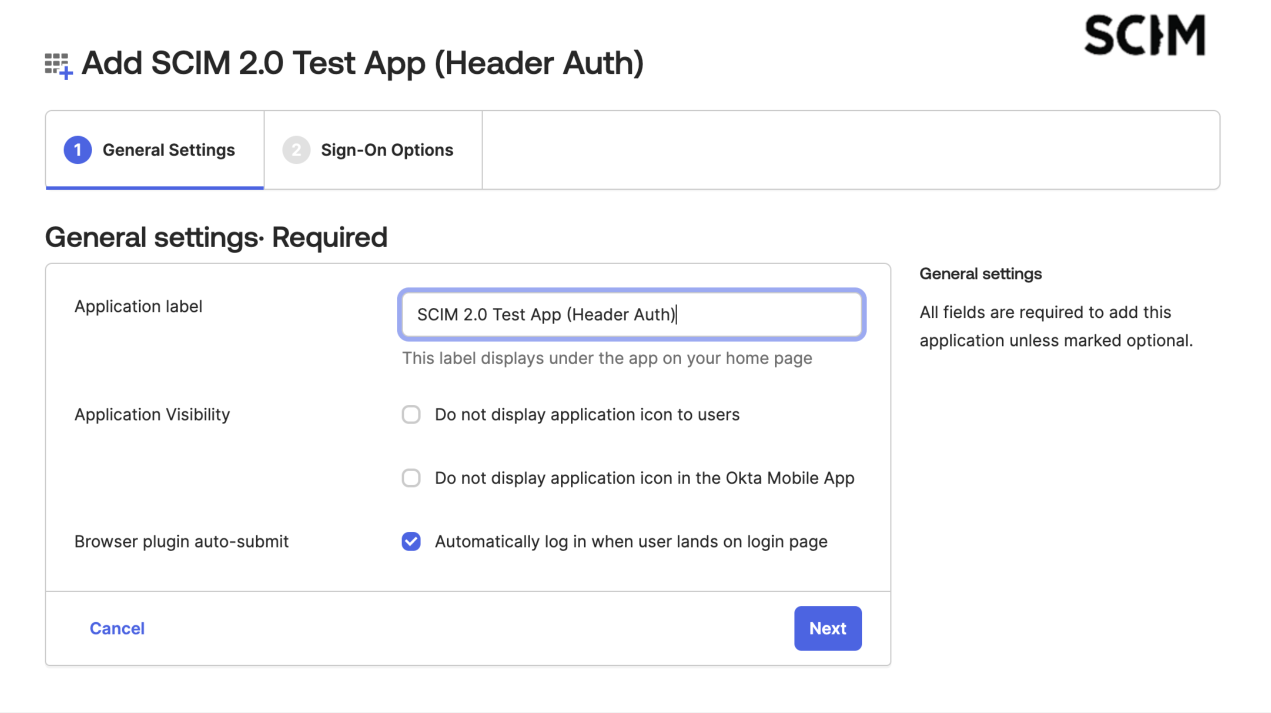
- Give it a friendly name and click Next.
- Change Application username format to email.
- Save your configuration by clicking Done.
Step 2 - Connect SCIM to Lightdash from Okta
- In the sidebar, click Applications > Applications.
- Select your application and go to the Provisioning tab.
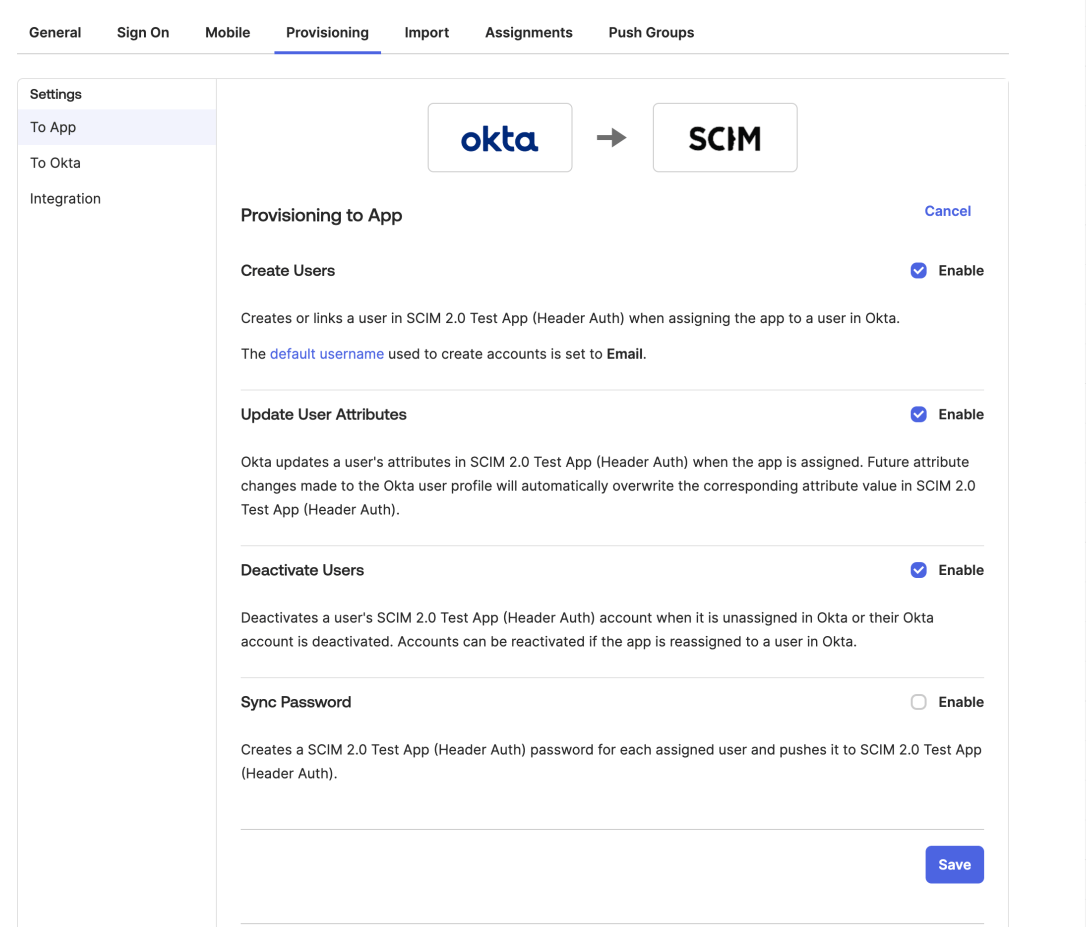
- Select Configure API Integration.
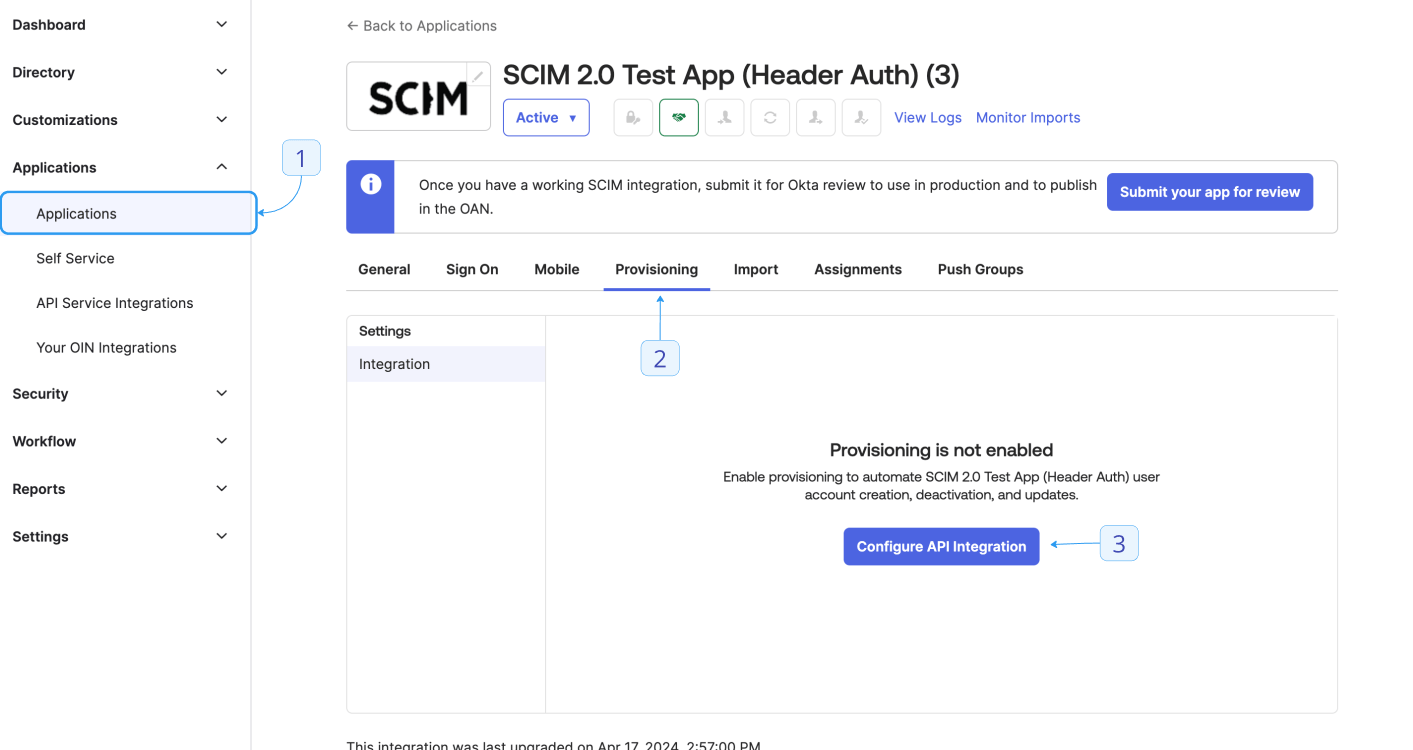
- Check the Enable API integration checkbox.
- Fill in the following fields:
- Base URL:
https://YOUR_APP_URL/api/v1/scim/v2/ - API Token:
Bearer YOUR_SCIM_TOKEN(See SCIM Setup within Lightdash above for generating a token)
- Save your configuration.
- More options should be available. In Provisioning > To App, select Edit.
- Enable Create Users.
- Enable Update User Attributes.
- Enable Deactivate Users.
- Click Save.
- Test the integration by clicking Assignments. Select Assign > Assign to people. Choose a user and click Assign > Save and Go Back. This user should be created in your Lightdash instance.
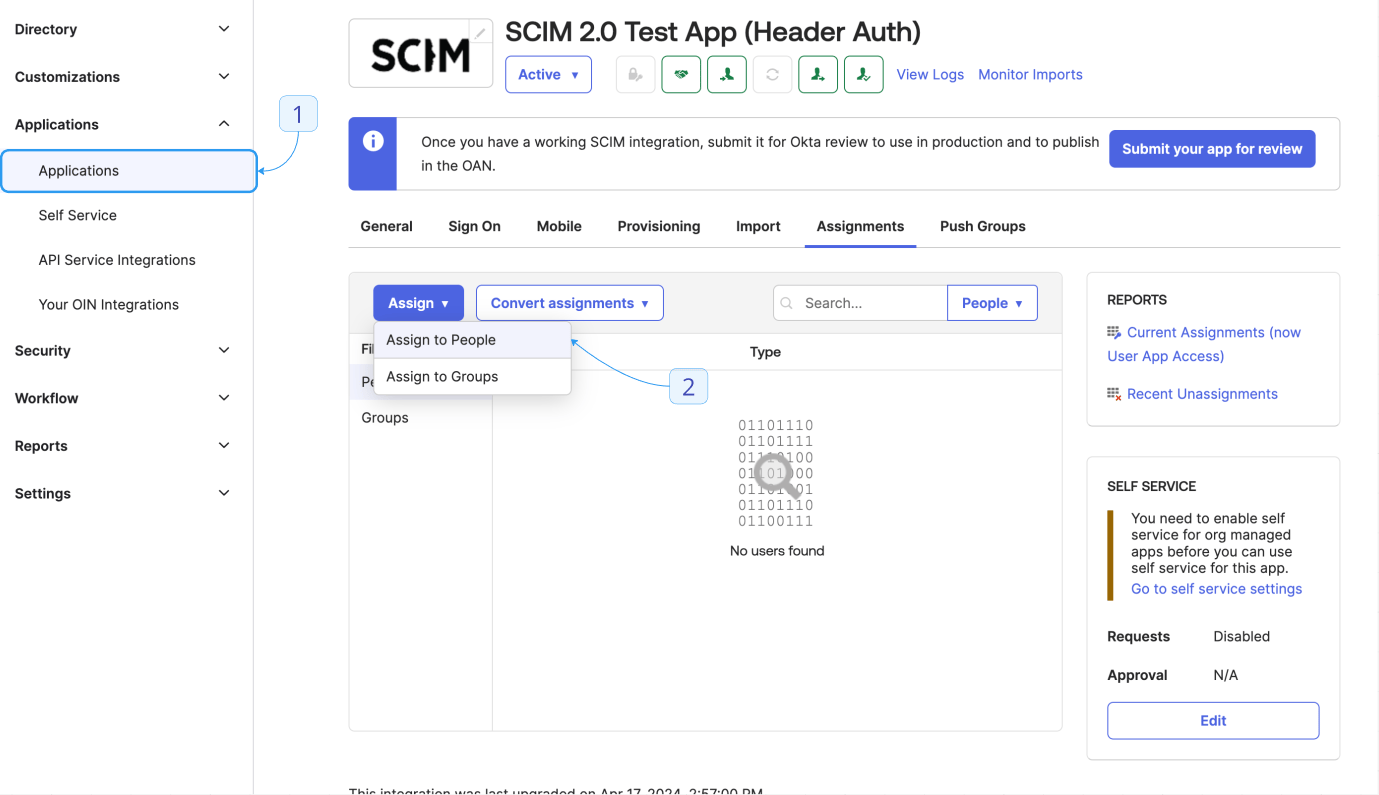
Lightdash will sync the active status from Okta to Lightdash.For example, if a user is provisioned as inactive or is deactivated in Okta, that user will still exist in Lightdash marked as inactive, meaning they will be unable to use the platform.
Step 3 - Managing Roles in Okta (Optional)
Create Attributes for Role Management
- Go to Provisioning > Profile Editor.
- Click Add attribute to create attributes for organization and project roles.
- Variable name:
org_role(or your preferred name) - External name:
roles.^[type=='org'].value - External namespace:
urn:ietf:params:scim:schemas:core:2.0:User
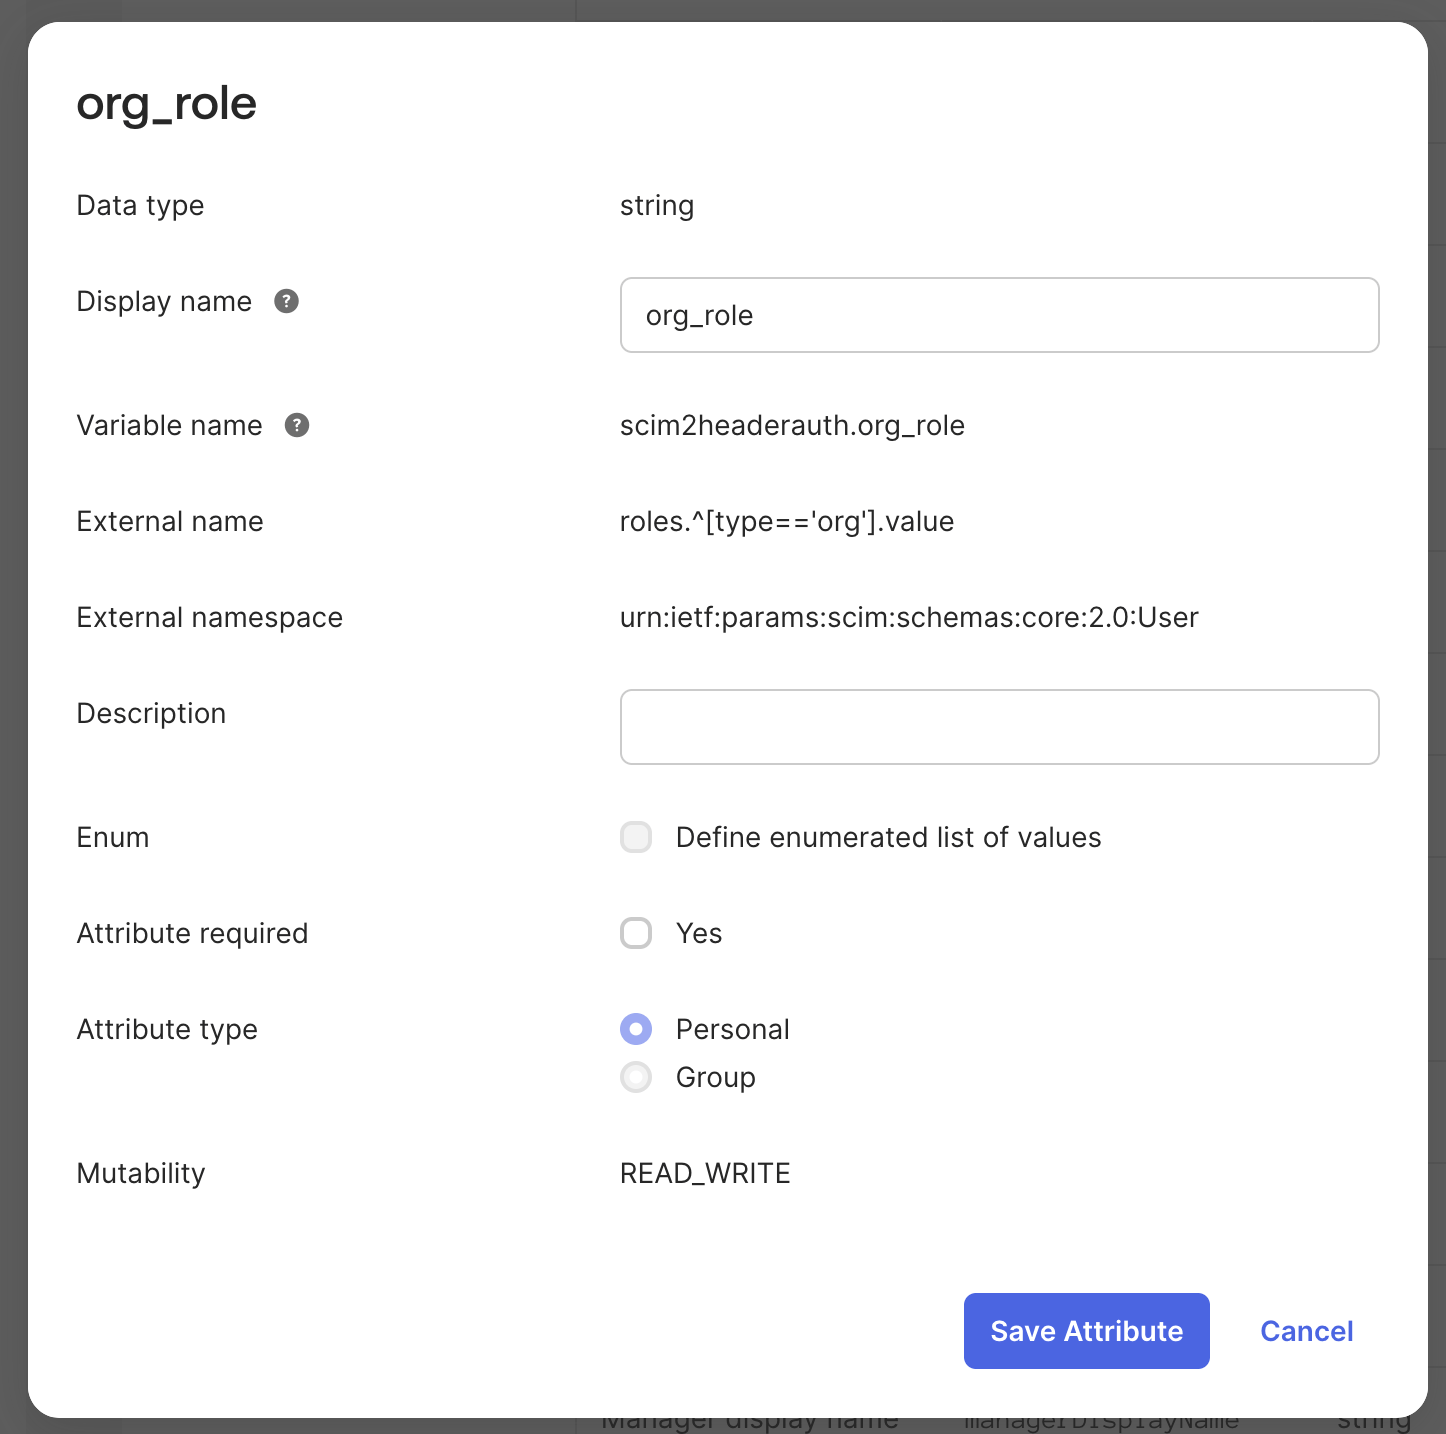
- Variable name:
project_role(or your preferred name) - External name:
roles.^[type=='project_name'].value - External namespace:
urn:ietf:params:scim:schemas:core:2.0:User
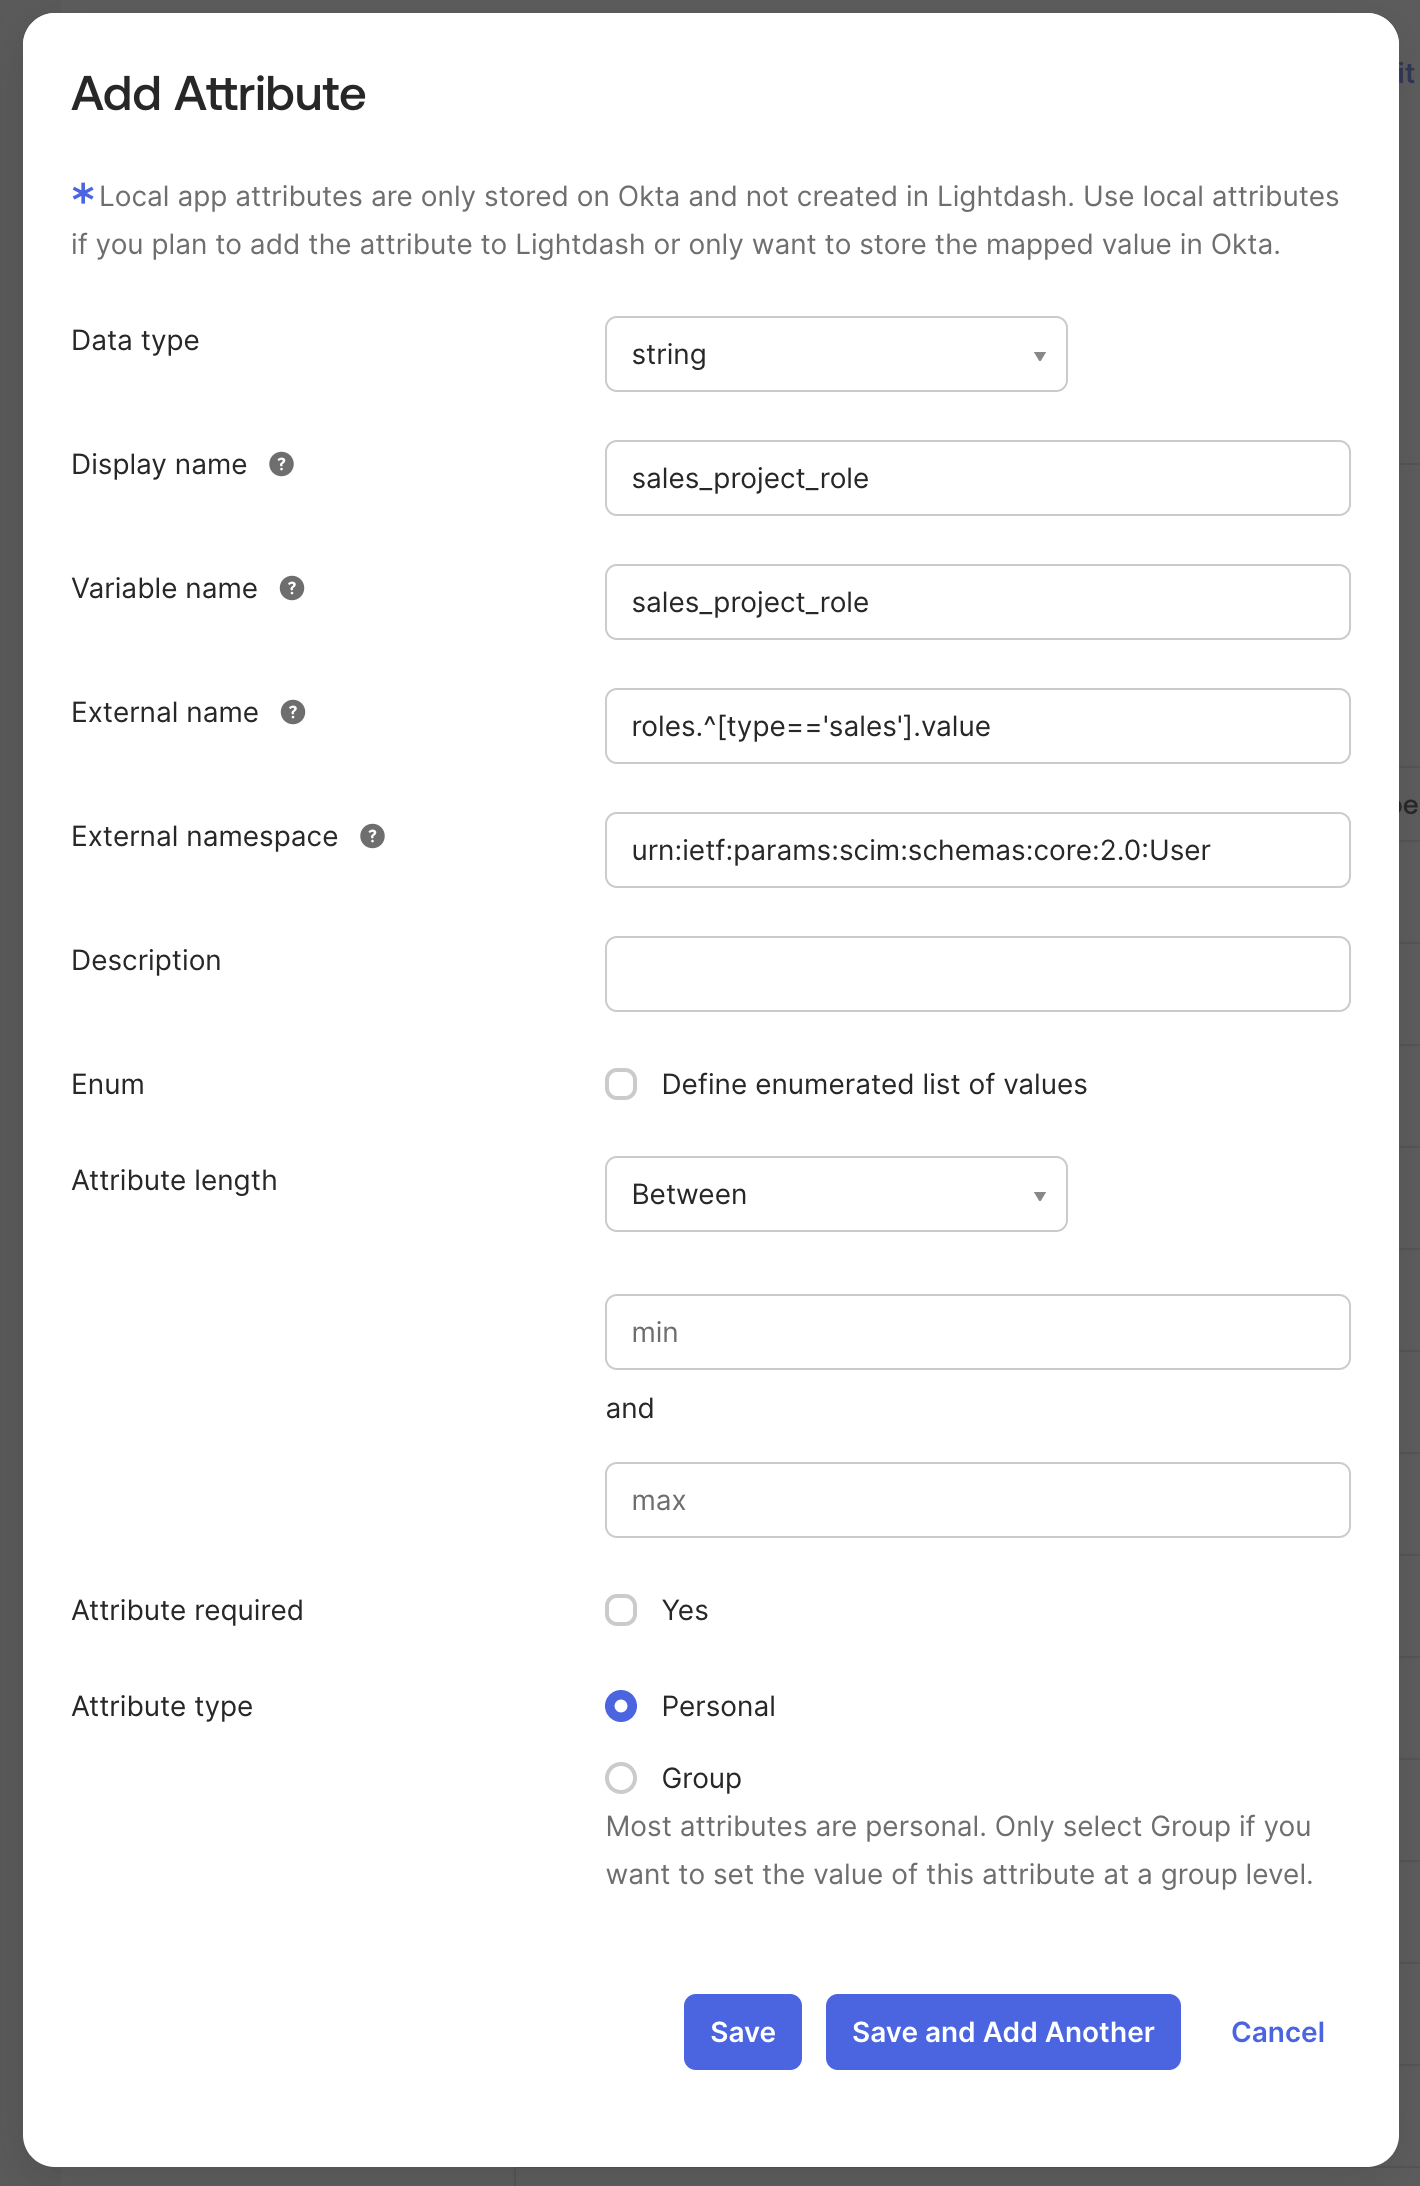
Define Role Mappings
- In the Profile Editor, go to Mappings > Okta User to Lightdash.
- Configure mappings based on Okta group membership.
3675b69e-8324-4110-bdca-059031aa8da3 with your actual project UUID and adjust group names to match your Okta groups.To assign a custom role, use the bare custom-role UUID for an organization-level custom role. For a project-level custom role, keep the project UUID prefix and use <project_uuid>:<custom_role_uuid>.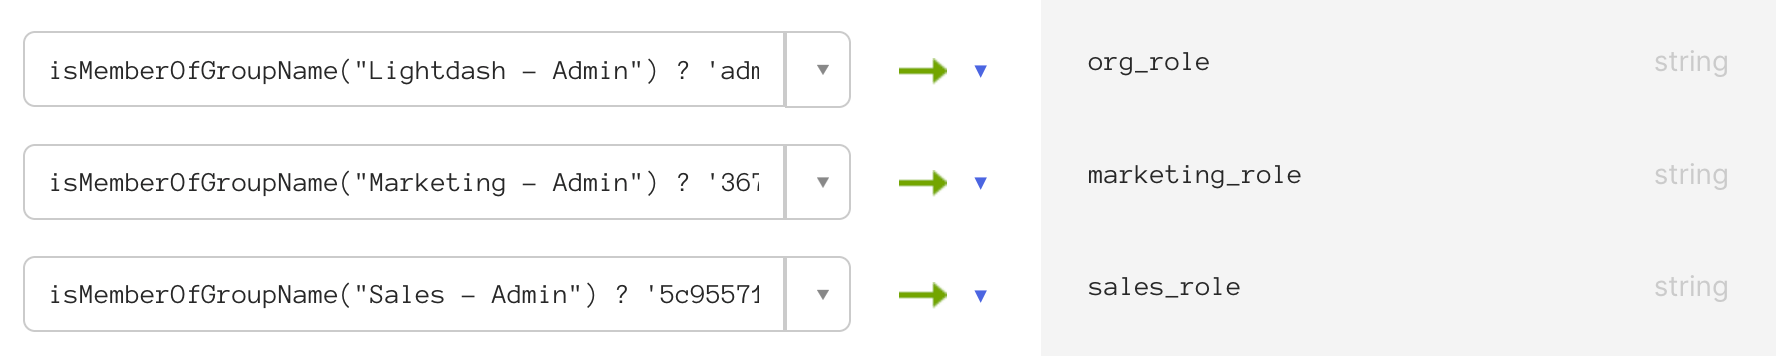
Azure
Azure
Configuring SCIM for your organization requires 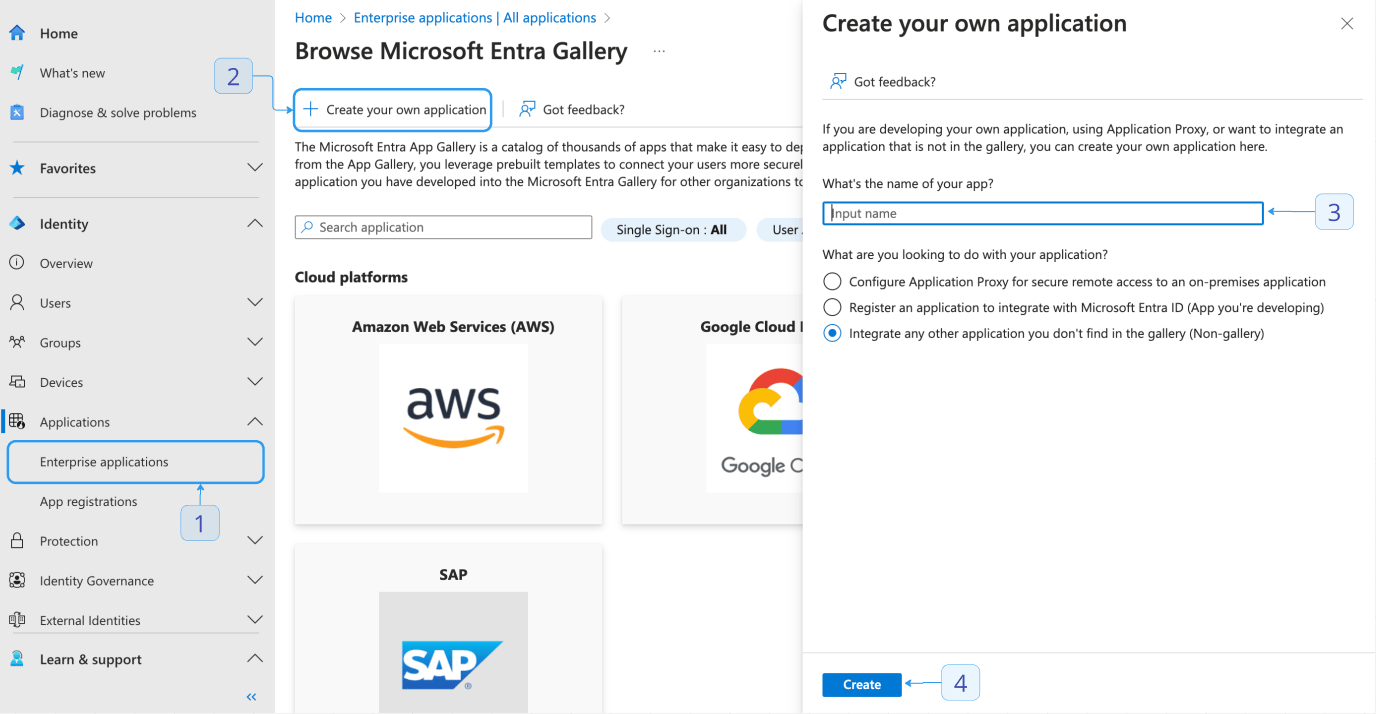
Hybrid identity administrator permissions in Entra ID.Step 1 - Connect SCIM to Lightdash from Azure
- Visit Entra ID and sign in.
- In the sidebar, click Enterprise applications.
- Select + New Registration.
- At the top of the page, select + Create Your own application.
- Add a friendly title.
- Leave the default “Non-gallery” option selected.
- Save your configuration by clicking Create.
Step 2 - Assign users and groups to the application
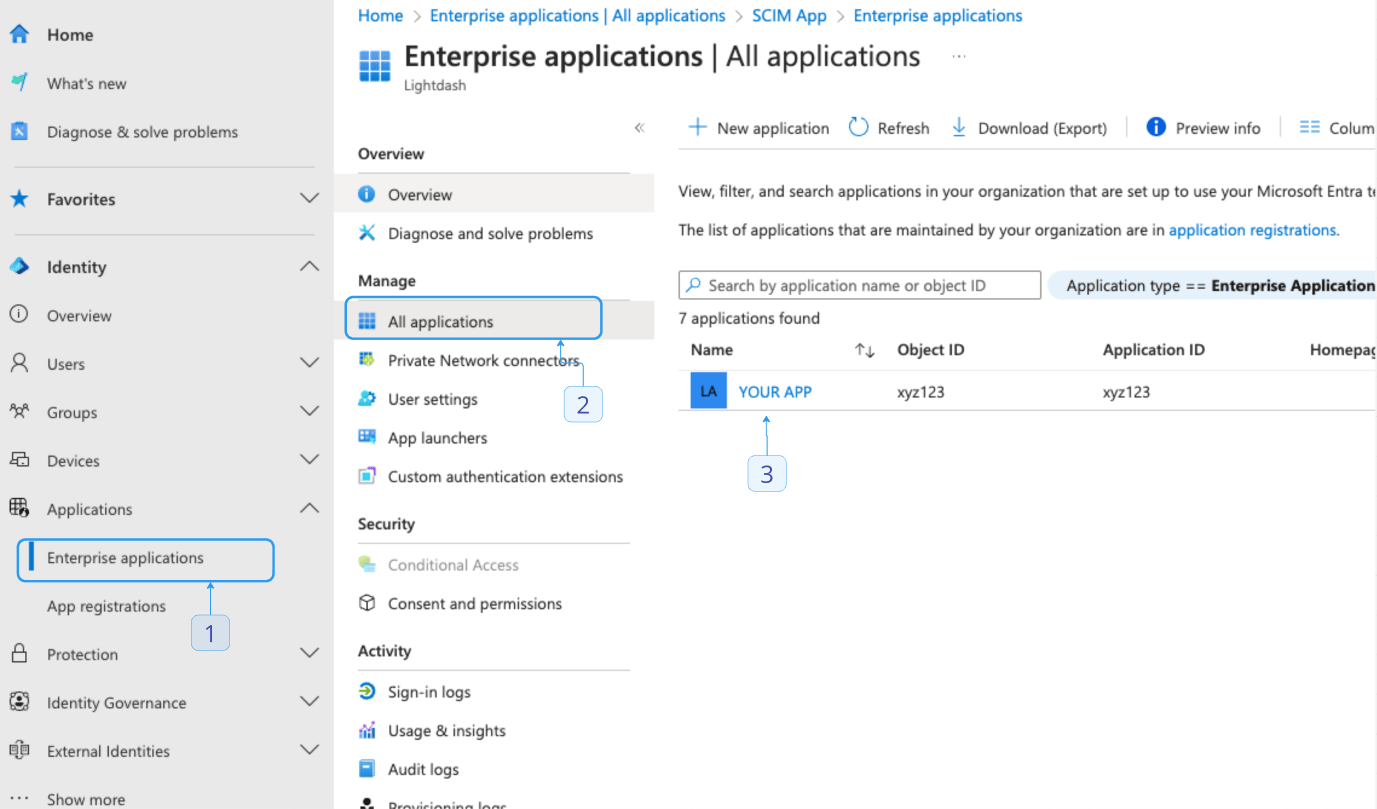
- Navigate to Enterprise applications and select your application.
- Select Users and groups > + Add user/group.
- Click None selected, which will open a modal.
- Select any users and groups you want to provision and then close the modal with Select.
- Click Assign to save.
Step 3 - Configure SCIM provisioning in Azure
- Navigate to Enterprise applications and select your application.
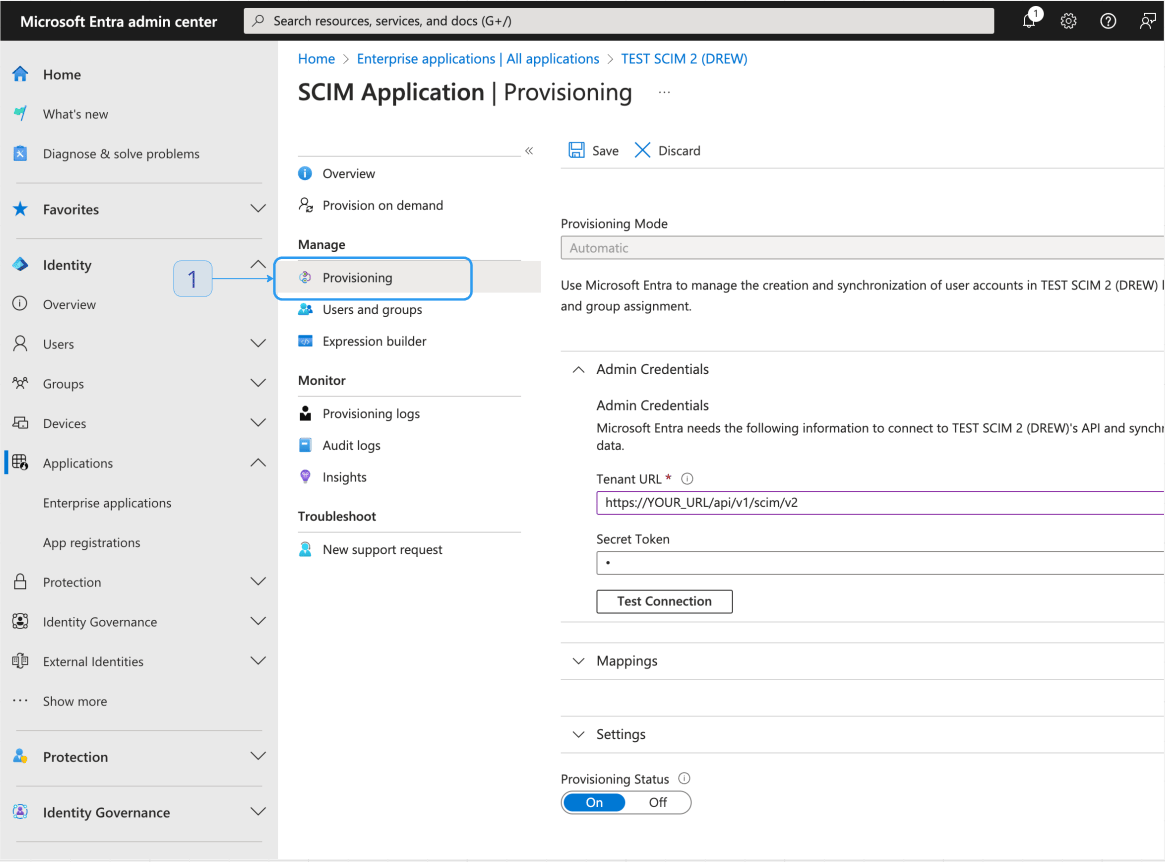
- Select Provision > Connect your application.
- Set Tenant URL and secret token based on the values in the Lightdash SCIM settings page.
- Test connection, to confirm values are correct.
- Click Create to save.
Step 4 - Start provisioning
- Navigate to Enterprise applications and select your application.
- Select Provision.
- Click Start provisioning to save.
- After a few minutes, your users and groups will be synced.
Lightdash will sync the active status from Azure to Lightdash.For example, if a user is provisioned as inactive or is deactivated in Azure, that user will still exist in Lightdash marked as inactive, meaning they will be unable to use the platform.
Google Workspace
Google Workspace
You can still automate user provisioning from Google Workspace in two ways:Role
Option 1 - Provision through an intermediary IdP
Keep Google Workspace as your identity source and connect it to an identity provider that supports custom SCIM applications, such as Okta or Microsoft Entra ID. Then follow the Okta or Azure guide above to connect that IdP to Lightdash.Option 2 - Call the Lightdash SCIM API directly
Lightdash exposes a standard SCIM 2.0 API, so any SCIM-compatible client can manage users and groups — including a sync job of your own that reads from the Google Directory API and pushes changes to Lightdash.Use the SCIM base URL and access token from SCIM Setup within Lightdash. For example, to create a user with an organization-level custom role and a project-level custom role:values follow the format described in User Role Provisioning. An organization-level custom role uses its bare custom-role UUID, while a project-level custom role uses <project_uuid>:<custom_role_uuid>. Only the value field is required.See the SCIM API reference for all endpoints and payloads.API docs
You can find the full API docs and examples for SCIM here.SCIM behavior and implementation details
userNameis mapped to the user’s primary email in Lightdash. Make sure your identity provider setsuserNameto the user’s primary email (and, if sending anemailsarray, the primary email should match).- When a user is updated to be inactive (
active: false) via SCIM, Lightdash will mark the user as inactive, lower their organization role tomember, and remove their access from all projects and groups. If you later reactivate the user, you’ll need to re-assign their group and project access via SCIM or in Lightdash. - An organization must always have at least one
admin. Any SCIM request that would leave the organization with no admins (for example, demoting or deactivating the sole remaining admin) will be rejected with an error. - A user can only have one role per organization and per project, unless custom roles are enabled for the organization (which includes role sets) — see Provisioning role sets below.
- A user must have an organization role.
- On creation, if no
rolesare provided, the organization role will default tomember. - On edit (PUT/PATCH), if no
rolesare provided, no changes are made to the user’s roles. - A user’s project role will be removed if there is no entry for it in the SCIM request, or if there is a value
<project_uuid>:no-role. This allows for explicit role removal from projects. - To reduce data pollution, roles for preview projects cannot be managed via SCIM, as those projects are intended to be short‑lived.
Can the IdP-provided SCIM email be trusted?
In most cases, the email attribute sent via SCIM is trustworthy. However, confirm this with your IdP as some allow users to change their email address. If reliability isn’t guaranteed, use a stable, non-user-editable identifier instead (e.g., OIDC sub, SAML NameID, or Microsoft Entra ID UPN). See provider‑specific guidance below.Microsoft / Azure AD / Entra ID
Theemail field is not trusted. Users with Microsoft have a UPN (userPrincipalName) which is their immutable sign-in identifier. However, the email field is just a contact email that users can freely change themselves.
References:
- https://www.crowdstrike.com/en-us/blog/noauth-microsoft-azure-ad-vulnerability/
- https://learn.microsoft.com/en-us/entra/identity-platform/migrate-off-email-claim-authorization
- https://www.bleepingcomputer.com/news/security/microsoft-fixes-azure-ad-auth-flaw-enabling-account-takeover/
Using UPN as email claim in OIDC
- Navigate to App Registrations: In the left-hand navigation pane, select “Azure Active Directory,” then “App registrations.”
- Select Your Application: Find and select the application you want to update.
- Open the Manifest: In the application settings, select “Manifest” to open the JSON editor for the application manifest.
- Edit the Manifest: Make the necessary changes to the manifest. For example, to map the UPN to the email claim, you can add the following to the optionalClaims section:
User Role Provisioning
Lightdash supports provisioning user roles through SCIM, allowing identity providers to specify and manage user roles (admin, member, etc.) when provisioning users. This makes it easier to manage user permissions directly from your identity provider without requiring additional steps in Lightdash. We support the standard SCIM 2.0roles attribute as defined in RFC 7643. Use this to provision a user’s organization and project roles.
Role types
Lightdash defines two role scopes: Organization and Project. Both scopes support system roles and custom roles.Do not prefix an organization-level custom role with the organization UUID. Its
value is only the custom-role UUID. Project role values always combine the project UUID and role identifier.Provisioning role sets
When custom roles are enabled for the organization, the sameroles array can carry a complete role set per level: at most one system role plus any number of custom roles for the organization, and likewise per project. No Lightdash-specific schema extension is needed.
Reading. GET /Users and GET /Users/{id} list every role the user holds. The organization’s system role (or its only custom role) is marked "primary": true; every additional role is "primary": false.
PUTandPATCHreplaceonrolesset the exact set: roles that are omitted are removed, and — as before — a project with no entry in the payload loses the user’s direct access (<project_uuid>:no-rolestill works for explicit removal).PATCHaddunions the named roles into the existing set;PATCHremovetakes the named roles out.- Identical entries are de-duplicated. A payload with no organization entry, more than one system organization role, or more than one system role for the same project is rejected with
400. - Deactivating a user (
active: false) still clears their roles as described above.
roles array with more than one entry per level is rejected exactly as before, so existing IdP mappings do not change behaviour.
Configuring available roles in your Identity Provider (IdP)
The SCIM roles model is currently an IETF draft, so native support to auto-discover roles via a/Roles endpoint varies by provider and connector.
Lightdash’s /Roles endpoint returns system and custom roles. Organization-level custom roles use their bare custom-role UUID as id and value, with type set to Organization. Project-level custom roles use <project_uuid>:<custom_role_uuid>, with type set to Project - <project_name>.
- Okta: Does not natively auto-populate role picklists by consuming a SCIM
/Rolesendpoint. You can still provisionrolesmanually or implement custom sync using Okta Workflows or a custom app. - Microsoft Entra ID (Azure AD): Does not currently auto-discover roles from
/Roles. Use manual configuration of allowed roles. - Google Cloud Identity / Workspace: Custom SCIM applications are not supported, so there is no role configuration to do in Google itself. See the Google Workspace integration guide above for the available approaches.
- SailPoint (IdentityNow/IdentityIQ): Supports SCIM roles harvesting; with the right connector configuration, it can ingest roles from custom endpoints like
/Roles. - Other IGA/IM tools (e.g., OneLogin): Some support importing roles from SCIM apps; use depends on the specific connector.
- Check your IdP/connector documentation for SCIM “roles” or explicit mention of the roles draft.
- Inspect provisioning or discovery logs: if the IdP issues
GET /Rolesduring discovery, it likely supports it. - If the connector supports custom discovery endpoints or schema extensions, you may be able to add
/Roleseven if it’s not built-in.
/Roles, use the manual configuration documented in your IdP. Configure organization-level custom roles as bare custom-role UUIDs and project-level custom roles as <project_uuid>:<custom_role_uuid>. Only the value is required by Lightdash.
Lightdash Extension Schema (deprecated)
To set user roles, Lightdash provides an extension schema that can be included in SCIM requests:role | The user’s role in the organization | No | member [1] |
When mapping attributes in Azure or Okta, you must prefix the property with the complete schema name. For example, to set the role property, you must use urn:lightdash:params:scim:schemas:extension:2.0:User:role as the attribute path.
Group role provisioning
In SCIM, you cannot assign a role attribute directly to a Group resource. Groups only contain members. Organizations typically choose one of the following patterns:- No groups in Lightdash
- Do not manage groups in Lightdash. Any groups created via the Lightdash UI should be removed by SCIM during its periodic sync (this may require configuration in your IdP’s SCIM app, such as enabling group deprovisioning or group push/provisioning for groups).
- Provision users with organization and project roles via SCIM.
- Manage group project roles in Lightdash and provision group memberships via SCIM
- Manage group project roles directly in Lightdash.
- Provision users with organization roles and group memberships via SCIM (do not assign project roles directly to users via SCIM).
- Users should not have direct project access as they inherit access through their organization role and group membership.
- During its periodic sync, SCIM will remove any project roles that were assigned to users via the Lightdash UI.
Rotating a SCIM access token
To maintain security, you may want to rotate your SCIM access tokens periodically. Follow these steps to rotate an existing token. Requirements for Rotation- Token UUID: To rotate a token, you’ll need its unique identifier (UUID), which you can find on the tokens page in your organization settings.
- Expiration Date: You must specify a new expiration date when rotating a token. Tokens without an expiration cannot be rotated.
- Time Interval: Tokens can only be rotated once per hour.
<scim-access-token-uuid> with the UUID of the token you wish to rotate, and <personal-access-token> with your personal access token. This process will invalidate the previous token and return a new token with the specified expiration date.