

Embedding requires the embedding add-on for Cloud Pro or Enterprise. Get in touch to add embedding to your plan. For self-hosted deployments, follow embedding setup.
Overview
The Lightdash React SDK (@lightdash/sdk) provides React components for embedding Lightdash content in your React or Next.js applications. The SDK offers advantages over iframe embedding:
- Seamless integration with your React application
- Programmatic filters for dashboards
- Callbacks for saves, filter changes, notifications, and errors (
onEvent,onError) - Custom styling to match your application
- TypeScript support with full type definitions
Set up CORS
To use the React SDK, you need to update your “Cross-Origin Resource Sharing” (CORS) policy so the domain hosting your React app is allowed to call the Lightdash API. In Lightdash, go to Project settings -> Embed configuration -> CORS and add each origin where you’ll use the SDK. Only organization admins see the CORS tab. The allowed origins are an organization setting rather than a project one, so one list covers every project in your organization, including a separate development project. To test locally against the same instance, add your development origin, such ashttp://localhost:3000, alongside your production one.
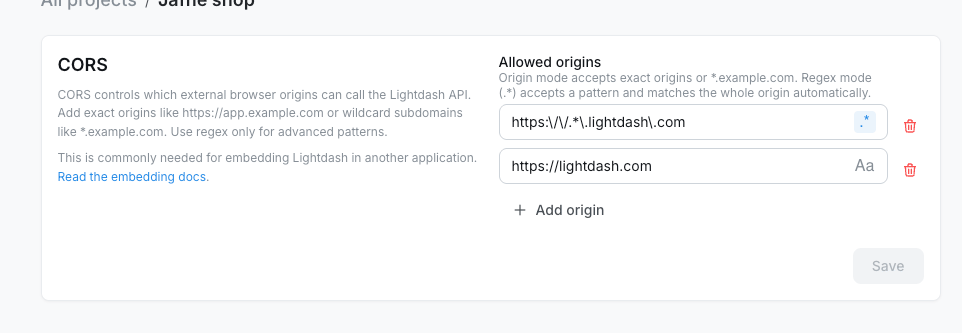
https://app.example.comallows only that exact origin.*.example.comallows HTTPS subdomains likehttps://app.example.comand is saved as a regex pattern.
.*) for advanced patterns. Enter the pattern body only; Lightdash matches the whole origin automatically. For example, https:\\/\\/.*\\.example\\.com allows subdomains of example.com.
For self-hosted deployments, you can also configure instance-level allowed origins with environment variables:
LIGHTDASH_CORS_ENABLED=false only if you want to disable CORS for the whole instance.
Browsers enforce a Same-Origin Policy that blocks a web application from making requests to a domain other than the one that served it. Because the React SDK calls the Lightdash API from your frontend, your instance has to name your application’s origin in its CORS configuration for those requests to go through.
CORS is only required for the React SDK. iframe embedding does not require CORS configuration.
Installing the Lightdash SDK
In your frontend project, use your preferred package manager to install the SDK.Starting with Lightdash
v2.207.0, the Embed SDK (@lightdash/sdk) requires React and React DOM 19.2 or later. Before installing or upgrading the SDK, update both react and react-dom in your frontend project to meet this requirement.This requirement does not apply to @lightdash/query-sdk, which is unaffected.For Next.js, version 15 or later is required.@lightdash/sdk and redeploy your app before investigating further.
Import CSS styles
The Lightdash SDK requires CSS styles to render components correctly. Import the SDK’s CSS file as the first import in your React application’s entry point:Components and hooks
The Lightdash SDK exports components for embedding Lightdash content and hooks for building custom host-app UI around embedded content:Lightdash.Dashboard- Embed complete dashboards with multiple tilesLightdash.DashboardBuilder- Let embedded users create a brand-new dashboardLightdash.Chart- Embed individual saved chartsLightdash.Explore- Embed interactive data exploration interfaceLightdash.AiAgent- Embed an AI agent so users can chat with their dataLightdash.MetricsCatalog- Embed the project metrics catalog so users can browse and explore metricsLightdash.useLightdashContent- List spaces, dashboards, charts, and data apps for a custom content catalogLightdash.useLightdashAiAgentThreads- List an embed user’s previous AI agent threads to build a thread history UI
Lightdash.Dashboard
Embed complete Lightdash dashboards with multiple visualizations, filters, and interactive features. See Embedding dashboards for the JWT claims that control what viewers can do.Props
Basic usage
With filters
Apply filters programmatically using thefilters prop:
With styling
Handle Explore in your app
When the token allows Explore, Explore from here on a saved chart opens Explore inside the component, with a Back button that returns to the dashboard. Drill-downs always open there too. PassonExplore to take over Explore from here for saved charts instead, for example to route to a page of your app that renders Lightdash.Explore. The component then doesn’t open Explore itself, so don’t pass onExplore only to track usage; use onEvent for that.
With edit mode
When the JWT includes awriteActions claim, you can render an existing dashboard in edit mode and let users rename it, add one or more saved charts, move or resize tiles, and save changes. The host app controls the edit-mode state through isEditMode and onEditModeChange.
Choose where new charts are saved
When the token setscanExplore: true, edit mode offers New chart in the add-tile menu and Save as new chart when editing a chart. Use chartSaveDestinations to control where those new charts are saved:
Lightdash.DashboardBuilder
Let embedded users build a brand-new dashboard from scratch. On mount, the SDK creates an empty dashboard in the token’s first write space and renders it through the same embedded dashboard component asLightdash.Dashboard. The host app controls when the dashboard is in edit mode.
Use this when you want your customers to author their own dashboards inside your app — for example, a “Create dashboard” page in your customer portal — without giving them a Lightdash login.
Props
Basic usage
Requirements and behavior
- The JWT must include a
writeActionsclaim withwriteSpaceUuids. JWTs withoutwriteActionsfail closed for write-capable paths. - The new dashboard is created in the first write space, named “Untitled dashboard”, and is empty.
- The add-chart picker lists saved charts and SQL charts from the write spaces, plus charts from any source spaces.
- Dashboards created or edited through the SDK are normal Lightdash dashboards — they can be viewed and edited from Lightdash and vice versa.
- See Write actions for the JWT claim and how to configure the actor and write spaces.
Lightdash.Chart
Embed individual saved charts for focused, single-metric displays with minimal UI.Props
filters.
Edit and drill into a chart
WithoutisEditMode, the chart renders read-only with minimal UI. Pass isEditMode as true or false to render the chart in Explore when the token’s write actor can update it, which requires a writeActions claim whose write spaces include the chart’s space:
isEditMode={true}opens the chart for editing; saving updates the chart.isEditMode={false}shows the chart in Explore’s view mode, where viewers can click a data point and Drill into it. The drill-down opens inside the component, with a Back to Chart button.
isEditMode={true} shows an error and isEditMode={false} falls back to the read-only chart.
Basic usage
With styling
Token generation for charts
Charts require a JWT withtype: 'chart':
Lightdash.Explore
Embed interactive data exploration interface with full query builder capabilities.Props
Basic usage
Lightdash.Explore starts from a chart, usually the one a viewer chose Explore from here on in a dashboard whose onExplore routed to this page:
With styling
Token generation for explores
Explores requirecanExplore: true in the JWT:
Lightdash.AiAgent
Embed a Lightdash AI agent so embedded users can chat with their data, generate charts, and save results back to a fixed space — without a Lightdash login. By default the component renders the agent inside an iframe; setrenderMode="native" to render it in your page instead. Use threadUuid to deep-link into an existing thread, or omit it to land on the new-thread screen.
Props
Lightdash.AiAgent does not accept filters, contentOverrides, uiOverrides, or onExplore. Threads, navigation, and chart actions are managed inside the embedded agent UI. In iframe mode, an open agent doesn’t pick up a replaced token; see Rotating tokens.
onThreadChange fires whenever the embedded agent creates a new thread or opens an existing one. Use it together with threadUuid to persist the current conversation in your app (for example in localStorage or your own backend) and resume it the next time the user returns. In iframe mode, the SDK passes a targetOrigin query parameter to the iframe and listens for lightdash:aiAgentThreadChanged postMessage events from the embedded page — no extra setup is required on your side.
Basic usage
Open a specific thread
PassthreadUuid to deep-link the embed into a specific conversation on mount:
Persist and resume the last conversation
CombinethreadUuid and onThreadChange to keep users on their most recent thread across page reloads. This example stores the latest thread UUID in localStorage:
Start a thread bound to a dashboard
Passbinding to bind the thread the embed creates to a dashboard, and threadContext to give the agent background for it, such as a summary of an earlier conversation. Both apply when the user sends the first message, and are ignored when threadUuid opens an existing thread. onThreadChange returns the new thread’s UUID:
sourceSpaceUuids. Errors, such as a dashboard outside those spaces, surface when the first message is sent. See Bind a thread to a dashboard for what a bound thread does and how to create one from your backend.
Render the agent natively
SetrenderMode="native" to render the agent directly in your page instead of an iframe. It uses the same props and token:
- The agent fills its container, so give the container a height. The chat scrolls inside the component, never your page.
- The agent calls the Lightdash API from your page, like the other SDK components, so your origin must be allowed in CORS.
styles.fontFamilyapplies, andonErrorreports every load and request failure. In iframe mode,onErroronly reports token errors.onThreadChangeis called directly instead of throughpostMessage. SettingthreadUuidtoundefinedopens a new thread.- The agent shows no toast notifications. Its messages reach
onEventasnotificationevents instead, andonErrorreports failures.
Token generation for AI agents
AI agent embeds require a JWT withcontent.type: 'aiAgent' and a writeActions claim that names the write spaces and the actor used for agent queries and chart saves:
writeActions.sourceSpaceUuids. The agent can read those spaces, search them, and bind threads to dashboards in them, but creates and updates content only in writeSpaceUuids. See Add charts from other spaces.
See Embedding AI agents for the full guide and AI agent token for the complete JWT structure.
Lightdash.MetricsCatalog
Embed the Lightdash metrics catalog so embedded users can browse the metrics defined in a project, preview them, and — when the JWT allows it — continue into Explore without leaving your app. When a viewer clicks Explore from here on a metric, the SDK swaps in an embedded Explore view; a Back action returns them to the catalog.Props
Lightdash.MetricsCatalog does not accept filters, contentOverrides, uiOverrides, or onExplore. The catalog and the embedded Explore it launches are managed inside the component.
Hide filter controls
UsehiddenFilters to remove built-in filter controls that don’t mean anything to your viewers. It only hides the controls; the metadata behind them, such as each metric’s owner, stays in the catalog.
Basic usage
Token generation for the metrics catalog
Metrics catalog embeds require a JWT withcontent.type: 'metricsCatalog' and a projectUuid. Set content.canExplore to true to let embedded users open Explore from a metric, and include a writeActions claim if you want them to save the resulting charts back to Lightdash.
canExplore (or set it to false) to publish a read-only browse experience. See Embedding the metrics catalog for the full guide and Metrics catalog token for the complete JWT structure.
API hooks
Lightdash.useLightdashContent
UseuseLightdashContent when you want your own app to list Lightdash content instead of embedding the Lightdash home page. A common pattern is to let customers choose a space in your UI, show the dashboards and charts in that space, then render the selected object with Lightdash.Dashboard or Lightdash.Chart.
The hook calls the Lightdash content API and returns metadata only. It does not render the selected chart or dashboard, and it does not replace the chart or dashboard embed token you pass to the render component.
Backend: generate an API access token
Generate the token on your backend with your Lightdash embed secret. Never expose the embed secret in browser code.Frontend: list content in a space
Options
Lightdash.useLightdashAiAgentThreads
UseuseLightdashAiAgentThreads when you want to show your users a list of their previous AI agent conversations — for example a “Recent chats” sidebar next to a Lightdash.AiAgent embed. The hook calls the AI agent threads endpoint with the embed JWT, so it returns only the threads for the token’s agent, write actor, and first write space. Viewers whose tokens share those see the same threads; user.externalId doesn’t separate them.
Pair it with Lightdash.AiAgent’s threadUuid and onThreadChange props to let users resume any past conversation.
Options
LightdashApiClientConfig as useLightdashContent, with auth.type: 'embedToken' and the AI agent embed JWT as the token.
Types
Example: thread history + resume
useLightdashAiAgentThreads uses the same embed JWT you pass to Lightdash.AiAgent. The token’s content.agentUuid and first write space are what scope the returned threads — the hook cannot list threads from a different agent or space, even if you pass a different agentUuid argument.
Generating embed tokens
All SDK components require JWTs generated server-side, signed with the embed secret from embed setup. Here’s a complete example, including user attributes for row-level filtering:Backend API endpoint
Frontend React component
Rotating tokens
Self-hosted instances need Lightdash2.137.0 or later to replace a token at runtime. On earlier versions the component keeps sending the first token it was given.
Short-lived tokens are the safer default. To keep a long-lived embed working, mint a new token before the current one expires and pass it to the same component. The token prop can change at any time: the component stays mounted, dashboard filters, Explore state and chart edit mode are kept, and every request from then on carries the new token. Do not change the component’s React key to swap tokens; that remounts it and resets its state.
Lightdash.Dashboard, Lightdash.DashboardBuilder, Lightdash.Chart, Lightdash.Explore, and Lightdash.MetricsCatalog.
- Refresh before expiry. A request that already failed on an expired token is not retried with the new one.
- Each component sends its own token, so components with different tokens, such as a dashboard and a chart, can share a page. Replacing one component’s token doesn’t affect the others.
- In iframe mode,
Lightdash.AiAgentreads the token from the iframe URL when it loads, so an open agent doesn’t pick up a replaced token. Mint AI agent tokens that outlive the session instead.
Listen to events
PassonEvent to Lightdash.Dashboard, Lightdash.DashboardBuilder, Lightdash.Chart, Lightdash.Explore, Lightdash.MetricsCatalog, or Lightdash.AiAgent to react to what viewers, or the agent, do in the embed, for example to confirm a save in your own UI or link to the new chart.
type and a payload:
The
LightdashEvent type also lists locationChanged and error. SDK components don’t send either: locationChanged comes only from iframe embeds, and failures go to onError.
SDK components don’t show toast notifications themselves. Render notification events in your own UI, or viewers won’t see save confirmations and error messages. A notification can be sent more than once with the same id, for example while an export goes from in progress to done; update the same message instead of adding another.
Events from the AI agent
Lightdash.AiAgent sends chartSaved and dashboardSaved once each time the agent creates or edits a saved chart or dashboard. Adding a chart to a dashboard sends one dashboardSaved. SQL charts and documents send nothing. In native mode, the agent’s notification events reach onEvent too; use onThreadChange to follow its threads.
In iframe mode, the agent posts events from the iframe to your page with postMessage, so your Lightdash instance must allow it:
- On Lightdash Cloud, ask Lightdash support to turn on embed events with
postMessageand add your page’s origin, such ashttps://app.example.com, to the iframe embedding domains. - On self-hosted instances, set
EMBED_EVENT_SYSTEM_ENABLEDandEMBED_EVENT_SYSTEM_POST_MESSAGE_ENABLEDtotrue, and add your page’s exact origin toLIGHTDASH_IFRAME_EMBEDDING_DOMAINS. Wildcard entries don’t match. See embedding variables.
onEvent never fires. Native mode calls onEvent directly and needs no instance setup.
Refresh a dashboard after the agent saves it
An embeddedLightdash.Dashboard doesn’t reload when the agent next to it edits the dashboard. Listen for dashboardSaved on the agent and remount the dashboard with a new key:
action is 'created' and dashboardUuid is the new dashboard; mint a dashboard token for it to show it.
Handle errors
PassonError to any SDK component to find out when it fails to load or a request fails, for example to show your own error screen instead of Lightdash’s.
onError only reports errors; the component still renders its own error state. A fatal error means the whole embed failed: the token couldn’t be read, any request failed because the token expired or is invalid, the dashboard, chart, or explore couldn’t be loaded, or the component crashed. After the first fatal error, the component stops reporting until it remounts. To retry, remount it, for example by changing its React key.
Lightdash.AiAgent in iframe mode, onError only reports token errors; in native mode it reports every failure.
Applying styles
Override styles within Lightdash components to match your application’s design.Supported style overrides
styles object passed to any component.
Font family
Sets the font family for all text within the embedded content. Font sizes and other properties are preserved.font-family explicitly, so the fontFamily style is applied with higher specificity to override these.
Background color
Sets the background for the embedded content. Can be any color value or'transparent'.
Complete example
CSS class overrides
Beyond thestyles prop, you can target embedded dashboard elements directly from your application’s stylesheet. Each element below carries a stable, human-readable classname that is part of the SDK’s public API — it won’t change when internal layout does, so your overrides stay resilient across releases.
Light and dark mode
Use thetheme prop to render embedded content in either 'light' or 'dark' mode. This is typically driven by the host application’s own theme state, so the embedded dashboard, chart, or explore matches the surrounding UI.
theme prop is supported on Lightdash.Dashboard, Lightdash.Chart, and Lightdash.Explore.
When theme is set, the SDK forces the Mantine color scheme and ignores any user-toggled preference stored in the embed. Omit the prop to let the embed use its default (light) color scheme.
Syncing with your app’s theme
Pass your app’s current theme value directly to the SDK so the embed re-renders when it changes:Combining with styles.backgroundColor
When theme is set, the embed uses the matching Mantine body background by default. If you also pass styles.backgroundColor, your value takes precedence:
Color palettes
You can customize the appearance of embedded dashboards using color palettes. Define multiple color palettes in your organization settings, then apply them to embedded dashboards using thepaletteUuid prop.
For more on customizing appearance, see customizing the appearance of your project.
Setting up color palettes
- Go to Organization settings > Appearance in Lightdash
- Define one or more color palettes
- Copy the palette UUID for the palette you want to use (or fetch from API
GET /api/v1/org/color-palettes)
Applying a palette
Pass thepaletteUuid prop to the Lightdash.Dashboard component:
Filtering data
Passfilters to <Lightdash.Dashboard/> to filter dimensions by value. The filters in this prop combine with AND. The Chart and Explore components do not support the filters prop.
When you pass filters, they replace the dashboard’s saved dimension filters for that embed instead of adding to them. Locked saved filters are the exception: they stay applied, and an SDK filter on a locked field is ignored.
Each SDK filter applies to every tile that has a field with the same name and type as the model and field you pass. Any per-tile targets set on the dashboard filter’s Tiles (or Tabs & tiles) tab aren’t used. A tile with no matching field isn’t filtered.
Filter structure
Basic example
Multiple filters
Filters are applied as AND operations:FilterOperator enum
ImportFilterOperator from the SDK:
Available fields
Only fields that are available for filtering can be filtered. These are specified in the JWT passed to the SDK. To generate tokens with filterable fields, configure your embed in the Lightdash UI or include the appropriate fields in your JWT structure.Localization
The React SDK has two translation props, split by what they translate:
There is no locale setting and no bundled language packs. Your app owns locale state and passes the translated strings for the language it wants. Anything you don’t override renders in the built-in English.
Both props are accepted by
Lightdash.Dashboard, Lightdash.DashboardBuilder, Lightdash.Chart, and Lightdash.Explore. They are React SDK props only; iframe embeds are not translatable.
Translating your content with contentOverrides
contentOverrides translates the content you author in Lightdash: dashboard names and descriptions, tile titles, chart names, axis labels, series names, markdown content, and the custom labels you’ve set on dashboard filters.
Recommended tools:
- Translation maps – The Lightdash CLI can generate translation maps when downloading content as code
- Runtime translation management – Use a translation library like
i18next - Translation production tools – Tools like Locize help manage translations efficiently
Video overview
Translation maps
The Lightdash CLI can produce translation maps for dashboards and charts. To include translation maps when downloading content, add the--language-map flag:
<file name>.language.map.yml file containing translatable strings.
Example translation map:
filters.labels block mapping each source label to its translation. Replace the right-hand values with the translated strings. Entries are keyed by the source label rather than by position, so translations keep working when filters are reordered, added, or removed. Renaming a filter label in Lightdash invalidates its entry, and the filter pill falls back to the untranslated label until you regenerate the map. Filters without a custom label show the field name, which isn’t translatable.
Translations only change what viewers see. When someone saves an embedded dashboard in edit mode, Lightdash keeps the source filter labels, so the saved dashboard is unchanged for other languages.
Runtime translation
At runtime, pass a translation object to the SDK’scontentOverrides prop. We suggest using i18Next to load translations:
Setting up i18Next with Locize
Translating the Lightdash UI with uiOverrides
uiOverrides translates the interface Lightdash renders around your content: filter operators and inputs, the add/edit filter popover, the date zoom control, tile menus, and dashboard export buttons.
Pass a flat object mapping keys to translated strings. The key set is exported as the TypeScript type SdkUiOverrides from @lightdash/sdk, so editors autocomplete every key and unknown keys are compile errors.
Both the
@lightdash/sdk package and your Lightdash instance must be on a version that includes uiOverrides. If you self-host, upgrade your instance as well, since the strings render inside Lightdash’s UI. There is no feature flag; uiOverrides is available wherever embedding is available.Available keys
Keys are flat dot-paths, namespaced by the surface they translate:filters.*– operator labels (including date-specific variants), units of time, filter pills, the add/edit filter popover, value inputs, autocomplete states, the collapsed filter-bar summary, cross-filtering menu items, and the required-filters flow viewers seedateZoom.*– the date zoom control, granularity names, tooltips, and the per-tile zoom indicatortileMenu.*– the tile menu: Explore from here, Download data, Export image, View underlying datadashboard.*– dashboard-level export and print buttonsexplorer.*– the Back button that returns from an embedded Explore to the dashboard, chart, or starting query
SdkUiOverrides type in @lightdash/sdk, so your editor autocompletes the full set. The keys for the surfaces above, with the built-in English defaults:
All translatable keys with English defaults
All translatable keys with English defaults
Complete Spanish example
Complete Spanish example
{token} placeholders unchanged, then review the output before shipping it.
Key rules
- Every key is optional. Partial dictionaries are fine; missing keys render in English.
- Keys are a stable, additive contract. Existing keys are never renamed or removed across SDK versions. New UI may add keys, which fall back to English until you translate them.
- Keep
{token}placeholders. Some values contain placeholders that Lightdash fills at runtime, like'filters.autocomplete.addValue': 'Add "{value}"'or'filters.crossFilter.menuLabel': 'Filter dashboard on {field} to'. Keep the token, with its exact name in braces, somewhere in the translation. Its position is free. No other syntax is supported (not ICU MessageFormat). - Plurals are one key per form. Count-dependent strings exist as separate keys, like
filters.summary.filterSingular/filters.summary.filterPlural, and units of time with.singular/.plural/.completedSingular/.completedPluralvariants. There are no CLDR plural rules, so languages with more than two plural forms can only approximate.
Using uiOverrides with an i18n framework
Because the map is flat JSON, it drops directly into i18next-style resource files. Keep a uiOverrides object per locale and pass the active one:
key prop) is the simplest way to re-render every string.
What can be translated
Not translatable:
- Data from your warehouse – string values in charts, dimension values, and raw table data render as they exist in your database
- Field and table names – dimension and metric names shown in the field picker, and on filter pills without a custom label, come from your dbt schema
- Date picker internals – month and weekday names inside calendar popups render in English
- Data formatting – numbers, dates, and currencies render per chart config
- Editor-only UI – dashboard edit mode is not translated