> ## Documentation Index
> Fetch the complete documentation index at: https://docs.lightdash.com/llms.txt
> Use this file to discover all available pages before exploring further.
# Service accounts
> Userless credentials with granular scopes for CLI and API access that outlive the admin who created them
Service accounts require an **Enterprise License Key**.
## Overview
Service accounts provide machine-to-machine authentication for automated access to the Lightdash API. Unlike personal access tokens which are tied to individual users, service accounts are organization-level entities designed for applications, CI/CD pipelines, and automated workflows.
Service accounts allow you to:
* Authenticate API requests without using personal user credentials
* Grant permissions through a system role or a [custom role](/workspace-admin/custom-roles) with granular scopes
* Attribute API actions directly to the service account in audit logs and `createdBy` / `updatedBy` fields
* Set expiration dates for tokens
## Enabling service accounts (self-hosted only)
If you're self-hosting Lightdash, you will need to add the following environment variable to your configuration:
```bash theme={null}
SERVICE_ACCOUNT_ENABLED=true
```
After enabling, restart your Lightdash instance for the change to take effect.
## Creating a Service Account
1. Navigate to **General Settings** → **Service Accounts**
2. Click **Add Service Account**
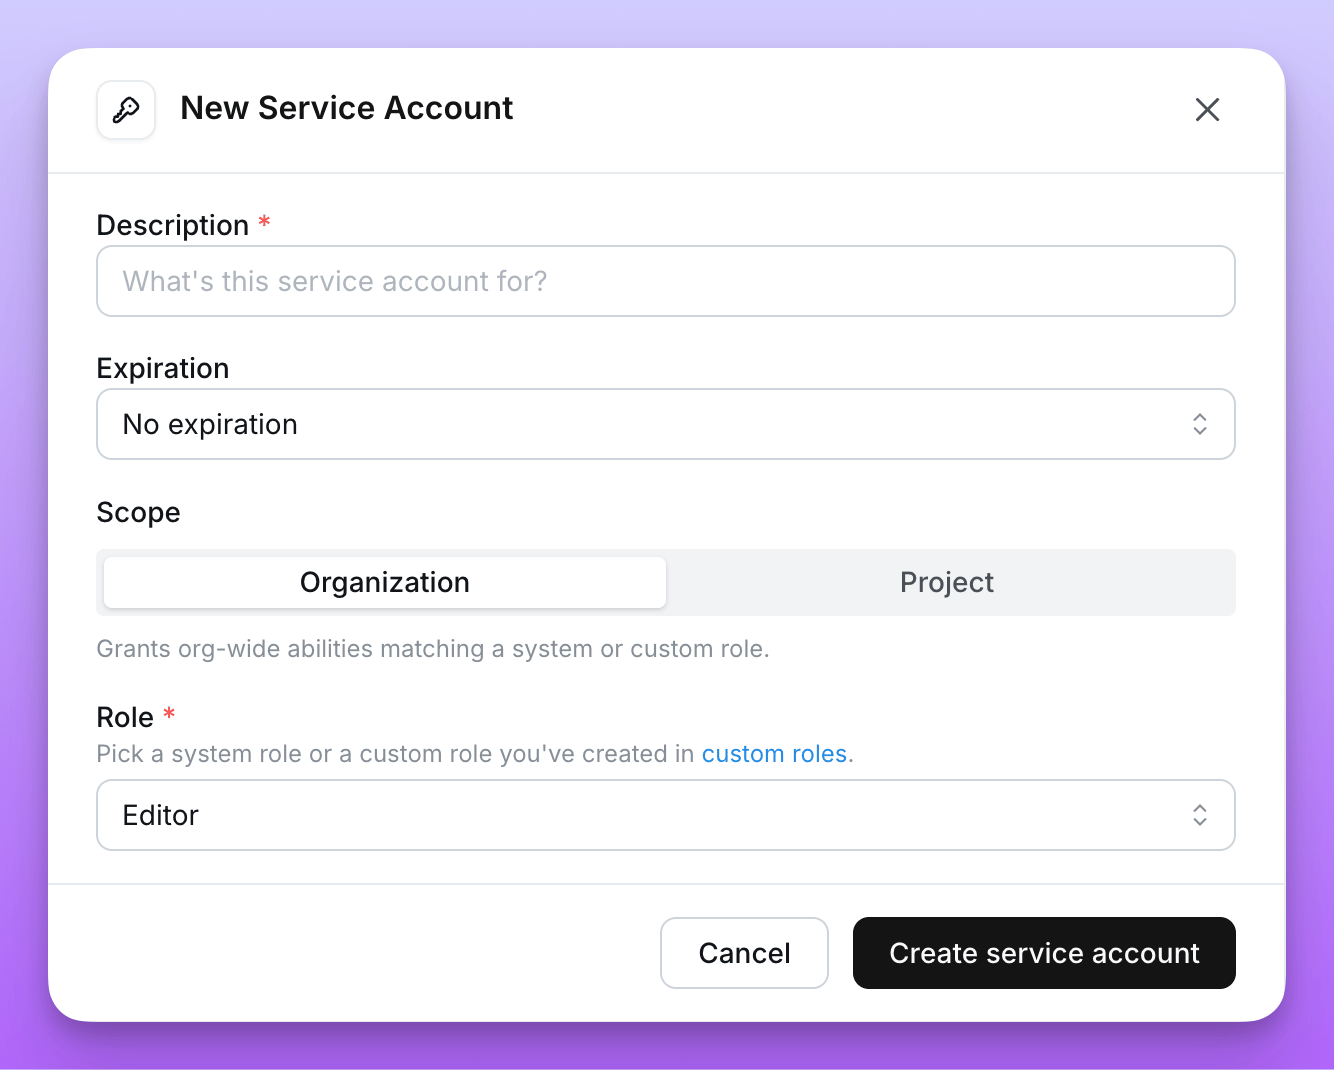 3. Enter a **Description** and optional **Expiry**
4. Choose the **Scope**:
* **Organization** (default) — the service account can act across every project in the organization, with permissions set by a single role.
* **Project** — the service account is limited to specific projects, with a separate role per project. See [Project-scoped service accounts](#project-scoped-service-accounts).
5. Assign permissions:
* For Organization scope, choose a **System role** or assign a **Custom role**.
* For Project scope, add one row per project the service account should access (project + role).
6. Click **Create service account**
7. **Copy** the generated token. This is the only time it will be shown. All service account tokens will be prefixed with `ldsvc_`
## Editing a service account
You can edit a service account's description, role, scopes, or project access in place — the token, expiry, and hash are never touched, so any CI/CD jobs, deployed services, and scripts using the token keep working.
1. Navigate to **General Settings** → **Service Accounts**
2. Open the **⋯** menu next to the service account and select **Edit**
3. Update any of the following:
* **Description**
* **Scope** — switch between **Organization** and **Project**
* **Role** or **Custom role** (for organization scope)
* **Project access** — add, remove, or change the role on each project grant (for project scope)
4. Click **Save**
Permission changes take effect on the service account's next API request. Switching scope clears the previous mode's permissions: changing from **Project** to **Organization** removes all project grants, and changing from **Organization** to **Project** removes the org-level role.
Only organization admins can edit service accounts.
## Rotating tokens
If a service account token is leaked or you want to rotate credentials on a schedule, you can rotate it in place without recreating the service account.
1. Navigate to **General Settings** → **Service Accounts**
2. Open the **⋯** menu next to the service account and select **Rotate token**
3. Choose a new **Expiry** for the rotated token
4. Click **Rotate token**
5. **Copy** the new token. As with creation, this is the only time it will be shown.
Rotating a token immediately invalidates the previous token. Update every consumer (CI/CD jobs, deployed services, scripts) before they retry with the old token.
Only service accounts created with an expiry can be rotated. Rotation is rate-limited to once per hour per service account.
## Permissions
When creating a service account, assign either a **system role** or a **custom role**.
### System roles
Service accounts can be assigned the same organization-level system roles available to users.
| Role | Description |
| ---------------------- | -------------------------------------------------------------------------------------------------------------------------- |
| **Admin** | Full organization-level control: manage access and permissions, invite users, create new projects, admin for all projects. |
| **Developer** | View and edit content in all projects, update project connections, create preview projects, use dashboards-as-code (CLI). |
| **Editor** | View and edit content in all projects. |
| **Interactive Viewer** | View content in all projects and interact with it (export results, comment, create scheduled deliveries). |
| **Viewer** | Read-only access to content in all projects. |
| **Member** | No project access by default; granted access on a per-project basis. |
For the full permission matrix, see [organization roles](/workspace-admin/roles#organization-roles-and-permissions).
### Custom roles
For finer-grained permissions, assign a [custom role](/workspace-admin/custom-roles) when creating or editing a service account. Custom roles let you pick the exact scopes the service account should have.
When a service account is bound to a custom role, the **⋯** menu next to it includes a **View custom role** link that opens the role definition.
Custom roles are only available on Lightdash Enterprise plans.
### Legacy scopes
The `org:view`, `org:edit`, and `org:admin` scopes are deprecated. Existing service accounts using these scopes continue to work, but new service accounts should be assigned a system or custom role instead.
| Scope | Description |
| ----------- | --------------------------------------------------------------------------------------------------------------------------------------------- |
| `org:view` | Read-only access to Lightdash content. |
| `org:edit` | Can create/modify Lightdash content (charts and dashboards), **and** all `org:view` permissions. |
| `org:admin` | Full organization-level control. Includes deploy, preview, download/upload, user-management, **and** all `org:edit` & `org:view` permissions. |
## Project-scoped service accounts
By default, service accounts are **organization-scoped** — they can act on every project in the organization through a single role. When a service account only needs to operate on specific projects, set its **Scope** to **Project** during creation.
A project-scoped service account:
* Has access only to the projects you grant at creation time
* Uses a separate role for each granted project
* Has no organization-wide content access outside of those projects
### Selecting projects and roles
In the **Add Service Account** modal, with **Scope** set to **Project**, add one row per project the service account should access:
1. Pick a project
2. Pick a role for that project — either one of the [project roles](/workspace-admin/roles#project-roles-and-permissions) (Viewer, Interactive Viewer, Editor, Developer, Admin) or a [custom role](/workspace-admin/custom-roles) defined in the organization
3. Add additional rows for other projects
3. Enter a **Description** and optional **Expiry**
4. Choose the **Scope**:
* **Organization** (default) — the service account can act across every project in the organization, with permissions set by a single role.
* **Project** — the service account is limited to specific projects, with a separate role per project. See [Project-scoped service accounts](#project-scoped-service-accounts).
5. Assign permissions:
* For Organization scope, choose a **System role** or assign a **Custom role**.
* For Project scope, add one row per project the service account should access (project + role).
6. Click **Create service account**
7. **Copy** the generated token. This is the only time it will be shown. All service account tokens will be prefixed with `ldsvc_`
## Editing a service account
You can edit a service account's description, role, scopes, or project access in place — the token, expiry, and hash are never touched, so any CI/CD jobs, deployed services, and scripts using the token keep working.
1. Navigate to **General Settings** → **Service Accounts**
2. Open the **⋯** menu next to the service account and select **Edit**
3. Update any of the following:
* **Description**
* **Scope** — switch between **Organization** and **Project**
* **Role** or **Custom role** (for organization scope)
* **Project access** — add, remove, or change the role on each project grant (for project scope)
4. Click **Save**
Permission changes take effect on the service account's next API request. Switching scope clears the previous mode's permissions: changing from **Project** to **Organization** removes all project grants, and changing from **Organization** to **Project** removes the org-level role.
Only organization admins can edit service accounts.
## Rotating tokens
If a service account token is leaked or you want to rotate credentials on a schedule, you can rotate it in place without recreating the service account.
1. Navigate to **General Settings** → **Service Accounts**
2. Open the **⋯** menu next to the service account and select **Rotate token**
3. Choose a new **Expiry** for the rotated token
4. Click **Rotate token**
5. **Copy** the new token. As with creation, this is the only time it will be shown.
Rotating a token immediately invalidates the previous token. Update every consumer (CI/CD jobs, deployed services, scripts) before they retry with the old token.
Only service accounts created with an expiry can be rotated. Rotation is rate-limited to once per hour per service account.
## Permissions
When creating a service account, assign either a **system role** or a **custom role**.
### System roles
Service accounts can be assigned the same organization-level system roles available to users.
| Role | Description |
| ---------------------- | -------------------------------------------------------------------------------------------------------------------------- |
| **Admin** | Full organization-level control: manage access and permissions, invite users, create new projects, admin for all projects. |
| **Developer** | View and edit content in all projects, update project connections, create preview projects, use dashboards-as-code (CLI). |
| **Editor** | View and edit content in all projects. |
| **Interactive Viewer** | View content in all projects and interact with it (export results, comment, create scheduled deliveries). |
| **Viewer** | Read-only access to content in all projects. |
| **Member** | No project access by default; granted access on a per-project basis. |
For the full permission matrix, see [organization roles](/workspace-admin/roles#organization-roles-and-permissions).
### Custom roles
For finer-grained permissions, assign a [custom role](/workspace-admin/custom-roles) when creating or editing a service account. Custom roles let you pick the exact scopes the service account should have.
When a service account is bound to a custom role, the **⋯** menu next to it includes a **View custom role** link that opens the role definition.
Custom roles are only available on Lightdash Enterprise plans.
### Legacy scopes
The `org:view`, `org:edit`, and `org:admin` scopes are deprecated. Existing service accounts using these scopes continue to work, but new service accounts should be assigned a system or custom role instead.
| Scope | Description |
| ----------- | --------------------------------------------------------------------------------------------------------------------------------------------- |
| `org:view` | Read-only access to Lightdash content. |
| `org:edit` | Can create/modify Lightdash content (charts and dashboards), **and** all `org:view` permissions. |
| `org:admin` | Full organization-level control. Includes deploy, preview, download/upload, user-management, **and** all `org:edit` & `org:view` permissions. |
## Project-scoped service accounts
By default, service accounts are **organization-scoped** — they can act on every project in the organization through a single role. When a service account only needs to operate on specific projects, set its **Scope** to **Project** during creation.
A project-scoped service account:
* Has access only to the projects you grant at creation time
* Uses a separate role for each granted project
* Has no organization-wide content access outside of those projects
### Selecting projects and roles
In the **Add Service Account** modal, with **Scope** set to **Project**, add one row per project the service account should access:
1. Pick a project
2. Pick a role for that project — either one of the [project roles](/workspace-admin/roles#project-roles-and-permissions) (Viewer, Interactive Viewer, Editor, Developer, Admin) or a [custom role](/workspace-admin/custom-roles) defined in the organization
3. Add additional rows for other projects
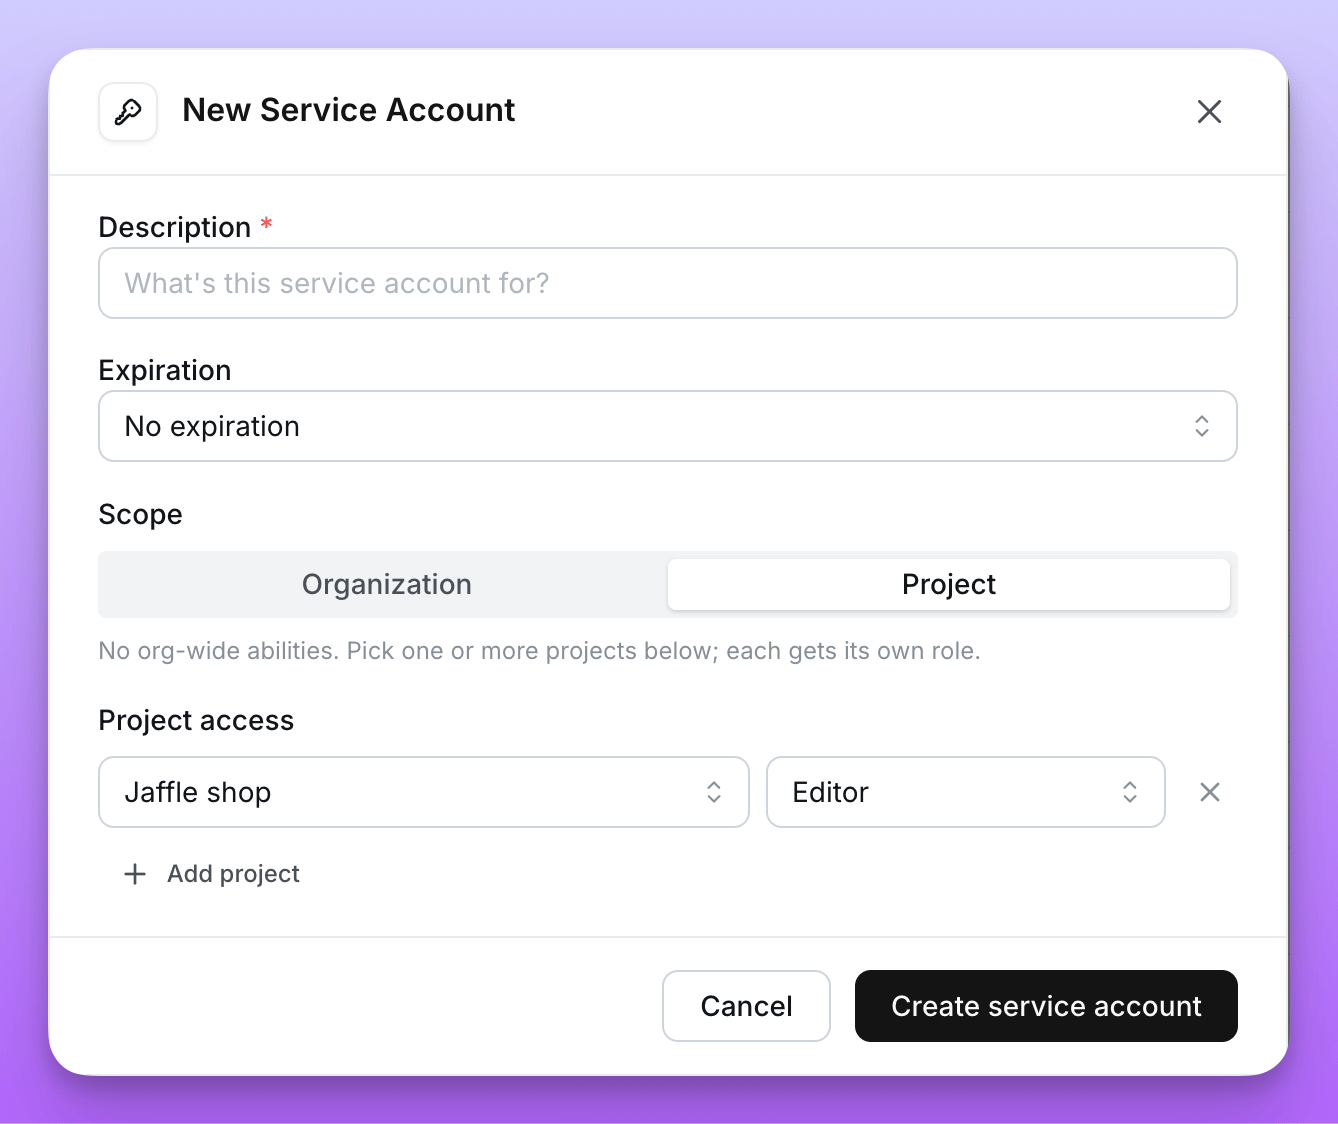 At least one project is required, and each project may only appear once.
### Viewing project access
In the service account list, project-scoped service accounts show an **N projects** badge in place of a role. Hover the badge to see each grant (project name — role).
### Updating project access
The projects and roles assigned to a project-scoped service account can be edited in place — see [Editing a service account](#editing-a-service-account). The token is preserved across edits, so integrations using it keep working.
## Using service accounts
### With Lightdash CLI
You can use service account tokens to authenticate with the Lightdash CLI:
```bash theme={null}
lightdash login https://your-lightdash-cloud --token ldsvc_your-token
```
### With the API
Service account tokens use the `Authorization` header:
```bash theme={null}
curl -H "Authorization: ldsvc_abc123xyz..." \
"$LIGHTDASH_URL/api/v1/..."
```
For full API documentation, see the [API Reference](/api-reference/v1/introduction).
## Example Use cases
### CI/CD automation
Use service accounts to automatically deploy dbt changes to Lightdash in your CI/CD pipeline. See [deploying with GitHub Actions](https://docs.lightdash.com/references/dbt-projects#1-automatically%3A-deploy-your-changes-to-lightdash-using-a-github-action) for implementation details.
### Instance initialization
When setting up a new self-hosted instance, configure `LD_SETUP_SERVICE_ACCOUNT_TOKEN` to initialize with a service account. See the [environment variables guide](https://docs.lightdash.com/self-host/customize-deployment/environment-variables#initialize-instance) for details.
### Automated reporting
Use service accounts to programmatically export dashboard data, schedule reports, or integrate Lightdash data into other systems via the API.
At least one project is required, and each project may only appear once.
### Viewing project access
In the service account list, project-scoped service accounts show an **N projects** badge in place of a role. Hover the badge to see each grant (project name — role).
### Updating project access
The projects and roles assigned to a project-scoped service account can be edited in place — see [Editing a service account](#editing-a-service-account). The token is preserved across edits, so integrations using it keep working.
## Using service accounts
### With Lightdash CLI
You can use service account tokens to authenticate with the Lightdash CLI:
```bash theme={null}
lightdash login https://your-lightdash-cloud --token ldsvc_your-token
```
### With the API
Service account tokens use the `Authorization` header:
```bash theme={null}
curl -H "Authorization: ldsvc_abc123xyz..." \
"$LIGHTDASH_URL/api/v1/..."
```
For full API documentation, see the [API Reference](/api-reference/v1/introduction).
## Example Use cases
### CI/CD automation
Use service accounts to automatically deploy dbt changes to Lightdash in your CI/CD pipeline. See [deploying with GitHub Actions](https://docs.lightdash.com/references/dbt-projects#1-automatically%3A-deploy-your-changes-to-lightdash-using-a-github-action) for implementation details.
### Instance initialization
When setting up a new self-hosted instance, configure `LD_SETUP_SERVICE_ACCOUNT_TOKEN` to initialize with a service account. See the [environment variables guide](https://docs.lightdash.com/self-host/customize-deployment/environment-variables#initialize-instance) for details.
### Automated reporting
Use service accounts to programmatically export dashboard data, schedule reports, or integrate Lightdash data into other systems via the API.