> ## Documentation Index
> Fetch the complete documentation index at: https://docs.lightdash.com/llms.txt
> Use this file to discover all available pages before exploring further.

# Dimensions reference

> The columns of your tables, and every option for defining and configuring them in YAML

Dimensions usually match 1:1 with columns in your dbt models (see [additional dimensions](#additional-dimensions) for counterexamples).

## Adding dimensions to your project

For a dimension to appear in Lightdash, you just need to declare it in your dbt model's YAML file.

```yaml theme={null}
models:
  - name: my_model
    columns:
      - name: user_id # will be "User id" in LightDash
        description: "Unique identifier for a user."
```

Write these entries by hand, or generate one for every column in a model with [`lightdash generate`](/workflow/cli/generate).

<Warning>
  Dimensions cannot use window functions in their `sql`. A dimension's SQL is inserted into the same `SELECT` as the main `GROUP BY` in the generated query, and SQL does not allow window functions in that position. If you need window-function logic, either model it directly in your dbt model (so the value is precomputed before Lightdash queries it), or add a [table calculation](/explore/table-calculations) on the query results. Lightdash also supports a small set of built-in window operations through [post calculation metrics](/semantic-layer/metrics#post-calculation-metrics) (`percent_of_previous`, `percent_of_total`, `running_total`).
</Warning>

## Dimension configuration

To customize the dimension, you can do it in your dbt model's YAML file under the `meta` tag. The syntax depends on your dbt version.

If you want to declare multiple dimensions based on the same column, check [additional dimensions](#additional-dimensions) section.

<CodeGroup>
  ```yaml dbt v1.10+ theme={null}
  models:
    - name: sales_stats
      config:
        meta:
          group_details:
            finance:
              label: Finance
              description: Finance-related fields.
          joins:
            - join: web_sessions
              sql_on: ${web_sessions.date} = ${sales_stats.date}
      columns:
        - name: revenue_gbp_total_est
          description: 'Total estimated revenue in GBP based on forecasting done by the finance team.'
          config:
            meta:
              dimension:
                type: number
                label: 'Total revenue' # this is the label you'll see in Lightdash
                description: 'My custom description' # you can override the description you'll see in Lightdash here
                sql: 'IF(${TABLE}.revenue_gbp_total_est = NULL, 0, ${registered_user_email})' # custom SQL applied to the column from dbt used to define the dimension
                hidden: false
                format: '[$£]#,##0.00' # GBP rounded to two decimal points
                groups: ['finance']
        - name: forecast_date
          description: 'Date of the forecasting.'
          config:
            meta:
              dimension:
                type: date
                time_intervals: ['DAY', 'WEEK', 'MONTH', 'QUARTER'] # not required: the default time intervals for dates are `['DAY', 'WEEK', 'MONTH', 'YEAR']`
                urls:
                  - label: 'Open in forecasting tool'
                    url: 'https://finance.com/forceasts/weeks/${ value.raw }'
                  - label: Open in Google Calendar
                    url: 'https://calendar.google.com/calendar/u/0/r/day/${ value.formatted |split: "-" |join: "/"}'
                required_attributes:
                  is_admin: 'true'
  ```

  ```yaml dbt v1.9 and earlier theme={null}
  models:
    - name: sales_stats
      meta:
        group_details:
          finance:
            label: Finance
            description: Finance-related fields.
        joins:
          - join: web_sessions
            sql_on: ${web_sessions.date} = ${sales_stats.date}
      columns:
        - name: revenue_gbp_total_est
          description: 'Total estimated revenue in GBP based on forecasting done by the finance team.'
          meta:
            dimension:
              type: number
              label: 'Total revenue' # this is the label you'll see in Lightdash
              description: 'My custom description' # you can override the description you'll see in Lightdash here
              sql: 'IF(${TABLE}.revenue_gbp_total_est = NULL, 0, ${registered_user_email})' # custom SQL applied to the column from dbt used to define the dimension
              hidden: false
              format: '[$£]#,##0.00' # GBP rounded to two decimal points
              groups: ['finance']
        - name: forecast_date
          description: 'Date of the forecasting.'
          meta:
            dimension:
              type: date
              time_intervals: ['DAY', 'WEEK', 'MONTH', 'QUARTER'] # not required: the default time intervals for dates are `['DAY', 'WEEK', 'MONTH', 'YEAR']`
              urls:
                - label: 'Open in forecasting tool'
                  url: 'https://finance.com/forceasts/weeks/${ value.raw }'
                - label: Open in Google Calendar
                  url: 'https://calendar.google.com/calendar/u/0/r/day/${ value.formatted |split: "-" |join: "/"}'
              required_attributes:
                is_admin: 'true'
  ```

  ```yaml Lightdash YAML theme={null}
  type: model
  name: sales_stats

  group_details:
    finance:
      label: Finance
      description: Finance-related fields.

  joins:
    - join: web_sessions
      sql_on: ${web_sessions.date} = ${sales_stats.date}

  dimensions:
    - name: revenue_gbp_total_est
      description: 'Total estimated revenue in GBP based on forecasting done by the finance team.'
      type: number
      label: 'Total revenue' # this is the label you'll see in Lightdash
      sql: 'IF(${TABLE}.revenue_gbp_total_est = NULL, 0, ${registered_user_email})' # custom SQL applied to the column from dbt used to define the dimension
      hidden: false
      format: '[$£]#,##0.00' # GBP rounded to two decimal points
      groups: ['finance']
    - name: forecast_date
      description: 'Date of the forecasting.'
      type: date
      time_intervals: ['DAY', 'WEEK', 'MONTH', 'QUARTER'] # not required: the default time intervals for dates are `['DAY', 'WEEK', 'MONTH', 'YEAR']`
      urls:
        - label: 'Open in forecasting tool'
          url: 'https://finance.com/forceasts/weeks/${ value.raw }'
        - label: Open in Google Calendar
          url: 'https://calendar.google.com/calendar/u/0/r/day/${ value.formatted |split: "-" |join: "/"}'
      required_attributes:
        is_admin: 'true'
  ```
</CodeGroup>

The table below shows all the dimension properties you can customize:

| Property                                     | Required | Value                                                                                                                                                                                                    | Description                                                                                                                                                                                                                                                                                                                                                                                  |
| :------------------------------------------- | :------- | :------------------------------------------------------------------------------------------------------------------------------------------------------------------------------------------------------- | :------------------------------------------------------------------------------------------------------------------------------------------------------------------------------------------------------------------------------------------------------------------------------------------------------------------------------------------------------------------------------------------- |
| label                                        | No       | string                                                                                                                                                                                                   | Custom label. If you set this property, this is what you'll see in Lightdash instead of the dimension name.                                                                                                                                                                                                                                                                                  |
| [type](#type)                                | No       | Dimension type                                                                                                                                                                                           | The dimension type is automatically pulled from your table schemas in Lightdash but you can override the type using this property.                                                                                                                                                                                                                                                           |
| [description](#description)                  | No       | string                                                                                                                                                                                                   | Description of the dimension in Lightdash. You can use this to override the description you have for the dimension in dbt.                                                                                                                                                                                                                                                                   |
| sql                                          | No       | string                                                                                                                                                                                                   | Custom SQL applied to the column used to define the dimension.                                                                                                                                                                                                                                                                                                                               |
| [time\_intervals](#time-intervals)           | No       | 'default' or OFF or an array\[] containing elements of [date](#date-options), [numeric](#numeric-options), [string](#string-options) options, or [custom granularity](#using-custom-granularities) names | 'default' (or not setting the time\_intervals property) will be converted into \['DAY', 'WEEK', 'MONTH', 'QUARTER', 'YEAR'] for dates and \['RAW', 'DAY', 'WEEK', 'MONTH', 'QUARTER', 'YEAR'] for timestamps; if you want no time intervals set 'OFF'. You can also include custom granularity names defined in `lightdash.config.yml`.                                                      |
| hidden                                       | No       | boolean                                                                                                                                                                                                  | If set to true, the dimension is hidden from Lightdash. By default, this is set to false if you don't include this property. Hidden dimensions are also excluded from drilldowns (View underlying data).                                                                                                                                                                                     |
| [compact](#compact)                          | No       | string                                                                                                                                                                                                   | This option will compact the number value (e.g. 1,500 to 1.50K). Currently supports one of the following: \['auto', 'thousands', 'millions', 'billions', 'trillions', 'kilobytes', 'megabytes', 'gigabytes', 'terabytes', 'petabytes', 'kibibytes', 'mebibytes', 'gibibytes', 'tebibytes', 'pebibytes']. Use `auto` to dynamically pick K/M/B/T based on each value's magnitude.             |
| [format](#format)                            | No       | string                                                                                                                                                                                                   | This option will format the output value on the results table and CSV export. Supports spreadsheet-style formatting (e.g. #,##0.00). Use [this website](https://customformats.com) to help build your custom format.                                                                                                                                                                         |
| [separator](#separator)                      | No       | string                                                                                                                                                                                                   | This option controls the grouping and decimal characters used when rendering numbers (e.g. `1.234.567,50` for European locales). One of: `default`, `commaPeriod`, `spacePeriod`, `periodComma`, `noSeparatorPeriod`, `apostrophePeriod`.                                                                                                                                                    |
| [groups](#groups)                            | No       | string or string\[]                                                                                                                                                                                      | If you set this property, the dimension will be grouped in the sidebar with other dimensions with the same group label.                                                                                                                                                                                                                                                                      |
| [urls](#urls)                                | No       | Array of  `url`, `label`                                                                                                                                                                                 | Adding urls to a dimension allows your users to click dimension values in the UI and take actions, like opening an external tool with a url, or open at a website. You can use liquid templates to customise the link based on the value of the dimension.                                                                                                                                   |
| [richText](#rich-text)                       | No       | string                                                                                                                                                                                                   | Rich text template for displaying formatted content in table cells. Supports Markdown, HTML, and LiquidJS templating.                                                                                                                                                                                                                                                                        |
| [required\_attributes](#required-attributes) | No       | Object with `user_attribute`, `value`                                                                                                                                                                    | Limits access to users with those attributes (AND logic - all must match)                                                                                                                                                                                                                                                                                                                    |
| [any\_attributes](#any-attributes)           | No       | Object with `user_attribute`, `value`                                                                                                                                                                    | Limits access to users with those attributes (OR logic - at least one must match)                                                                                                                                                                                                                                                                                                            |
| [colors](#color)                             | No       | Object with `value`, `color`                                                                                                                                                                             | Color for the values in the chart                                                                                                                                                                                                                                                                                                                                                            |
| [image](#image-display)                      | No       | Object with `url`                                                                                                                                                                                        | **\[WIP]** Display images in table cells using URL templates. Supports LiquidJS templating for dynamic URLs.                                                                                                                                                                                                                                                                                 |
| [case\_sensitive](#case-sensitive)           | No       | boolean                                                                                                                                                                                                  | If set to `false`, string filters on this dimension will be case insensitive. Defaults to `true`. Overrides explore-level setting.                                                                                                                                                                                                                                                           |
| [filter\_autocomplete](#filter-autocomplete) | No       | Object                                                                                                                                                                                                   | Configure the filter autocomplete suggestions for this dimension. Provide a static list of `values` (with optional display `label`s), point at a `label_dimension` in the same table to label warehouse-fetched values, source values from a dimension in another model with `options_from_dimension`, and/or disable warehouse-based autocomplete by setting `fetch_from_warehouse: false`. |
| [tags](#tags)                                | No       | string\[]                                                                                                                                                                                                | An array of string tags for categorizing and filtering dimensions programmatically. Tags can be used by AI agents, API filters, and other backend workflows.                                                                                                                                                                                                                                 |
| [convert\_timezone](#convert-timezone)       | No       | boolean                                                                                                                                                                                                  | **\[Experimental]** If set to `false`, the dimension opts out of the project query timezone for display, grouping, and extracts - the raw warehouse value is rendered instead. Defaults to `true`. Has no effect unless a project query timezone is set.                                                                                                                                     |
| [timestamp\_domain](#timestamp-domain)       | No       | `aware` or `naive`                                                                                                                                                                                       | Declares whether a `timestamp` column stores an instant (`aware`) or a bare wall clock with no zone (`naive`). Overrides what Lightdash detects from the warehouse catalog.                                                                                                                                                                                                                  |

## Type

The types of your dimensions are pulled from your data warehouse, automatically. You can override these types using the `type` meta tag in your .yml file. If you run `lightdash generate` to generate your .yml files, then Lightdash will add the `type` from your data warehouse to your .yml files automatically.

<CodeGroup>
  ```yaml dbt v1.10+ theme={null}
  - name: user_created_date
    config:
      meta:
        dimension:
          type: date
  ```

  ```yaml dbt v1.9 and earlier theme={null}
  - name: user_created_date
    meta:
      dimension:
        type: date
  ```

  ```yaml Lightdash YAML theme={null}
  dimensions:
    - name: user_created_date
      type: date
  ```
</CodeGroup>

We currently support these dimension types:

| Dimension Types |
| :-------------- |
| string          |
| number          |
| timestamp       |
| date            |
| boolean         |

## Description

Column descriptions in your YAML file are automatically pulled into Lightdash and you can spot them if you hover over the dimension name.

<Frame>
  <img src="https://mintcdn.com/lightdash/5NMMM4n0puUIh3u9/images/semantic-layer/dimensions/screenshot-column-descriptions-3498d7b3c09c38fda5b755ce21358b2c.png?fit=max&auto=format&n=5NMMM4n0puUIh3u9&q=85&s=23a9d5129d8037e94e46a272ab551135" alt="Dimensions list with an info icon beside &#x22;User id&#x22; showing the tooltip &#x22;Unique identifier for a user.&#x22;" width="1178" height="182" data-path="images/semantic-layer/dimensions/screenshot-column-descriptions-3498d7b3c09c38fda5b755ce21358b2c.png" />
</Frame>

Descriptions support any formatting that works with YAML, but the three characters used most often are:

### Quotes for escaping

When you surround text with double or single quotes it will escape the text between so that any special characters recognized by YAML will still pass through to the Lightdash UI.

```yaml theme={null}
description: 'The contents of this column include this & that.'
```

### Greater than symbol for folded text blocks

When you use `>-` it allows you to type descriptions that are multiple lines long in the YAML file, but the text will be combined into a single line when parsed. The `lightdash generate` command will automatically add this to keep YAML files easy to read.

This description in YAML:

```yaml theme={null}
- name: product_tier
  description: >-
    This is a longer description...
    ...that requires multiple lines
    and it will be combined in the Lightdash UI
```

Will appear like this in the Lightdash UI:

```yaml theme={null}
This is a longer description......that requires multiple lines and it will be combined in the Lightdash UI
```

### Vertical bar for preserving line breaks

If you need line breaks to stay in place when they show up in the Lightdash UI, you can use a `|` character like this:

```yaml theme={null}
- name: product_tier
  description: |
    This is a longer description...
    ...that requires multiple lines
    and it will stay on multiple lines
```

And in Lightdash UI it will appear like this:

```yaml theme={null}
This is a longer description...
...that requires multiple lines
and it will stay on multiple lines
```

### Using dbt doc blocks

You can also use dbt docs blocks in descriptions, [more on that here](/workflow/cli/generate#using-doc-blocks-to-build-better-yml-files).

## Format

You can use the `format` parameter to have your fields show in a particular format in Lightdash. Lightdash supports spreadsheet-style format expressions for all field types.

To help you build your format expression, we recommend using [https://customformats.com/](https://customformats.com/).

```yaml theme={null} theme={null} theme={null}
models:
  - name: sales
    columns:
      - name: revenue
        meta:
          metrics:
            total_us_revenue:
              type: sum
              description: 'Total revenue in USD, with two decimal places, compacted to thousands'
              format: '$#,##0.00," K"' # 505,430 will appear as '$505.43 K'
            percent_of_total_global_revenue:
              type: number
              description: 'Percent of total global revenue coming from US revenue.'
              sql: ${total_us_revenue} / ${total_global_revenue}
              format: '0.00%' # 0.67895243 will appear as '67.89%'
```

### Example format expressions

| Description                                    | Format Expression     | Raw Value            | Formatted Output      |
| :--------------------------------------------- | :-------------------- | :------------------- | :-------------------- |
| **Adds "km" suffix to the value**              | `#,##0.00" km"`       | 100000.00            | 100,000.00 km         |
|                                                |                       | 15000.25             | 15,000.25 km          |
|                                                |                       | 500                  | 500.00 km             |
| **Format date with 12-hour clock**             | `m/d/yyyy h:mm AM/PM` | 2023-09-05T15:45:00Z | 9/5/2023 3:45 PM      |
|                                                |                       | 2024-01-20T08:30:00Z | 1/20/2024 8:30 AM     |
| **Display the full name of the day**           | `dddd`                | 2023-09-05T15:45:00Z | Tuesday               |
|                                                |                       | 2024-01-20T08:30:00Z | Saturday              |
| **Format positive, negative, and zero values** | `"⬆️ "0;"⬇️ "0;0`     | -500                 | ⬇️ 500                |
|                                                |                       | 200                  | ⬆️ 200                |
|                                                |                       | 0                    | 0                     |
| **Text formatting**                            | `"Delivered in "@`    | 2 weeks              | Delivered in 2 weeks  |
|                                                |                       | 18 hours             | Delivered in 18 hours |
| **Percentage formatting**                      | `#,##0.00%`           | 0.6758               | 67.58%                |
|                                                |                       | 0.1                  | 10.00%                |
|                                                |                       | 0.002                | 0.20%                 |
| **No formatting**                              | `0`                   | 12345232             | 12345232              |
|                                                |                       | 56.7856              | 57                    |
| **Currency formatting (USD)**                  | `[$$]#,##0.00`        | 15430.75436          | \$15,430.75           |
|                                                |                       | 1234.50              | \$1,234.50            |
| **Currency formatting (GBP)**                  | `[$£]#,##0.00`        | 15430.75436          | £15,430.75            |
|                                                |                       | 1234.50              | £1,234.50             |
| **Compact currency in thousands**              | `[$$]#,##0,"K"`       | 15430.75436          | \$15K                 |
|                                                |                       | 15430.75436          | \$15.43K              |
| **Compact currency in millions**               | `[$$]#,##0.00,,"M"`   | 13334567             | \$13.33M              |
|                                                |                       | 120000000            | \$120.00M             |

<Accordion title="(Legacy) format and round options">
  Spreadsheet-style format expressions are the recommended way of adding formatting to your fields in Lightdash. There are legacy formatting options, listed below, which are less flexible than the spreadsheet-style formatting.

  <Info>
    If you use both legacy and spreadsheet-style formatting options for a single field, Lightdash will ignore the legacy `format` and `round` options and only apply the spreadsheet-style formatting expression.
  </Info>

  #### Format (legacy)

  ```yaml theme={null} theme={null} theme={null}
  models:
    - name: sales_stats
      columns:
        - name: revenue
          description: 'Total estimated revenue in GBP based on forecasting done by the finance team.'
          meta:
            metrics:
              total_revenue:
                label: 'Total revenue GBP'
                type: SUM
                format: 'gbp'
  ```

  These are the options:

  | Option  | Equivalent format expression | Raw value | Displayed value |
  | :------ | :--------------------------- | :-------- | :-------------- |
  | km      | `'#,##0.00" km"'`            | 10        | 10 km           |
  | mi      | `'#,##0.00" mi"'`            | 10        | 10 mi           |
  | usd     | `'[\$\$]#,##0.00'`           | 10        | \$10.00         |
  | gbp     | `'[\$£]#,##0.00'`            | 10        | £10.00          |
  | eur     | `'[\$€]#,##0.00'`            | 10        | €10.00          |
  | jpy     | `'[\$¥]#,##0.00'`            | 10        | ¥10             |
  | percent | `'#,##0.00%'`                | 0.1       | 10.00%          |
  | id      | `'0'`                        | 12389572  | 12389572        |

  `percent` multiplies the raw value by 100, and `id` strips commas and spaces from number and string values so they read as identifiers.

  #### Round (legacy)

  You can round values to appear with a certain number of decimal points.

  ```yaml theme={null} theme={null} theme={null}
  models:
    - name: sales
      columns:
        - name: revenue
          meta:
            metrics:
              total_revenue:
                type: sum
                round: 0 # equivalent format expression: '#,##0.0'
  ```
</Accordion>

## Compact

You can compact values in your YAML. For example, if I wanted all of my revenue values to be shown in thousands (e.g. `1,500` appears as `1.50K`), then I would write something like this in my .yml:

```yaml theme={null} theme={null} theme={null}
models:
  - name: sales
    columns:
      - name: revenue
        meta:
          dimension:
            compact: thousands # You can also use 'K'
```

| Value     | Alias                | Equivalent format expression              | Example output |
| :-------- | :------------------- | :---------------------------------------- | :------------- |
| auto      |                      | dynamic — picks K/M/B/T per value         | 1.50K / 2.30M  |
| thousands | "K" and "thousand"   | `'#,##0," K"'` or `'#,##0.00," K"'`       | 1K             |
| millions  | "M" and "million"    | `'#,##0,," M"'` or `'#,##0.00,," M"'`     | 1M             |
| billions  | "B" and "billion"    | `'#,##0,,," B"'` or `'#,##0.00,,," B"'`   | 1B             |
| trillions | "T" and "trillion"   | `'#,##0,,,," T"'` or `'#,##0.00,,,," T"'` | 1T             |
| kilobytes | "KB" and "kilobyte"  |                                           | 1KB            |
| megabytes | "MB" and "megabyte"  |                                           | 1MB            |
| gigabytes | "GB" and "gigabyte"  |                                           | 1GB            |
| terabytes | "TB" and "terabyte"  |                                           | 1TB            |
| petabytes | "PB" and "petabyte"  |                                           | 1PB            |
| kibibytes | "KiB" and "kibibyte" |                                           | 1KiB           |
| mebibytes | "MiB" and "mebibyte" |                                           | 1MiB           |
| gibibytes | "GiB" and "gibibyte" |                                           | 1GiB           |
| tebibytes | "TiB" and "tebibyte" |                                           | 1TiB           |
| pebibytes | "PiB" and "pebibyte" |                                           | 1PiB           |

## Separator

You can use the `separator` property to control the grouping and decimal characters used when rendering numbers, so values display correctly for non-US locales (e.g. `1.234.567,50` in Europe or `1'234'567.50` in Switzerland).

`separator` only changes the separator characters. It composes with `format` (including spreadsheet-style `format` expressions), `compact`, `round`, and `currency`, which still control the overall shape of the number.

```yaml theme={null} theme={null} theme={null}
models:
  - name: sales
    columns:
      - name: revenue
        meta:
          metrics:
            total_revenue:
              type: sum
              format: '[$€]#,##0.00'
              separator: periodComma # 1.234.567,50 €
```

These are the supported values:

| Value               | Example output | Description                                                                                 |
| :------------------ | :------------- | :------------------------------------------------------------------------------------------ |
| `default`           | `1,234,567.50` | Uses the Lightdash default (comma thousands, period decimal). Same as omitting `separator`. |
| `commaPeriod`       | `1,234,567.50` | Comma thousands separator, period decimal separator.                                        |
| `spacePeriod`       | `1 234 567.50` | Space thousands separator, period decimal separator.                                        |
| `periodComma`       | `1.234.567,50` | Period thousands separator, comma decimal separator.                                        |
| `noSeparatorPeriod` | `1234567.50`   | No thousands separator, period decimal separator.                                           |
| `apostrophePeriod`  | `1'234'567.50` | Apostrophe thousands separator, period decimal separator (Swiss).                           |

## Time intervals

Lightdash automatically adds intervals for dimensions that are timestamps or dates, so you don't have to!

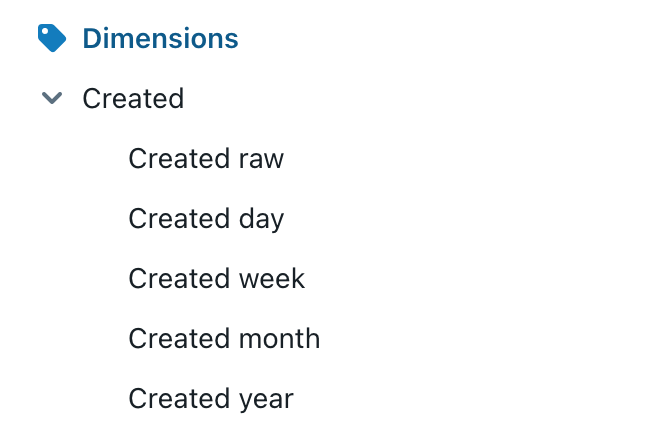
For example, here we have the timestamp dimension `created` defined in our dbt project:

```yaml theme={null}
- name: created
  description: 'Timestamp when the user was created.'
```

Lightdash breaks this out into the default intervals automatically. So, this is how `created` appears in our Lightdash project:
<Frame>
  <img src="https://mintcdn.com/lightdash/5NMMM4n0puUIh3u9/images/semantic-layer/dimensions/screenshot-default-intervals-1fb6e04e2d4f617bb22f9fea86fa52c6.png?fit=max&auto=format&n=5NMMM4n0puUIh3u9&q=85&s=18cfce8b8b43705e8bd09a4f4e98a619" alt="screenshot-default-intervals" width="652" height="440" data-path="images/semantic-layer/dimensions/screenshot-default-intervals-1fb6e04e2d4f617bb22f9fea86fa52c6.png" />
</Frame>

<Info>
  [**Formatting added to a date or timestamp dimension will be applied to all of the time intervals for that dimension.**](#format)

  If you want to apply different formats for different time intervals, we recommend creating [additional dimensions](#additional-dimensions) for time intervals where you want to customize the format.
</Info>

### Default time intervals

The default time intervals that Lightdash adds are...

**For `date` type**:

```yaml theme={null}
['DAY', 'WEEK', 'MONTH', 'QUARTER', 'YEAR']
```

**For `timestamp` type**:

```yaml theme={null}
['RAW', 'DAY', 'WEEK', 'MONTH', 'QUARTER', 'YEAR']
```

### Disable time intervals

If you want to turn off time intervals for a dimension, you set the `time_intervals` property to `OFF`.

In this example, `created` would now appear as a single, timestamp dimension without a drop-down list of time intervals in Lightdash:

<CodeGroup>
  ```yaml dbt v1.10+ theme={null}
  - name: created
    description: 'Timestamp when the user was created.'
    config:
      meta:
        dimension:
          type: timestamp
          time_intervals: OFF
  ```

  ```yaml dbt v1.9 and earlier theme={null}
  - name: created
    description: 'Timestamp when the user was created.'
    meta:
      dimension:
        type: timestamp
        time_intervals: OFF
  ```

  ```yaml Lightdash YAML theme={null}
  dimensions:
    - name: created
      description: 'Timestamp when the user was created.'
      type: timestamp
      time_intervals: OFF
  ```

</CodeGroup>

<Frame>
  <img src="https://mintcdn.com/lightdash/5NMMM4n0puUIh3u9/images/semantic-layer/dimensions/screenshot-intervals-off-e786a3290b6c8b8454fe7f223a5682d8.png?fit=max&auto=format&n=5NMMM4n0puUIh3u9&q=85&s=c1c1dc719bc7e483389312d7a8bbf2f1" alt="screenshot-intervals-off" width="546" height="206" data-path="images/semantic-layer/dimensions/screenshot-intervals-off-e786a3290b6c8b8454fe7f223a5682d8.png" />
</Frame>

### To customize the time intervals for a dimension, you can use the `time_intervals` parameter.

If you specify time intervals manually, then this overrides the default time intervals used by Lightdash.

<CodeGroup>
  ```yaml dbt v1.10+ theme={null}
  - name: created
    description: 'Timestamp when the user was created.'
    config:
      meta:
        dimension:
          time_intervals: ['DAY', 'DAY_OF_MONTH_NUM', 'MONTH', 'QUARTER_NAME', 'YEAR']
  ```

  ```yaml dbt v1.9 and earlier theme={null}
  - name: created
    description: 'Timestamp when the user was created.'
    meta:
      dimension:
        time_intervals: ['DAY', 'DAY_OF_MONTH_NUM', 'MONTH', 'QUARTER_NAME', 'YEAR']
  ```

  ```yaml Lightdash YAML theme={null}
  dimensions:
    - name: created
      description: 'Timestamp when the user was created.'
      time_intervals: ['DAY', 'DAY_OF_MONTH_NUM', 'MONTH', 'QUARTER_NAME', 'YEAR']
  ```
</CodeGroup>

You can see all of the standard interval options for date and timestamp fields below. You can also add custom intervals using *additional dimensions*, there's an example below the following tables.

### Date options

<div className="sticky-first-col">
  | Option      | Description                                   | Type            | Displayed value                           | Notes                                                         |
  | :---------- | :-------------------------------------------- | :-------------- | :---------------------------------------- | :------------------------------------------------------------ |
  | RAW         | Original value                                | Date / DateTime | 2019-01-01 / 2019-01-01, 09:30:30:300 UTC |                                                               |
  | YEAR        | Date truncated to the nearest year            | Date            | 2019                                      |                                                               |
  | QUARTER     | Date truncated to the nearest quarter         | Date            | 2019-Q1                                   |                                                               |
  | MONTH       | Date truncated to the nearest month           | Date            | 2019-01-01                                |                                                               |
  | WEEK        | Date truncated to the nearest week            | Date            | 2019-01-01                                | The start of the week depends on your warehouse configuration |
  | DAY         | Date truncated to the nearest day             | Date            | 2019-01-01                                |                                                               |
  | HOUR        | Datetime truncated to the nearest hour        | DateTime        | 2019-01-01, 09 UTC                        |                                                               |
  | MINUTE      | Datetime truncated to the nearest minute      | DateTime        | 2019-01-01, 09:30 UTC                     |                                                               |
  | SECOND      | Datetime truncated to the nearest second      | DateTime        | 2019-01-01, 09:30:30 UTC                  |                                                               |
  | MILLISECOND | Datetime truncated to the nearest millisecond | DateTime        | 2019-01-01, 09:30:30:300 UTC              |                                                               |
</div>

### Numeric options

<div className="sticky-first-col">
  | Option                | Description                  | Type   | Displayed value | Notes                                                                         |
  | :-------------------- | :--------------------------- | :----- | :-------------- | :---------------------------------------------------------------------------- |
  | DAY\_OF\_WEEK\_INDEX  | Index of the day of the week | Number | 0               | The value range and start of the week depends on your warehouse configuration |
  | DAY\_OF\_MONTH\_NUM   | Day of the month             | Number | 21              |                                                                               |
  | DAY\_OF\_YEAR\_NUM    | Day of the year              | Number | 127             |                                                                               |
  | WEEK\_NUM             | Week number                  | Number | 37              |                                                                               |
  | MONTH\_NUM            | Month number                 | Number | 7               |                                                                               |
  | QUARTER\_NUM          | Quarter number               | Number | 3               |                                                                               |
  | YEAR\_NUM             | Year number                  | Number | 2019            |                                                                               |
  | MINUTE\_OF\_HOUR\_NUM | Minute number                | Number | 50              |                                                                               |
  | HOUR\_OF\_DAY\_NUM    | Hour number                  | Number | 22              |                                                                               |
</div>

### String options

| Option              | Description     | Type   | Displayed value |
| :------------------ | :-------------- | :----- | :-------------- |
| DAY\_OF\_WEEK\_NAME | Day of the week | String | Monday          |
| MONTH\_NAME         | Month name      | String | March           |
| QUARTER\_NAME       | Quarter name    | String | Q3              |

### Using custom granularities

<Info>
  <Badge icon="flask" color="purple" size="sm" shape="pill">Beta</Badge> Custom granularities are available on all plans. [What Beta means](/support/feature-maturity-levels).
</Info>

You can define reusable custom time granularities in your `lightdash.config.yml` file and reference them in the `time_intervals` array. Unlike [custom time intervals using additional dimensions](#custom-time-intervals-with-additional-dimensions), custom granularities **appear in the date zoom dropdown** alongside standard options (Day, Week, Month, etc.).

**Step 1**: Define custom granularities in `lightdash.config.yml`:

```yaml theme={null}
# lightdash.config.yml
custom_granularities:
  fiscal_quarter:
    label: "Fiscal Quarter"
    sql: "DATE_TRUNC('quarter', ${COLUMN} + INTERVAL '1 month')"
  week_monday:
    label: "Week (Mon-Sun)"
    sql: "DATE_TRUNC('week', ${COLUMN})"
```

**Step 2**: Reference them in your dimension's `time_intervals`:

<CodeGroup>
  ```yaml dbt v1.10+ theme={null}
  - name: order_date
    description: 'Date the order was placed'
    config:
      meta:
        dimension:
          type: date
          time_intervals: ['DAY', 'WEEK', 'fiscal_quarter', 'YEAR']
  ```

  ```yaml dbt v1.9 and earlier theme={null}
  - name: order_date
    description: 'Date the order was placed'
    meta:
      dimension:
        type: date
        time_intervals: ['DAY', 'WEEK', 'fiscal_quarter', 'YEAR']
  ```

  ```yaml Lightdash YAML theme={null}
  dimensions:
    - name: order_date
      description: 'Date the order was placed'
      type: date
      time_intervals: ['DAY', 'WEEK', 'fiscal_quarter', 'YEAR']
  ```
</CodeGroup>

The `${COLUMN}` placeholder in the SQL expression is automatically replaced with the dimension's column SQL at runtime. Custom granularities also inherit `requiredAttributes` and `anyAttributes` from the parent dimension.

<Info>
  See [lightdash.config.yml reference](/semantic-layer/lightdash-config-yml#custom-granularities-configuration) for the full configuration options and the [Date zoom guide](/explore/dashboards/date-zoom) for information on configuring the date zoom dropdown.
</Info>

### Custom time intervals with additional dimensions

You can also create custom time-based dimensions by using additional dimensions and groups. This approach groups custom dimensions with their parent date dimension in the sidebar, but **these dimensions do not appear in the date zoom dropdown** - they are only available as separate fields in the dimension list.

<Note>
  If you need custom time intervals to appear in the **date zoom dropdown**, use [custom granularities](#using-custom-granularities) defined in `lightdash.config.yml` instead.
</Note>

Here's an example of how that might look if you wanted to add `year_of_week_iso` grouped with the `delivery_date` dimension. Note that by defining the `groups:` option, we ensure that the new "Year of week" option is displayed grouped with the parent dimension in the sidebar.

<CodeGroup>
  ```yaml dbt v1.10+ theme={null}
  - name: delivery_date
    config:
      meta:
        dimension:
          label: "Delivery Date"
          type: date
          time_intervals: [ ... ]
        additional_dimensions:
          year_of_week_num:
            type: number
            label: "Year of week"
            sql: "yearofweekiso(${delivery_date})"
            groups: ["Delivery Date"]
  ```

  ```yaml dbt v1.9 and earlier theme={null}
  - name: delivery_date
    meta:
      dimension:
        label: "Delivery Date"
        type: date
        time_intervals: [ ... ]
      additional_dimensions:
        year_of_week_num:
          type: number
          label: "Year of week"
          sql: "yearofweekiso(${delivery_date})"
          groups: ["Delivery Date"]
  ```

  ```yaml Lightdash YAML theme={null}
  dimensions:
    - name: delivery_date
      label: "Delivery Date"
      type: date
      time_intervals: [ ... ]
    - name: year_of_week_num
      type: number
      label: "Year of week"
      sql: "yearofweekiso(${delivery_date})"
      groups: ["Delivery Date"]
  ```
</CodeGroup>

### Reference time intervals in other dimensions

You can reference specific time intervals of a dimension in other dimensions. When you define time intervals for a dimension (like `session_start`), Lightdash creates separate dimensions for each interval (e.g., `session_start_day`, `session_start_month`). You can reference these in custom SQL for other dimensions.

For example, if you have a `user_created_at` dimension with time intervals defined, you can calculate the duration between two dates using the `DAY` interval:

```yaml theme={null}
  - name: user_created_at
    meta:
      dimension:
        type: timestamp
        time_intervals:
        - DAY_OF_WEEK_NAME
        - WEEK
        - MONTH
        - RAW
        - DAY
        - HOUR_OF_DAY_NUM
        - QUARTER
  - name: first_purchase_at
    meta:
      dimension:
        type: timestamp
        time_intervals:
        - DAY
        - MONTH
        - QUARTER
  - name: duration
    meta:
      dimension:
        type: number
        sql: EXTRACT(DAY FROM ${first_purchase_at_day} - ${user_created_at_day})
```

In this example, `${user_created_at_day}` and `${first_purchase_at_day}` reference the `DAY` time interval versions of the `user_created_at` and `first_purchase_at` dimensions.

## Groups

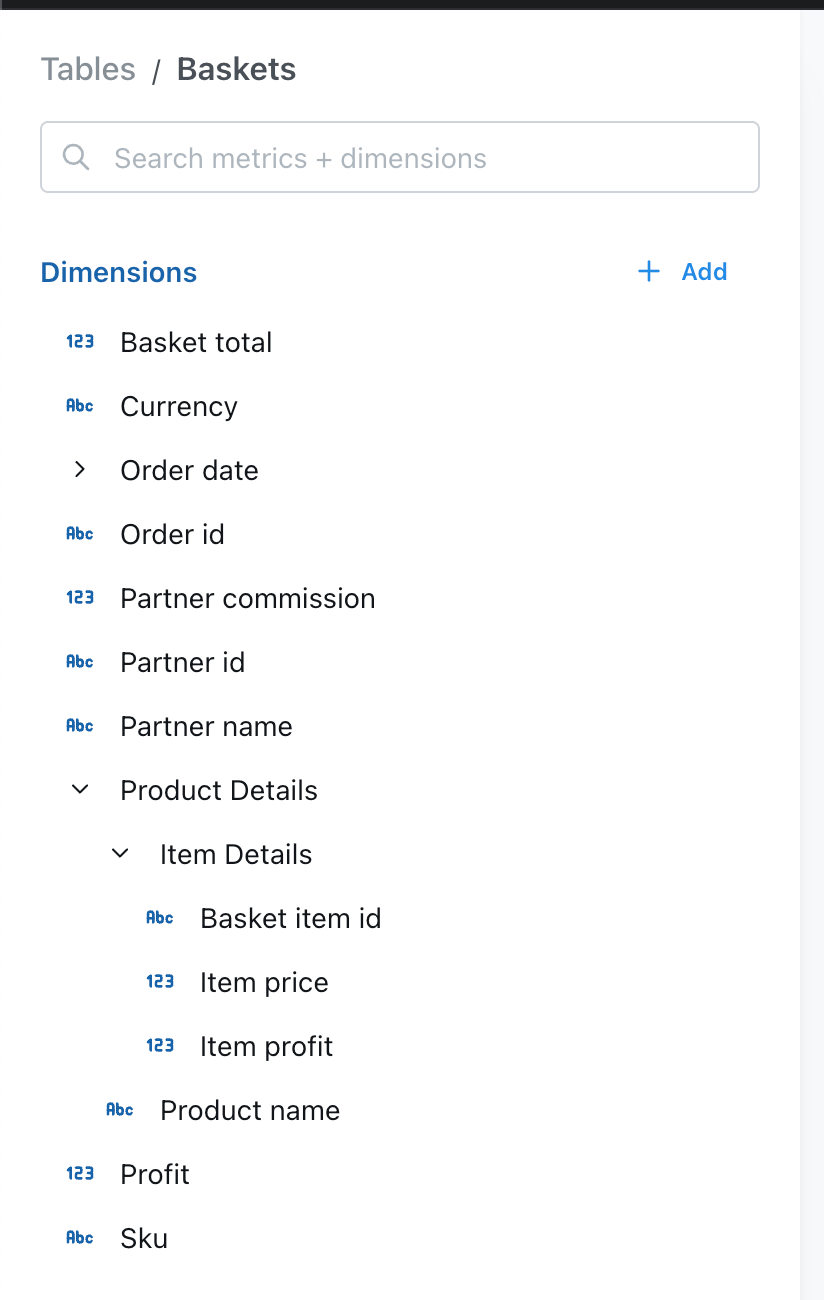
You can group your dimensions and metrics in the sidebar using the `groups` parameter.

To do this, you need to set up `group_details` in the model's configuration. Then, you can use these groups to organize metrics and dimensions. You can create nested groups up to 3 levels.

<CodeGroup>
  ```yaml dbt v1.10+ theme={null}
  models:
    - name: baskets
      config:
        meta:
          group_details:
            product_details:
              label: Product Details
              description: 'Fields that have information about the products in the basket.'
            item_details:
              label: Item Details
              description: 'Fields that have information about the items in the basket.'

      columns:
        - name: basket_item_id
          description: 'ID for the product item within the basket.'
          config:
            meta:
              dimension:
                groups: ['product_details', 'item_details'] # this would add the dimension to a nested group: `product details` --> `item details`
        - name: product_name
          description: 'Full name of the product.'
          config:
            meta:
              dimension:
                label: 'Product name'
                groups: ['product_details'] # this would add the dimension under the group label: `product_details`
  ```

  ```yaml dbt v1.9 and earlier theme={null}
  models:
    - name: baskets
      meta:
        group_details:
          product_details:
            label: Product Details
            description: 'Fields that have information about the products in the basket.'
          item_details:
            label: Item Details
            description: 'Fields that have information about the items in the basket.'

      columns:
        - name: basket_item_id
          description: 'ID for the product item within the basket.'
          meta:
            dimension:
              groups: ['product_details', 'item_details'] # this would add the dimension to a nested group: `product details` --> `item details`
        - name: product_name
          description: 'Full name of the product.'
          meta:
            dimension:
              label: 'Product name'
              groups: ['product_details'] # this would add the dimension under the group label: `product_details`
  ```

  ```yaml Lightdash YAML theme={null}
  type: model
  name: baskets

  group_details:
    product_details:
      label: Product Details
      description: 'Fields that have information about the products in the basket.'
    item_details:
      label: Item Details
      description: 'Fields that have information about the items in the basket.'

  dimensions:
    - name: basket_item_id
      description: 'ID for the product item within the basket.'
      groups: ['product_details', 'item_details'] # this would add the dimension to a nested group: `product details` --> `item details`
    - name: product_name
      description: 'Full name of the product.'
      label: 'Product name'
      groups: ['product_details'] # this would add the dimension under the group label: `product_details`
  ```
</CodeGroup>

This example would look like this in the sidebar:
<Frame>
  <img src="https://mintcdn.com/lightdash/5NMMM4n0puUIh3u9/images/semantic-layer/dimensions/groups-757097385f03095824be4746f585d50b.png?fit=max&auto=format&n=5NMMM4n0puUIh3u9&q=85&s=71a7ce511090ab8270b11581a5337e2b" alt="Dimensions sidebar with a Product Details group expanded to a nested Item Details group of basket item fields" width="824" height="1300" data-path="images/semantic-layer/dimensions/groups-757097385f03095824be4746f585d50b.png" />
</Frame>

## URLs

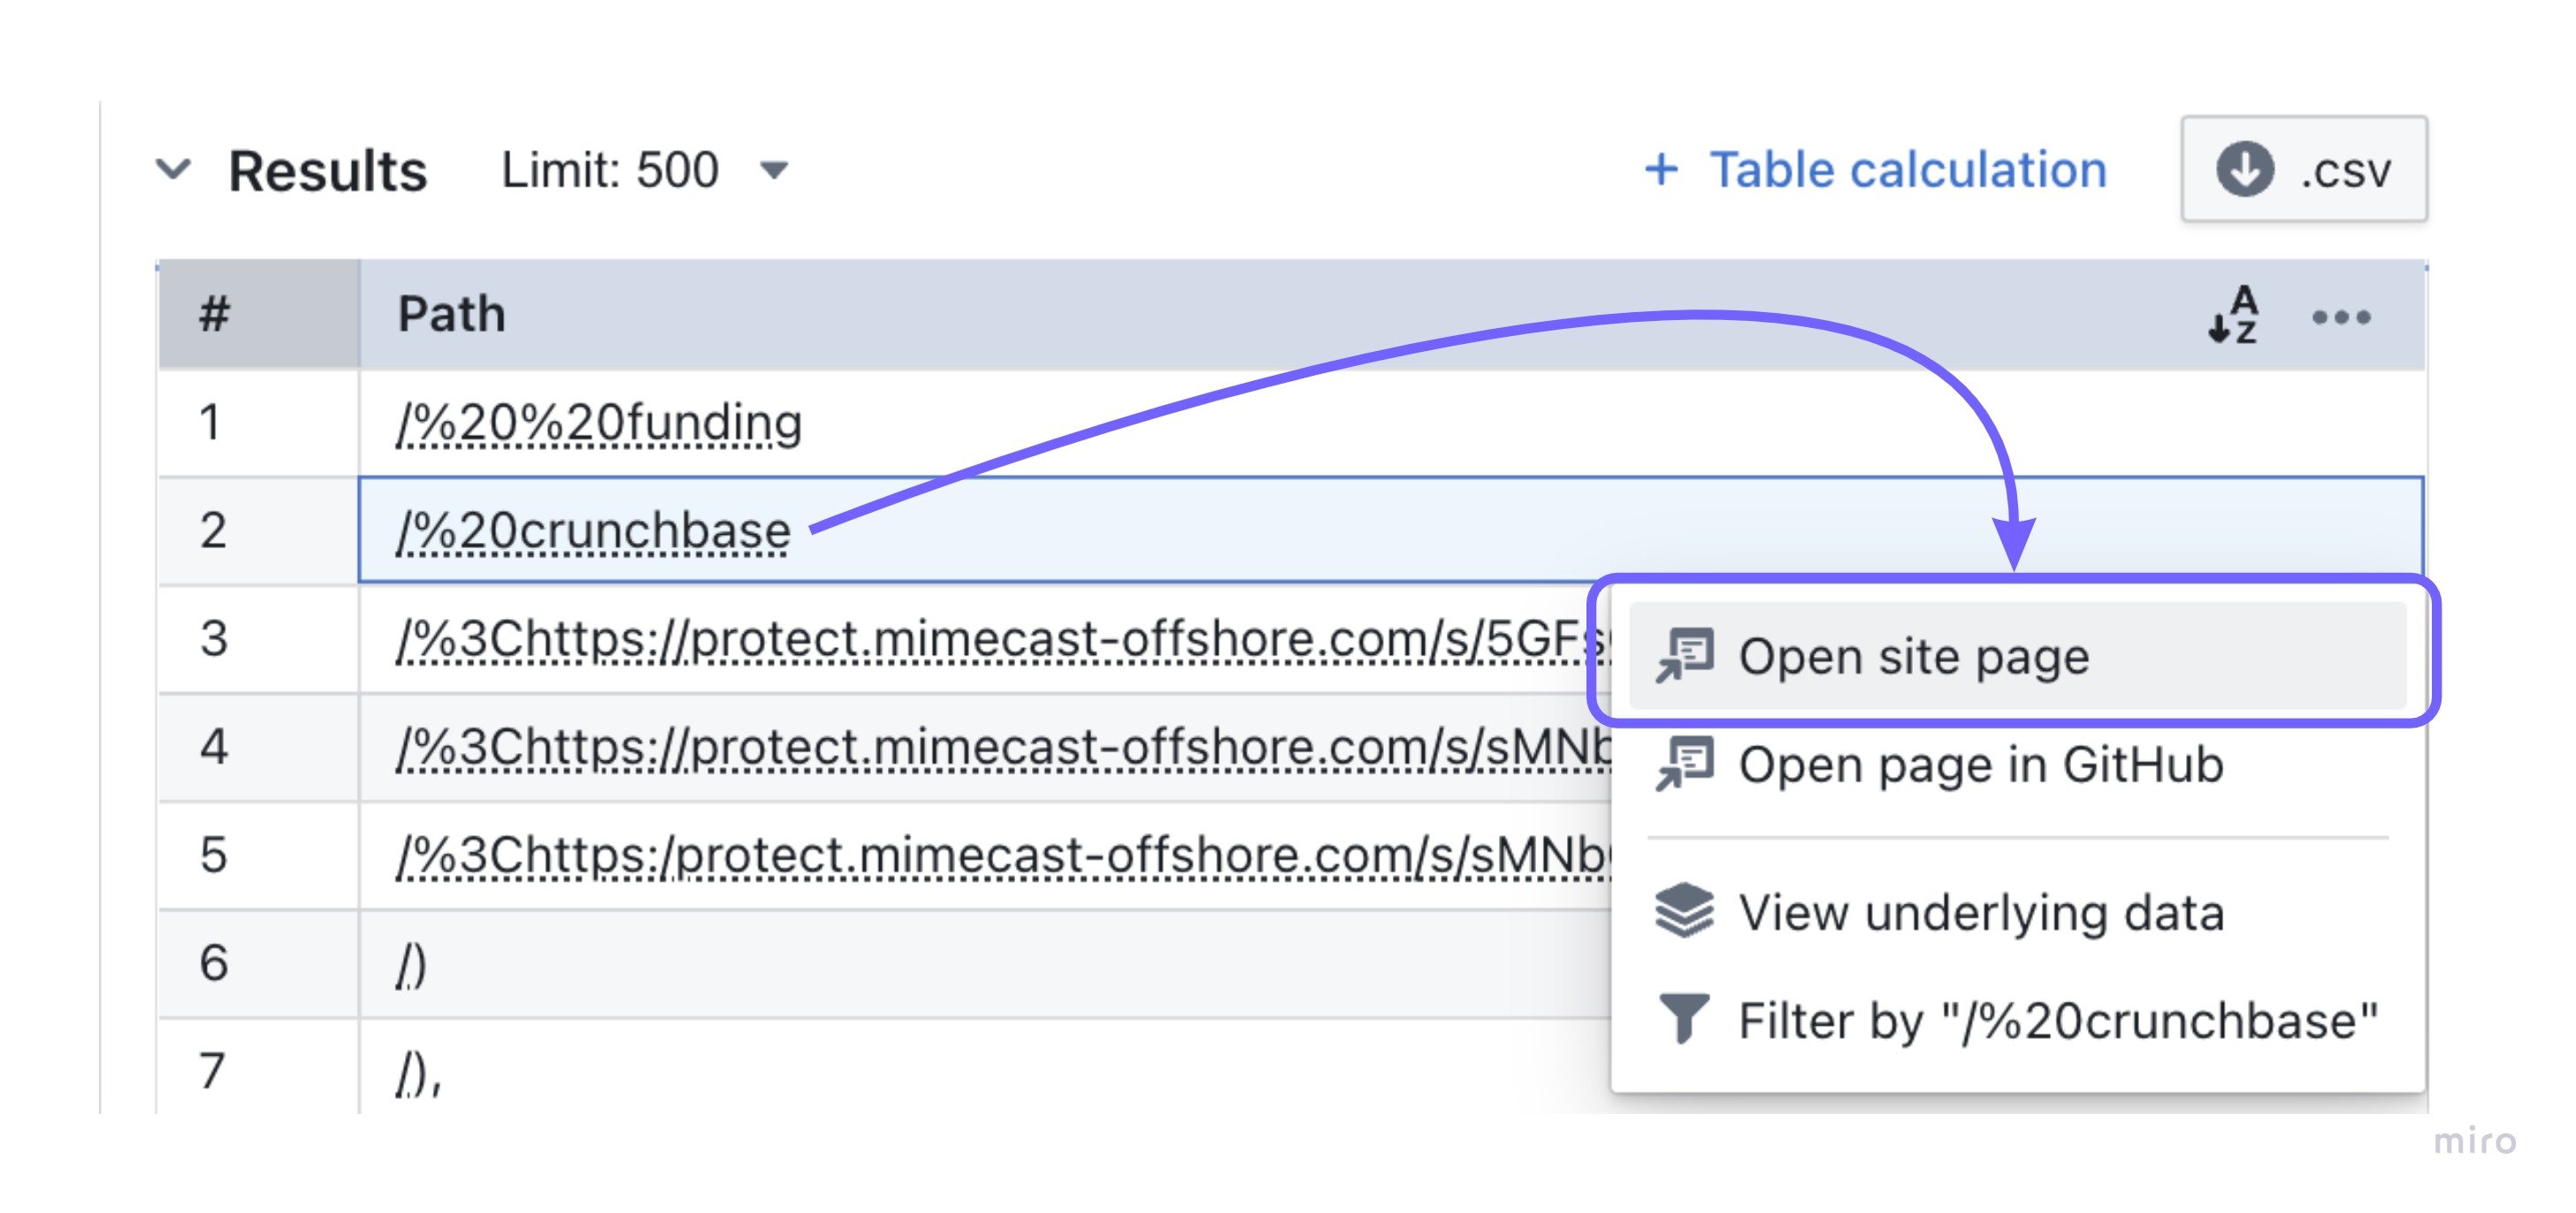
Lightdash users can interact with dimension values by clicking on them. If you're already storing URLs in your models, you can create hyperlinks to those URLs in Lightdash, like so:

<CodeGroup>
  ```yaml dbt v1.10+ theme={null}
  columns:
    - name: candidate_profile_url
      label: URL of the candidate profile
      config:
        meta:
          dimension:
            urls:
              - label: Open in CRM
                url: ${ value.raw }
  ```

  ```yaml dbt v1.9 and earlier theme={null}
  columns:
    - name: candidate_profile_url
      label: URL of the candidate profile
      meta:
        dimension:
          urls:
            - label: Open in CRM
              url: ${ value.raw }
  ```

  ```yaml Lightdash YAML theme={null}
  dimensions:
    - name: candidate_profile_url
      label: URL of the candidate profile
      urls:
        - label: Open in CRM
          url: ${ value.raw }
  ```
</CodeGroup>

### How to add custom URLs

By adding custom urls you can configure the actions available to your users. Like linking to external tools, or taking actions in other tools.
<Frame>
  <img src="https://mintcdn.com/lightdash/5NMMM4n0puUIh3u9/images/semantic-layer/dimensions/clickable-dimension-link-70554874d4e468900e9d8fadf3b53cd2.jpg?fit=max&auto=format&n=5NMMM4n0puUIh3u9&q=85&s=3d67e26a0ebbe5253b29dbf664dd95cd" alt="Results table with a Path cell open, showing an &#x22;Open site page&#x22; link above &#x22;View underlying data&#x22;" width="2913" height="1372" data-path="images/semantic-layer/dimensions/clickable-dimension-link-70554874d4e468900e9d8fadf3b53cd2.jpg" />
</Frame>

In the example below, users can click on a company name and open a corresponding record in their CRM or search for the company in google or open that company's Slack channel.

<CodeGroup>
  ```yaml dbt v1.10+ theme={null}
  columns:
    - name: company_name
      label: Registered trading name of the company
      config:
        meta:
          dimension:
            urls:
              - label: Search for company in Google
                url: 'https://google.com/search?${ value.formatted | url_encode }'
              - label: Open in CRM
                url: 'https://mycrm.com/companies/${ row.company.company_id.raw | url_encode }'
  ```

  ```yaml dbt v1.9 and earlier theme={null}
  columns:
    - name: company_name
      label: Registered trading name of the company
      meta:
        dimension:
          urls:
            - label: Search for company in Google
              url: 'https://google.com/search?${ value.formatted | url_encode }'
            - label: Open in CRM
              url: 'https://mycrm.com/companies/${ row.company.company_id.raw | url_encode }'
  ```

  ```yaml Lightdash YAML theme={null}
  dimensions:
    - name: company_name
      label: Registered trading name of the company
      urls:
        - label: Search for company in Google
          url: 'https://google.com/search?${ value.formatted | url_encode }'
        - label: Open in CRM
          url: 'https://mycrm.com/companies/${ row.company.company_id.raw | url_encode }'
  ```
</CodeGroup>

The `${ value.formatted }` will be replaced with the value of the company name in the Lightdash UI at query run time. The `${ row.company.company_id.raw }` will be replaced with the value of the company id in the Lightdash UI at query run time. The action will be disabled if the column "company\_id" from table "company" is not part of the query.

### You can reference values from other columns in your URLs

You can reference another dimension from your table in your URL. For these URLs to work, the other column you've referenced needs to be included in your results table. For example, say I've added a URL to `company_name` and it uses the field `customer_id`:

<CodeGroup>
  ```yaml dbt v1.10+ theme={null}
  columns:
    - name: company_name
      label: Registered trading name of the company
      config:
        meta:
          dimension:
            urls:
              - label: "Open company"
                url: "https://example.com/company/${row.customers.customer_id.raw | url_encode }"
  ```

  ```yaml dbt v1.9 and earlier theme={null}
  columns:
    - name: company_name
      label: Registered trading name of the company
      meta:
        dimension:
          urls:
            - label: "Open company"
              url: "https://example.com/company/${row.customers.customer_id.raw | url_encode }"
  ```

  ```yaml Lightdash YAML theme={null}
  dimensions:
    - name: company_name
      label: Registered trading name of the company
      urls:
        - label: "Open company"
          url: "https://example.com/company/${row.customers.customer_id.raw | url_encode }"
  ```
</CodeGroup>

This URL will only work if I have `customer_id` included in my results table.

### Liquid templating

Use templates to configure values dynamically at runtime based on query results.

**Available liquid tags**

| Tag                                         | Description                                                                                 |
| :------------------------------------------ | :------------------------------------------------------------------------------------------ |
| `${ value.formatted }`                      | The exact value of the dimension as seen in the Lightdash UI. For example `$1,427.20`       |
| `${ value.raw }`                            | The raw value of the dimension returned from the underlying SQL query. For example `1427.2` |
| `${ row.table_name.column_name.formatted }` | The exact value of the column as seen in the Lightdash UI. For example `$1,427.20`          |
| `${ row.table_name.column_name.raw }`       | The raw value of the dimension returned from the underlying SQL query. For example `1427.2` |

**Available liquid filters**

Filters can be used to make small transformations of your values:

* `url_encode`: Encode a string as URL safe, for example it replaces spaces with `%20`.

  ```liquid theme={null} theme={null} theme={null}
  ${ value.formatted | url_encode }
  ```

* `downcase`: Convert a string to lowercase.

  ```liquid theme={null} theme={null} theme={null}
  ${ value.formatted | downcase }
  ```

* `append`: Append one string to another.

  ```liquid theme={null} theme={null} theme={null}
  ${ value.formatted | append: ".html" }
  ```

There are [many more filters available in the Liquid documentation](https://liquidjs.com/filters/overview.html).

## Rich text

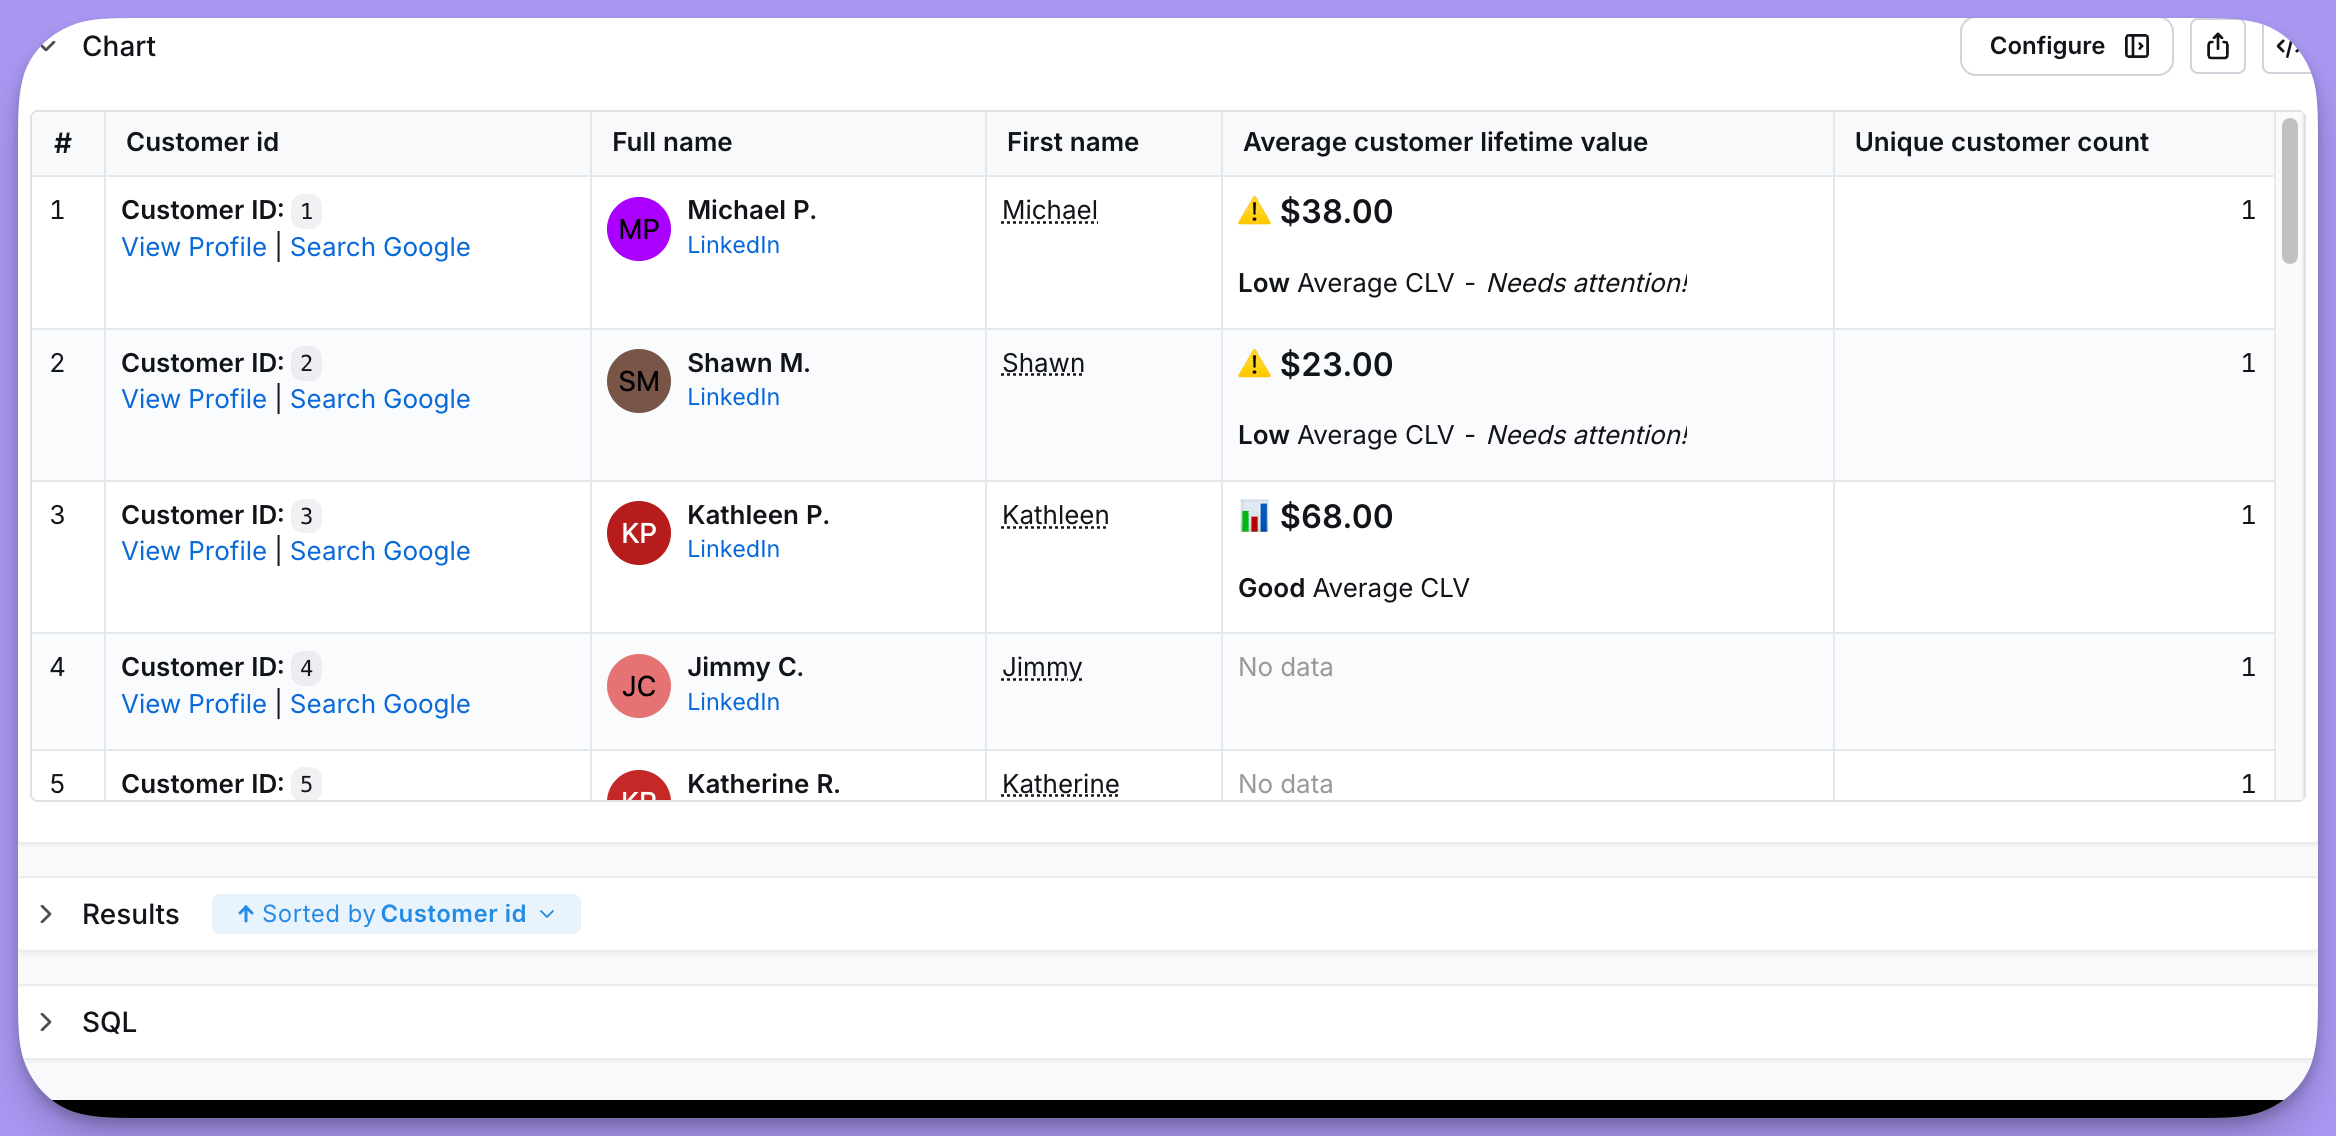
The `richText` property allows you to define custom HTML/Markdown templates for displaying dimension and metric values in table cells. This enables sophisticated data presentation with formatting, styling, conditional logic, and external integrations.
<Frame>
  <img src="https://mintcdn.com/lightdash/5NMMM4n0puUIh3u9/images/semantic-layer/dimensions/rich-text-hero.png?fit=max&auto=format&n=5NMMM4n0puUIh3u9&q=85&s=945d325f7e51ca41d8380a8ee571acbd" alt="Rich text examples rendered in a Table chart" width="2336" height="1136" data-path="images/semantic-layer/dimensions/rich-text-hero.png" />
</Frame>

<Info>
  Rich text only renders in the **Table chart visualization**. It does not affect the Results panel below the explore, CSV/Excel exports, or the underlying data values. To see your `richText` take effect, switch the chart type to **Table**.
</Info>

`richText` is supported on both **dimensions** and **metrics**. It accepts Markdown, inline HTML, and [LiquidJS](https://liquidjs.com/) templating. HTML is sanitized with a GitHub-safe allowlist that permits inline `style` attributes but strips `<script>`, `<iframe>`, and event handlers (e.g. `onclick`). External links automatically open in a new tab.

### Basic example

Display a dimension value with bold text, an inline code span, and clickable links:

<CodeGroup>
  ```yaml dbt v1.10+ theme={null}
  columns:
    - name: customer_id
      description: 'Unique customer identifier'
      config:
        meta:
          dimension:
            richText: |
              **Customer ID:** `${ value.raw }`

              [View Profile](https://example.com/customer/${ value.raw }) | [Search Google](https://google.com/search?q=customer%20${ value.formatted | url_encode })
  ```

  ```yaml dbt v1.9 and earlier theme={null}
  columns:
    - name: customer_id
      description: 'Unique customer identifier'
      meta:
        dimension:
          richText: |
            **Customer ID:** `${ value.raw }`

            [View Profile](https://example.com/customer/${ value.raw }) | [Search Google](https://google.com/search?q=customer%20${ value.formatted | url_encode })
  ```

  ```yaml Lightdash YAML theme={null}
  dimensions:
    - name: customer_id
      description: 'Unique customer identifier'
      richText: |
        **Customer ID:** `${ value.raw }`

        [View Profile](https://example.com/customer/${ value.raw }) | [Search Google](https://google.com/search?q=customer%20${ value.formatted | url_encode })
  ```
</CodeGroup>

<Frame>
  <img src="https://mintcdn.com/lightdash/5NMMM4n0puUIh3u9/images/semantic-layer/dimensions/rich-text-basic-markdown-links.png?fit=max&auto=format&n=5NMMM4n0puUIh3u9&q=85&s=0770598bc34b9d0e858295a8c5a7b72c" alt="Cells rendered with a bold &#x22;Customer ID:&#x22; label, a code-style ID, and two inline links per row" width="1236" height="816" data-path="images/semantic-layer/dimensions/rich-text-basic-markdown-links.png" />
</Frame>

### Conditional formatting

Use Liquid control flow tags to switch rendering based on the value — for example, to tier a metric with emoji indicators and a matching text label. Always guard against `nil` so empty cells render gracefully:

<CodeGroup>
  ```yaml dbt v1.10+ theme={null}
  columns:
    - name: customer_lifetime_value
      config:
        meta:
          metrics:
            average_clv:
              type: average
              richText: |
                {% raw %}{% if value.raw == nil %}
                <span style="color: #999;">No data</span>
                {% elsif value.raw >= 100 %}
                ### 📈 ${ value.formatted }
                **Excellent** Average CLV
                {% elsif value.raw >= 50 %}
                ### 📊 ${ value.formatted }
                **Good** Average CLV
                {% else %}
                ### ⚠️ ${ value.formatted }
                **Low** Average CLV - _Needs attention!_
                {% endif %}{% endraw %}
  ```

  ```yaml dbt v1.9 and earlier theme={null}
  columns:
    - name: customer_lifetime_value
      meta:
        metrics:
          average_clv:
            type: average
            richText: |
              {% raw %}{% if value.raw == nil %}
              <span style="color: #999;">No data</span>
              {% elsif value.raw >= 100 %}
              ### 📈 ${ value.formatted }
              **Excellent** Average CLV
              {% elsif value.raw >= 50 %}
              ### 📊 ${ value.formatted }
              **Good** Average CLV
              {% else %}
              ### ⚠️ ${ value.formatted }
              **Low** Average CLV - _Needs attention!_
              {% endif %}{% endraw %}
  ```

  ```yaml Lightdash YAML theme={null}
  metrics:
    - name: average_clv
      type: average
      sql: ${customer_lifetime_value}
      richText: |
        {% raw %}{% if value.raw == nil %}
        <span style="color: #999;">No data</span>
        {% elsif value.raw >= 100 %}
        ### 📈 ${ value.formatted }
        **Excellent** Average CLV
        {% elsif value.raw >= 50 %}
        ### 📊 ${ value.formatted }
        **Good** Average CLV
        {% else %}
        ### ⚠️ ${ value.formatted }
        **Low** Average CLV - _Needs attention!_
        {% endif %}{% endraw %}
  ```
</CodeGroup>

<Frame>
  <img src="https://mintcdn.com/lightdash/5NMMM4n0puUIh3u9/images/semantic-layer/dimensions/rich-text-conditional-tiers.png?fit=max&auto=format&n=5NMMM4n0puUIh3u9&q=85&s=e6d5e10381e229574c9950b7c10a4416" alt="Conditional tiers rendered with emoji, bold and italic text, and a grey &#x22;No data&#x22; fallback for null values" width="1236" height="816" data-path="images/semantic-layer/dimensions/rich-text-conditional-tiers.png" />
</Frame>

<Note>
  Liquid blocks inside dbt YAML must be wrapped in `{% raw %}...{% endraw %}` so dbt's Jinja engine passes the template through to Lightdash untouched.
</Note>

### HTML, images, and inline styles

For richer layouts, combine inline HTML with images and `style` attributes. This example renders an avatar image alongside the name with a secondary link underneath:

<CodeGroup>
  ```yaml dbt v1.10+ theme={null}
  columns:
    - name: full_name
      description: 'Customer full name'
      config:
        meta:
          dimension:
            type: string
            richText: |
              {% raw %}{% if value.raw == nil %}
              <span style="color: #999;">-</span>
              {% else %}
              <div style="display: flex; align-items: center; gap: 8px;">
                <img src="https://ui-avatars.com/api/?name=${ value.formatted | url_encode }&background=random&size=32&rounded=true"
                     width="32" height="32"
                     style="border-radius: 50%;"
                     alt="${ value.formatted }" />
                <p>
                  <strong style="float:left">${ value.formatted }</strong><br/>
                  <span style="color: #666; font-size: 0.9em;">
                    <a style="float:left;" href="https://www.linkedin.com/search/results/people/?keywords=${ value.formatted | url_encode }" target="_blank">LinkedIn</a>
                  </span>
                </p>
              </div>
              {% endif %}{% endraw %}
  ```

  ```yaml dbt v1.9 and earlier theme={null}
  columns:
    - name: full_name
      description: 'Customer full name'
      meta:
        dimension:
          type: string
          richText: |
            {% raw %}{% if value.raw == nil %}
            <span style="color: #999;">-</span>
            {% else %}
            <div style="display: flex; align-items: center; gap: 8px;">
              <img src="https://ui-avatars.com/api/?name=${ value.formatted | url_encode }&background=random&size=32&rounded=true"
                   width="32" height="32"
                   style="border-radius: 50%;"
                   alt="${ value.formatted }" />
              <p>
                <strong style="float:left">${ value.formatted }</strong><br/>
                <span style="color: #666; font-size: 0.9em;">
                  <a style="float:left;" href="https://www.linkedin.com/search/results/people/?keywords=${ value.formatted | url_encode }" target="_blank">LinkedIn</a>
                </span>
              </p>
            </div>
            {% endif %}{% endraw %}
  ```

  ```yaml Lightdash YAML theme={null}
  dimensions:
    - name: full_name
      description: 'Customer full name'
      type: string
      richText: |
        {% raw %}{% if value.raw == nil %}
        <span style="color: #999;">-</span>
        {% else %}
        <div style="display: flex; align-items: center; gap: 8px;">
          <img src="https://ui-avatars.com/api/?name=${ value.formatted | url_encode }&background=random&size=32&rounded=true"
               width="32" height="32"
               style="border-radius: 50%;"
               alt="${ value.formatted }" />
          <p>
            <strong style="float:left">${ value.formatted }</strong><br/>
            <span style="color: #666; font-size: 0.9em;">
              <a style="float:left;" href="https://www.linkedin.com/search/results/people/?keywords=${ value.formatted | url_encode }" target="_blank">LinkedIn</a>
            </span>
          </p>
        </div>
        {% endif %}{% endraw %}
  ```
</CodeGroup>

<Frame>
  <img src="https://mintcdn.com/lightdash/5NMMM4n0puUIh3u9/images/semantic-layer/dimensions/rich-text-html-avatars.png?fit=max&auto=format&n=5NMMM4n0puUIh3u9&q=85&s=c6a9d59d9603651677c7fbd17fefd831" alt="Avatar image with colored initials, bold name, and a LinkedIn link rendered per row" width="1236" height="816" data-path="images/semantic-layer/dimensions/rich-text-html-avatars.png" />
</Frame>

### Liquid templating in rich text

Use templates to configure values dynamically at runtime based on query results.

**Available liquid tags**

| Tag                                         | Description                                                                                 |
| :------------------------------------------ | :------------------------------------------------------------------------------------------ |
| `${ value.formatted }`                      | The exact value of the dimension as seen in the Lightdash UI. For example `$1,427.20`       |
| `${ value.raw }`                            | The raw value of the dimension returned from the underlying SQL query. For example `1427.2` |
| `${ row.table_name.column_name.formatted }` | The exact value of the column as seen in the Lightdash UI. For example `$1,427.20`          |
| `${ row.table_name.column_name.raw }`       | The raw value of the dimension returned from the underlying SQL query. For example `1427.2` |

**Available liquid filters**

Filters can be used to make small transformations of your values:

* `url_encode`: Encode a string as URL safe, for example it replaces spaces with `%20`.

  ```liquid theme={null} theme={null} theme={null}
  ${ value.formatted | url_encode }
  ```

* `downcase`: Convert a string to lowercase.

  ```liquid theme={null} theme={null} theme={null}
  ${ value.formatted | downcase }
  ```

* `append`: Append one string to another.

  ```liquid theme={null} theme={null} theme={null}
  ${ value.formatted | append: ".html" }
  ```

There are [many more filters available in the Liquid documentation](https://liquidjs.com/filters/overview.html).

## Required attributes

Lightdash can use `user attributes` to limit some dimensions to some users.

In the example below, only users with `is_admin` attribute `true` can use the `salary` dimension on `user` table. Users without access to this dimension will not see it or the custom metrics created from this dimension on the `explore page`.

<CodeGroup>
  ```yaml dbt v1.10+ theme={null}
  columns:
    - name:
      description: User name
    - salary:
      description: User salary
      config:
        meta:
          dimension:
            required_attributes:
              is_admin: "true"
  ```

  ```yaml dbt v1.9 and earlier theme={null}
  columns:
    - name:
      description: User name
    - salary:
      description: User salary
      meta:
        dimension:
          required_attributes:
            is_admin: "true"
  ```

  ```yaml Lightdash YAML theme={null}
  dimensions:
    - name: user_name
      description: User name
    - name: salary
      description: User salary
      required_attributes:
        is_admin: "true"
  ```
</CodeGroup>

If a user without access to this dimension runs a query that contains this dimension, they will get a `Forbidden` error.

## Any attributes

While `required_attributes` uses AND logic (all conditions must match), `any_attributes` uses OR logic — a user only needs to match **at least one** condition.

<CodeGroup>
  ```yaml dbt v1.10+ theme={null}
  columns:
    - name: salary
      description: User salary
      config:
        meta:
          dimension:
            any_attributes:
              department: ["hr", "finance"]
              role: "manager"
  ```

  ```yaml dbt v1.9 and earlier theme={null}
  columns:
    - name: salary
      description: User salary
      meta:
        dimension:
          any_attributes:
            department: ["hr", "finance"]
            role: "manager"
  ```

  ```yaml Lightdash YAML theme={null}
  dimensions:
    - name: salary
      description: User salary
      any_attributes:
        department: ["hr", "finance"]
        role: "manager"
  ```
</CodeGroup>

In this example, users with `department = "hr"` OR `department = "finance"` OR `role = "manager"` can see the `salary` dimension.

You can combine both `required_attributes` and `any_attributes` on the same dimension. When both are set, both checks must pass. See [user attributes](/workspace-admin/user-attributes#combining-required_attributes-and-any_attributes) for details.

### Current limitations

Lightdash dimensions and custom metrics are protected by this feature, however, it is possible to write custom SQL to bypass this filter, for example:

* Developers and admins running SQL queries on SQL runner.
* Custom SQL or subqueries on `table calculations`

<Info>
  Scheduler deliveries will run against the user who created the scheduled delivery, be careful when sharing required attributes with other users.
</Info>

## Convert timezone

<Info>
  <Badge icon="test-pipe-2" color="orange" size="sm" shape="pill">Experimental</Badge> Contact support to enable the `convert_timezone` dimension override for your organization. It has no effect unless the [project query timezone](/workspace-admin/set-project-timezone#configure-your-project-timezone) is set. [What Experimental means](/support/feature-maturity-levels).
</Info>

Set `convert_timezone: false` on a `timestamp` dimension to opt it out of the project query timezone. This is useful for columns that should always render in their raw warehouse value - system timestamps, audit logs, or pre-converted timezone columns.

When set, the dimension's display, grouping, and calendar extracts all use the raw warehouse value. Time-interval children of the dimension (`_day`, `_month`, `_day_of_week_index`, ...) inherit the opt-out automatically.

Filters still use the project query timezone regardless of this setting, so every dimension on a row agrees on whether the row matches the filter.

<CodeGroup>
  ```yaml dbt v1.10+ theme={null}
  columns:
    - name: created_at_utc
      config:
        meta:
          dimension:
            type: timestamp
            convert_timezone: false
  ```

  ```yaml dbt v1.9 and earlier theme={null}
  columns:
    - name: created_at_utc
      meta:
        dimension:
          type: timestamp
          convert_timezone: false
  ```

  ```yaml Lightdash YAML theme={null}
  dimensions:
    - name: created_at_utc
      type: timestamp
      convert_timezone: false
  ```
</CodeGroup>

See [Per-dimension timezone opt-out](/workspace-admin/set-project-timezone#opt-a-column-out-of-timezone-conversion) in the Timezones guide for how this interacts with other timezone settings and filter behavior.

## Timestamp domain

Lightdash reads whether a `timestamp` column stores an instant (`aware`) or a bare wall clock (`naive`) from your warehouse catalog, so you don't usually need to set this. Override it when the catalog type doesn't match the data, for example a `TIMESTAMP_NTZ` column that already holds UTC instants.

<CodeGroup>
  ```yaml dbt v1.10+ theme={null}
  columns:
    - name: created_at
      config:
        meta:
          dimension:
            type: timestamp
            timestamp_domain: aware
  ```

  ```yaml dbt v1.9 and earlier theme={null}
  columns:
    - name: created_at
      meta:
        dimension:
          type: timestamp
          timestamp_domain: aware
  ```

  ```yaml Lightdash YAML theme={null}
  dimensions:
    - name: created_at
      type: timestamp
      timestamp_domain: aware
  ```
</CodeGroup>

The YAML value wins over the catalog. It's ignored on dimensions with custom `sql` and on additional dimensions. Interval children (`_day`, `_month`, ...) inherit from their base.

See [Override a column timestamp domain](/workspace-admin/set-project-timezone#override-a-column-timestamp-domain) in the Timezones guide.

## Color

You can predefine colors for your string type dimensions, these colors will be used instead of your default organization colors for the right value when you use a grouped bar chart or a pie chart.

<CodeGroup>
  ```yaml dbt v1.10+ theme={null}
    - name: status
      description: "{{ doc(\"orders_status\") }}"
      config:
        meta:
          dimension:
            colors:
              "placed": "#e6fa0f"
              "completed": "#558B2F"
              "shipped": "#29B6F6"
              "return_pending": "#FF6F00"
              "returned": "#E91E63"
  ```

  ```yaml dbt v1.9 and earlier theme={null}
    - name: status
      description: "{{ doc(\"orders_status\") }}"
      meta:
        dimension:
          colors:
            "placed": "#e6fa0f"
            "completed": "#558B2F"
            "shipped": "#29B6F6"
            "return_pending": "#FF6F00"
            "returned": "#E91E63"
  ```

  ```yaml Lightdash YAML theme={null}
  dimensions:
    - name: status
      description: "Order status"
      colors:
        "placed": "#e6fa0f"
        "completed": "#558B2F"
        "shipped": "#29B6F6"
        "return_pending": "#FF6F00"
        "returned": "#E91E63"
  ```
</CodeGroup>

<Frame>
  <img src="https://mintcdn.com/lightdash/5NMMM4n0puUIh3u9/images/semantic-layer/dimensions/pie-chart-color-b5c761ad3dc797717c6397920572b1c4.png?fit=max&auto=format&n=5NMMM4n0puUIh3u9&q=85&s=53f496c203eaac8bc393556bdabcf050" alt="Pie chart Series config panel listing order-status series, each with a colour swatch matching its slice" width="1343" height="481" data-path="images/semantic-layer/dimensions/pie-chart-color-b5c761ad3dc797717c6397920572b1c4.png" />
</Frame>

<Note>
  Use #HEX colors. Other color types like `rgb`, `rgba`, or a color name (for example, `orange`) work on charts, but not in the chart config.

  You can override a dimension color by picking a color for that series in the chart config, and that color takes precedence over the organization color palette.
</Note>

## Case sensitive

You can control whether string filters on a dimension are case sensitive or case insensitive.

* Default: `case_sensitive: true` (case sensitive)
* When `false`: string filters ignore case differences

This setting affects these string filter operators:

* `equals`
* `not equals`
* `starts with`
* `ends with`
* `includes`
* `doesn't include`

<CodeGroup>
  ```yaml dbt v1.10+ theme={null}
  columns:
    - name: customer_name
      description: 'Name of the customer'
      config:
        meta:
          dimension:
            case_sensitive: false
  ```

  ```yaml dbt v1.9 and earlier theme={null}
  columns:
    - name: customer_name
      description: 'Name of the customer'
      meta:
        dimension:
          case_sensitive: false
  ```

  ```yaml Lightdash YAML theme={null}
  dimensions:
    - name: customer_name
      description: 'Name of the customer'
      case_sensitive: false
  ```
</CodeGroup>

### SQL behavior examples

Given a filter value `jes` on a dimension like `customers.first_name`:

* With `case_sensitive: true` (default), generated SQL uses case-sensitive matching, for example:

```sql theme={null}
("customers"."first_name") LIKE '%jes%'
```

* With `case_sensitive: false`, generated SQL normalizes both sides for case-insensitive matching:

```sql theme={null}
UPPER("customers"."first_name") LIKE UPPER('%jes%')
```

So with `case_sensitive: false`, filtering for `john` would match `John`, `JOHN`, `john`, etc.

<Info>
  Dimension-level `case_sensitive` settings override explore-level and project-level settings. See [Tables reference](/semantic-layer/tables#case-sensitive) for explore-level configuration and [lightdash.config.yml reference](/semantic-layer/lightdash-config-yml#defaults-configuration) for project-level defaults.
</Info>

## Filter autocomplete

You can customize the suggestions users see when filtering on a dimension. This is useful when you want to:

* Provide a curated, static list of suggested values (with optional human-friendly labels) instead of relying solely on values from your warehouse.
* Label warehouse-fetched values with a human-readable name from another dimension in the same table (for example, showing customer names next to customer IDs).
* Source autocomplete values from a dimension in another model (for example, drive a `flight.airline_code` filter from the canonical list in `dim_airlines`).
* Disable the live warehouse lookup for autocomplete to reduce warehouse queries on dimensions with very high cardinality or sensitive values.

Regardless of which option you use, filter autocomplete always returns `{ value, label }` pairs. The `value` is what gets used in the filter, and the `label` is what's displayed in the dropdown. Parameters that source their options from the same dimension via [`options_from_dimension`](/semantic-layer/parameters#parameters-configuration) automatically pick up these labels too.

### Properties

| Property                                                        | Required | Value                     | Description                                                                                                                                                                                                                                                                                                                                                                                    |
| :-------------------------------------------------------------- | :------- | :------------------------ | :--------------------------------------------------------------------------------------------------------------------------------------------------------------------------------------------------------------------------------------------------------------------------------------------------------------------------------------------------------------------------------------------- |
| values                                                          | No       | Array of `value`, `label` | A static, hard-coded list of suggested filter values. `value` is the raw value used in the filter; `label` is the optional display name shown in the autocomplete dropdown. Duplicate `value`s are ignored (the first occurrence wins). Use this when the set of values is small and known ahead of time.                                                                                      |
| label\_dimension                                                | No       | string                    | Name of another dimension in the same table whose value is used as the display label for each warehouse-fetched value. Unlike static `values` (which only supports hard-coded labels), `label_dimension` labels every value that comes back from the warehouse, and search and sort both run against the label rather than the underlying value. Ignored when `options_from_dimension` is set. |
| [options\_from\_dimension](#sourcing-values-from-another-model) | No       | Object                    | Fetch autocomplete values from a dimension in another model instead of from this dimension itself. Requires `model` and `dimension`; accepts an optional `label_dimension` in that source model. Cascading filters from the current explore are not applied to the lookup query. Ignored when `fetch_from_warehouse: false` is also set.                                                       |
| fetch\_from\_warehouse                                          | No       | boolean                   | If set to `false`, Lightdash won't query the warehouse for autocomplete suggestions on this dimension. Defaults to `true`.                                                                                                                                                                                                                                                                     |

### Static suggested values with labels

<CodeGroup>
  ```yaml dbt v1.10+ theme={null}
  columns:
    - name: status
      description: 'Subscription status'
      config:
        meta:
          dimension:
            filter_autocomplete:
              values:
                - value: 'active'
                  label: 'Active customer'
                - value: 'trial'
                  label: 'Trial'
                - value: 'churned'
  ```

  ```yaml dbt v1.9 and earlier theme={null}
  columns:
    - name: status
      description: 'Subscription status'
      meta:
        dimension:
          filter_autocomplete:
            values:
              - value: 'active'
                label: 'Active customer'
              - value: 'trial'
                label: 'Trial'
              - value: 'churned'
  ```

  ```yaml Lightdash YAML theme={null}
  dimensions:
    - name: status
      description: 'Subscription status'
      filter_autocomplete:
        values:
          - value: 'active'
            label: 'Active customer'
          - value: 'trial'
            label: 'Trial'
          - value: 'churned'
  ```
</CodeGroup>

### Disabling warehouse autocomplete

Set `fetch_from_warehouse: false` to stop Lightdash from querying your warehouse for autocomplete suggestions on this dimension. Users can still type values manually; if you also provide `values`, those will be shown as suggestions.

<CodeGroup>
  ```yaml dbt v1.10+ theme={null}
  columns:
    - name: customer_email
      config:
        meta:
          dimension:
            filter_autocomplete:
              fetch_from_warehouse: false
  ```

  ```yaml dbt v1.9 and earlier theme={null}
  columns:
    - name: customer_email
      meta:
        dimension:
          filter_autocomplete:
            fetch_from_warehouse: false
  ```

  ```yaml Lightdash YAML theme={null}
  dimensions:
    - name: customer_email
      filter_autocomplete:
        fetch_from_warehouse: false
  ```
</CodeGroup>

### Labelling warehouse-fetched values with another dimension

Set `label_dimension` to the name of another dimension in the same table to show a human-readable label alongside each warehouse-fetched value. The filter still applies to the underlying value, but the dropdown displays the label. Search and sort in the autocomplete dropdown also run against the label rather than the underlying value.

For example, an `orders` model exposes a `customer_id` dimension that users want to filter on, but the ids are opaque. Adding `label_dimension: customer_name` makes the autocomplete show customer names in the dropdown while still filtering by `customer_id`:

<CodeGroup>
  ```yaml dbt v1.10+ theme={null}
  columns:
    - name: customer_id
      config:
        meta:
          dimension:
            filter_autocomplete:
              label_dimension: customer_name
    - name: customer_name
      config:
        meta:
          dimension: {}
  ```

  ```yaml dbt v1.9 and earlier theme={null}
  columns:
    - name: customer_id
      meta:
        dimension:
          filter_autocomplete:
            label_dimension: customer_name
    - name: customer_name
      meta:
        dimension: {}
  ```

  ```yaml Lightdash YAML theme={null}
  dimensions:
    - name: customer_id
      filter_autocomplete:
        label_dimension: customer_name
    - name: customer_name
  ```
</CodeGroup>

The referenced dimension must live in the same table. Any [parameter](/semantic-layer/parameters#parameters-configuration) that sources its options from `customer_id` via `options_from_dimension` also picks up the customer name labels automatically.

### Sourcing values from another model

Set `options_from_dimension` to fetch autocomplete values from a dimension in another model instead of from this dimension itself. This is useful when the canonical list of allowed values lives in a lookup or dimension table, but the filter is exposed on a fact table that only stores foreign keys.

For example, an `flights` model exposes an `airline_code` dimension, but the full list of airlines lives in a `dim_airlines` lookup model. Point `options_from_dimension` at `dim_airlines.code` to drive the autocomplete from the lookup, and add `label_dimension: name` to show the airline name next to each code:

<CodeGroup>
  ```yaml dbt v1.10+ theme={null}
  columns:
    - name: airline_code
      config:
        meta:
          dimension:
            filter_autocomplete:
              options_from_dimension:
                model: dim_airlines
                dimension: code
                label_dimension: name
  ```

  ```yaml dbt v1.9 and earlier theme={null}
  columns:
    - name: airline_code
      meta:
        dimension:
          filter_autocomplete:
            options_from_dimension:
              model: dim_airlines
              dimension: code
              label_dimension: name
  ```

  ```yaml Lightdash YAML theme={null}
  dimensions:
    - name: airline_code
      filter_autocomplete:
        options_from_dimension:
          model: dim_airlines
          dimension: code
          label_dimension: name
  ```
</CodeGroup>

Properties inside `options_from_dimension`:

| Property         | Required | Value  | Description                                                                                                                                     |
| :--------------- | :------- | :----- | :---------------------------------------------------------------------------------------------------------------------------------------------- |
| model            | Yes      | string | The model to source autocomplete values from. Must have an explore — hidden models and seeds can't be used.                                     |
| dimension        | Yes      | string | The dimension in `model` whose values populate the autocomplete dropdown.                                                                       |
| label\_dimension | No       | string | A dimension in the same source `model` whose value is shown as the display label for each fetched value. Search and sort run against the label. |

Notes:

* Cascading filters from the current explore are not applied to the lookup query, so users see the full list of values from the source model regardless of other filters on the current query.
* The dimension-level `label_dimension` on the current dimension is ignored when `options_from_dimension` is set. Set `label_dimension` inside `options_from_dimension` instead — labels always come from the model the values come from.
* If `fetch_from_warehouse: false` is also set on this dimension, curated `values` are served and `options_from_dimension` is ignored. Lightdash surfaces a project warning when both are configured together.

## Image Display

<Warning>
  **Work in Progress**: This feature is currently in development and may be subject to changes.
</Warning>

You can configure dimensions to display images in table cells using URL templates. Images are rendered as thumbnails with hover tooltips showing larger previews, perfect for visualizing product images, user avatars, or any other image-based data.

### How it works

To display images, you define an `image` property with a URL template in your dimension or additional dimension configuration. The URL can be dynamic, using LiquidJS templating to construct URLs based on row data and field values.

**Simplest example - column already contains image URLs:**

If your column already contains complete image URLs, you can simply configure it to display as an image:

<CodeGroup>
  ```yaml dbt v1.10+ theme={null}
  columns:
    - name: image_url
      description: "Image URL for the event"
      config:
        meta:
          dimension:
            type: string
            image:
              url: "${value.raw}"
  ```

  ```yaml dbt v1.9 and earlier theme={null}
  columns:
    - name: image_url
      description: "Image URL for the event"
      meta:
        dimension:
          type: string
          image:
            url: "${value.raw}"
  ```

  ```yaml Lightdash YAML theme={null}
  dimensions:
    - name: image_url
      description: "Image URL for the event"
      type: string
      image:
        url: "${value.raw}"
  ```
</CodeGroup>

**With custom dimensions and fit:**

You can control the size and display behavior of images using width, height, and fit options:

<CodeGroup>
  ```yaml dbt v1.10+ theme={null}
  columns:
    - name: product_image_url
      description: "Product image URL"
      config:
        meta:
          dimension:
            type: string
            image:
              url: "${value.raw}"
              width: 100
              height: 100
              fit: "cover"
  ```

  ```yaml dbt v1.9 and earlier theme={null}
  columns:
    - name: product_image_url
      description: "Product image URL"
      meta:
        dimension:
          type: string
          image:
            url: "${value.raw}"
            width: 100
            height: 100
            fit: "cover"
  ```

  ```yaml Lightdash YAML theme={null}
  dimensions:
    - name: product_image_url
      description: "Product image URL"
      type: string
      image:
        url: "${value.raw}"
        width: 100
        height: 100
        fit: "cover"
  ```
</CodeGroup>

**Basic example with URL template:**

<CodeGroup>
  ```yaml dbt v1.10+ theme={null}
  columns:
    - name: product_id
      config:
        meta:
          additional_dimensions:
            product_image:
              type: string
              label: "Product Image"
              description: "Product thumbnail image"
              image:
                url: "https://example.com/images/${value.raw}.jpg"
  ```

  ```yaml dbt v1.9 and earlier theme={null}
  columns:
    - name: product_id
      meta:
        additional_dimensions:
          product_image:
            type: string
            label: "Product Image"
            description: "Product thumbnail image"
            image:
              url: "https://example.com/images/${value.raw}.jpg"
  ```

  ```yaml Lightdash YAML theme={null}
  dimensions:
    - name: product_id
    - name: product_image
      type: string
      label: "Product Image"
      description: "Product thumbnail image"
      image:
        url: "https://example.com/images/${value.raw}.jpg"
  ```
</CodeGroup>

**Advanced example with dynamic URLs:**

<CodeGroup>
  ```yaml dbt v1.10+ theme={null}
  columns:
    - name: event_type
      config:
        meta:
          additional_dimensions:
            event_image:
              type: string
              label: "Event Image"
              description: "Event banner image"
              image:
                url: "https://cdn.example.com/${value.raw}-${row.events.event_id.raw | upcase}.png"
  ```

  ```yaml dbt v1.9 and earlier theme={null}
  columns:
    - name: event_type
      meta:
        additional_dimensions:
          event_image:
            type: string
            label: "Event Image"
            description: "Event banner image"
            image:
              url: "https://cdn.example.com/${value.raw}-${row.events.event_id.raw | upcase}.png"
  ```

  ```yaml Lightdash YAML theme={null}
  dimensions:
    - name: event_type
    - name: event_image
      type: string
      label: "Event Image"
      description: "Event banner image"
      image:
        url: "https://cdn.example.com/${value.raw}-${row.events.event_id.raw | upcase}.png"
  ```
</CodeGroup>

### Display behavior

* **Thumbnails**: Images display as thumbnails in table cells (default: 32px height)
* **Hover preview**: Hovering over a thumbnail reveals a larger preview via tooltip
* **Error handling**: Failed image loads show a photo-off icon with error details in the tooltip
* **Validation**: Invalid URL syntax is caught and displays an error state

### Image configuration properties

The `image` object supports the following properties:

| Property | Type   | Default    | Description                                                                                                |
| :------- | :----- | :--------- | :--------------------------------------------------------------------------------------------------------- |
| `url`    | string | (required) | The image URL. Supports LiquidJS templating with `${value.raw}`, `${row.table.column.raw}`, etc.           |
| `width`  | number | auto       | Image width in pixels. When specified without height, height defaults to 'auto' to maintain aspect ratio.  |
| `height` | number | 32         | Image height in pixels.                                                                                    |
| `fit`    | string | "cover"    | Controls how the image fits within the dimensions. Options: `"cover"`, `"contain"`, `"fill"`, or `"none"`. |

**Fit options:**

* **`cover`** (default) - Image fills the space while maintaining aspect ratio. May crop content.
* **`contain`** - Scales image to fit within dimensions while preserving aspect ratio. No cropping.
* **`fill`** - Stretches image to fill dimensions. May distort aspect ratio.
* **`none`** - Displays image at its original size without scaling.

**Examples:**

```yaml theme={null}
# Square thumbnail with cover fit
image:
  url: "${value.raw}"
  width: 50
  height: 50
  fit: "cover"

# Wide thumbnail maintaining aspect ratio
image:
  url: "https://example.com/images/${value.raw}.jpg"
  width: 100
  # height defaults to 'auto' to maintain aspect ratio

# Original size display
image:
  url: "${value.raw}"
  fit: "none"
```

### URL Templating

The `image.url` property supports LiquidJS templating with the same tags and filters available for [dimension URLs](#urls):

**Available liquid tags:**

| Tag                                         | Description                                                               |
| :------------------------------------------ | :------------------------------------------------------------------------ |
| `${ value.formatted }`                      | The exact value of the dimension as seen in the Lightdash UI              |
| `${ value.raw }`                            | The raw value of the dimension returned from the underlying SQL query     |
| `${ row.table_name.column_name.formatted }` | The exact value of another column as seen in the Lightdash UI             |
| `${ row.table_name.column_name.raw }`       | The raw value of another dimension returned from the underlying SQL query |

**Available liquid filters:**

You can use [liquid filters](https://liquidjs.com/filters/overview.html) to transform values:

```yaml theme={null}
image:
  url: "https://example.com/${value.raw | downcase}.jpg"
```

### Current limitations

* **Dimensions only**: Image display is currently supported for dimensions and additional dimensions only (not metrics or table calculations)
* **Referenced columns**: When using `${ row.table_name.column_name }` templates, the referenced column must be included in your results table for the image to display

### Example: Product catalog with images

<CodeGroup>
  ```yaml dbt v1.10+ theme={null}
  models:
    - name: products
      columns:
        - name: sku
          description: "Product SKU code"
          config:
            meta:
              dimension:
                type: string
              additional_dimensions:
                product_thumbnail:
                  type: string
                  label: "Product Image"
                  description: "Product catalog image"
                  image:
                    url: "https://cdn.mystore.com/products/${value.raw}/thumbnail.jpg"
                    width: 80
                    height: 80
                    fit: "cover"
        - name: category
          description: "Product category"
          config:
            meta:
              dimension:
                type: string
              additional_dimensions:
                category_icon:
                  type: string
                  label: "Category Icon"
                  description: "Category icon image"
                  image:
                    url: "https://cdn.mystore.com/icons/${value.raw | downcase}.png"
                    width: 40
                    height: 40
                    fit: "contain"
        - name: hero_image_url
          description: "Product hero image URL"
          config:
            meta:
              dimension:
                type: string
                image:
                  url: "${value.raw}"
                  width: 120
                  fit: "cover"
  ```

  ```yaml dbt v1.9 and earlier theme={null}
  models:
    - name: products
      columns:
        - name: sku
          description: "Product SKU code"
          meta:
            dimension:
              type: string
            additional_dimensions:
              product_thumbnail:
                type: string
                label: "Product Image"
                description: "Product catalog image"
                image:
                  url: "https://cdn.mystore.com/products/${value.raw}/thumbnail.jpg"
                  width: 80
                  height: 80
                  fit: "cover"
        - name: category
          description: "Product category"
          meta:
            dimension:
              type: string
            additional_dimensions:
              category_icon:
                type: string
                label: "Category Icon"
                description: "Category icon image"
                image:
                  url: "https://cdn.mystore.com/icons/${value.raw | downcase}.png"
                  width: 40
                  height: 40
                  fit: "contain"
        - name: hero_image_url
          description: "Product hero image URL"
          meta:
            dimension:
              type: string
              image:
                url: "${value.raw}"
                width: 120
                fit: "cover"
  ```

  ```yaml Lightdash YAML theme={null}
  type: model
  name: products

  dimensions:
    - name: sku
      description: "Product SKU code"
      type: string
    - name: product_thumbnail
      type: string
      label: "Product Image"
      description: "Product catalog image"
      image:
        url: "https://cdn.mystore.com/products/${value.raw}/thumbnail.jpg"
        width: 80
        height: 80
        fit: "cover"
    - name: category
      description: "Product category"
      type: string
    - name: category_icon
      type: string
      label: "Category Icon"
      description: "Category icon image"
      image:
        url: "https://cdn.mystore.com/icons/${value.raw | downcase}.png"
        width: 40
        height: 40
        fit: "contain"
    - name: hero_image_url
      description: "Product hero image URL"
      type: string
      image:
        url: "${value.raw}"
        width: 120
        fit: "cover"
  ```
</CodeGroup>

## Tags

You can add tags to individual dimensions to categorize them for programmatic use. Tags are string arrays that Lightdash preserves and exposes via the API.

Tags are useful for:

* **AI agent access control** — restrict which dimensions an [AI agent](/agents/data-access) can see
* **API filtering** — filter the [data catalog metrics endpoint](/api-reference/v1/recipes#filter-metrics-by-tag-using-the-data-catalog-api) by tag to retrieve only the dimensions you need
* **Pipeline ingestion** — flag specific dimensions for downstream ETL or semantic layer workflows

<Note>
  Tags are **not** displayed as Metrics Catalog categories in the Lightdash UI. They function as a backend/programmatic control mechanism only.
</Note>

<CodeGroup>
  ```yaml dbt v1.10+ theme={null}
  models:
    - name: orders
      columns:
        - name: status
          config:
            meta:
              dimension:
                tags: ["core", "sales"]
        - name: location
          config:
            meta:
              dimension:
                tags: ["core", "operations"]
  ```

  ```yaml dbt v1.9 and earlier theme={null}
  models:
    - name: orders
      columns:
        - name: status
          meta:
            dimension:
              tags: ["core", "sales"]
        - name: location
          meta:
            dimension:
              tags: ["core", "operations"]
  ```

  ```yaml Lightdash YAML theme={null}
  type: model
  name: orders

  dimensions:
    - name: status
      tags: ["core", "sales"]
    - name: location
      tags: ["core", "operations"]
  ```
</CodeGroup>

## Using special characters or capital letters in your column names

If you use special characters on your column names, you might get errors when using those columns on explore. For example, having a column named `Status` with capital S on a table named `orders` in postgres throws the following error:

```bash theme={null}
column orders.status does not exist
```

To fix this, we can add the quoted column to our `sql` meta tag on dimensions

<CodeGroup>
  ```yaml dbt v1.10+ theme={null}
  - name: status
    config:
      meta:
        dimension:
          type: string
          sql: '"orders"."Status"' # you can also use '${TABLE}."Status"'
  ```

  ```yaml dbt v1.9 and earlier theme={null}
  - name: status
    meta:
      dimension:
        type: string
        sql: '"orders"."Status"' # you can also use '${TABLE}."Status"'
  ```

  ```yaml Lightdash YAML theme={null}
  dimensions:
    - name: status
      type: string
      sql: '"orders"."Status"' # you can also use '${TABLE}."Status"'
  ```
</CodeGroup>

This will quote the `Status` columns on the SQL query

```sql theme={null}
SELECT
  "orders".order_id AS "orders_order_id",
  "orders"."Status" AS "orders_status"
FROM "postgres"."jaffle"."orders" AS "orders"
```

## Additional dimensions

Additional dimensions let you define multiple dimensions off of a single column from your dbt model. This is useful when [adding different formatting](#adding-different-formatting) to a column, [comparing or combining columns](#comparing-or-combining-columns), [parsing JSON columns](#parsing-json-columns), or creating persisted groups/buckets based off of a column.

A "normal" dimension is a column created in your .sql file in dbt that is written to your data warehouse. An additional dimension is not included in your dbt .sql file, so it's not written to your data warehouse. When used in Lightdash, it just adds the dimension definition to your SQL query (so it's "created" at runtime).

All [dimension configurations](#dimension-configuration) are available for additional dimensions. You can also [use additional dimensions when defining metrics](#using-additional-dimensions-in-metrics).

<Info>
  Additional dimensions names need to be unique in the model.
</Info>

### Adding different formatting

<CodeGroup>
  ```yaml dbt v1.10+ theme={null}
  columns:
    - name: revenue
      config:
        meta:
          dimension:
            type: number
          additional_dimensions:
            revenue_in_thousands:
              type: number
              format: '#,##0," K"'
            revenue_in_millions:
              type: number
              format: '#,##0,," M"'
  ```

  ```yaml dbt v1.9 and earlier theme={null}
  columns:
    - name: revenue
      meta:
        dimension:
          type: number
        additional_dimensions:
          revenue_in_thousands:
            type: number
            format: '#,##0," K"'
          revenue_in_millions:
            type: number
            format: '#,##0,," M"'
  ```

  ```yaml Lightdash YAML theme={null}
  dimensions:
    - name: revenue
      type: number
    - name: revenue_in_thousands
      type: number
      sql: ${TABLE}.revenue
      format: '#,##0," K"'
    - name: revenue_in_millions
      type: number
      sql: ${TABLE}.revenue
      format: '#,##0,," M"'
  ```
</CodeGroup>

### Comparing or combining columns

When defining additional dimensions, you can reference other dimensions, even from joined tables (`organizations` is a joined table in the example below).

<CodeGroup>
  ```yaml dbt v1.10+ theme={null}
  columns:
    - name: created_date
      config:
        meta:
          dimension:
            type: date
          additional_dimensions:
            days_to_first_query_run:
              type: number
              description: 'Number of days between a user being created and their first query run.'
              sql: ${first_query_date} - ${created_date}
            days_to_organization_first_payment:
              type: number
              description: 'Number of days between a user being created and their organization making its first payment. This will be negative for users who joined after the first payment.'
              sql: ${created_date} - ${organizations.first_payment_date}
  ```

  ```yaml dbt v1.9 and earlier theme={null}
  columns:
    - name: created_date
      meta:
        dimension:
          type: date
        additional_dimensions:
          days_to_first_query_run:
            type: number
            description: 'Number of days between a user being created and their first query run.'
            sql: ${first_query_date} - ${created_date}
          days_to_organization_first_payment:
            type: number
            description: 'Number of days between a user being created and their organization making its first payment. This will be negative for users who joined after the first payment.'
            sql: ${created_date} - ${organizations.first_payment_date}
  ```

  ```yaml Lightdash YAML theme={null}
  dimensions:
    - name: created_date
      type: date
    - name: days_to_first_query_run
      type: number
      description: 'Number of days between a user being created and their first query run.'
      sql: ${first_query_date} - ${created_date}
    - name: days_to_organization_first_payment
      type: number
      description: 'Number of days between a user being created and their organization making its first payment. This will be negative for users who joined after the first payment.'
      sql: ${created_date} - ${organizations.first_payment_date}
  ```
</CodeGroup>

### Parsing JSON columns

Usually you'll want to add `hidden:true` for the main JSON dimension since raw JSON is not useful in charts.

<CodeGroup>
  ```yaml dbt v1.10+ theme={null}
  columns:
    - name: metadata # this is a jsonb column with metadata
      config:
        meta:
          dimension:
            hidden: true
          additional_dimensions:
            version:
              type: number
              sql: JSON_VALUE(${metadata}, '$.version') # custom SQL applied to get the "version" value inside metadata
  ```

  ```yaml dbt v1.9 and earlier theme={null}
  columns:
    - name: metadata # this is a jsonb column with metadata
      meta:
        dimension:
          hidden: true
        additional_dimensions:
          version:
            type: number
            sql: JSON_VALUE(${metadata}, '$.version') # custom SQL applied to get the "version" value inside metadata
  ```

  ```yaml Lightdash YAML theme={null}
  dimensions:
    - name: metadata # this is a jsonb column with metadata
      hidden: true
    - name: version
      type: number
      sql: JSON_VALUE(${metadata}, '$.version') # custom SQL applied to get the "version" value inside metadata
  ```
</CodeGroup>

### Adding multiple timezones for the same dimension

You can use additional dimensions to convert a timestamp into multiple timezones:

<CodeGroup>
  ```yaml dbt v1.10+ theme={null}
  columns:
    - name: created_at
      description: 'The time that the thing was created'
      config:
        meta:
          dimension:
            label: 'Created (UTC)'
            type: timestamp
          additional_dimensions:
            created_at_est:
              type: timestamp
              label: 'Created (EST)'
              description: 'The time that the thing was created, in EST'
              sql: "convert_timezone('UTC', 'America/New_York', ${TABLE}.created_at)"
  ```

  ```yaml dbt v1.9 and earlier theme={null}
  columns:
    - name: created_at
      description: 'The time that the thing was created'
      meta:
        dimension:
          label: 'Created (UTC)'
          type: timestamp
        additional_dimensions:
          created_at_est:
            type: timestamp
            label: 'Created (EST)'
            description: 'The time that the thing was created, in EST'
            sql: "convert_timezone('UTC', 'America/New_York', ${TABLE}.created_at)"
  ```

  ```yaml Lightdash YAML theme={null}
  dimensions:
    - name: created_at
      description: 'The time that the thing was created'
      label: 'Created (UTC)'
      type: timestamp
    - name: created_at_est
      type: timestamp
      label: 'Created (EST)'
      description: 'The time that the thing was created, in EST'
      sql: "convert_timezone('UTC', 'America/New_York', ${TABLE}.created_at)"
  ```
</CodeGroup>

### Using additional dimensions in metrics

To define metrics based on additional dimensions, you need to add them to the model's meta metrics, or use custom SQL in defining them under the column's meta.

<CodeGroup>
  ```yaml dbt v1.10+ theme={null}
  models:
    - name: users
      config:
        meta:
          metrics:
            highest_version_model_metric_example:
              type: max
              sql: ${version}
        columns:
          - name: metadata
            meta:
              dimension:
                hidden: true
              additional_dimensions:
                version:
                  type: number
                  sql: JSON_VALUE(${metadata}, '$.version')
              metrics:
                highest_version:
                  type: max
                  sql: ${version}
  ```

  ```yaml dbt v1.9 and earlier theme={null}
  models:
    - name: users
      meta:
        metrics:
          highest_version_model_metric_example:
            type: max
            sql: ${version}
      columns:
        - name: metadata
          meta:
            dimension:
              hidden: true
            additional_dimensions:
              version:
                type: number
                sql: JSON_VALUE(${metadata}, '$.version')
            metrics:
              highest_version:
                type: max
                sql: ${version}
  ```

  ```yaml Lightdash YAML theme={null}
  type: model
  name: users

  dimensions:
    - name: metadata
      hidden: true
    - name: version
      type: number
      sql: JSON_VALUE(${metadata}, '$.version')

  metrics:
    highest_version_model_metric_example:
      type: max
      sql: ${version}
    highest_version:
      type: max
      sql: ${version}
  ```
</CodeGroup>

### Referencing time intervals in additional dimensions

You can reference time interval dimensions within additional dimensions. This is useful for creating custom logic based on specific time intervals.

For example, you can create a tier based on whether a specific time interval has a value:

<CodeGroup>
  ```yaml dbt v1.10+ theme={null}
    - name: session_start
      config:
        meta:
          dimension:
            type: timestamp
            time_intervals:
            - DAY_OF_WEEK_NAME
            - WEEK
            - MONTH
            - RAW
            - DAY
            - HOUR_OF_DAY_NUM
            - QUARTER
          additional_dimensions:
            extra_session_start_tier:
              type: string
              sql: |
                CASE
                  WHEN ${session_start_month} IS NOT NULL THEN 'month'
                  ELSE 'else' END
  ```

  ```yaml dbt v1.9 and earlier theme={null}
    - name: session_start
      meta:
        dimension:
          type: timestamp
          time_intervals:
          - DAY_OF_WEEK_NAME
          - WEEK
          - MONTH
          - RAW
          - DAY
          - HOUR_OF_DAY_NUM
          - QUARTER
        additional_dimensions:
          extra_session_start_tier:
            type: string
            sql: |
              CASE
                WHEN ${session_start_month} IS NOT NULL THEN 'month'
                ELSE 'else' END
  ```

  ```yaml Lightdash YAML theme={null}
  dimensions:
    - name: session_start
      type: timestamp
      time_intervals:
      - DAY_OF_WEEK_NAME
      - WEEK
      - MONTH
      - RAW
      - DAY
      - HOUR_OF_DAY_NUM
      - QUARTER
    - name: extra_session_start_tier
      type: string
      sql: |
        CASE
          WHEN ${session_start_month} IS NOT NULL THEN 'month'
          ELSE 'else' END
  ```
</CodeGroup>

In this example, the additional dimension `extra_session_start_tier` references `${session_start_month}`, which is the `MONTH` time interval of the `session_start` dimension.
