> ## Documentation Index
> Fetch the complete documentation index at: https://docs.lightdash.com/llms.txt
> Use this file to discover all available pages before exploring further.
# Lightdash MCP
Available to all Lightdash Cloud users.
The [Model Context Protocol (MCP)](https://modelcontextprotocol.io/) enables AI assistants (e.g. ChatGPT, Claude, OpenAI Codex) and custom agents to directly interact with your Lightdash data. This integration allows MCP clients to explore your data models, search for metrics and dimensions, and provide data-driven insights - all through natural conversation. You can use MCP with existing AI assistants or integrate it into your own custom agents and automated workflows. MCP uses secure OAuth authentication and respects all your existing access controls, ensuring data remains protected.
With MCP, your AI assistant becomes a data analyst that can:
* Browse and understand your data models
* Find relevant metrics and dimensions
* Run queries and generate visualizations
* Discover existing charts and dashboards, including verified content
* Create and edit charts and dashboards using content-as-code
* Leverage your AI agents' domain expertise and verified answers
* Switch between different projects seamlessly
* Respect your data governance and access controls
MCP respects all your existing Lightdash permissions and user attributes. MCP
clients can only access the data that your user account has permission to
view.
## Get started
Setting up MCP is quick and straightforward. You can connect your AI assistant to your Lightdash instance in just a few minutes.
### Prerequisites
* A Lightdash Cloud account or Enterprise account with MCP enabled
* An MCP-compatible AI assistant (e.g., Claude.ai, Claude Desktop, ChatGPT, OpenAI Codex)
### Network requirements
If your organization uses a corporate firewall, VPN, or internet security tool, the following domains must be allowlisted for MCP to work correctly:
| Domain | Purpose |
| -------------------------------------- | ---------------------------------------------------------------------------- |
| `.lightdash.cloud` | Lightdash API and OAuth authentication |
| `claudemcpcontent.com` | Used by Claude to render visual content (charts, tables) from MCP connectors |
If `claudemcpcontent.com` is blocked, Claude will still return query results as text but will not be able to display Lightdash visual charts. You may see the error: *"Failed to set up MCP app. Check that claudemcpcontent.com is not blocked by your network or browser."*
If you're having trouble, try opening Claude in an incognito/private browser window to rule out browser extensions (like ad blockers) that may be blocking these domains.
### Installation
#### Claude.ai (Web & Desktop Apps)
Set up MCP in the [Claude.ai](https://claude.ai) web app, and it will automatically sync to your Claude Desktop app after restart.
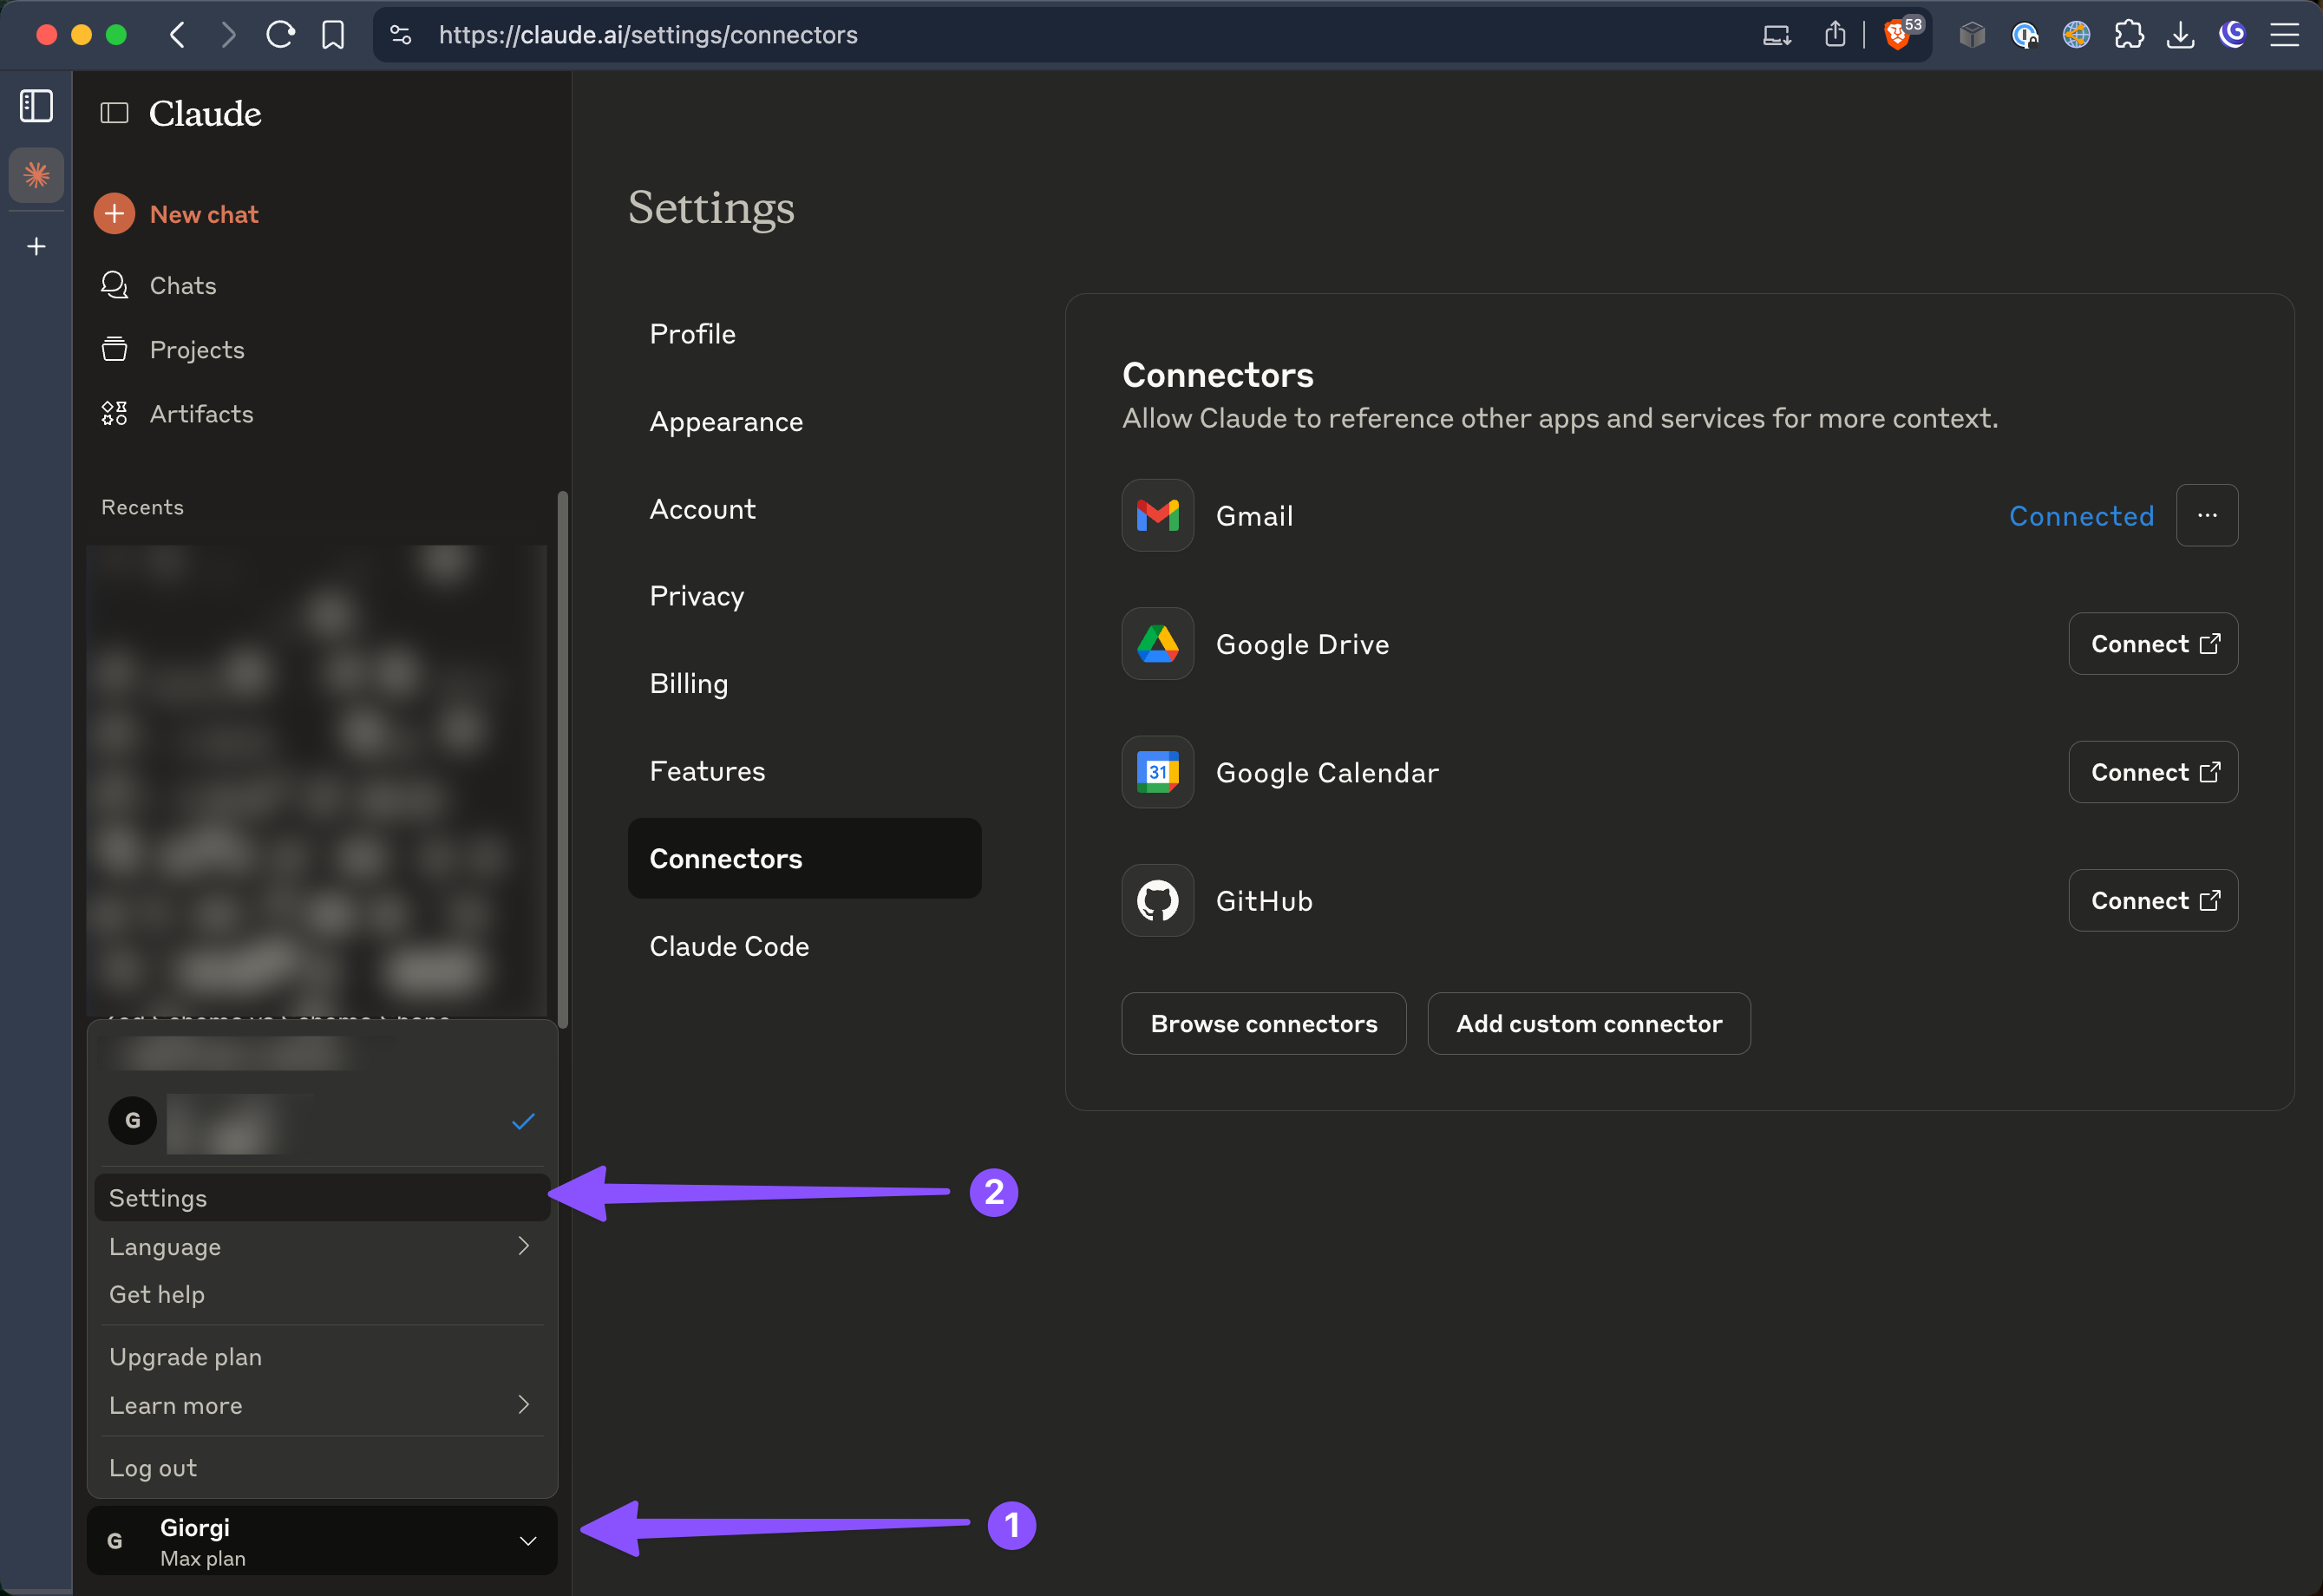
1. **Access Settings in Claude.ai**
Navigate to your profile menu (bottom-left corner) and select Settings.
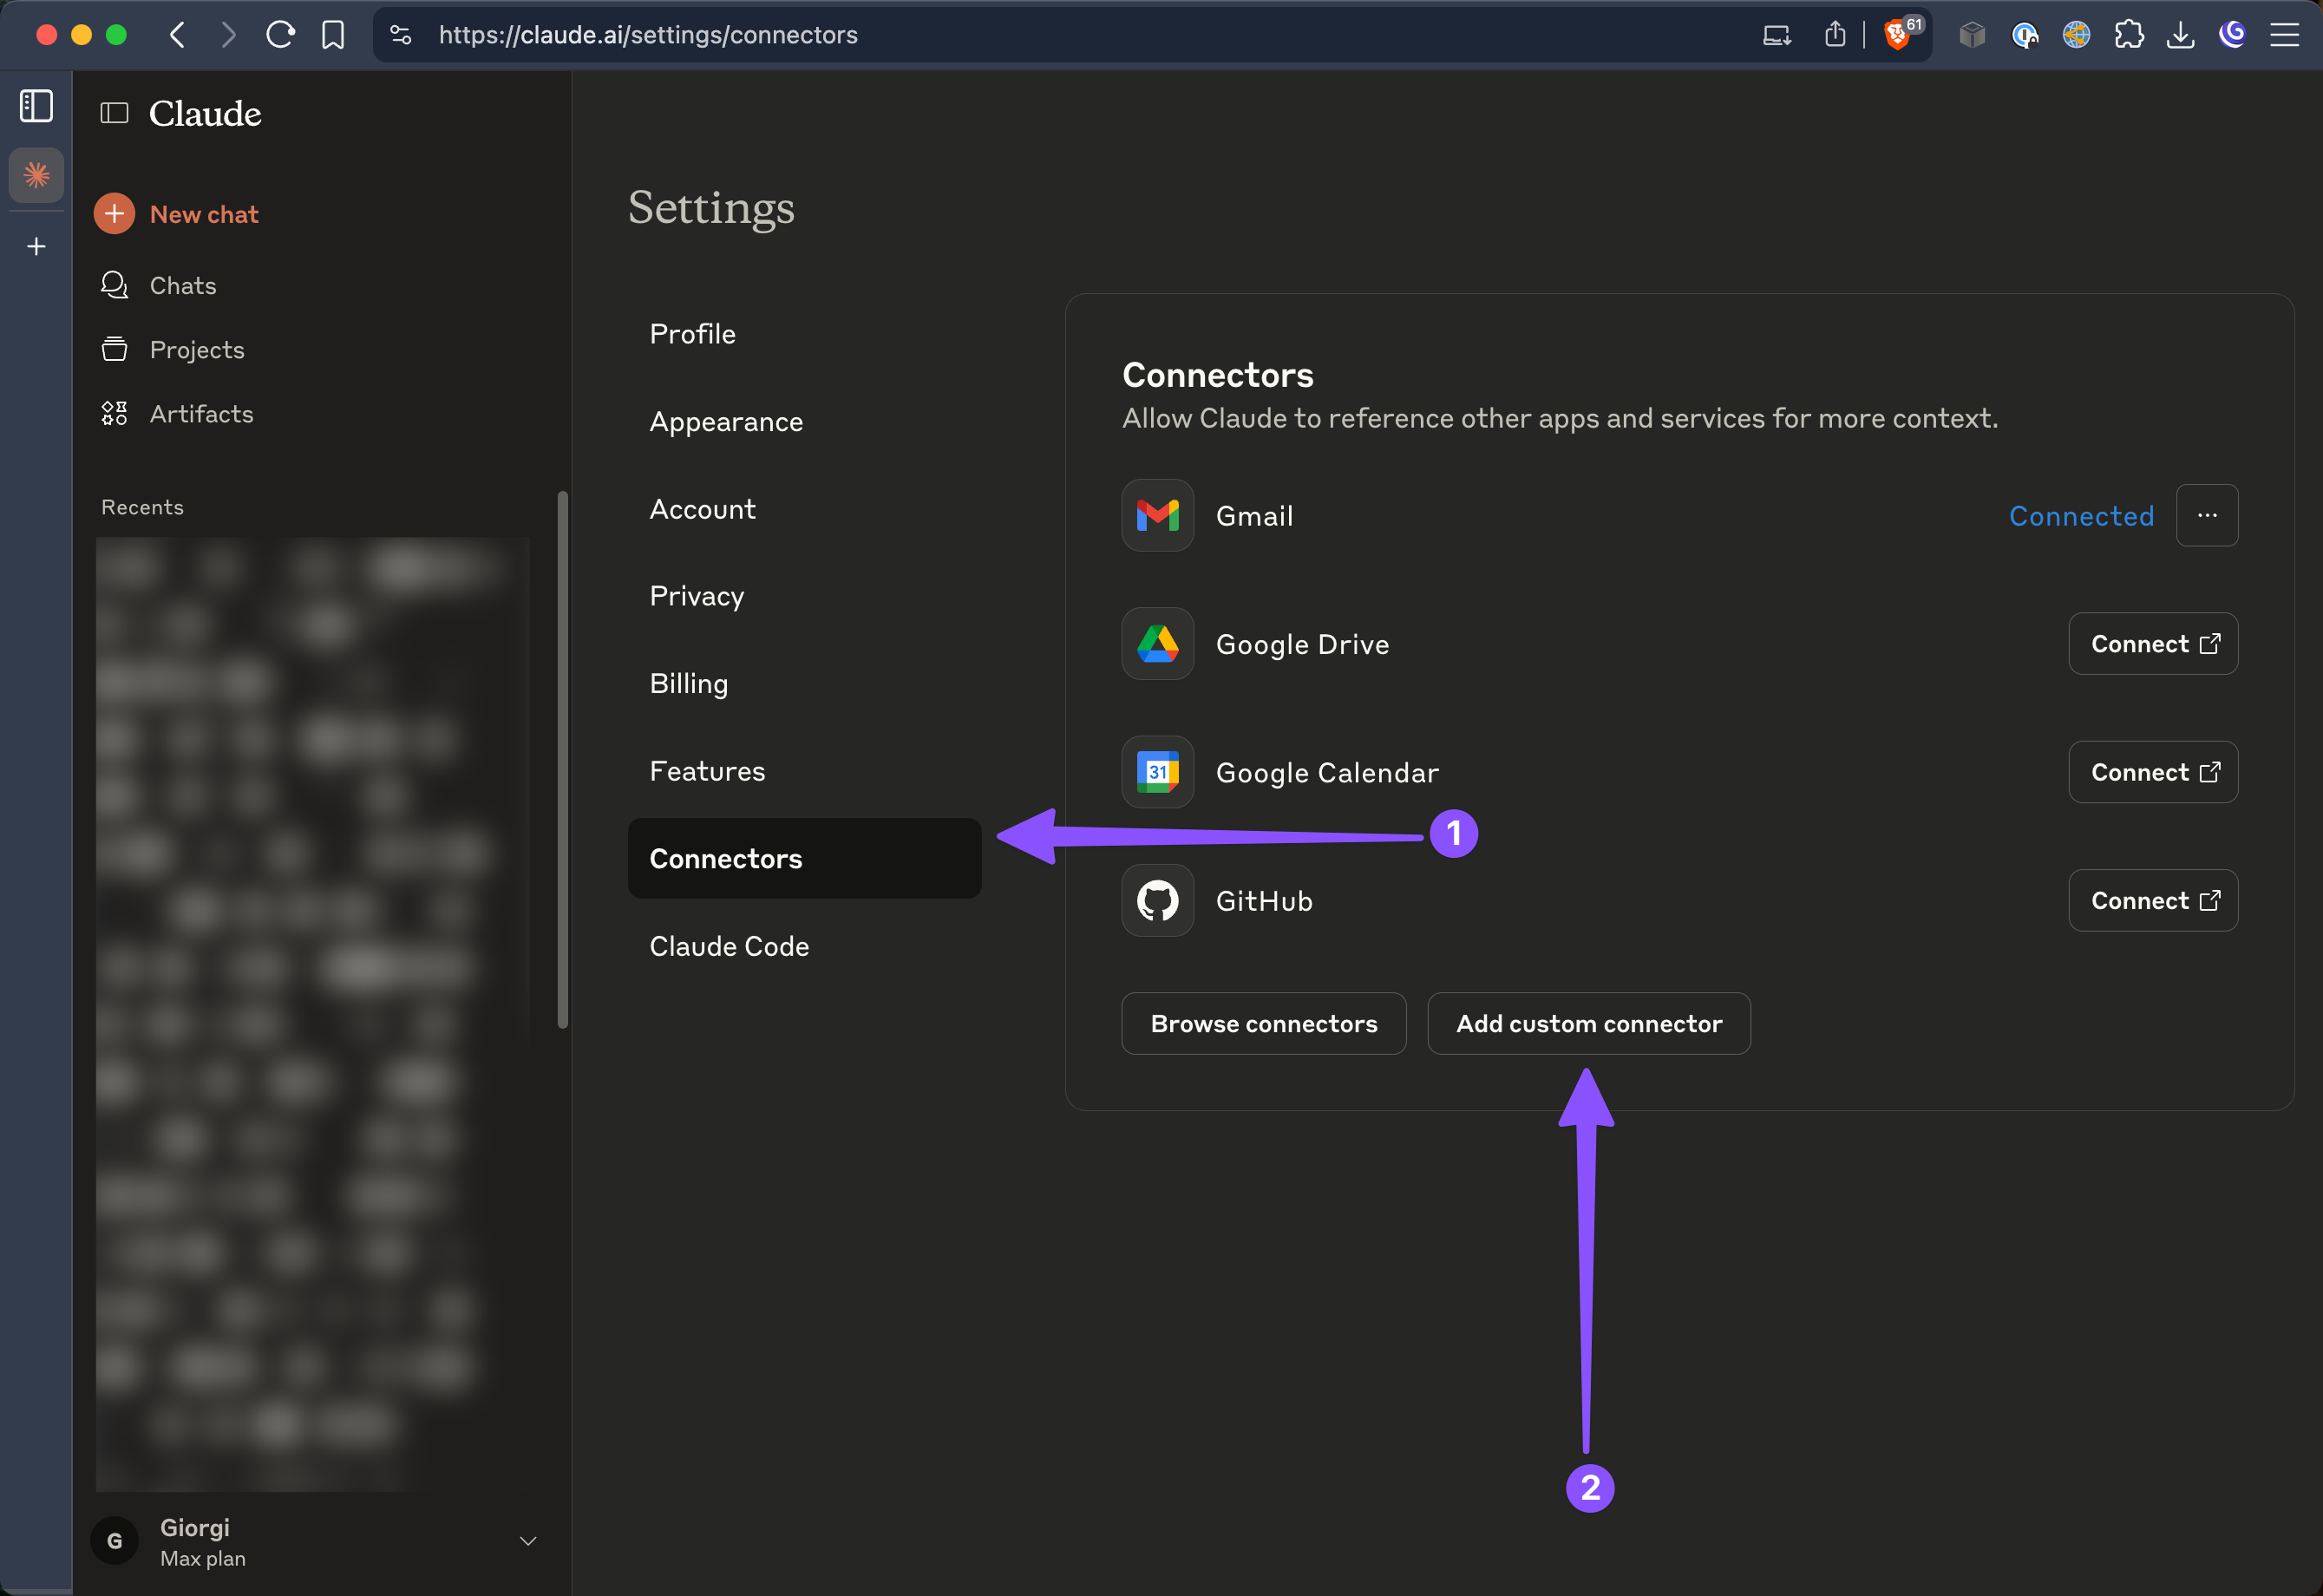
 2. **Add Custom Connector**
In the Settings menu, select "Connectors" from the sidebar, then click "Add custom connector".
2. **Add Custom Connector**
In the Settings menu, select "Connectors" from the sidebar, then click "Add custom connector".
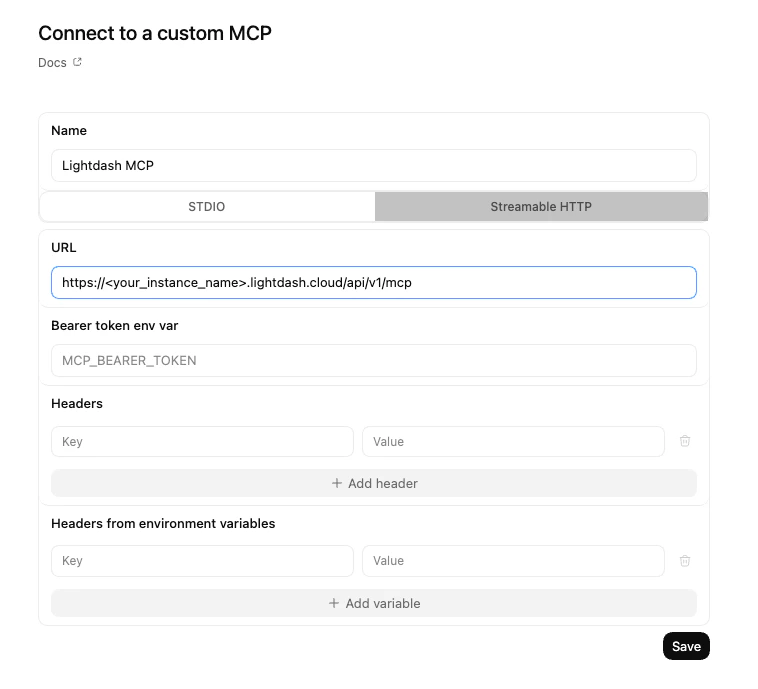
 3. **Configure Connection**
Fill in the connection details with your Lightdash instance information.
3. **Configure Connection**
Fill in the connection details with your Lightdash instance information.
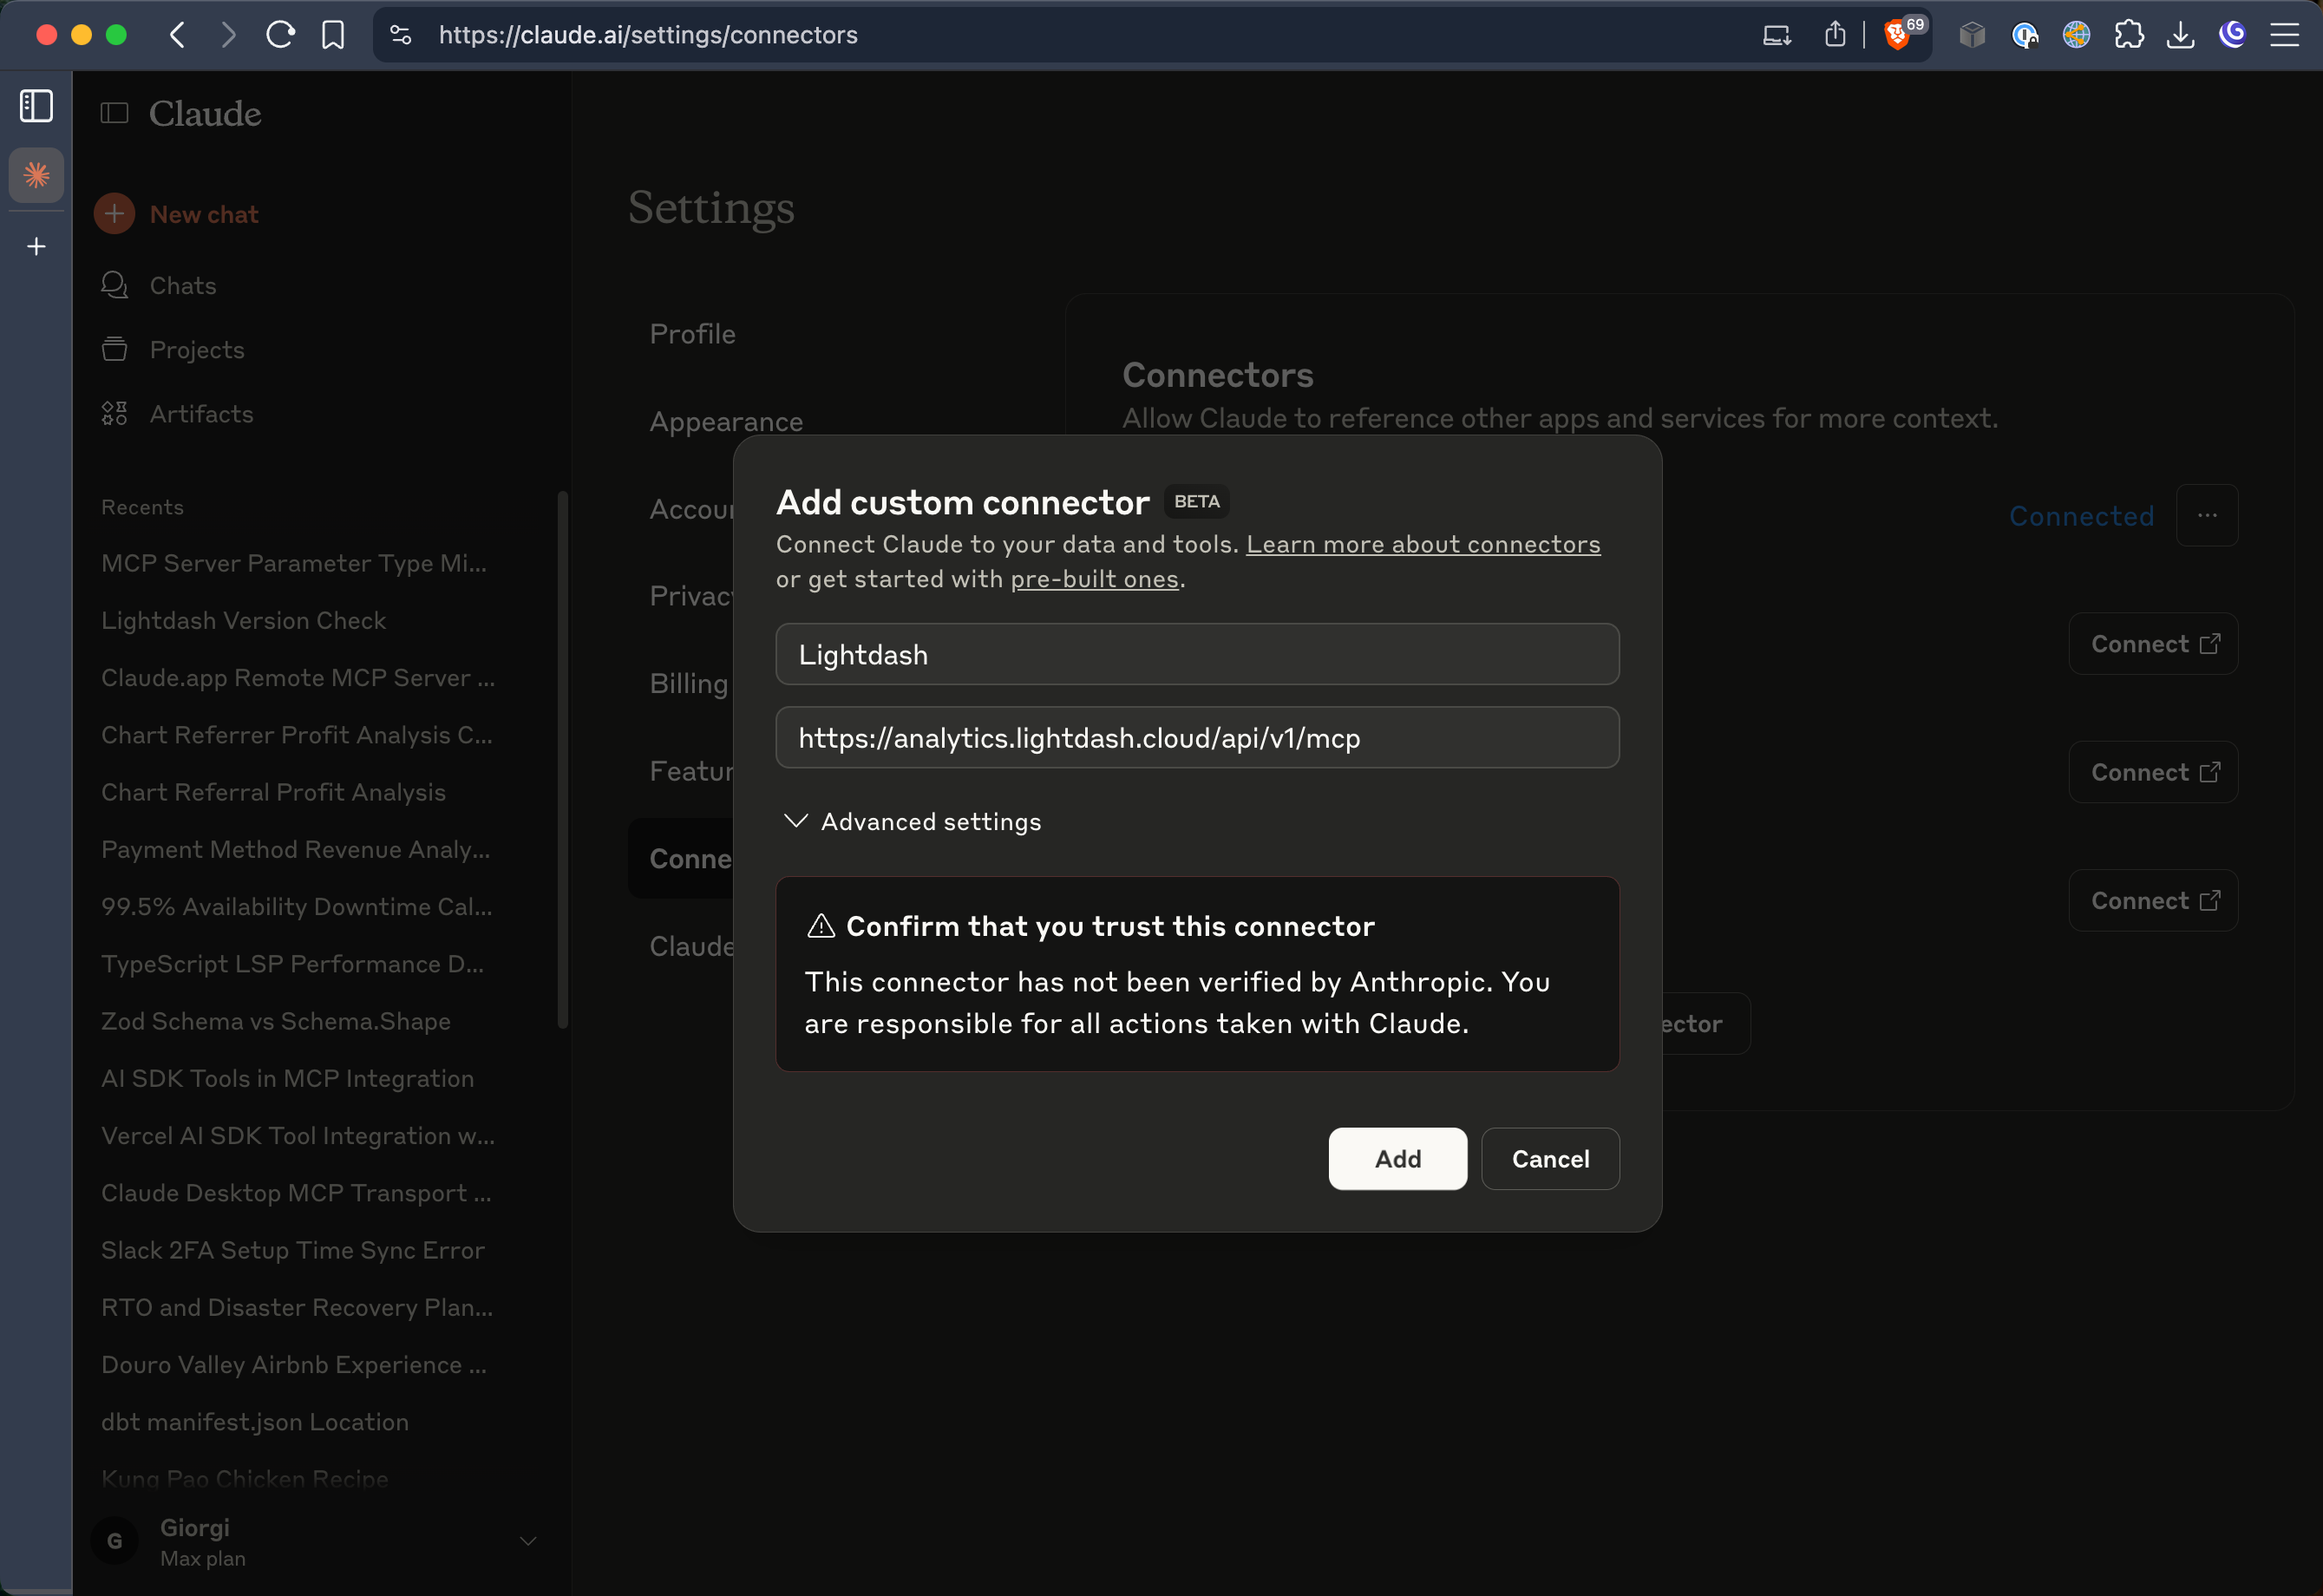 * **Name:** Lightdash (or any name you prefer)
* **URL:** `https://.lightdash.cloud/api/v1/mcp`
4. **Connect and Authenticate**
Click the "Connect" button to initiate the authentication process.
* **Name:** Lightdash (or any name you prefer)
* **URL:** `https://.lightdash.cloud/api/v1/mcp`
4. **Connect and Authenticate**
Click the "Connect" button to initiate the authentication process.
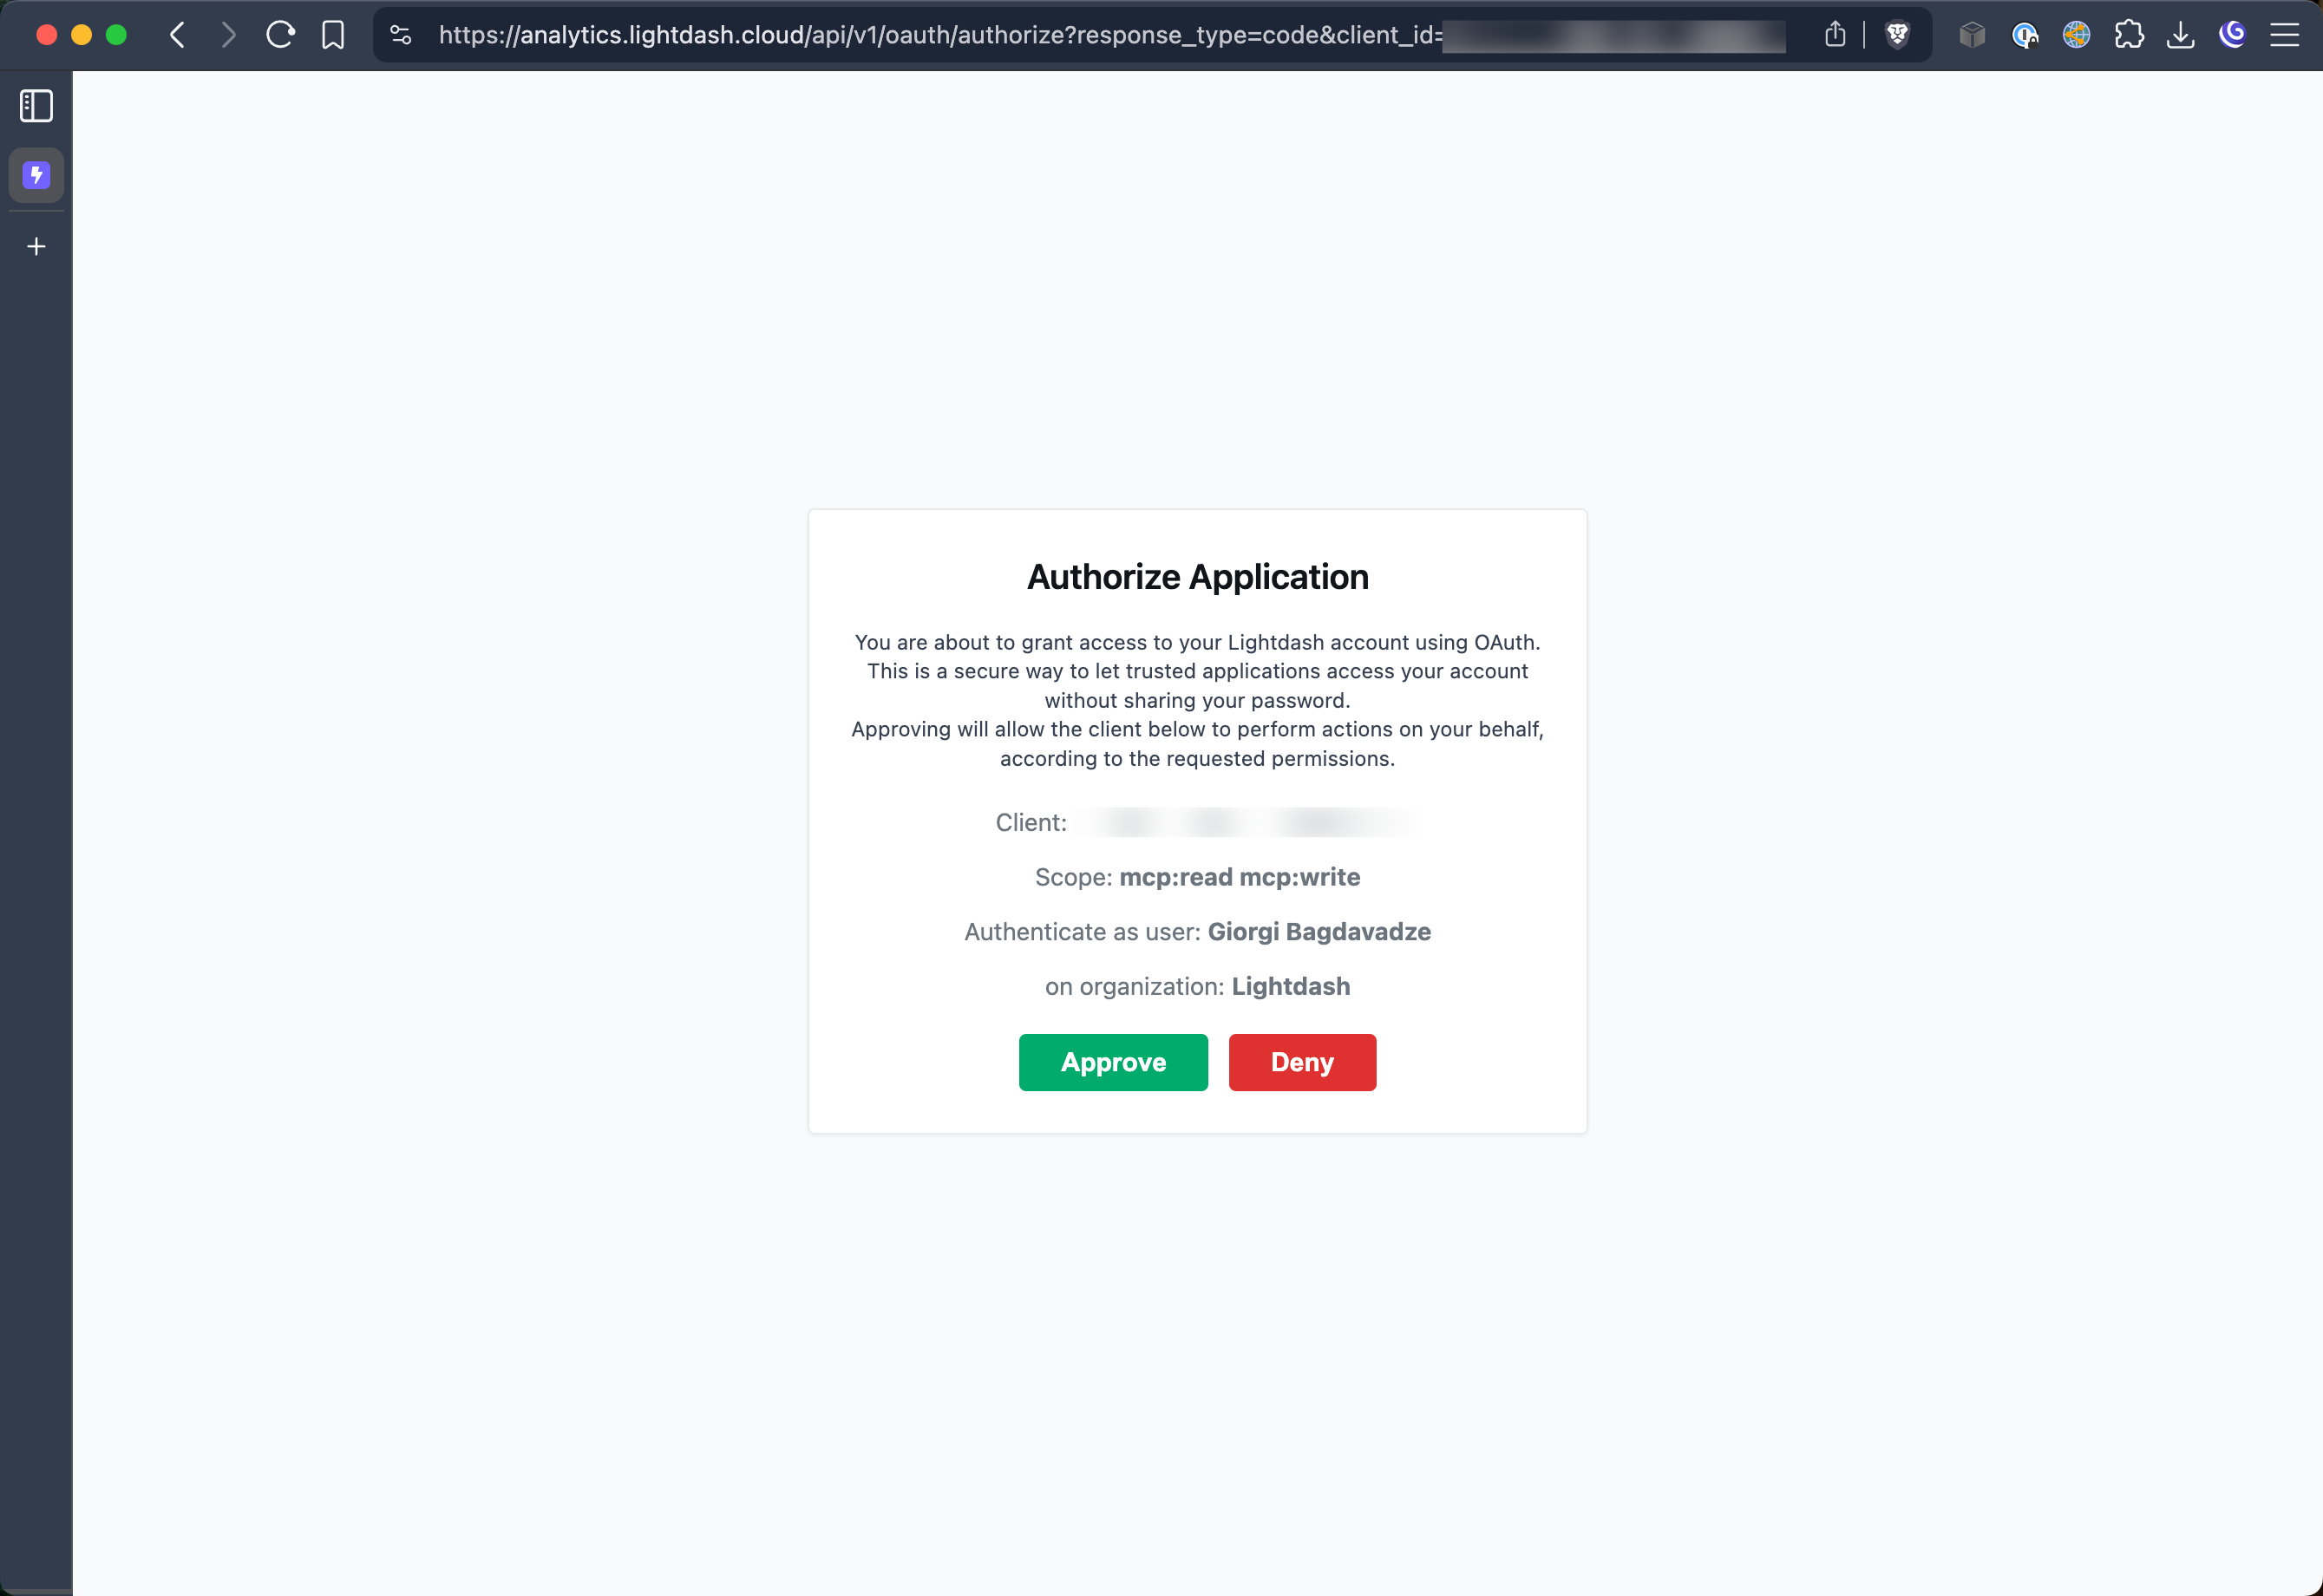
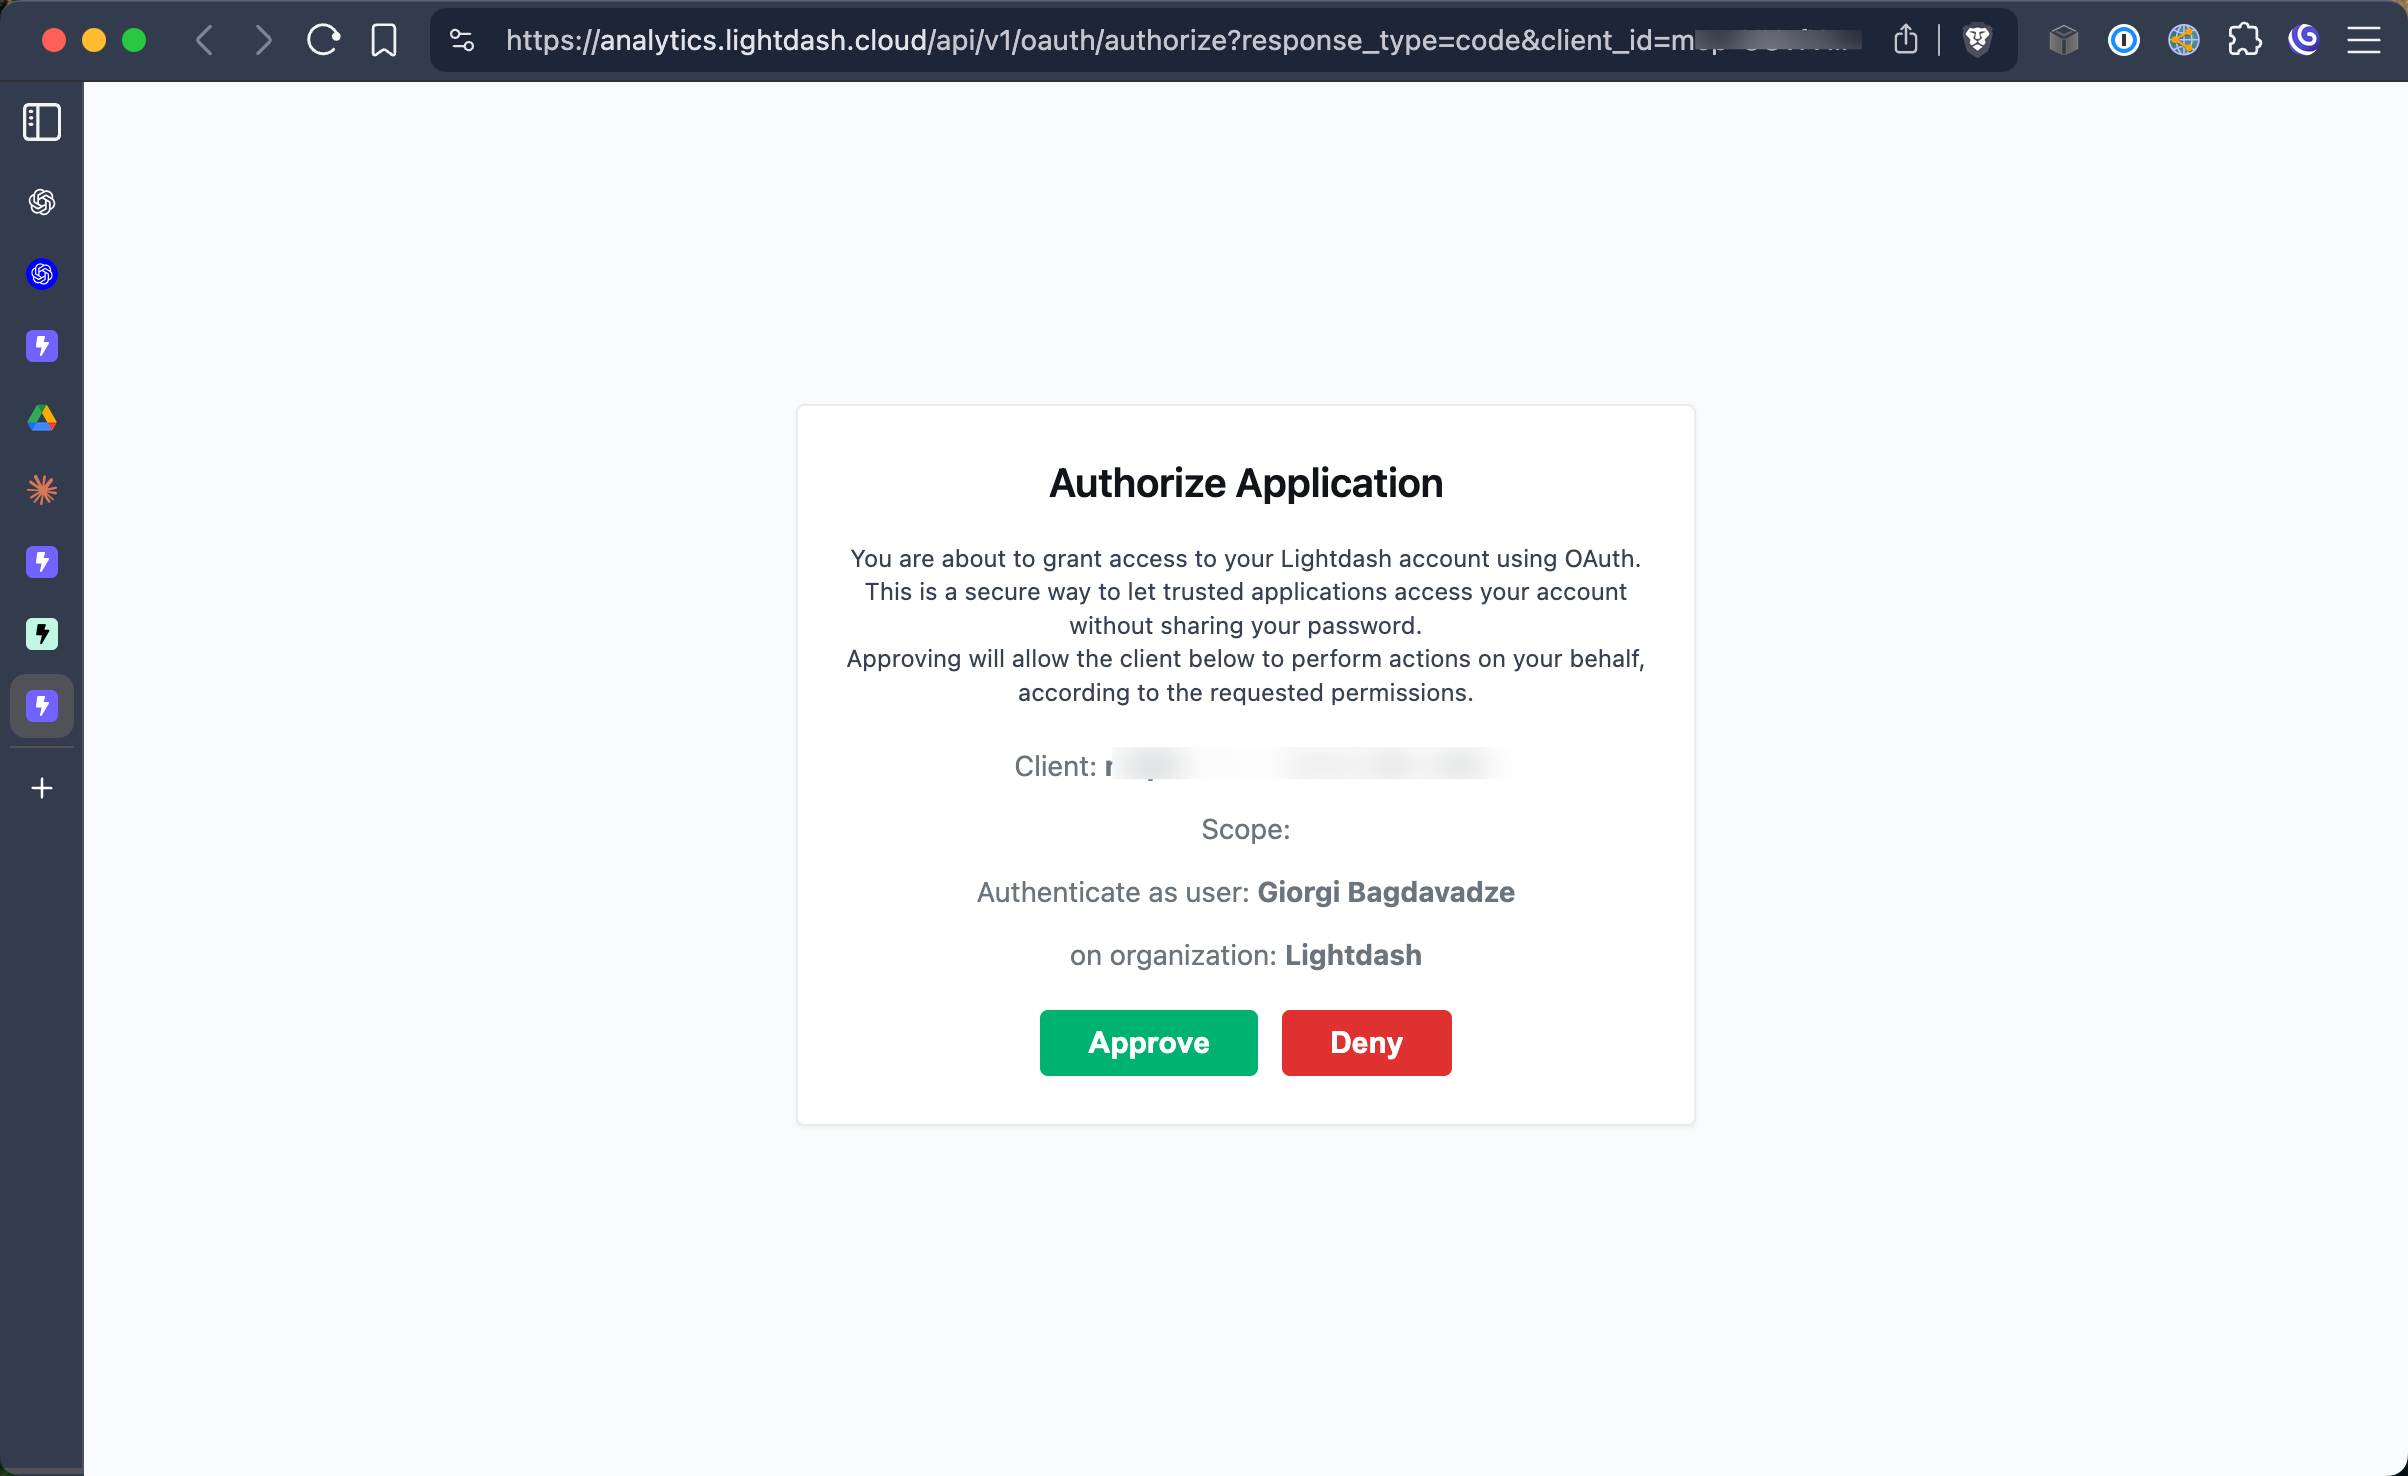
 5. **Complete OAuth Flow**
Log in to your Lightdash account and approve the connection when prompted.
5. **Complete OAuth Flow**
Log in to your Lightdash account and approve the connection when prompted.
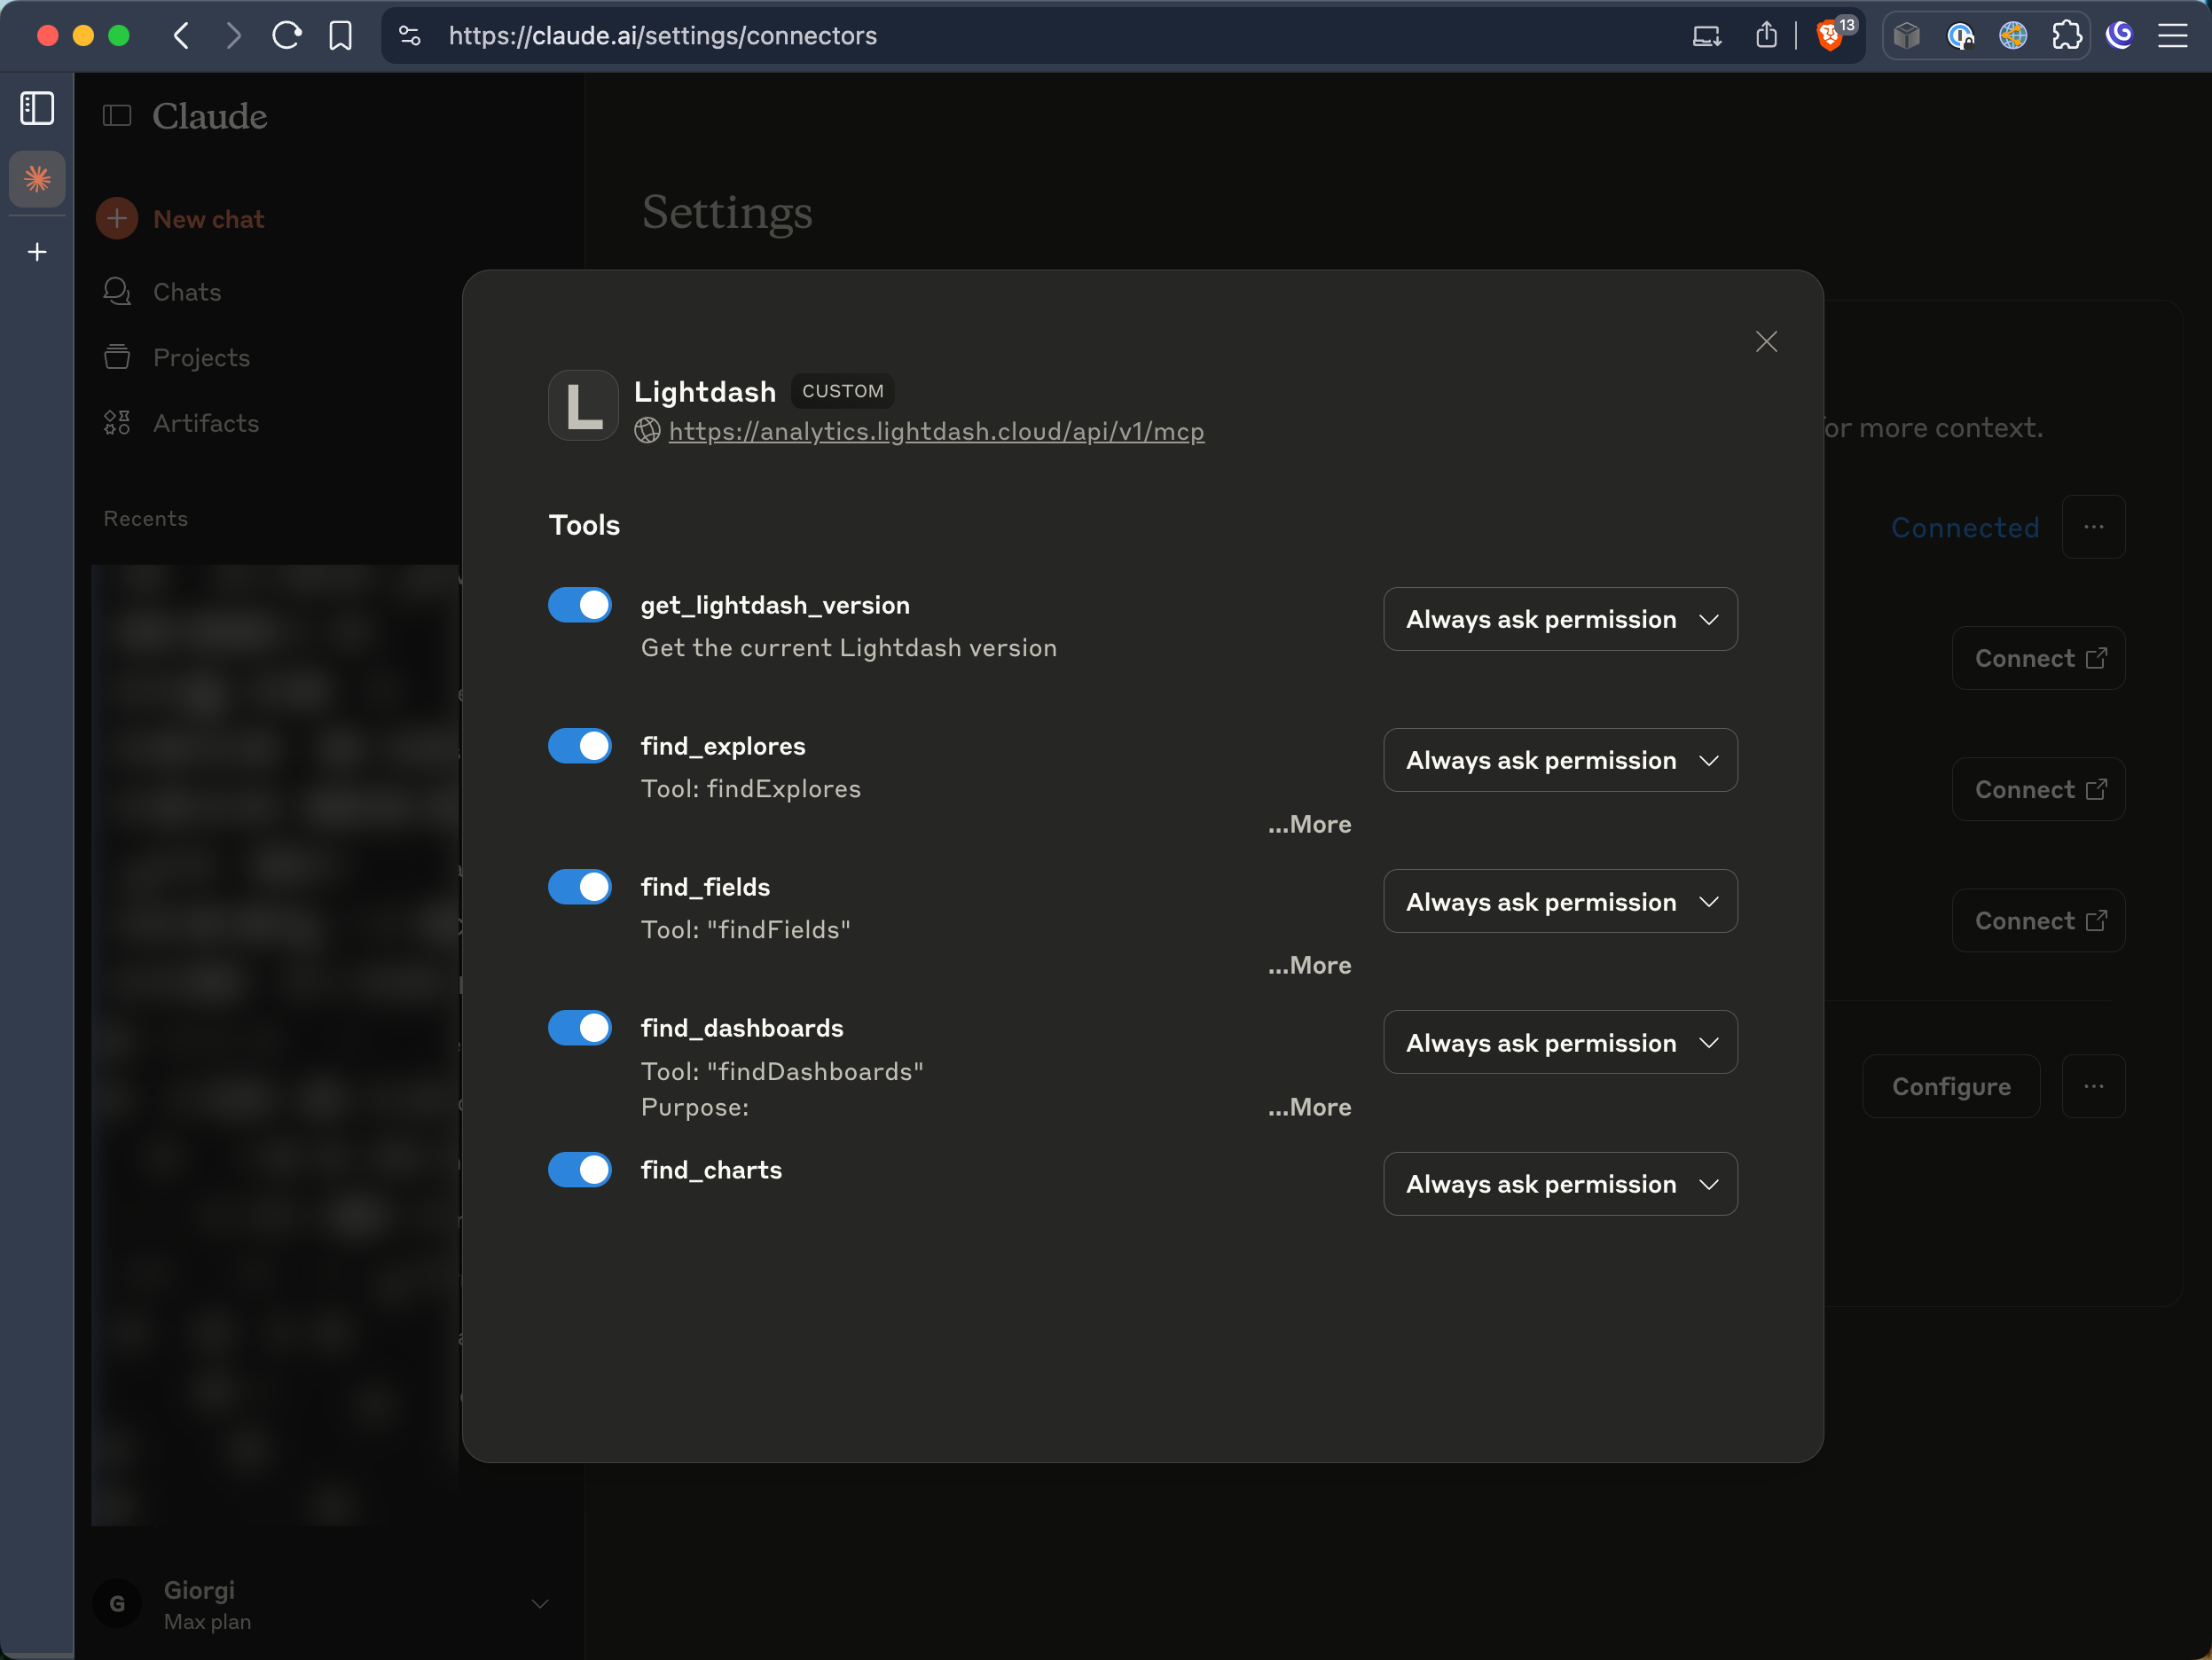
 6. **Configure Permissions (Optional)**
Optionally configure which MCP tools Claude can access and set any additional permissions.
6. **Configure Permissions (Optional)**
Optionally configure which MCP tools Claude can access and set any additional permissions.
 #### ChatGPT (Web App)
ChatGPT support for MCP is coming soon! Stay tuned for updates.
#### OpenAI Codex
1. **Navigate to Settings**
Go to **Settings > MCP Servers** and click **Add Server**.
2. **Configure Connection**
Select **Streamable HTTP** as the transport type and enter your Lightdash MCP URL.
#### ChatGPT (Web App)
ChatGPT support for MCP is coming soon! Stay tuned for updates.
#### OpenAI Codex
1. **Navigate to Settings**
Go to **Settings > MCP Servers** and click **Add Server**.
2. **Configure Connection**
Select **Streamable HTTP** as the transport type and enter your Lightdash MCP URL.
 * **URL:** `https://.lightdash.cloud/api/v1/mcp`
3. **Authenticate**
Once the server is created, an **Authenticate** option will appear in the MCP Servers list. Click it to complete the OAuth flow with your Lightdash account.
* **URL:** `https://.lightdash.cloud/api/v1/mcp`
3. **Authenticate**
Once the server is created, an **Authenticate** option will appear in the MCP Servers list. Click it to complete the OAuth flow with your Lightdash account.
 #### Claude Code CLI
For developers using Claude Code CLI:
```bash theme={null}
claude mcp add lightdash https://.lightdash.cloud/api/v1/mcp -t http
```
Replace `` with your actual Lightdash instance name.
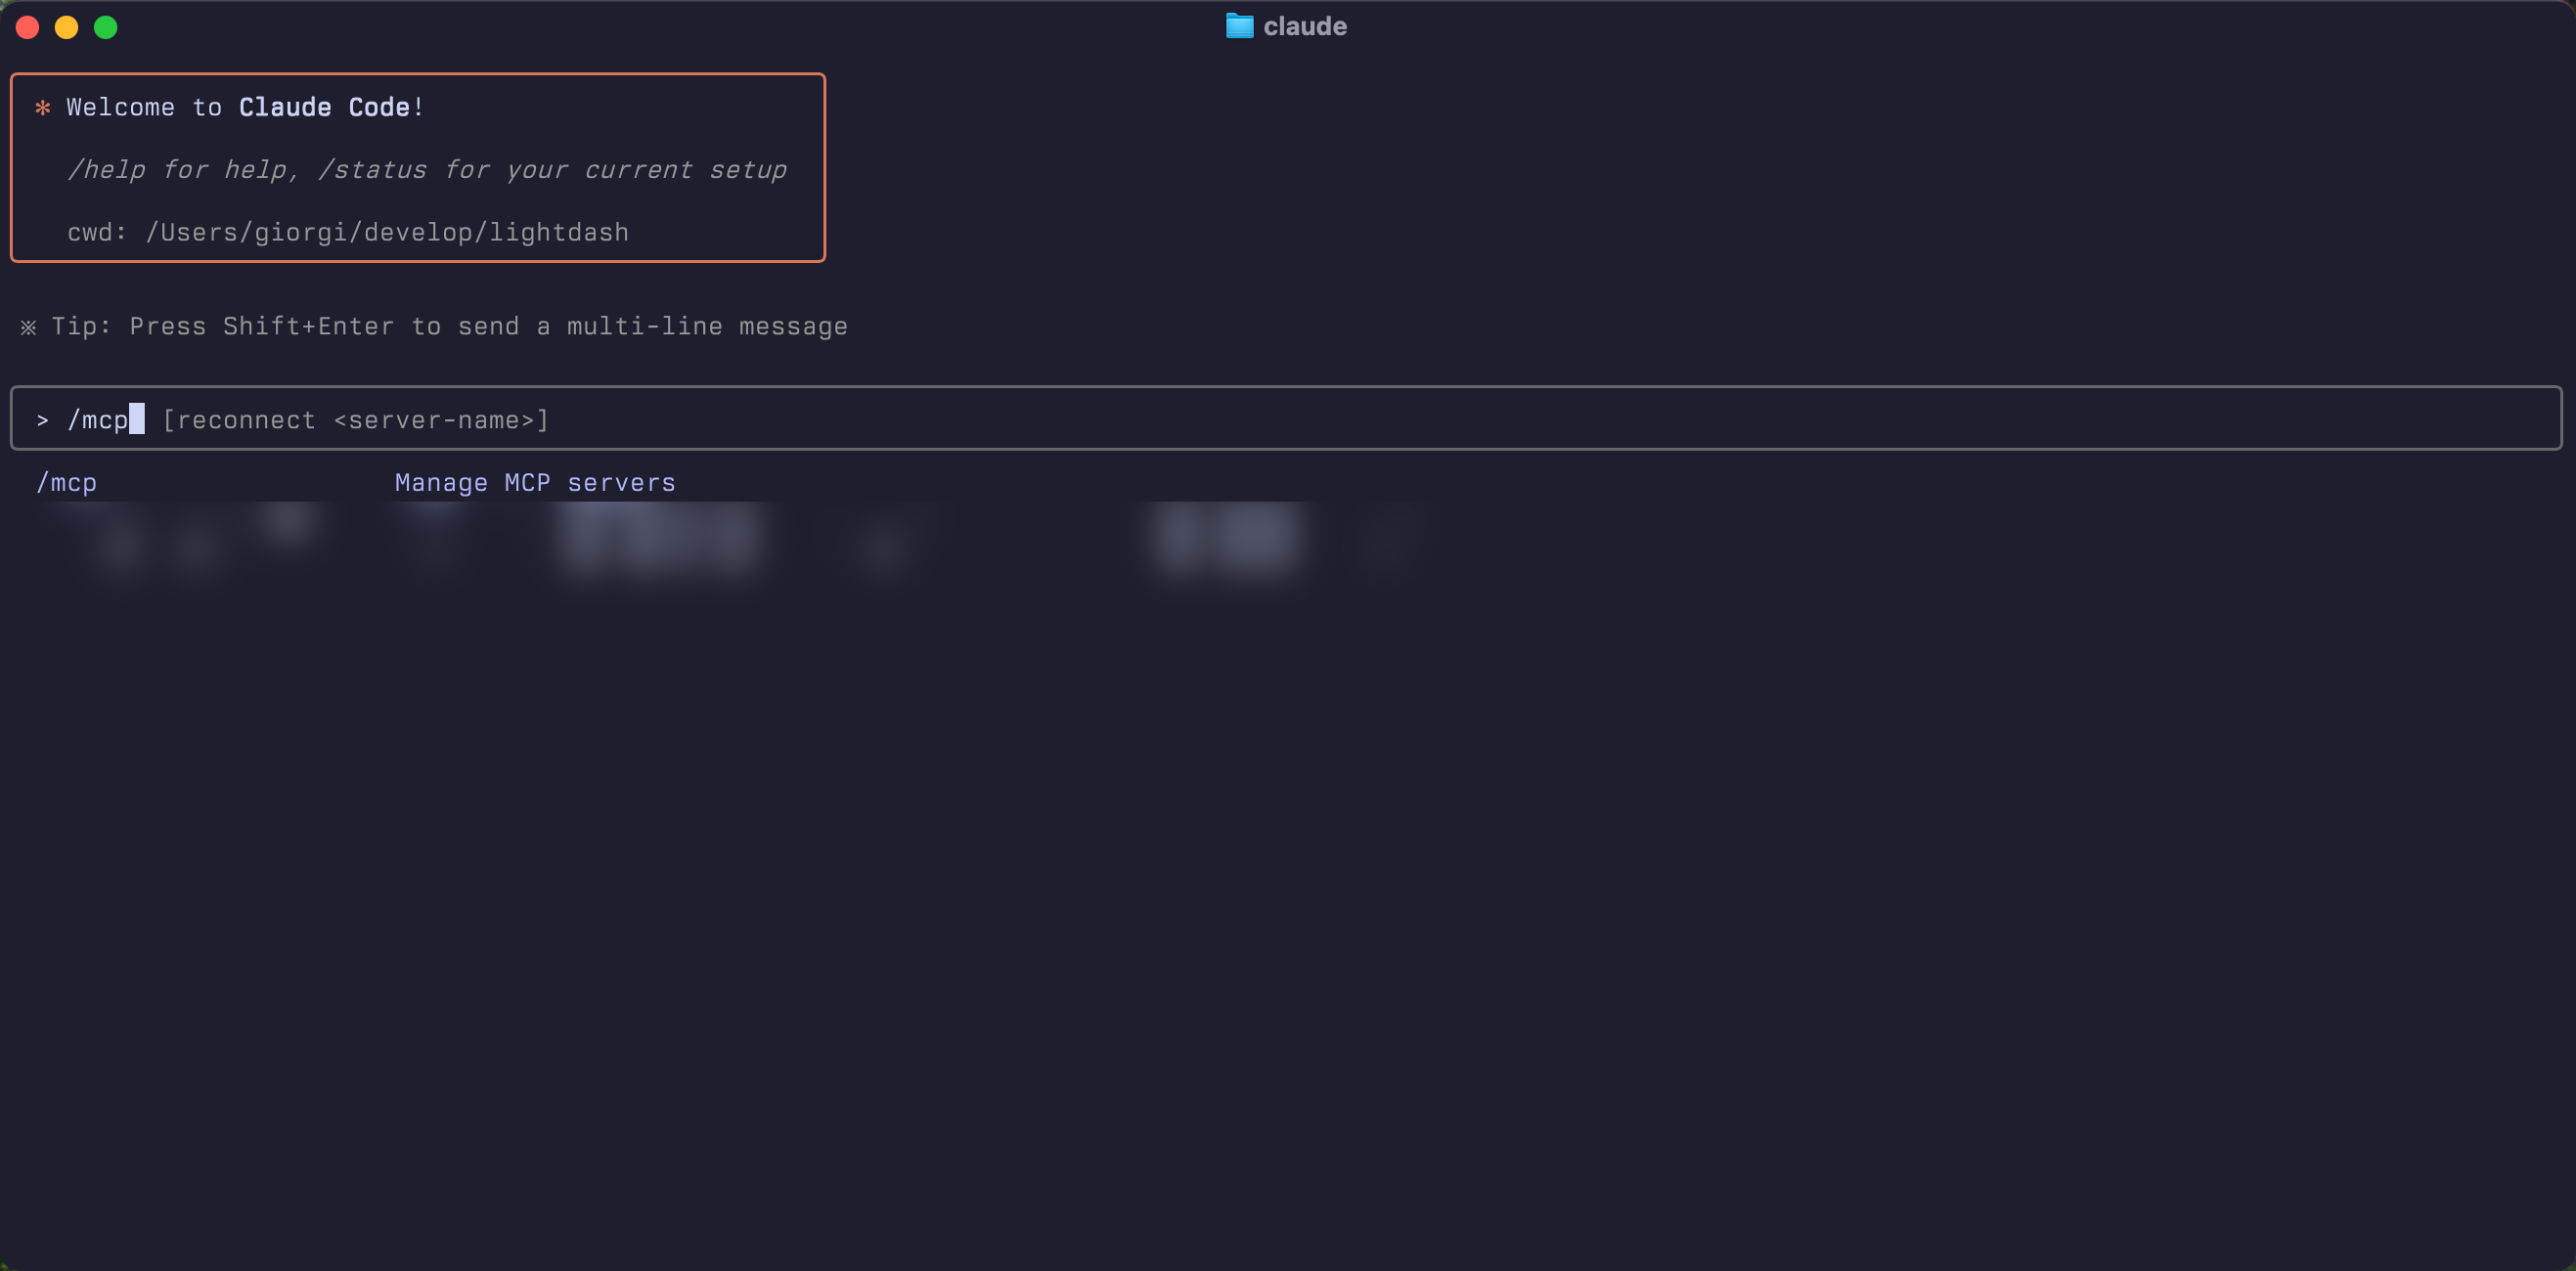
1. **Use the /mcp command in Claude Code**
#### Claude Code CLI
For developers using Claude Code CLI:
```bash theme={null}
claude mcp add lightdash https://.lightdash.cloud/api/v1/mcp -t http
```
Replace `` with your actual Lightdash instance name.
1. **Use the /mcp command in Claude Code**
 2. **Select Lightdash from the list**
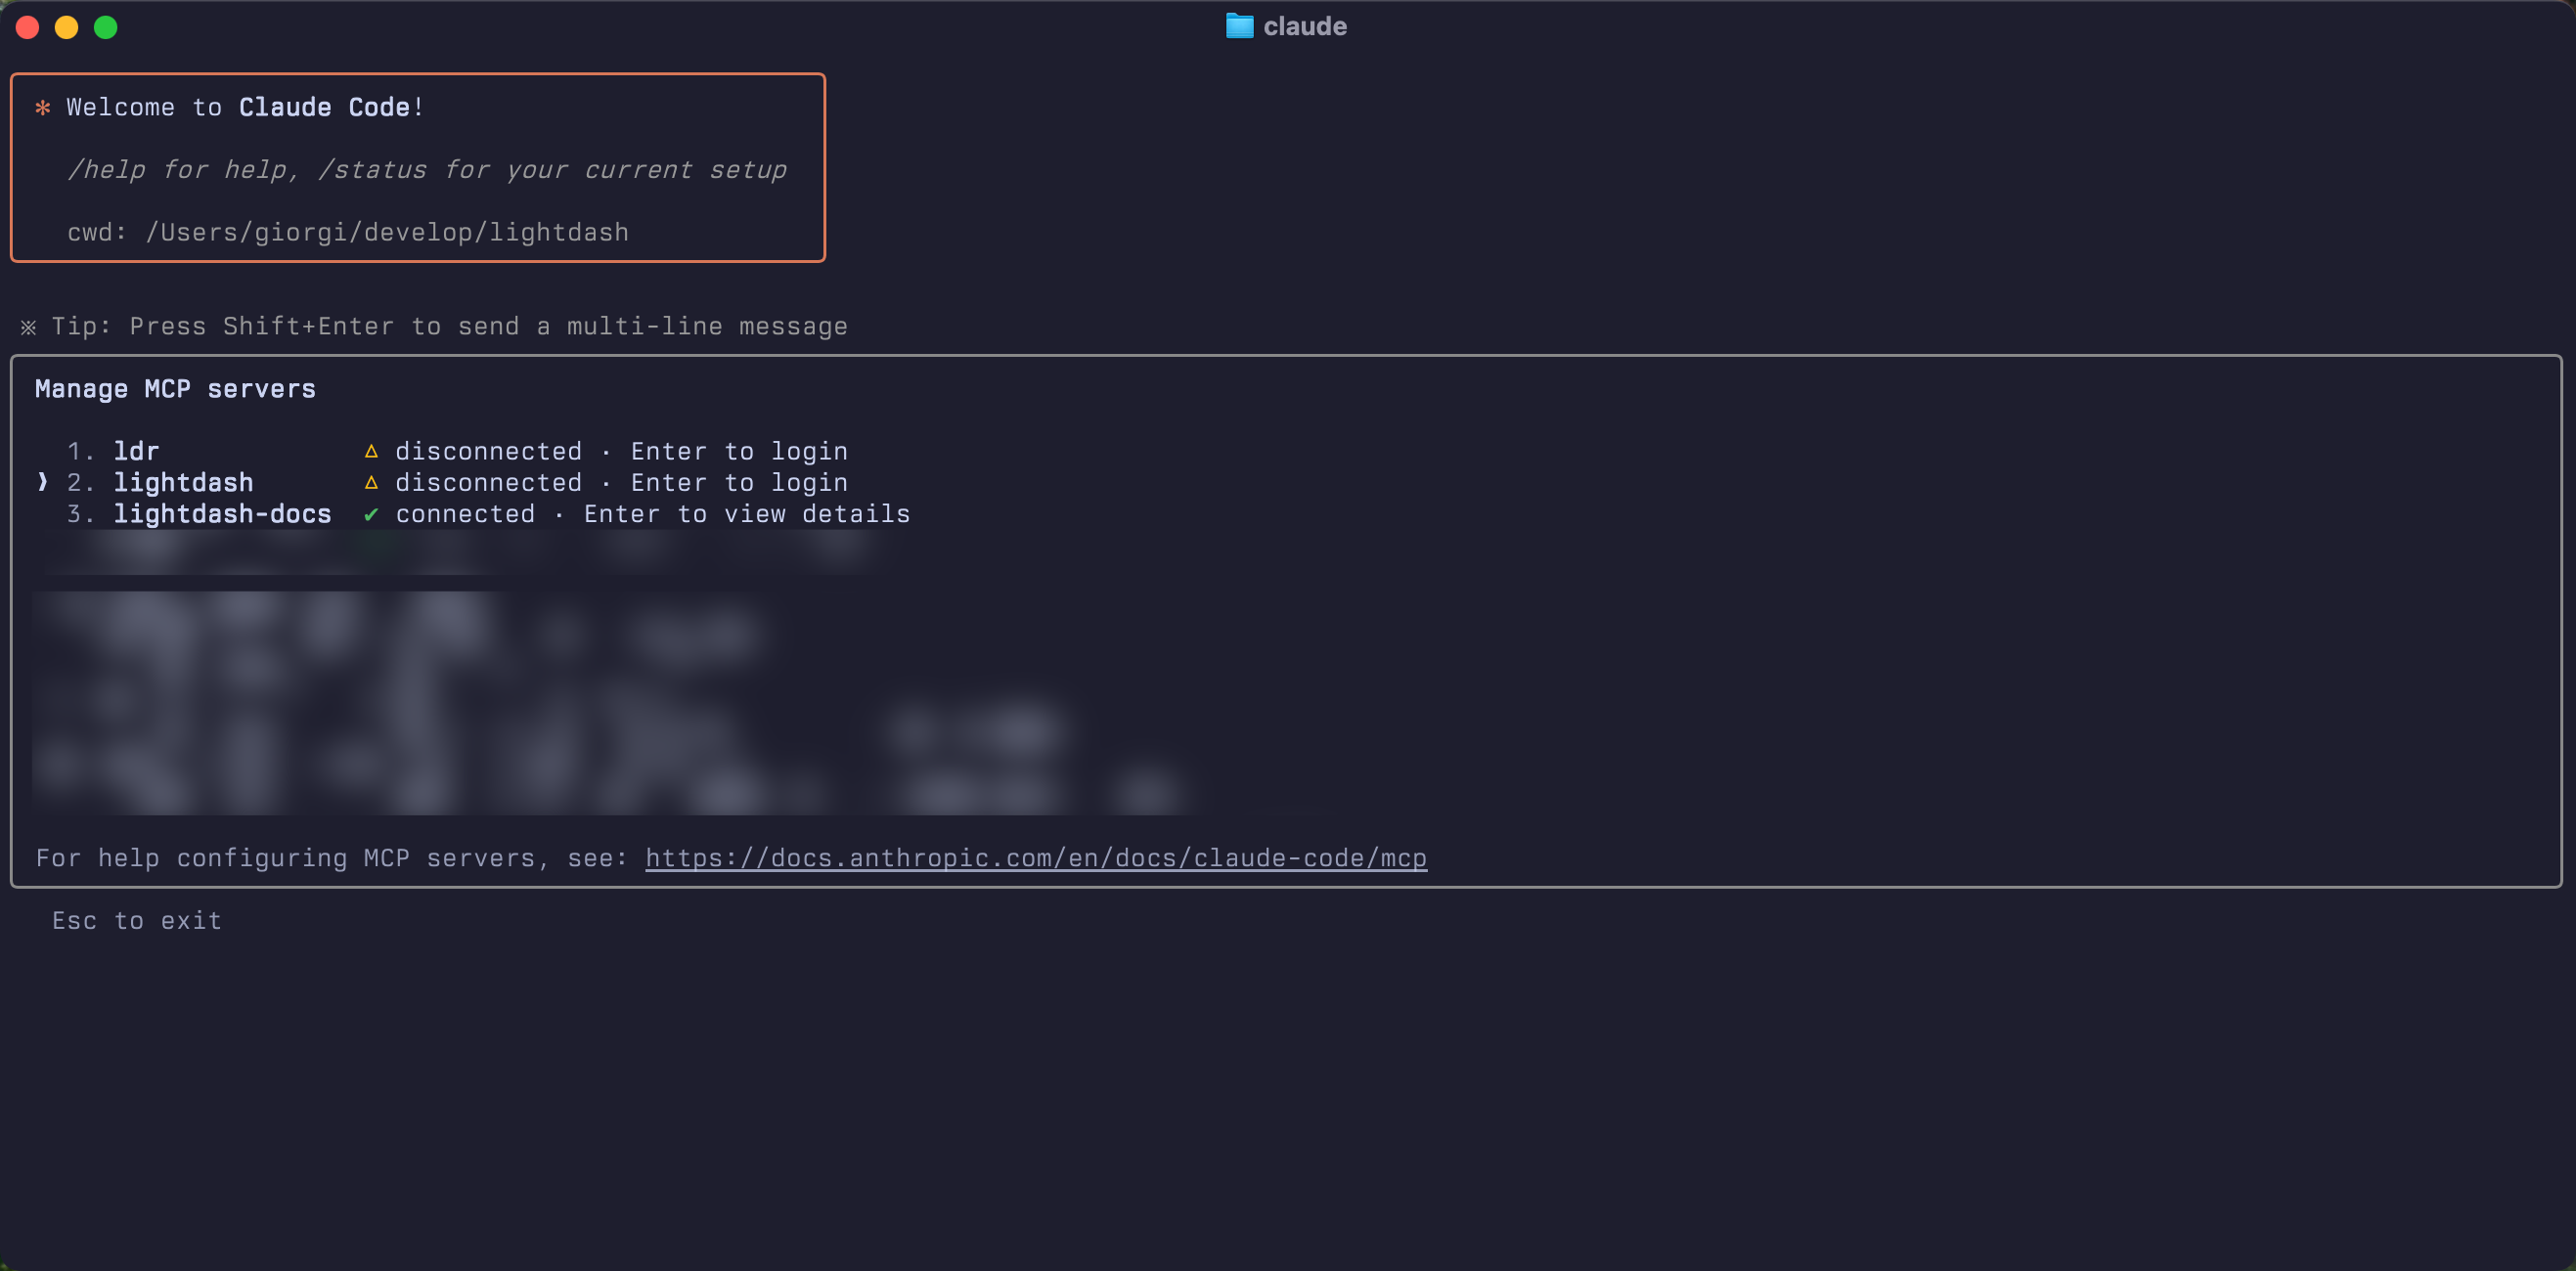 3. **Authenticate with Lightdash**
 4. **Complete OAuth Flow**
 5. **Start using MCP**
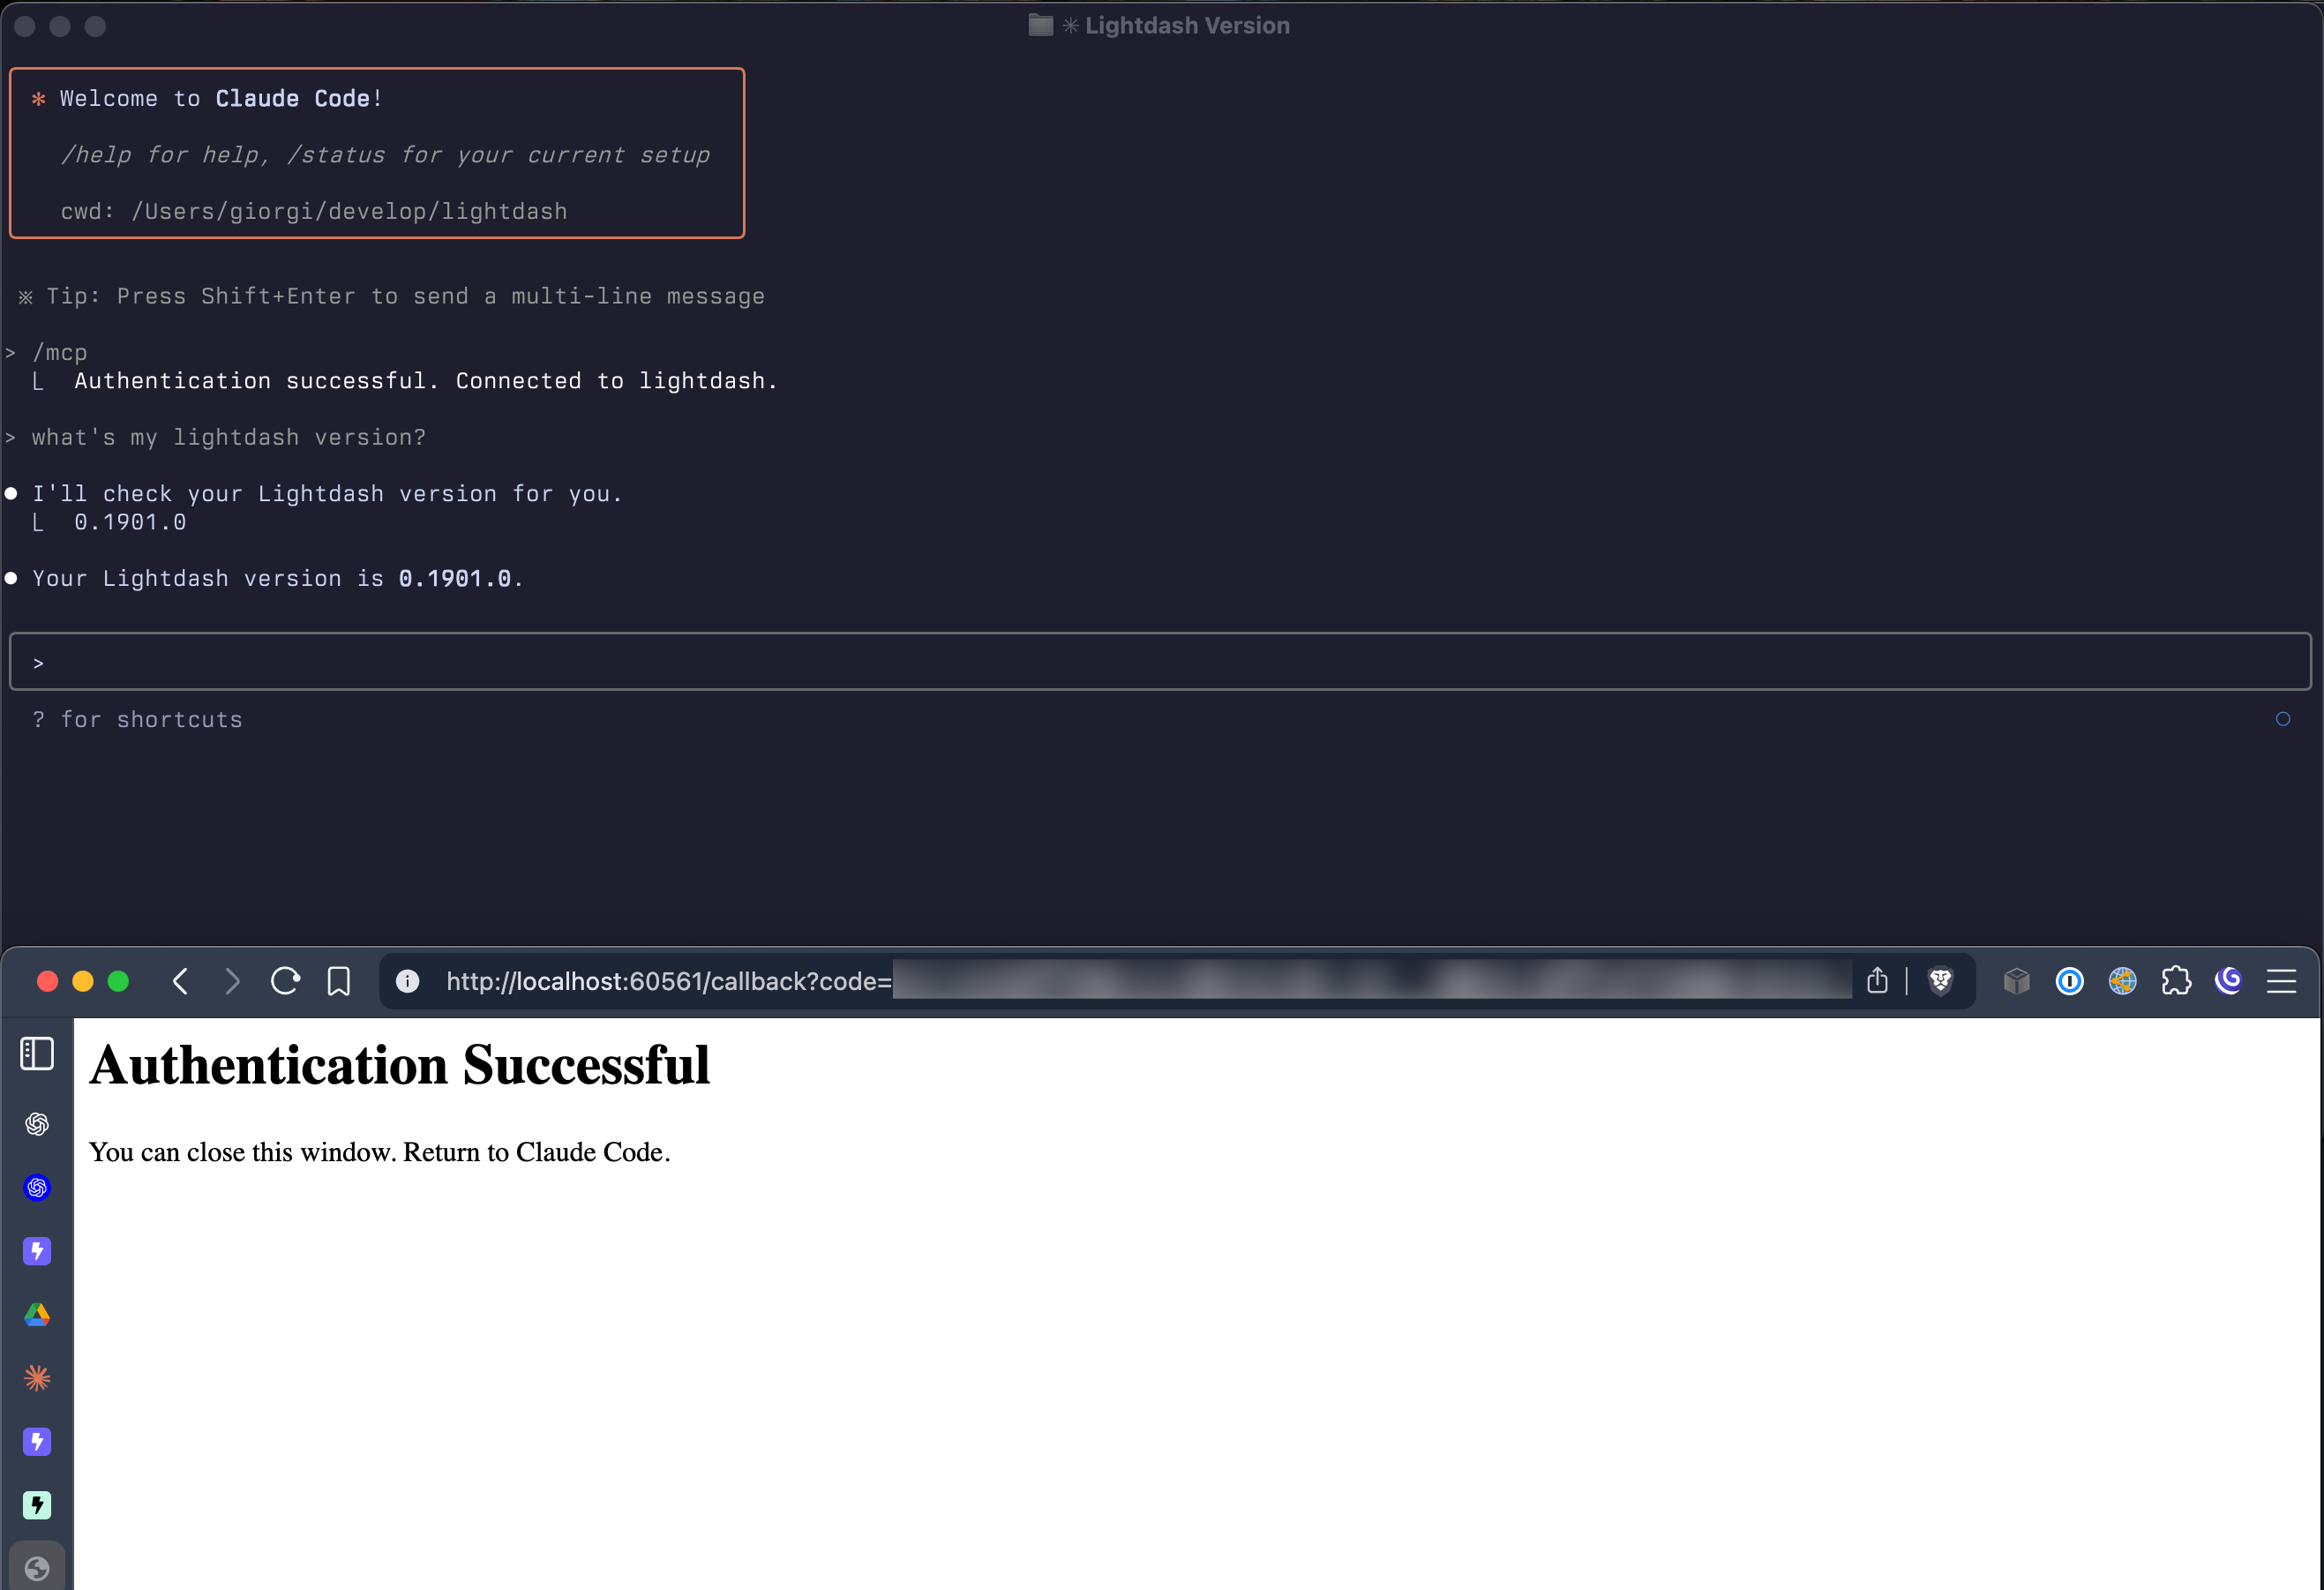 After authentication, you can start asking questions about your Lightdash data directly in Claude Code!
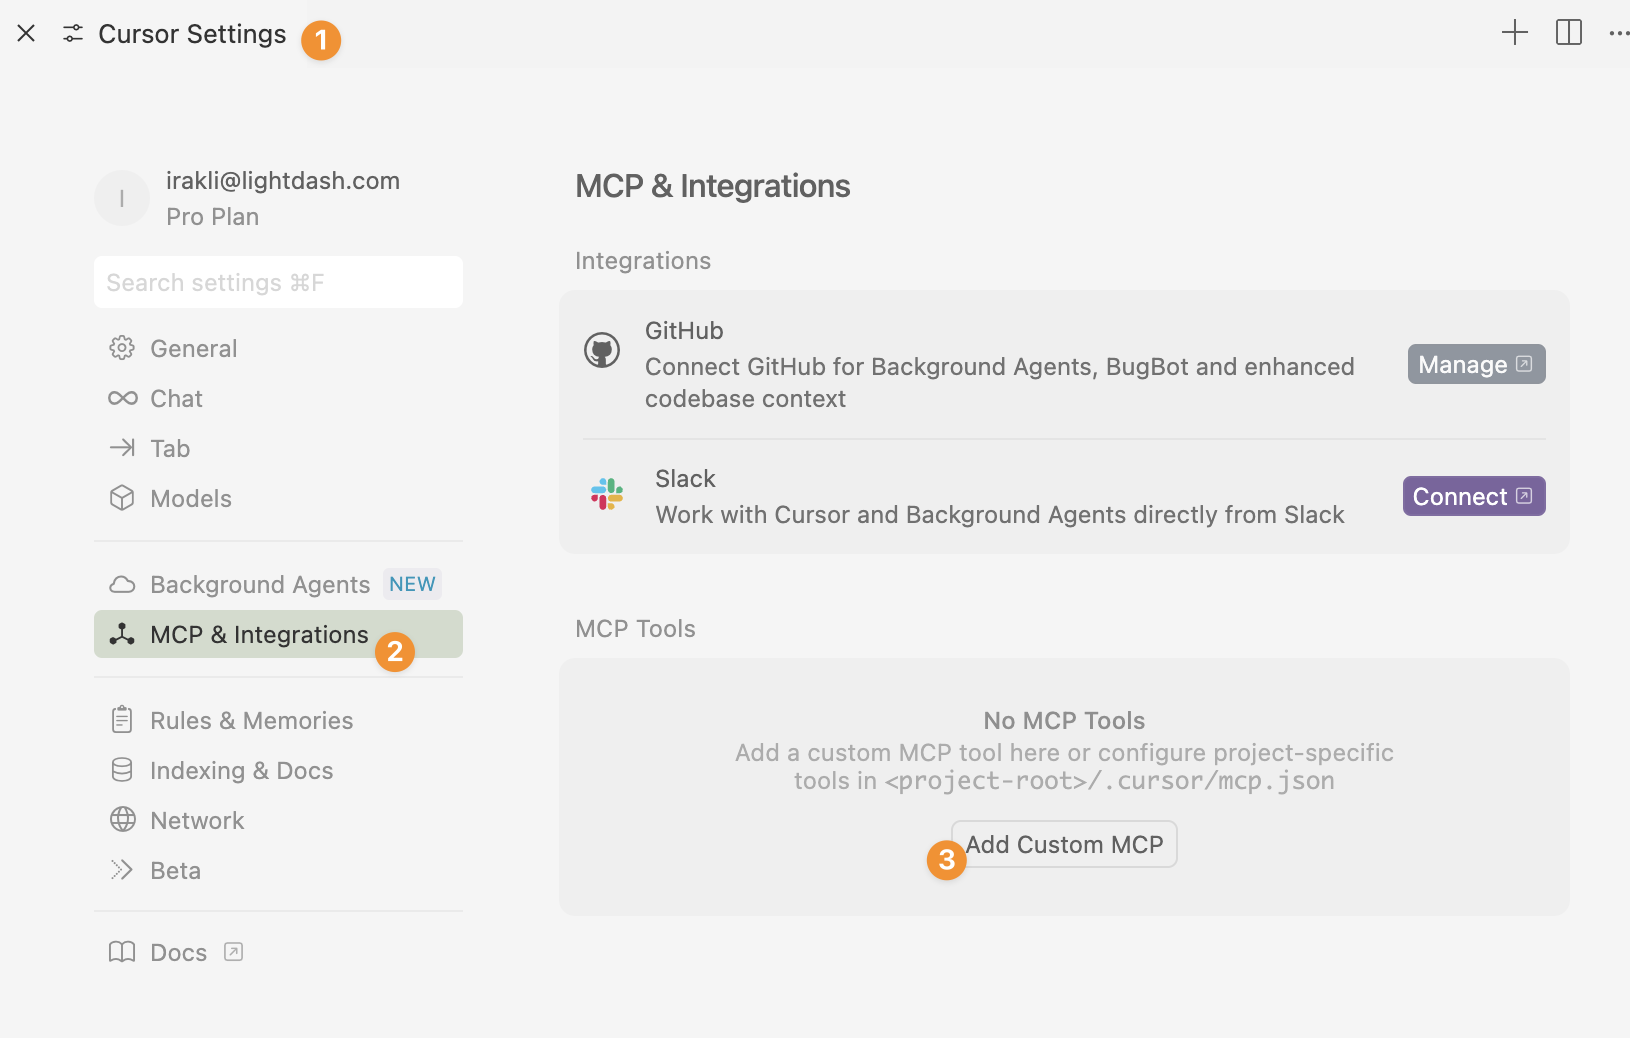
#### Cursor Editor
Navigate to **Cursor Settings > MCP & Integrations**
After authentication, you can start asking questions about your Lightdash data directly in Claude Code!
#### Cursor Editor
Navigate to **Cursor Settings > MCP & Integrations**
 #### Custom Integration (For Developers)
If you're building your own agents or automated workflows, you can integrate directly with Lightdash MCP:
* **Transport**: Lightdash MCP exposes a StreamableHTTP transport endpoint at `https://.lightdash.cloud/api/v1/mcp`
* **Debugging**: Use `@modelcontextprotocol/inspector` to inspect and debug the MCP connection
* **Authentication**: For interactive setups use OAuth 2.0. For headless agents and automated workflows, you can authenticate with a Personal Access Token by passing `Authorization: ApiKey ` instead. Create the token under **Settings → Personal access tokens** for the user whose permissions and attributes you want the integration to use. Service account tokens are also supported on plans that include them.
* **Documentation**: See the [MCP specification](https://modelcontextprotocol.io/docs) for implementation details
* **Pin a project (optional)**: pass `X-Lightdash-Project: ` to scope the MCP session to a specific project, skipping the `set_project` step. See [details below](#pin-a-project-with-the-x-lightdash-project-header).
* **Override user attributes per request (optional)**: pass `X-Lightdash-User-Attributes: ` to override the authenticated user's attributes for that request (useful for row-level security when an agent acts on behalf of different end-users).
##### Pin a project with the `X-Lightdash-Project` header
By default, MCP clients use `set_project` to choose an active project, and the selection is stored as a per-user context. If you're building an integration that should always operate against a single project, you can pre-select the project by sending the `X-Lightdash-Project` header on every request to `/api/v1/mcp`.
When the header is set:
* The project UUID in the header is used as the active project for that request, overriding any project previously set with `set_project`.
* The `list_projects` and `set_project` tools are hidden from `tools/list`, so the AI assistant can't change the project for the request.
* Access to the project is still enforced by your user, API key, or service account's permissions — the header can't be used to access projects the caller can't already see.
This is useful when you want each integration, workspace, or environment to be locked to one project (for example, a separate connector per project) without relying on the AI assistant to call `set_project` first.
The header value must be a valid project UUID. You can find the project UUID in the Lightdash URL when viewing a project (`/projects//...`).
```json Cursor (.cursor/mcp.json) theme={null}
{
"mcpServers": {
"lightdash-sales": {
"url": "https://.lightdash.cloud/api/v1/mcp",
"headers": {
"X-Lightdash-Project": "00000000-0000-0000-0000-000000000000"
}
}
}
}
```
```bash curl theme={null}
curl https://.lightdash.cloud/api/v1/mcp \
-H "Authorization: Bearer " \
-H "X-Lightdash-Project: 00000000-0000-0000-0000-000000000000" \
-H "Content-Type: application/json" \
-d '{"jsonrpc":"2.0","id":1,"method":"tools/list"}'
```
If the header value isn't a valid UUID, it's ignored and the request falls back to the user's stored project context. Permissions are always checked against the resolved project, so a header for a project the caller can't view will return a "no access" error.
{/* TODO: Add screenshots of the MCP inspector interface */}
## What it can do
### Core capabilities
MCP provides AI assistants with powerful tools to interact with your Lightdash data:
#### Project management
* **List projects** - View all accessible projects in your organization
* **Set active project** - Switch context between different projects (required before accessing any data). Accepts an optional `tags` array to filter the explores and fields visible in the session to those matching the given tags — the same tag-based filtering used by [AI agents](/guides/ai-agents/data-access#limiting-access-to-specific-explores-and-fields), but available directly in an MCP session without needing an agent. Useful when tags work in the Lightdash UI but you also want to scope an MCP session to a specific domain (e.g., `["sales"]`).
* **Get current project** - Check which project is currently active
An active project must be set before MCP can retrieve any data. Your AI assistant will typically handle this automatically by listing available projects and asking you to select one.
#### Data exploration
* **List explores** - See all available data models in the current project at a glance
* **Find explores** - Search for relevant data models using natural language (e.g., "customer orders")
* **Find fields** - Search for specific metrics and dimensions by business terms (e.g., "total revenue", "order date")
* **Search field values** - Look up valid values for a field, useful for building filters
* **Find content** - Search for existing spaces, charts, and dashboards by name or description. Results include space breadcrumbs and direct links. Optionally scope the search to a single space (and its descendants) by passing a space slug.
* **List content** - Browse accessible content as a hierarchy. By default it returns root-level spaces; pass a space slug to list the charts, dashboards, and nested spaces directly inside that space. Use this when you want the agent to walk space → content rather than search by keyword.
* **List verified content** - Discover charts and dashboards that admins have marked as verified, so agents can reference trusted, canonical patterns when building new content. If you want your agent to prefer verified patterns, ask it to in your prompt (e.g. *"Use verified charts as the reference for any new chart you build."*).
#### Query execution
* **Run metric query** - Execute queries using your semantic layer's metrics and dimensions. Completed results include a best-effort `exploreUrl` so you can open the query in Lightdash to keep exploring.
* **Render chart** - Render a visualization (tables, bar charts, line charts, pie charts, and more) for a completed metric query result in MCP App-capable clients (e.g., Claude). Call this after a metric query finishes when you want a visual chart; the query is not re-executed. SQL Runner results are not supported by `render_chart`.
* **Run SQL** - Execute arbitrary SQL queries directly against the project's data warehouse. Useful for ad-hoc analysis or queries that don't fit the explore-based model. Returns up to 500 rows by default (configurable up to 5,000). Completed results include a best-effort `sqlRunnerUrl` so you can open the compiled SQL in [SQL Runner](/guides/developer/sql-runner).
* **Get query result** - Poll for the result of a long-running query. If `run_metric_query` or `run_sql` doesn't finish within its wait window, the tool returns a `queryUuid` and the assistant polls `get_query_result` until the warehouse completes the query — so long queries don't time out the session.
**Run SQL** requires the `manage SqlRunner` permission. The SQL is executed directly against your warehouse, so use the appropriate SQL dialect for your connection (e.g., PostgreSQL, BigQuery, Snowflake).
When you call `run_sql` from a custom MCP client or live artifact, the tool returns both a CSV text payload and a `structuredContent` object. Prefer `structuredContent.rows` over parsing the CSV — values arrive as JSON-serializable primitives (numbers, strings, booleans, ISO date strings, or `null`), so you don't need `parseFloat` or `parseInt` on numeric columns.
**Response envelope:**
```json theme={null}
{
"content": [
{ "type": "text", "text": "" }
],
"structuredContent": {
"rows": [
{ "status": "completed", "n": 94, "total_amount": 2397 }
],
"columns": ["status", "n", "total_amount"],
"rowCount": 1,
"sqlRunnerUrl": "https://.lightdash.cloud/projects//sql-runner?..."
}
}
```
**Example usage:**
```ts theme={null}
const result = await callMcpTool('run_sql', { sql, limit });
const rows = result.structuredContent.rows; // [{ status: 'completed', n: 94, ... }, ...]
const columns = result.structuredContent.columns; // ['status', 'n', 'total_amount']
const sqlRunnerUrl = result.structuredContent.sqlRunnerUrl; // shareable link to inspect/edit the SQL in SQL Runner, or null
```
**Notes:**
* Empty results still return `structuredContent` as `{ rows: [], columns, rowCount: 0, sqlRunnerUrl }` — distinct from a parse failure.
* `sqlRunnerUrl` is best-effort and may be `null` if the share link cannot be created. It points to the compiled SQL that was executed, which may differ slightly from the SQL you submitted.
* On error, the response has `isError: true` and `content[0].text` contains the error message; `structuredContent` is omitted.
* `content[0].text` continues to carry the raw CSV, so existing clients that parse the text payload keep working.
**Security best practice:** Ensure the database credentials configured in your Lightdash connection have **read-only (viewer) access** to your warehouse. Since `run_sql` executes arbitrary SQL, a connection with write permissions could allow AI agents to modify or delete warehouse data.
#### Editing content
MCP can read, create, and edit Lightdash charts and dashboards using the same [content-as-code](/guides/developer/dashboards-as-code) payloads that the Lightdash CLI uses. This lets agents make targeted edits to existing content or build new charts and dashboards directly in a conversation, without downloading YAML files locally.
* **Read content** (`read_content`) - Fetch a chart or dashboard as JSON by slug. Call this before editing so the agent can see the current state.
* **Edit content** (`edit_content`) - Apply an [RFC 6902 JSON Patch](https://datatracker.ietf.org/doc/html/rfc6902) to an existing chart or dashboard, then validate and persist. Use this for surgical changes (e.g. rename a field, add a filter, swap a chart color) without rewriting the whole object.
* **Create content** (`create_content`) - Create a new chart or dashboard from a full chart-as-code or dashboard-as-code object. Returns the persisted slug and URL.
These tools reuse the same permissions, validation, and project context as the [Lightdash CLI](/guides/cli/how-to-install-the-lightdash-cli) `download` and `upload` commands, so the user driving the MCP session needs the same access required to manage that content in Lightdash.
**Admin kill-switch.** Organization admins can disable content writes across all MCP clients from **Settings → Ask AI → General** by turning off **Allow content changes via MCP**. When this is off, `create_content` and `edit_content` are not registered for any MCP client in the organization — reading content over MCP is unaffected, and per-user permissions still apply when it's on. The toggle is **on by default**.
When prompting an agent to build content, ask it to use [verified content](#data-exploration) as a reference. The agent can call `find_content` and `read_content` on a verified chart, then use that JSON as the template for `create_content` — giving you new content that follows the patterns your team has already approved.
**Example prompt:** *"Read the `weekly-revenue` chart, then create a copy called `weekly-revenue-by-region` that adds `customers_region` as a pivot dimension."*
The assistant will call `read_content` to fetch the source chart, modify the JSON to add the pivot, and call `create_content` to save the new chart — returning a link to open it in Lightdash.
For bulk edits across many dashboards or as part of a CI/CD pipeline, the [download-edit-upload workflow](/guides/developer/editing-dashboards-with-agents) using the Lightdash CLI is still the recommended approach. MCP content tools are best for interactive edits inside an AI assistant.
#### Agent context
* **Route agent** - Automatically select and activate the best agent for a user prompt within the active project. This is the preferred way to pick an agent — it mirrors the [AI Router](/guides/ai-agents/ai-router) experience in the Lightdash app, so MCP sessions get the same automatic agent selection.
* **List agents** - Discover available AI agents and their areas of expertise
* **Set agent** - Manually activate an agent to scope your session to its explores, instructions, and verified answers. Use this when you want to override automatic routing.
* **Get current agent** - Check which agent is active and view its full context
* **Clear agent** - Remove agent scoping and return to the full project context
These tools are covered in detail in the [Using AI agent context](#using-ai-agent-context) section below.
When an agent is active, its scope applies to the whole session: data exploration is limited to the agent's explores, and content tools (find, list, read, create, and edit) only see spaces the agent has access to.
#### Built-in skills
Lightdash ships built-in skills (such as `developing-in-lightdash`) that give AI assistants guidance for working with Lightdash — for example, conventions for writing dbt models, charts, and dashboards. These skills are exposed as MCP resources, which most clients consume automatically.
For MCP clients that don't read resources directly (e.g. Claude Code), three fallback tools let the assistant discover and load the same content:
* **List skills** (`list_skills`) - Return the available built-in skills along with their supporting resource files
* **Read skill** (`read_skill`) - Read the main `SKILL.md` instructions for a skill by name (e.g. `developing-in-lightdash`)
* **Read skill resource** (`read_skill_resource`) - Read a supporting resource file for a skill by name and resource path (e.g. `resources/dashboard-best-practices.md`)
You don't need to call these tools explicitly — when relevant, the assistant will call `list_skills` to discover what's available and then load the skill content it needs. If your client already supports MCP resources, you can ignore these tools; both paths return the same content.
The Lightdash MCP server exposes its built-in skills as MCP resources, so any MCP-compatible client can discover and load them at runtime — no CLI install required. This is useful for custom agents that want to dynamically fetch Lightdash's guidance on building dashboards, charts, and semantic layer configuration.
The server advertises support via the `io.modelcontextprotocol/skills` extension capability returned from `initialize`. Clients that don't recognize the extension can still list and read the resources directly.
**Available resources:**
| URI | Type | Description |
| ------------------------------------------------- | ------------------ | --------------------------------------------------------------------------------------------------- |
| `skill://index.json` | `application/json` | Discovery index listing every built-in skill and its supporting files. |
| `skill://lightdash//SKILL.md` | `text/markdown` | A skill's instructions and frontmatter (e.g. `skill://lightdash/developing-in-lightdash/SKILL.md`). |
| `skill://lightdash//resources/` | `text/markdown` | Supporting reference files for a skill. |
**Example: list and read a skill via JSON-RPC**
```json theme={null}
// List available resources
{ "jsonrpc": "2.0", "id": 1, "method": "resources/list", "params": {} }
// Read the discovery index
{ "jsonrpc": "2.0", "id": 2, "method": "resources/read",
"params": { "uri": "skill://index.json" } }
// Read a specific skill
{ "jsonrpc": "2.0", "id": 3, "method": "resources/read",
"params": { "uri": "skill://lightdash/developing-in-lightdash/SKILL.md" } }
```
If you're working in Claude Code, Cursor, or another supported editor, you can also [install skills via the CLI](/guides/developer/agent-skills#installing-skills) — it ships the same files to your local agent without requiring an MCP round trip.
### Example conversations
Here are some examples of how you can interact with AI assistants using MCP:
#### Example 1: Verifying your MCP connection
After connecting, verify that the MCP integration is working by asking your AI assistant to list available tools.
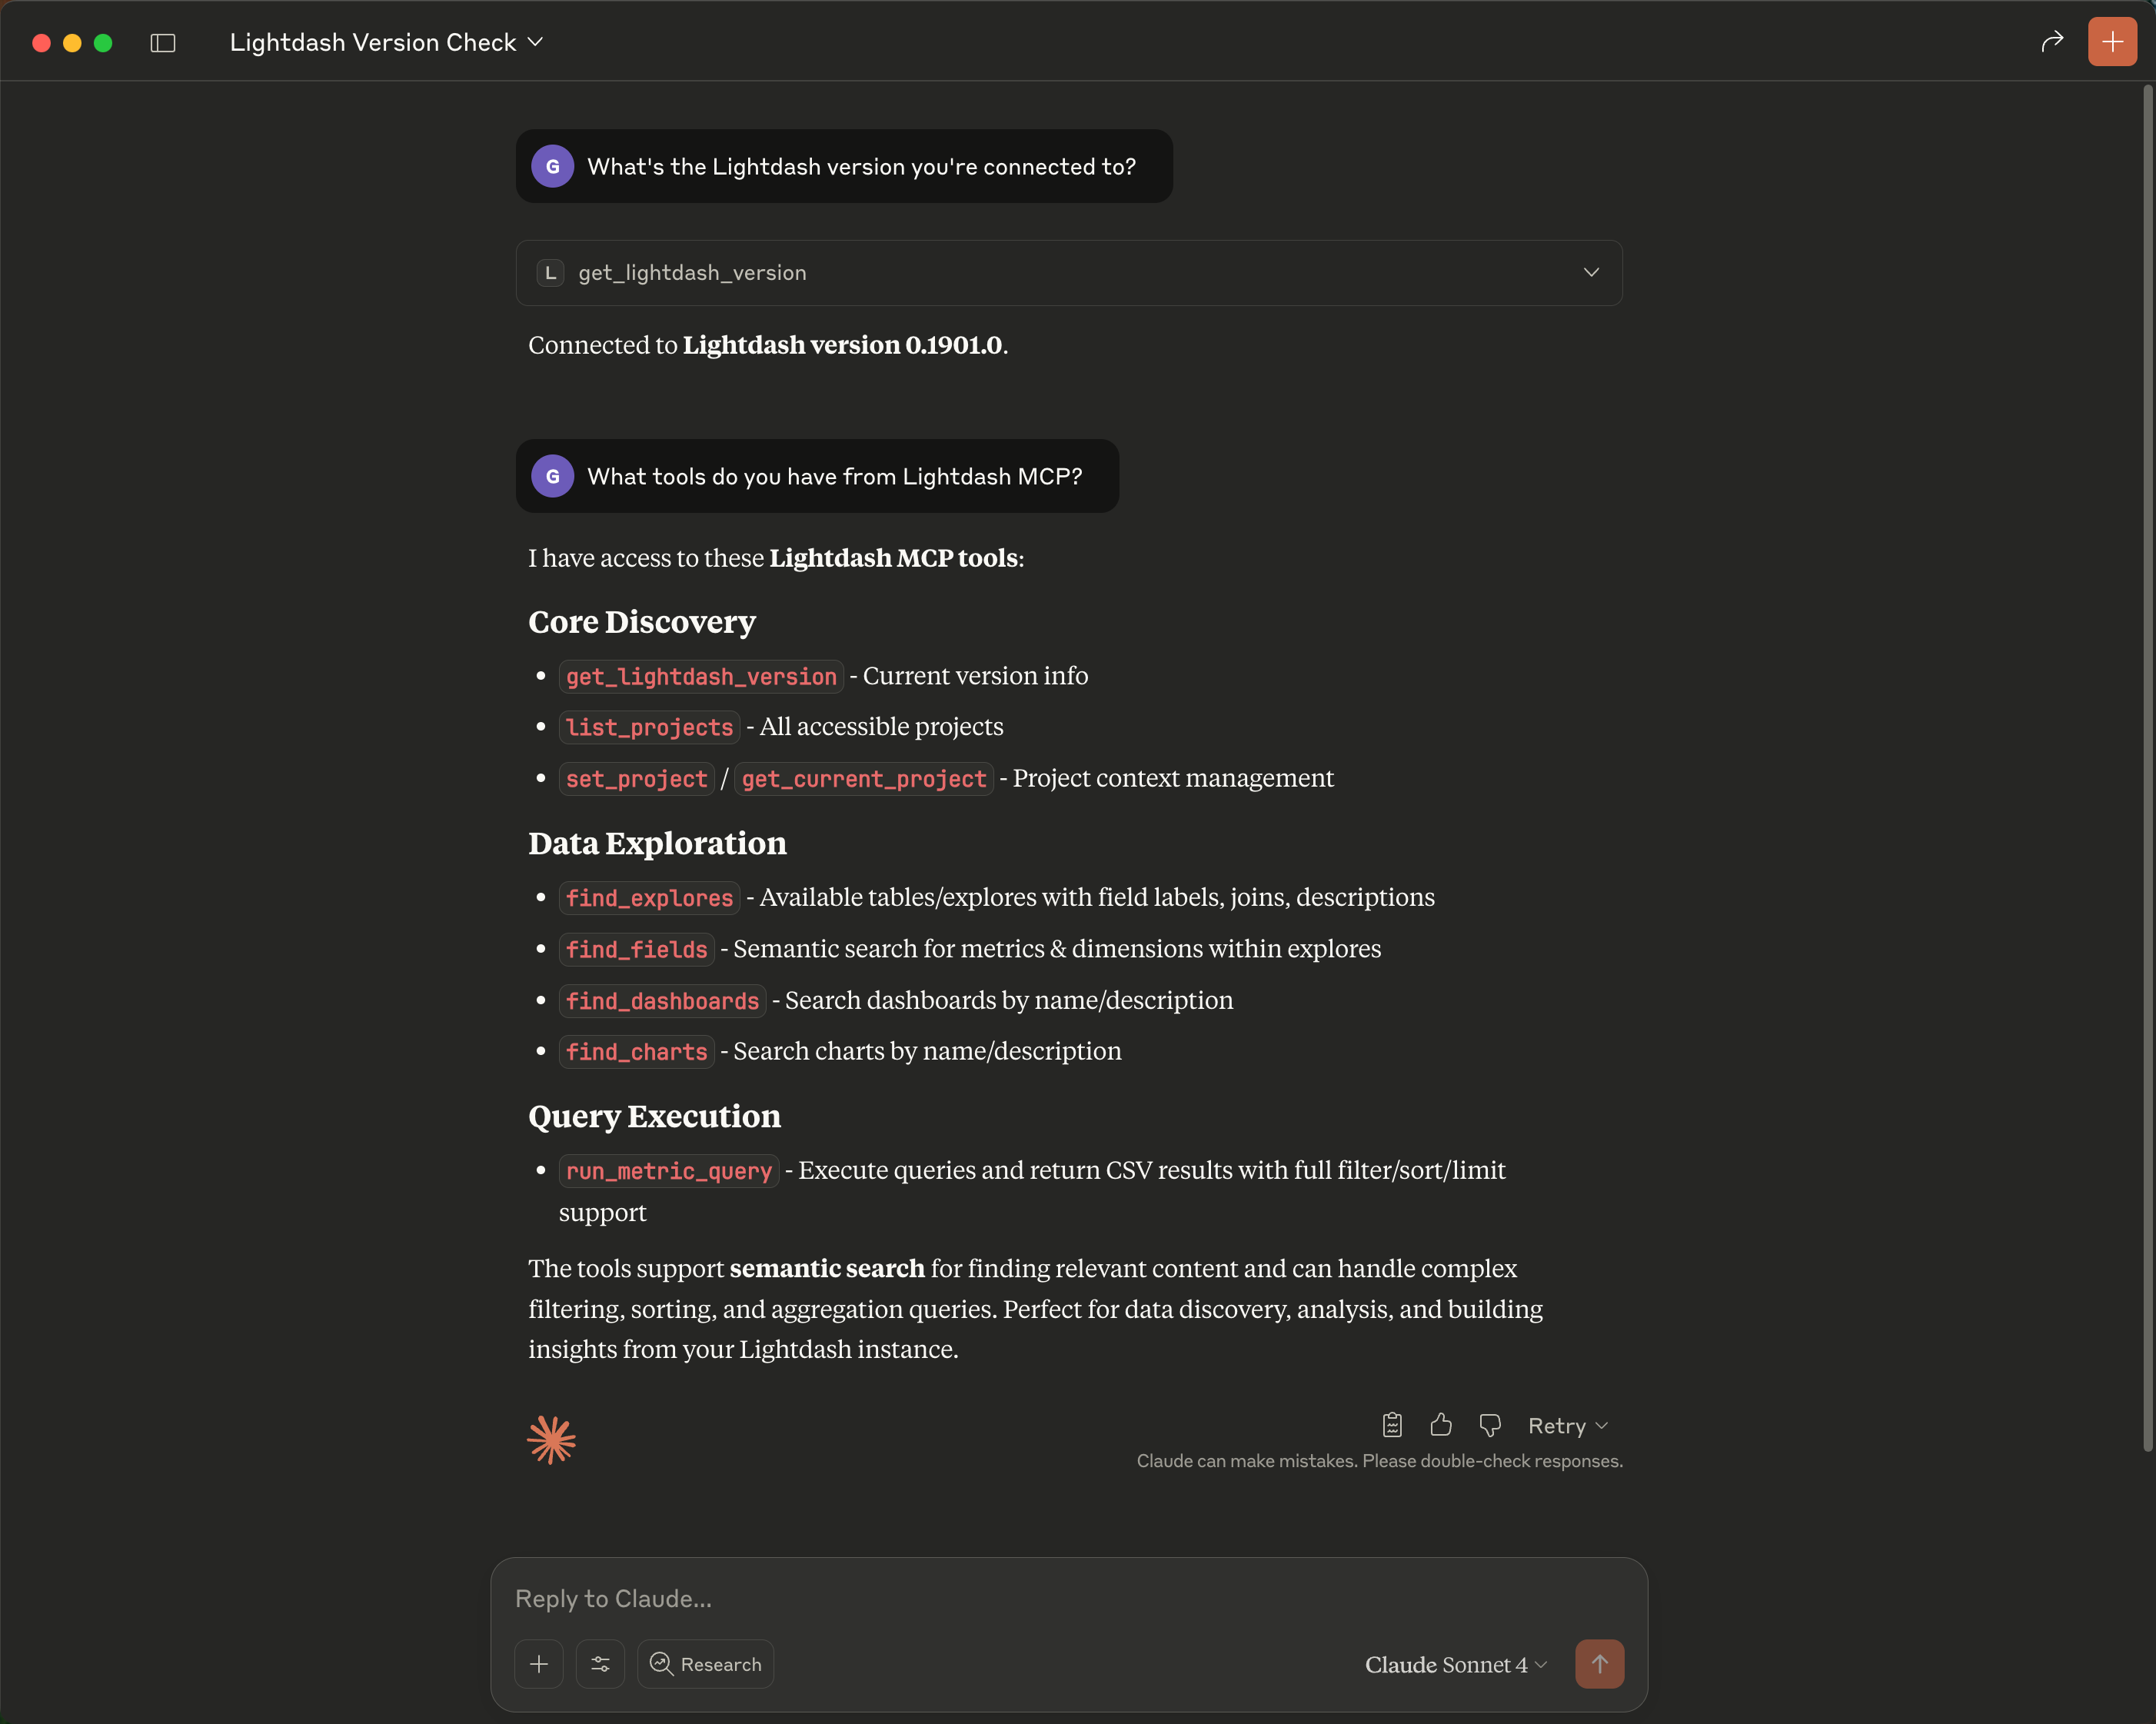
**Prompt:** *"What Lightdash tools do you have access to?"*
The assistant will confirm the connection and list the available MCP tools, such as `list_projects`, `find_fields`, `run_metric_query`, `run_sql`, and others. This is a quick way to verify that authentication succeeded and the MCP server is reachable.
#### Custom Integration (For Developers)
If you're building your own agents or automated workflows, you can integrate directly with Lightdash MCP:
* **Transport**: Lightdash MCP exposes a StreamableHTTP transport endpoint at `https://.lightdash.cloud/api/v1/mcp`
* **Debugging**: Use `@modelcontextprotocol/inspector` to inspect and debug the MCP connection
* **Authentication**: For interactive setups use OAuth 2.0. For headless agents and automated workflows, you can authenticate with a Personal Access Token by passing `Authorization: ApiKey ` instead. Create the token under **Settings → Personal access tokens** for the user whose permissions and attributes you want the integration to use. Service account tokens are also supported on plans that include them.
* **Documentation**: See the [MCP specification](https://modelcontextprotocol.io/docs) for implementation details
* **Pin a project (optional)**: pass `X-Lightdash-Project: ` to scope the MCP session to a specific project, skipping the `set_project` step. See [details below](#pin-a-project-with-the-x-lightdash-project-header).
* **Override user attributes per request (optional)**: pass `X-Lightdash-User-Attributes: ` to override the authenticated user's attributes for that request (useful for row-level security when an agent acts on behalf of different end-users).
##### Pin a project with the `X-Lightdash-Project` header
By default, MCP clients use `set_project` to choose an active project, and the selection is stored as a per-user context. If you're building an integration that should always operate against a single project, you can pre-select the project by sending the `X-Lightdash-Project` header on every request to `/api/v1/mcp`.
When the header is set:
* The project UUID in the header is used as the active project for that request, overriding any project previously set with `set_project`.
* The `list_projects` and `set_project` tools are hidden from `tools/list`, so the AI assistant can't change the project for the request.
* Access to the project is still enforced by your user, API key, or service account's permissions — the header can't be used to access projects the caller can't already see.
This is useful when you want each integration, workspace, or environment to be locked to one project (for example, a separate connector per project) without relying on the AI assistant to call `set_project` first.
The header value must be a valid project UUID. You can find the project UUID in the Lightdash URL when viewing a project (`/projects//...`).
```json Cursor (.cursor/mcp.json) theme={null}
{
"mcpServers": {
"lightdash-sales": {
"url": "https://.lightdash.cloud/api/v1/mcp",
"headers": {
"X-Lightdash-Project": "00000000-0000-0000-0000-000000000000"
}
}
}
}
```
```bash curl theme={null}
curl https://.lightdash.cloud/api/v1/mcp \
-H "Authorization: Bearer " \
-H "X-Lightdash-Project: 00000000-0000-0000-0000-000000000000" \
-H "Content-Type: application/json" \
-d '{"jsonrpc":"2.0","id":1,"method":"tools/list"}'
```
If the header value isn't a valid UUID, it's ignored and the request falls back to the user's stored project context. Permissions are always checked against the resolved project, so a header for a project the caller can't view will return a "no access" error.
{/* TODO: Add screenshots of the MCP inspector interface */}
## What it can do
### Core capabilities
MCP provides AI assistants with powerful tools to interact with your Lightdash data:
#### Project management
* **List projects** - View all accessible projects in your organization
* **Set active project** - Switch context between different projects (required before accessing any data). Accepts an optional `tags` array to filter the explores and fields visible in the session to those matching the given tags — the same tag-based filtering used by [AI agents](/guides/ai-agents/data-access#limiting-access-to-specific-explores-and-fields), but available directly in an MCP session without needing an agent. Useful when tags work in the Lightdash UI but you also want to scope an MCP session to a specific domain (e.g., `["sales"]`).
* **Get current project** - Check which project is currently active
An active project must be set before MCP can retrieve any data. Your AI assistant will typically handle this automatically by listing available projects and asking you to select one.
#### Data exploration
* **List explores** - See all available data models in the current project at a glance
* **Find explores** - Search for relevant data models using natural language (e.g., "customer orders")
* **Find fields** - Search for specific metrics and dimensions by business terms (e.g., "total revenue", "order date")
* **Search field values** - Look up valid values for a field, useful for building filters
* **Find content** - Search for existing spaces, charts, and dashboards by name or description. Results include space breadcrumbs and direct links. Optionally scope the search to a single space (and its descendants) by passing a space slug.
* **List content** - Browse accessible content as a hierarchy. By default it returns root-level spaces; pass a space slug to list the charts, dashboards, and nested spaces directly inside that space. Use this when you want the agent to walk space → content rather than search by keyword.
* **List verified content** - Discover charts and dashboards that admins have marked as verified, so agents can reference trusted, canonical patterns when building new content. If you want your agent to prefer verified patterns, ask it to in your prompt (e.g. *"Use verified charts as the reference for any new chart you build."*).
#### Query execution
* **Run metric query** - Execute queries using your semantic layer's metrics and dimensions. Completed results include a best-effort `exploreUrl` so you can open the query in Lightdash to keep exploring.
* **Render chart** - Render a visualization (tables, bar charts, line charts, pie charts, and more) for a completed metric query result in MCP App-capable clients (e.g., Claude). Call this after a metric query finishes when you want a visual chart; the query is not re-executed. SQL Runner results are not supported by `render_chart`.
* **Run SQL** - Execute arbitrary SQL queries directly against the project's data warehouse. Useful for ad-hoc analysis or queries that don't fit the explore-based model. Returns up to 500 rows by default (configurable up to 5,000). Completed results include a best-effort `sqlRunnerUrl` so you can open the compiled SQL in [SQL Runner](/guides/developer/sql-runner).
* **Get query result** - Poll for the result of a long-running query. If `run_metric_query` or `run_sql` doesn't finish within its wait window, the tool returns a `queryUuid` and the assistant polls `get_query_result` until the warehouse completes the query — so long queries don't time out the session.
**Run SQL** requires the `manage SqlRunner` permission. The SQL is executed directly against your warehouse, so use the appropriate SQL dialect for your connection (e.g., PostgreSQL, BigQuery, Snowflake).
When you call `run_sql` from a custom MCP client or live artifact, the tool returns both a CSV text payload and a `structuredContent` object. Prefer `structuredContent.rows` over parsing the CSV — values arrive as JSON-serializable primitives (numbers, strings, booleans, ISO date strings, or `null`), so you don't need `parseFloat` or `parseInt` on numeric columns.
**Response envelope:**
```json theme={null}
{
"content": [
{ "type": "text", "text": "" }
],
"structuredContent": {
"rows": [
{ "status": "completed", "n": 94, "total_amount": 2397 }
],
"columns": ["status", "n", "total_amount"],
"rowCount": 1,
"sqlRunnerUrl": "https://.lightdash.cloud/projects//sql-runner?..."
}
}
```
**Example usage:**
```ts theme={null}
const result = await callMcpTool('run_sql', { sql, limit });
const rows = result.structuredContent.rows; // [{ status: 'completed', n: 94, ... }, ...]
const columns = result.structuredContent.columns; // ['status', 'n', 'total_amount']
const sqlRunnerUrl = result.structuredContent.sqlRunnerUrl; // shareable link to inspect/edit the SQL in SQL Runner, or null
```
**Notes:**
* Empty results still return `structuredContent` as `{ rows: [], columns, rowCount: 0, sqlRunnerUrl }` — distinct from a parse failure.
* `sqlRunnerUrl` is best-effort and may be `null` if the share link cannot be created. It points to the compiled SQL that was executed, which may differ slightly from the SQL you submitted.
* On error, the response has `isError: true` and `content[0].text` contains the error message; `structuredContent` is omitted.
* `content[0].text` continues to carry the raw CSV, so existing clients that parse the text payload keep working.
**Security best practice:** Ensure the database credentials configured in your Lightdash connection have **read-only (viewer) access** to your warehouse. Since `run_sql` executes arbitrary SQL, a connection with write permissions could allow AI agents to modify or delete warehouse data.
#### Editing content
MCP can read, create, and edit Lightdash charts and dashboards using the same [content-as-code](/guides/developer/dashboards-as-code) payloads that the Lightdash CLI uses. This lets agents make targeted edits to existing content or build new charts and dashboards directly in a conversation, without downloading YAML files locally.
* **Read content** (`read_content`) - Fetch a chart or dashboard as JSON by slug. Call this before editing so the agent can see the current state.
* **Edit content** (`edit_content`) - Apply an [RFC 6902 JSON Patch](https://datatracker.ietf.org/doc/html/rfc6902) to an existing chart or dashboard, then validate and persist. Use this for surgical changes (e.g. rename a field, add a filter, swap a chart color) without rewriting the whole object.
* **Create content** (`create_content`) - Create a new chart or dashboard from a full chart-as-code or dashboard-as-code object. Returns the persisted slug and URL.
These tools reuse the same permissions, validation, and project context as the [Lightdash CLI](/guides/cli/how-to-install-the-lightdash-cli) `download` and `upload` commands, so the user driving the MCP session needs the same access required to manage that content in Lightdash.
**Admin kill-switch.** Organization admins can disable content writes across all MCP clients from **Settings → Ask AI → General** by turning off **Allow content changes via MCP**. When this is off, `create_content` and `edit_content` are not registered for any MCP client in the organization — reading content over MCP is unaffected, and per-user permissions still apply when it's on. The toggle is **on by default**.
When prompting an agent to build content, ask it to use [verified content](#data-exploration) as a reference. The agent can call `find_content` and `read_content` on a verified chart, then use that JSON as the template for `create_content` — giving you new content that follows the patterns your team has already approved.
**Example prompt:** *"Read the `weekly-revenue` chart, then create a copy called `weekly-revenue-by-region` that adds `customers_region` as a pivot dimension."*
The assistant will call `read_content` to fetch the source chart, modify the JSON to add the pivot, and call `create_content` to save the new chart — returning a link to open it in Lightdash.
For bulk edits across many dashboards or as part of a CI/CD pipeline, the [download-edit-upload workflow](/guides/developer/editing-dashboards-with-agents) using the Lightdash CLI is still the recommended approach. MCP content tools are best for interactive edits inside an AI assistant.
#### Agent context
* **Route agent** - Automatically select and activate the best agent for a user prompt within the active project. This is the preferred way to pick an agent — it mirrors the [AI Router](/guides/ai-agents/ai-router) experience in the Lightdash app, so MCP sessions get the same automatic agent selection.
* **List agents** - Discover available AI agents and their areas of expertise
* **Set agent** - Manually activate an agent to scope your session to its explores, instructions, and verified answers. Use this when you want to override automatic routing.
* **Get current agent** - Check which agent is active and view its full context
* **Clear agent** - Remove agent scoping and return to the full project context
These tools are covered in detail in the [Using AI agent context](#using-ai-agent-context) section below.
When an agent is active, its scope applies to the whole session: data exploration is limited to the agent's explores, and content tools (find, list, read, create, and edit) only see spaces the agent has access to.
#### Built-in skills
Lightdash ships built-in skills (such as `developing-in-lightdash`) that give AI assistants guidance for working with Lightdash — for example, conventions for writing dbt models, charts, and dashboards. These skills are exposed as MCP resources, which most clients consume automatically.
For MCP clients that don't read resources directly (e.g. Claude Code), three fallback tools let the assistant discover and load the same content:
* **List skills** (`list_skills`) - Return the available built-in skills along with their supporting resource files
* **Read skill** (`read_skill`) - Read the main `SKILL.md` instructions for a skill by name (e.g. `developing-in-lightdash`)
* **Read skill resource** (`read_skill_resource`) - Read a supporting resource file for a skill by name and resource path (e.g. `resources/dashboard-best-practices.md`)
You don't need to call these tools explicitly — when relevant, the assistant will call `list_skills` to discover what's available and then load the skill content it needs. If your client already supports MCP resources, you can ignore these tools; both paths return the same content.
The Lightdash MCP server exposes its built-in skills as MCP resources, so any MCP-compatible client can discover and load them at runtime — no CLI install required. This is useful for custom agents that want to dynamically fetch Lightdash's guidance on building dashboards, charts, and semantic layer configuration.
The server advertises support via the `io.modelcontextprotocol/skills` extension capability returned from `initialize`. Clients that don't recognize the extension can still list and read the resources directly.
**Available resources:**
| URI | Type | Description |
| ------------------------------------------------- | ------------------ | --------------------------------------------------------------------------------------------------- |
| `skill://index.json` | `application/json` | Discovery index listing every built-in skill and its supporting files. |
| `skill://lightdash//SKILL.md` | `text/markdown` | A skill's instructions and frontmatter (e.g. `skill://lightdash/developing-in-lightdash/SKILL.md`). |
| `skill://lightdash//resources/` | `text/markdown` | Supporting reference files for a skill. |
**Example: list and read a skill via JSON-RPC**
```json theme={null}
// List available resources
{ "jsonrpc": "2.0", "id": 1, "method": "resources/list", "params": {} }
// Read the discovery index
{ "jsonrpc": "2.0", "id": 2, "method": "resources/read",
"params": { "uri": "skill://index.json" } }
// Read a specific skill
{ "jsonrpc": "2.0", "id": 3, "method": "resources/read",
"params": { "uri": "skill://lightdash/developing-in-lightdash/SKILL.md" } }
```
If you're working in Claude Code, Cursor, or another supported editor, you can also [install skills via the CLI](/guides/developer/agent-skills#installing-skills) — it ships the same files to your local agent without requiring an MCP round trip.
### Example conversations
Here are some examples of how you can interact with AI assistants using MCP:
#### Example 1: Verifying your MCP connection
After connecting, verify that the MCP integration is working by asking your AI assistant to list available tools.
**Prompt:** *"What Lightdash tools do you have access to?"*
The assistant will confirm the connection and list the available MCP tools, such as `list_projects`, `find_fields`, `run_metric_query`, `run_sql`, and others. This is a quick way to verify that authentication succeeded and the MCP server is reachable.
 #### Example 2: Setting up a project and finding dashboards
Before querying data, you need to set an active project. Then you can search for existing dashboards and charts.
**Prompt:** *"What projects do I have access to? Set the Jaffle Shop project, then show me all dashboards related to revenue."*
The assistant will:
1. Call `list_projects` to show your available projects
2. Call `set_project` to activate "Jaffle Shop"
3. Call `find_content` with your search term to find matching dashboards and charts
**Expected output:** A list of dashboards and charts matching "revenue", including their names, descriptions, and direct links to view them in Lightdash.
#### Example 2: Setting up a project and finding dashboards
Before querying data, you need to set an active project. Then you can search for existing dashboards and charts.
**Prompt:** *"What projects do I have access to? Set the Jaffle Shop project, then show me all dashboards related to revenue."*
The assistant will:
1. Call `list_projects` to show your available projects
2. Call `set_project` to activate "Jaffle Shop"
3. Call `find_content` with your search term to find matching dashboards and charts
**Expected output:** A list of dashboards and charts matching "revenue", including their names, descriptions, and direct links to view them in Lightdash.
 #### Example 3: Exploring data and running a metric query
Once a project is active, you can explore data models and run queries using your semantic layer.
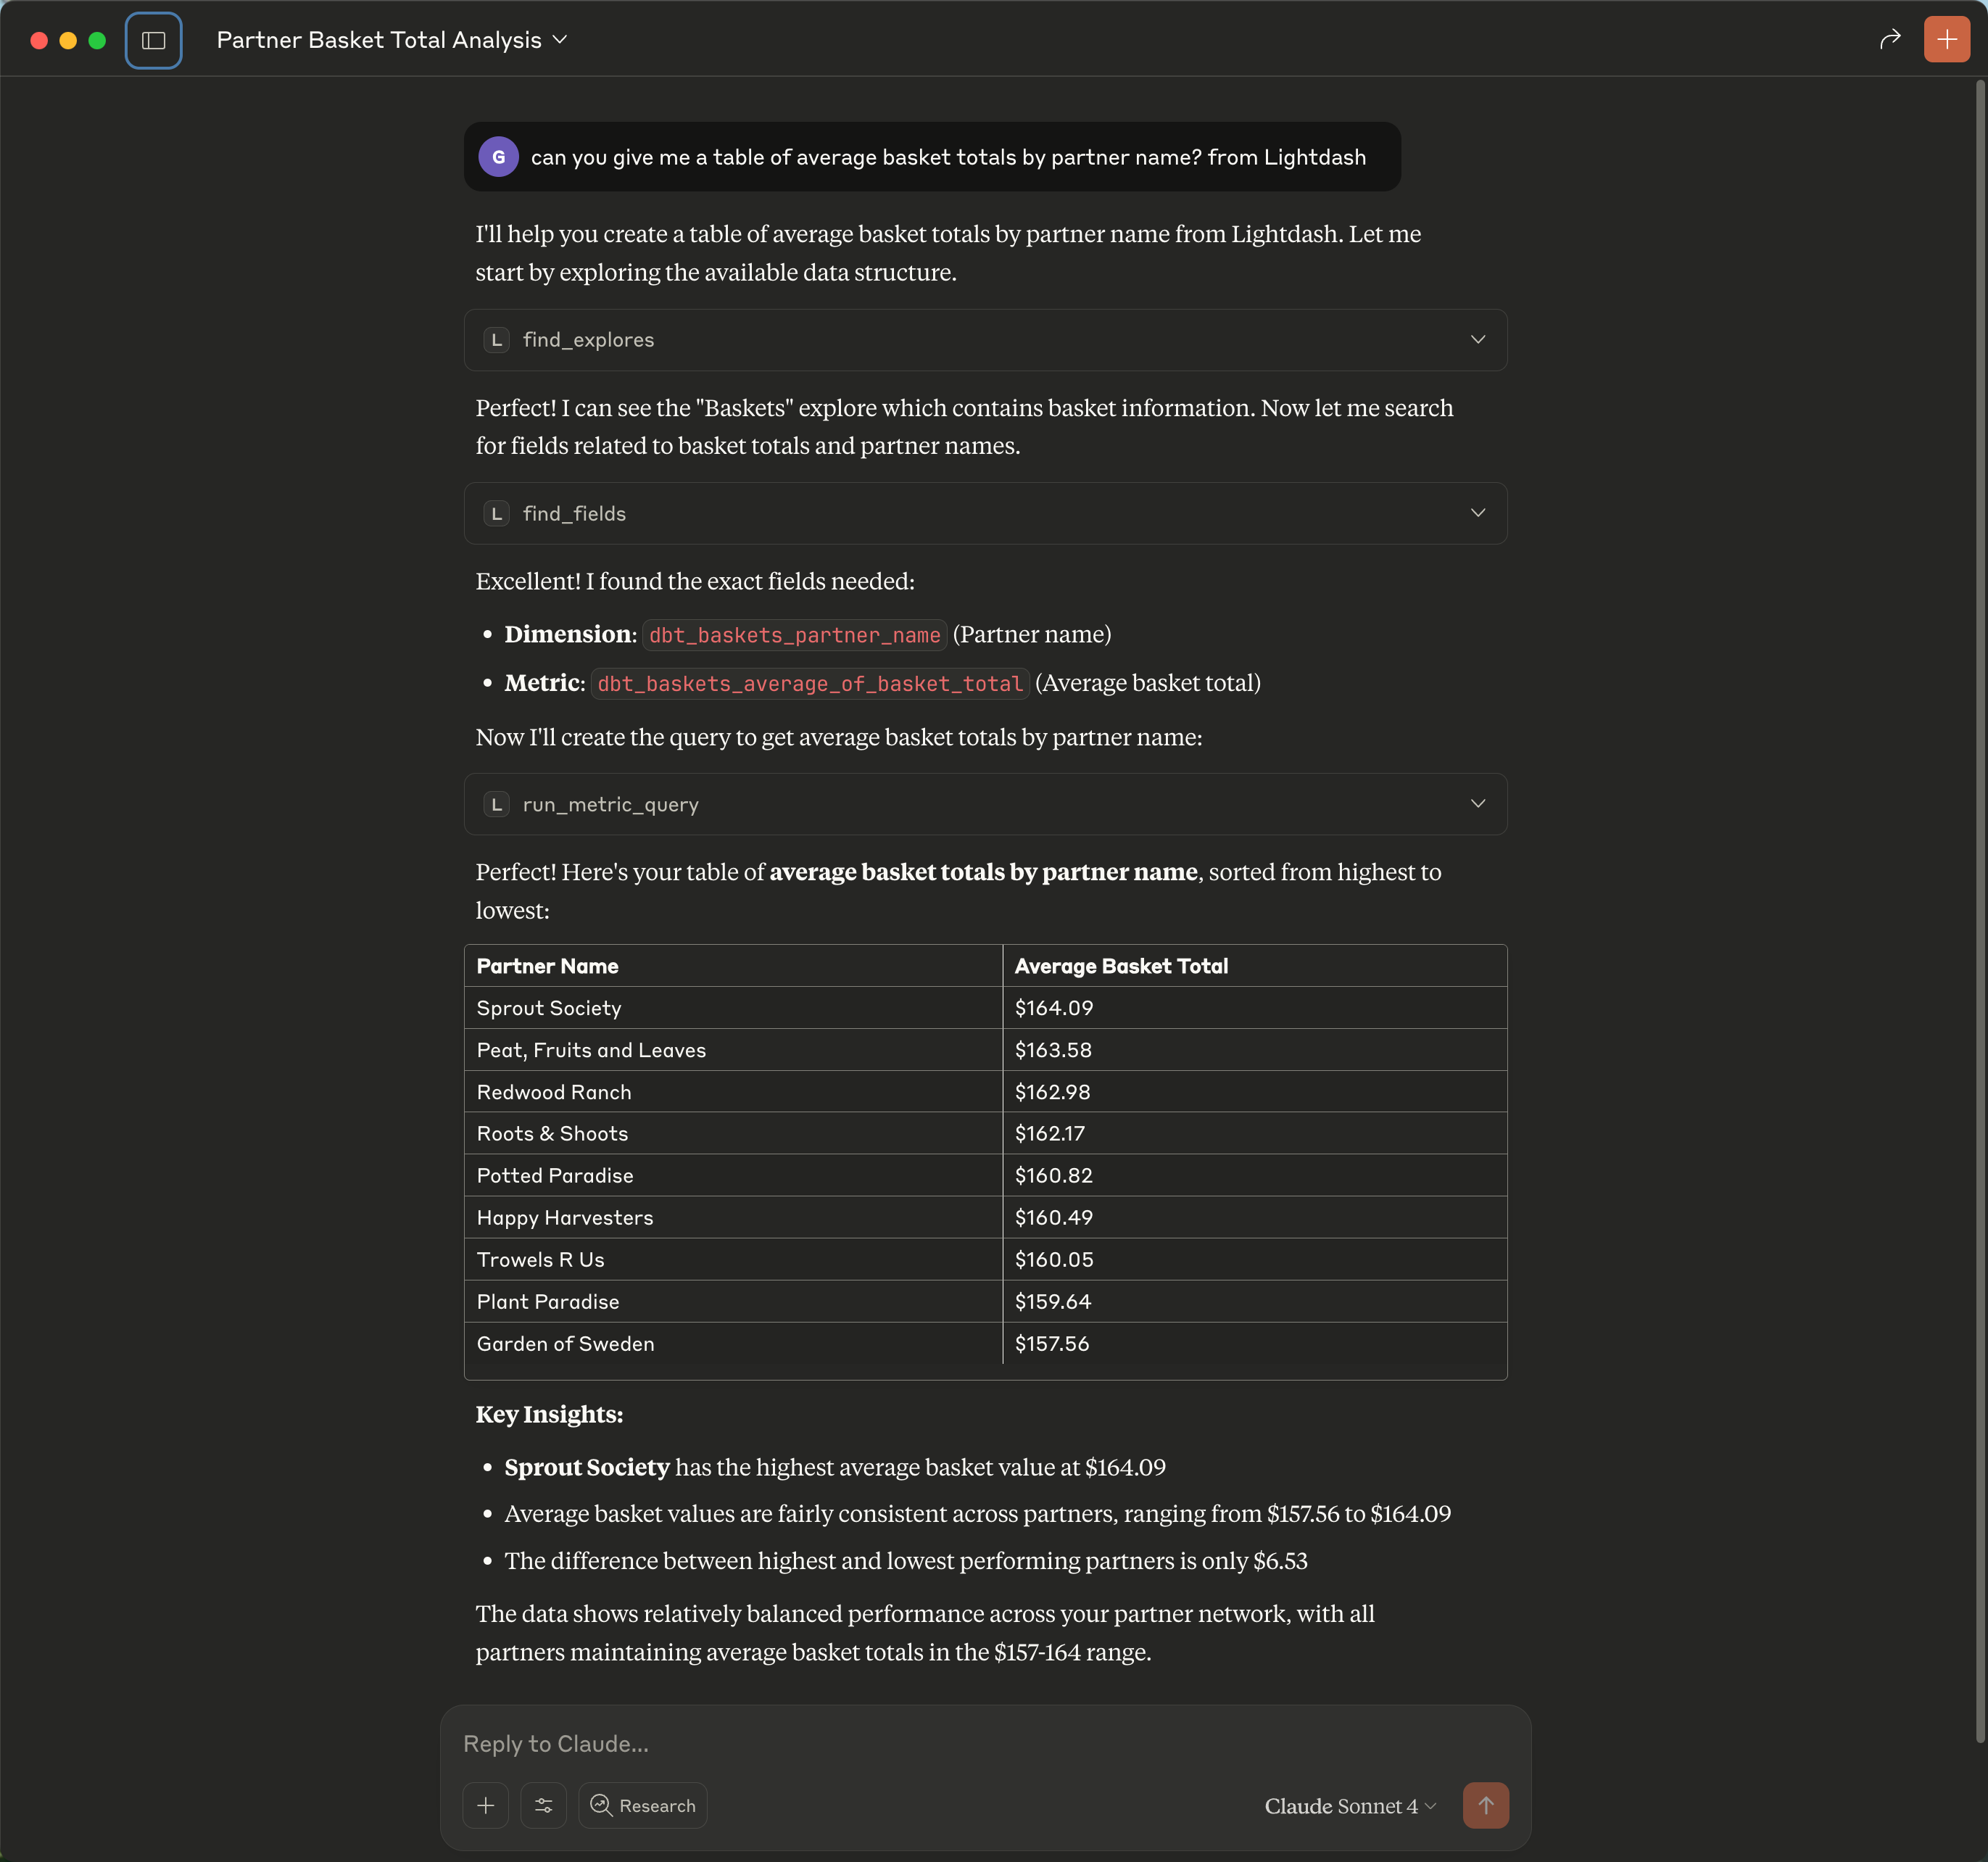
**Prompt:** *"What metrics do we have for orders? Show me total revenue by month for the last 6 months as a bar chart."*
The assistant will:
1. Call `find_fields` to search for order-related metrics and dimensions (e.g., `orders_total_revenue`, `orders_order_date`)
2. Call `run_metric_query` with the appropriate explore, metrics, dimensions, filters, and sort order to fetch the data and render a visualization
**Expected output:** A bar chart showing monthly revenue for the last 6 months, along with the underlying data table. The query uses your semantic layer definitions, so metric calculations and joins are handled automatically.
#### Example 3: Exploring data and running a metric query
Once a project is active, you can explore data models and run queries using your semantic layer.
**Prompt:** *"What metrics do we have for orders? Show me total revenue by month for the last 6 months as a bar chart."*
The assistant will:
1. Call `find_fields` to search for order-related metrics and dimensions (e.g., `orders_total_revenue`, `orders_order_date`)
2. Call `run_metric_query` with the appropriate explore, metrics, dimensions, filters, and sort order to fetch the data and render a visualization
**Expected output:** A bar chart showing monthly revenue for the last 6 months, along with the underlying data table. The query uses your semantic layer definitions, so metric calculations and joins are handled automatically.
 ## Using AI agent context
If your organization has [Lightdash AI agents](/guides/ai-agents) configured, you can reuse their configuration in your MCP sessions — so you get consistent guidance regardless of where you're working.
### How is this different from Lightdash AI agents?
[Lightdash AI agents](/guides/ai-agents) are a fully managed experience inside Lightdash and Slack. They handle everything end-to-end: interpreting your question, picking the right data, running queries, and presenting results.
With MCP, you can use Lightdash data in other contexts, but the AI assistant driving an MCP session doesn't have the same specialized tuning that Lightdash AI agents provide out of the box. Agent context via MCP bridges that gap: it brings your agents' domain knowledge into any MCP session.
### What you get from agent context
When you activate an agent in your MCP session, your AI assistant receives:
* **[Specialized content](/guides/ai-agents/best-practices#think-specialized-not-general)**: only the data models relevant to that agent's domain
* **[Verified answers](/guides/ai-agents/verified-answers#how-verified-answers-work)**: curated example queries that demonstrate correct usage of the data model
* **[Custom instructions](/guides/ai-agents/getting-started#instructions)**: domain-specific rules like *"Always filter orders by status = 'completed'"*
### Example workflow
1. **Set your project** with `set_project`
2. **Let the router pick an agent** with `route_agent` — pass the user's prompt and Lightdash activates the best-fit agent automatically. Use `list_agents` + `set_agent` only when you want to inspect candidates or override the choice manually.
3. **Ask your questions** — the agent's context automatically guides queries
`route_agent` chooses between agents the user can already access — it never widens permissions. If only one agent is accessible, it activates that agent directly; if none are accessible, it returns an error so the assistant can fall back to the unscoped project context.
**Prompt:** *"What AI agents are available?"*
## Using AI agent context
If your organization has [Lightdash AI agents](/guides/ai-agents) configured, you can reuse their configuration in your MCP sessions — so you get consistent guidance regardless of where you're working.
### How is this different from Lightdash AI agents?
[Lightdash AI agents](/guides/ai-agents) are a fully managed experience inside Lightdash and Slack. They handle everything end-to-end: interpreting your question, picking the right data, running queries, and presenting results.
With MCP, you can use Lightdash data in other contexts, but the AI assistant driving an MCP session doesn't have the same specialized tuning that Lightdash AI agents provide out of the box. Agent context via MCP bridges that gap: it brings your agents' domain knowledge into any MCP session.
### What you get from agent context
When you activate an agent in your MCP session, your AI assistant receives:
* **[Specialized content](/guides/ai-agents/best-practices#think-specialized-not-general)**: only the data models relevant to that agent's domain
* **[Verified answers](/guides/ai-agents/verified-answers#how-verified-answers-work)**: curated example queries that demonstrate correct usage of the data model
* **[Custom instructions](/guides/ai-agents/getting-started#instructions)**: domain-specific rules like *"Always filter orders by status = 'completed'"*
### Example workflow
1. **Set your project** with `set_project`
2. **Let the router pick an agent** with `route_agent` — pass the user's prompt and Lightdash activates the best-fit agent automatically. Use `list_agents` + `set_agent` only when you want to inspect candidates or override the choice manually.
3. **Ask your questions** — the agent's context automatically guides queries
`route_agent` chooses between agents the user can already access — it never widens permissions. If only one agent is accessible, it activates that agent directly; if none are accessible, it returns an error so the assistant can fall back to the unscoped project context.
**Prompt:** *"What AI agents are available?"*
 **Prompt:** *"Use the Sales Analyst agent."*
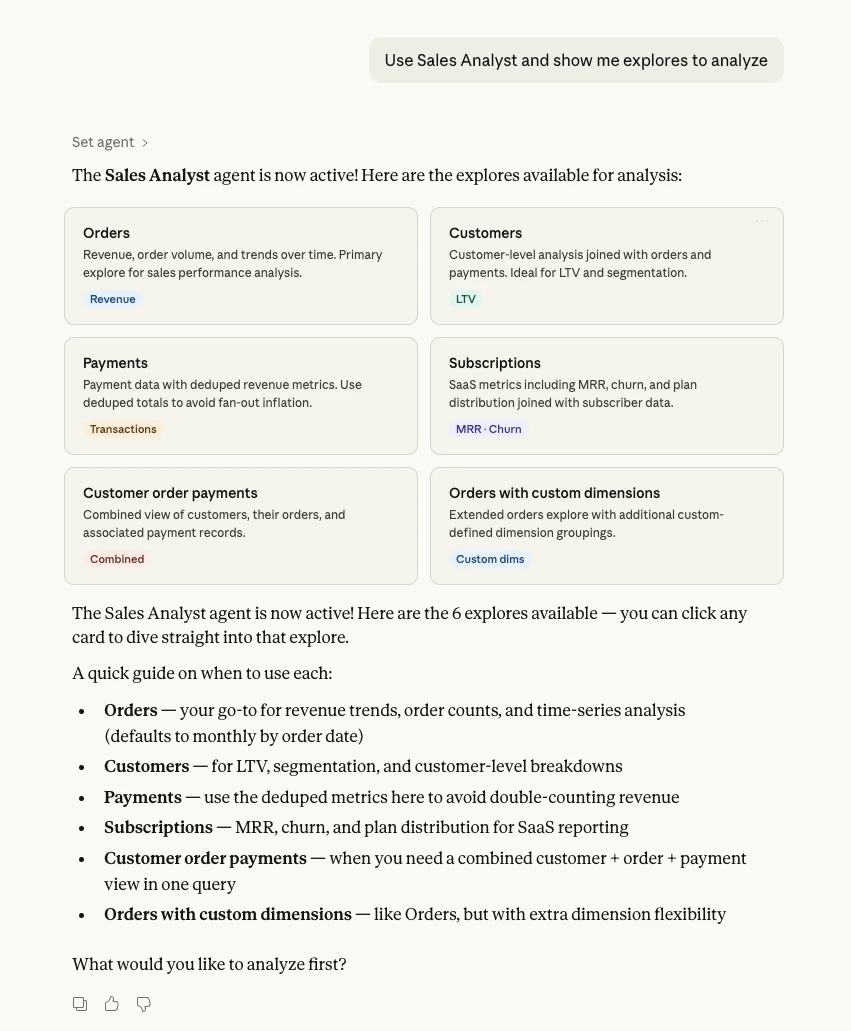 Once an agent is active, your queries automatically follow its instructions. For example, with a Sales Analyst agent configured with these instructions:
```
You are a Sales analyst for Jaffle Shop. Your role is to answer questions
about revenue, orders, customers and subscriptions.
Key guidelines:
- Use the orders explore as the starting point for revenue and order
volume questions.
- Always include a time dimension when showing trends. Default to monthly
granularity unless the user specifies otherwise.
- Format currency values in CAD.
```
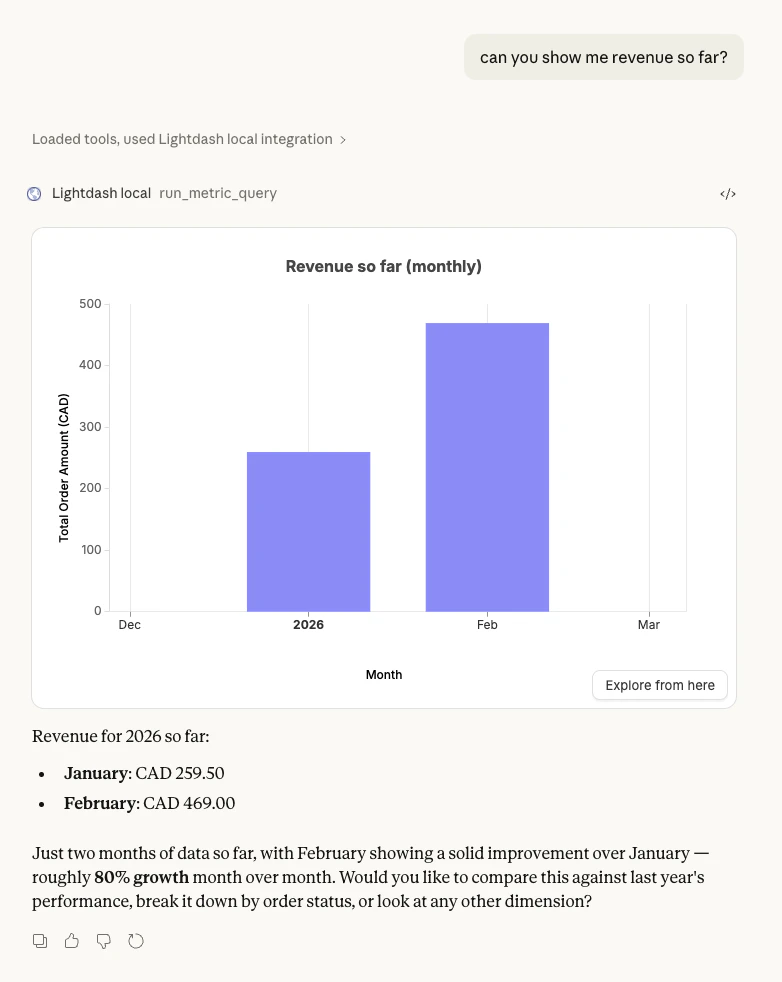
**Prompt:** *"Can you show me revenue so far?"*
The assistant will automatically use the `orders` explore, include a monthly time dimension, and format values in CAD — all without you specifying these details, because the agent's instructions guide the query.
Once an agent is active, your queries automatically follow its instructions. For example, with a Sales Analyst agent configured with these instructions:
```
You are a Sales analyst for Jaffle Shop. Your role is to answer questions
about revenue, orders, customers and subscriptions.
Key guidelines:
- Use the orders explore as the starting point for revenue and order
volume questions.
- Always include a time dimension when showing trends. Default to monthly
granularity unless the user specifies otherwise.
- Format currency values in CAD.
```
**Prompt:** *"Can you show me revenue so far?"*
The assistant will automatically use the `orders` explore, include a monthly time dimension, and format values in CAD — all without you specifying these details, because the agent's instructions guide the query.
 ## Built-in prompt
The Lightdash MCP server includes a built-in **`lightdash-analyst`** prompt with guidelines for querying data effectively. MCP clients that support prompts can use this automatically, so you don't need to configure custom instructions manually.
When an [AI agent](#using-ai-agent-context) is active, the prompt automatically adapts to include the agent's context.
## Best practices
To get the most value from MCP, ensure your Lightdash data is well-organized and documented. See our [AI agents best practices guide](/guides/ai-agents#best-practices) for detailed recommendations on:
* Organizing and naming your data models
* Writing effective documentation and AI hints
* Optimizing for AI assistant performance
* Security and permissions considerations
***
## Lightdash Docs MCP
In addition to the Lightdash data MCP above, we also offer a **Docs MCP endpoint** that gives AI coding agents access to the complete Lightdash documentation. This is free for everyone—including open source users and all cloud tiers.
### Benefits
The Docs MCP helps AI agents:
* Understand Lightdash concepts, configuration, and best practices
* Generate accurate YAML configurations for metrics and dimensions
* Troubleshoot issues using official documentation
* Stay up-to-date with the latest Lightdash features
For the best experience building and maintaining your semantic layer, we recommend using [agent skills](/guides/developer/agent-skills) instead. Skills provide more targeted context for AI coding agents and are optimized for code generation tasks.
### Setup
The Docs MCP endpoint is available at `https://docs.lightdash.com/mcp`. Add it to your AI coding tool:
Add to your `.cursor/mcp.json`:
```json theme={null}
{
"mcpServers": {
"lightdash-docs": {
"url": "https://docs.lightdash.com/mcp"
}
}
}
```
Run the following command:
```bash theme={null}
claude mcp add lightdash-docs https://docs.lightdash.com/mcp -t http
```
Add to your `~/.codeium/windsurf/mcp_config.json`:
```json theme={null}
{
"mcpServers": {
"lightdash-docs": {
"serverUrl": "https://docs.lightdash.com/mcp"
}
}
}
```
### Availability
The Docs MCP is free for everyone:
* Open source users
* Cloud Pro
* Cloud Enterprise
No authentication required.
## FAQ
**Q: Does Lightdash MCP store my data or query results?**
A: No, Lightdash MCP does not store any query results, conversation responses, or data. MCP acts as a bridge that allows AI assistants to access your Lightdash metadata and execute queries in real-time. The MCP consumer (your AI assistant) is responsible for any data storage. Depending on which AI assistant you use, data might be shared with third parties according to their privacy policies.
**Q: Can multiple team members use MCP?**
A: Yes, each team member can set up their own MCP connection with their individual Lightdash credentials. Each connection respects that user's specific permissions and access controls.
**Q: Can MCP modify my data or dashboards?**
A: MCP can create and edit Lightdash charts and dashboards via the [content-as-code tools](#editing-content) when your user account has the required permissions. MCP cannot modify your underlying warehouse data — query execution is read-only (metric queries and SQL `SELECT` only). All write operations respect your existing Lightdash permissions and project access controls.
**Q: Claude returns data as text but no visual chart is displayed. What's wrong?**
A: Claude uses the domain `claudemcpcontent.com` to render visual content from MCP connectors. If this domain is blocked by your corporate firewall, VPN, internet security tool, or a browser extension (like an ad blocker), Claude will fall back to text-only output. See [Network requirements](#network-requirements) above for the full list of domains to allowlist.
## Built-in prompt
The Lightdash MCP server includes a built-in **`lightdash-analyst`** prompt with guidelines for querying data effectively. MCP clients that support prompts can use this automatically, so you don't need to configure custom instructions manually.
When an [AI agent](#using-ai-agent-context) is active, the prompt automatically adapts to include the agent's context.
## Best practices
To get the most value from MCP, ensure your Lightdash data is well-organized and documented. See our [AI agents best practices guide](/guides/ai-agents#best-practices) for detailed recommendations on:
* Organizing and naming your data models
* Writing effective documentation and AI hints
* Optimizing for AI assistant performance
* Security and permissions considerations
***
## Lightdash Docs MCP
In addition to the Lightdash data MCP above, we also offer a **Docs MCP endpoint** that gives AI coding agents access to the complete Lightdash documentation. This is free for everyone—including open source users and all cloud tiers.
### Benefits
The Docs MCP helps AI agents:
* Understand Lightdash concepts, configuration, and best practices
* Generate accurate YAML configurations for metrics and dimensions
* Troubleshoot issues using official documentation
* Stay up-to-date with the latest Lightdash features
For the best experience building and maintaining your semantic layer, we recommend using [agent skills](/guides/developer/agent-skills) instead. Skills provide more targeted context for AI coding agents and are optimized for code generation tasks.
### Setup
The Docs MCP endpoint is available at `https://docs.lightdash.com/mcp`. Add it to your AI coding tool:
Add to your `.cursor/mcp.json`:
```json theme={null}
{
"mcpServers": {
"lightdash-docs": {
"url": "https://docs.lightdash.com/mcp"
}
}
}
```
Run the following command:
```bash theme={null}
claude mcp add lightdash-docs https://docs.lightdash.com/mcp -t http
```
Add to your `~/.codeium/windsurf/mcp_config.json`:
```json theme={null}
{
"mcpServers": {
"lightdash-docs": {
"serverUrl": "https://docs.lightdash.com/mcp"
}
}
}
```
### Availability
The Docs MCP is free for everyone:
* Open source users
* Cloud Pro
* Cloud Enterprise
No authentication required.
## FAQ
**Q: Does Lightdash MCP store my data or query results?**
A: No, Lightdash MCP does not store any query results, conversation responses, or data. MCP acts as a bridge that allows AI assistants to access your Lightdash metadata and execute queries in real-time. The MCP consumer (your AI assistant) is responsible for any data storage. Depending on which AI assistant you use, data might be shared with third parties according to their privacy policies.
**Q: Can multiple team members use MCP?**
A: Yes, each team member can set up their own MCP connection with their individual Lightdash credentials. Each connection respects that user's specific permissions and access controls.
**Q: Can MCP modify my data or dashboards?**
A: MCP can create and edit Lightdash charts and dashboards via the [content-as-code tools](#editing-content) when your user account has the required permissions. MCP cannot modify your underlying warehouse data — query execution is read-only (metric queries and SQL `SELECT` only). All write operations respect your existing Lightdash permissions and project access controls.
**Q: Claude returns data as text but no visual chart is displayed. What's wrong?**
A: Claude uses the domain `claudemcpcontent.com` to render visual content from MCP connectors. If this domain is blocked by your corporate firewall, VPN, internet security tool, or a browser extension (like an ad blocker), Claude will fall back to text-only output. See [Network requirements](#network-requirements) above for the full list of domains to allowlist.