> ## Documentation Index
> Fetch the complete documentation index at: https://docs.lightdash.com/llms.txt
> Use this file to discover all available pages before exploring further.
# Scheduled deliveries
> Scheduled deliveries let you send a dashboard or saved chart, and their results to people via email or Slack - even to people who don't have an account in your Lightdash instance.
If your Lightdash organization has [Slack](/references/workspace/adding-slack-integration) set up, you can create or select an existing saved chart or dashboard, add a scheduled delivery to it, and tell Lightdash when you’d like the send out your update. You can set up as many scheduled deliveries to a saved chart or dashboard as you like, and if you make any changes to the content, Lightdash will update the scheduled deliveries the next time they’re sent.
**For security reasons, the delivered files expire after 3 days by default.**
This means old emails or Slack shares will have broken images and there is not an option to retrieve them. If you want to keep the sent files, it's best to download them from the scheduled delivery.
Organization admins can [configure download link expiration](#configuring-download-link-expiration) globally or per channel.
**Self-hosted: fix broken images in emails behind firewalls**
If your Lightdash instance is behind a firewall, email clients like Gmail may not be able to load images from your internal URLs. Set `EMAIL_SMTP_IMAGE_INLINE_CID=true` to embed images directly into emails as attachments. See [SMTP configuration](/self-host/customize-deployment/configure-smtp-for-lightdash-email-notifications) for details.
## Enabling scheduled deliveries
Emailed scheduled deliveries are available on all Lightdash Cloud plans.
To set up Slack, an organization admin will have to [add the Slack integration](/references/workspace/adding-slack-integration).
## Creating a scheduled delivery
**Only users with** [admin, developer, editor or interactive viewer roles](/references/workspace/roles) **can create and edit scheduled deliveries.**
Note that the interactive viewer role can only create and edit their *own* scheduled deliveries. Other roles have edit access over *all* scheduled deliveries.
To create a scheduled delivery, click on the three-dot menu in the top-right corner of your chart or dashboard, then click on `scheduled deliveries`.
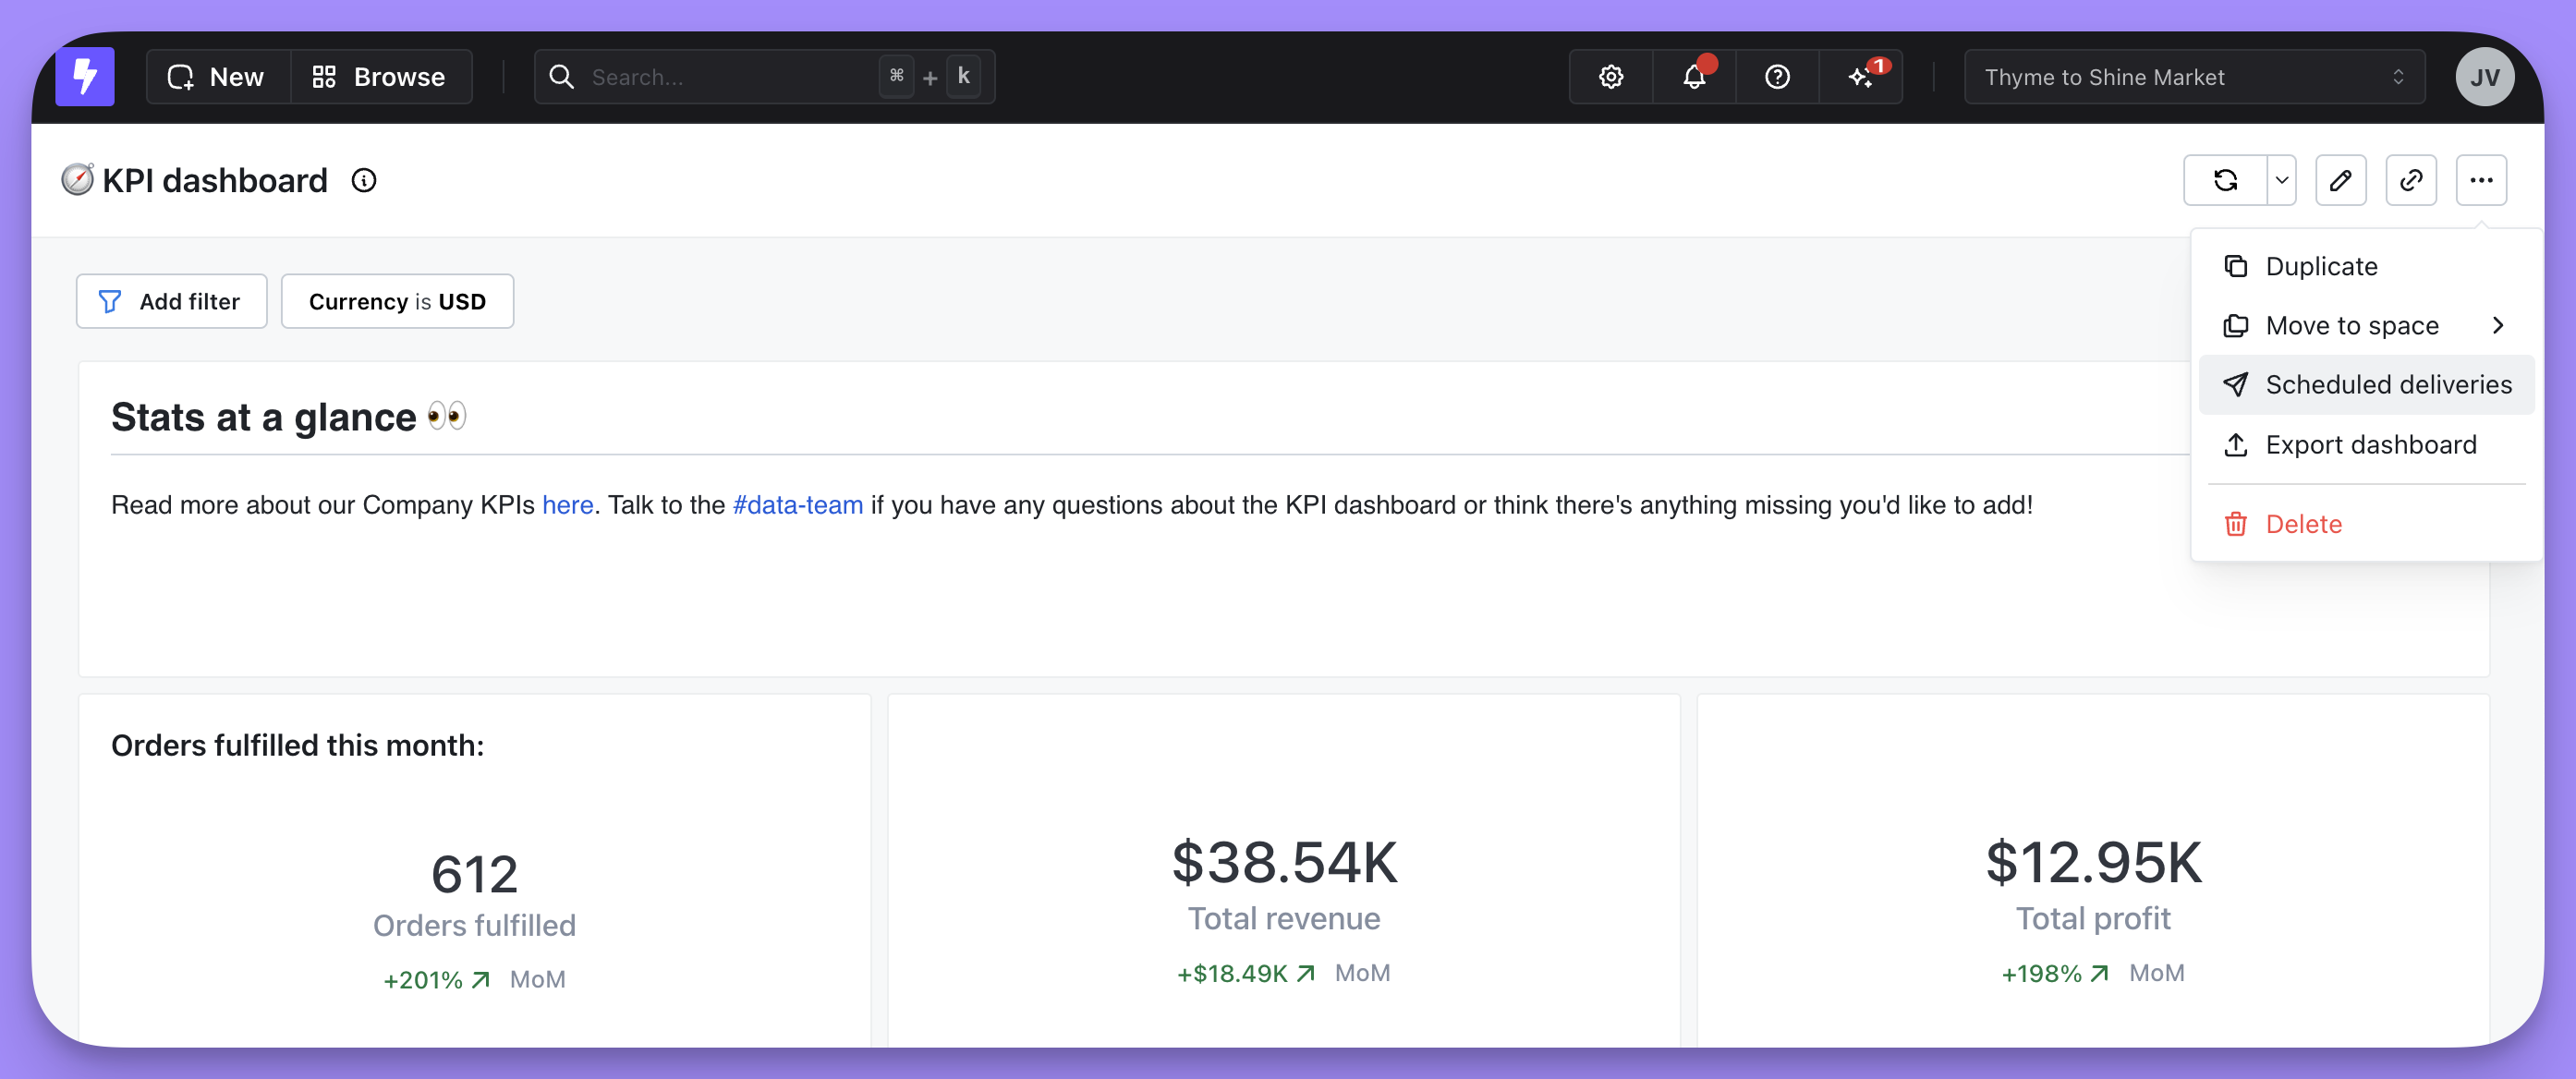 You'll get a modal that shows you the list of existing scheduled deliveries for your saved chart or dashboard, and gives you the option to start a new one.
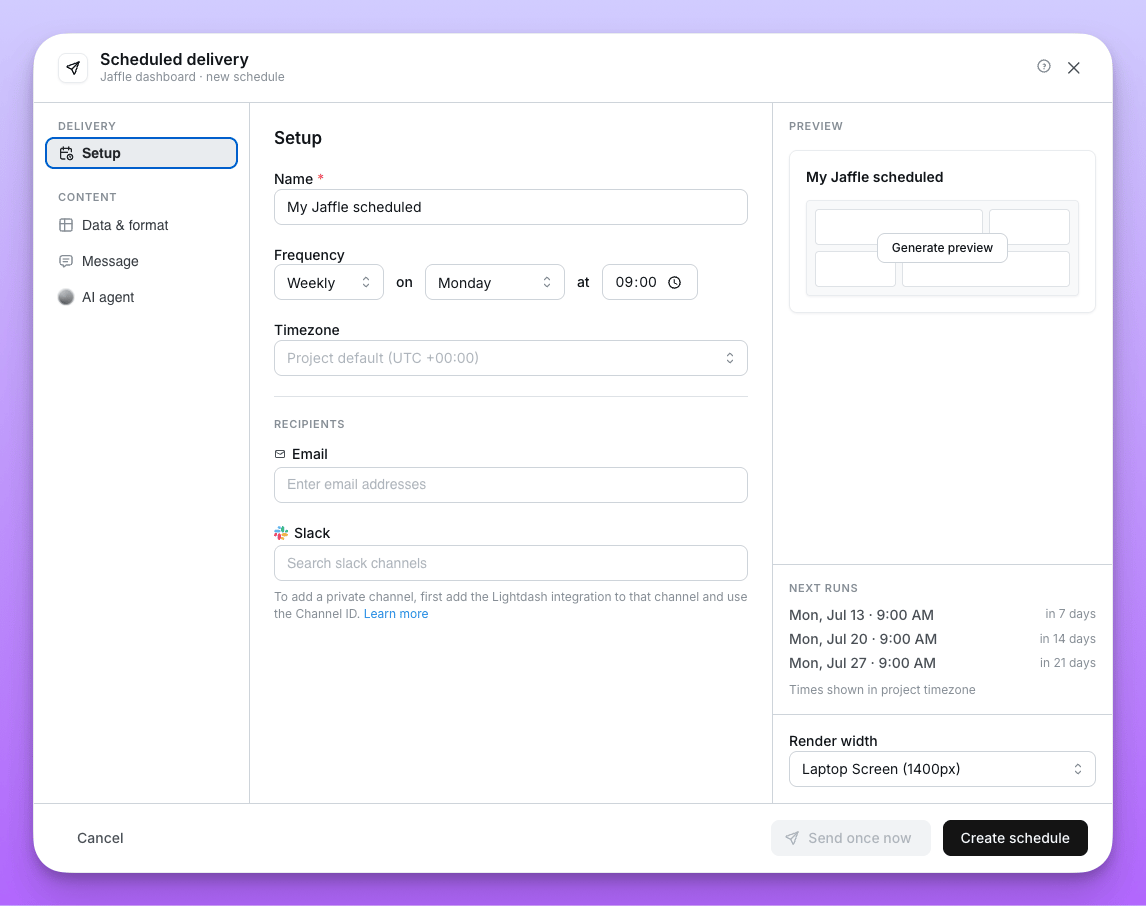
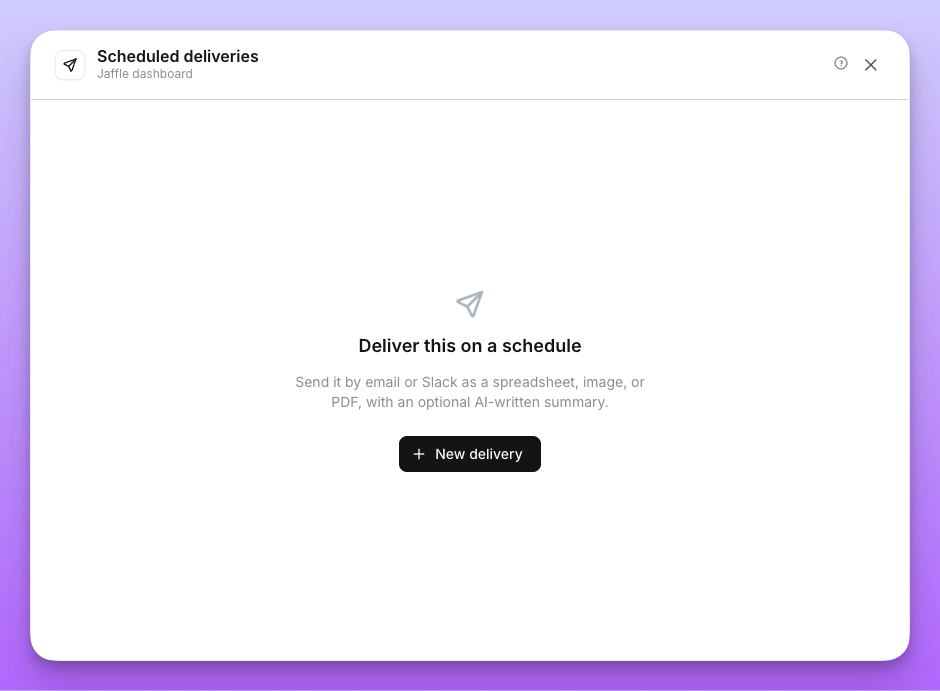 Click `New delivery` to open the scheduled delivery configuration. The sidebar splits everything into a **Delivery** section (when and where it's sent) and a **Content** section (what's inside it and how it's written), with a live preview and your next few send dates always visible on the right.
### Setup
Under `Delivery > Setup`, name your delivery, set how often it runs (hourly, daily, weekly, monthly, or a custom Cron expression), and pick a time zone — deliveries follow your project's default time zone unless you override it here. Add recipients as email addresses or Slack channels; you can target a person in Slack with `@persons-name` or a channel with `#channel-name`. If your organization has them enabled, [Microsoft Teams](#sending-to-microsoft-teams) and [Google Chat](#sending-to-google-chat) also show up here as destinations.
Click `New delivery` to open the scheduled delivery configuration. The sidebar splits everything into a **Delivery** section (when and where it's sent) and a **Content** section (what's inside it and how it's written), with a live preview and your next few send dates always visible on the right.
### Setup
Under `Delivery > Setup`, name your delivery, set how often it runs (hourly, daily, weekly, monthly, or a custom Cron expression), and pick a time zone — deliveries follow your project's default time zone unless you override it here. Add recipients as email addresses or Slack channels; you can target a person in Slack with `@persons-name` or a channel with `#channel-name`. If your organization has them enabled, [Microsoft Teams](#sending-to-microsoft-teams) and [Google Chat](#sending-to-google-chat) also show up here as destinations.
 ### Data & format
Under `Content > Data & format`, choose how the content is delivered — `Image`, `CSV`, `.xlsx`, or `PDF` — and, for dashboards, adjust the [saved filters](/guides/limiting-data-using-filters#adding-saved-filters-to-your-dashboard) so different recipients can get a different cut of the same dashboard without you having to duplicate it. Row and cell limits for CSV/XLSX exports are covered in [Export limits](/references/workspace/export-limits).
### Message
Under `Content > Message`, write the static message that goes out with every delivery. If you'd rather Lightdash write it for you from the data itself, turn on an [AI agent](#ai-agent) instead.
## AI agent
AI-enhanced messages require the [AI agents](/guides/ai-agents) add-on, available for Cloud Pro and Enterprise plans. [View pricing](https://www.lightdash.com/pricing)
Instead of a static message, Lightdash can write the delivery message from your data on **every send** — summarizing the results and calling out notable changes or trends, so recipients get the headline before they even open the attachment.
### Data & format
Under `Content > Data & format`, choose how the content is delivered — `Image`, `CSV`, `.xlsx`, or `PDF` — and, for dashboards, adjust the [saved filters](/guides/limiting-data-using-filters#adding-saved-filters-to-your-dashboard) so different recipients can get a different cut of the same dashboard without you having to duplicate it. Row and cell limits for CSV/XLSX exports are covered in [Export limits](/references/workspace/export-limits).
### Message
Under `Content > Message`, write the static message that goes out with every delivery. If you'd rather Lightdash write it for you from the data itself, turn on an [AI agent](#ai-agent) instead.
## AI agent
AI-enhanced messages require the [AI agents](/guides/ai-agents) add-on, available for Cloud Pro and Enterprise plans. [View pricing](https://www.lightdash.com/pricing)
Instead of a static message, Lightdash can write the delivery message from your data on **every send** — summarizing the results and calling out notable changes or trends, so recipients get the headline before they even open the attachment.
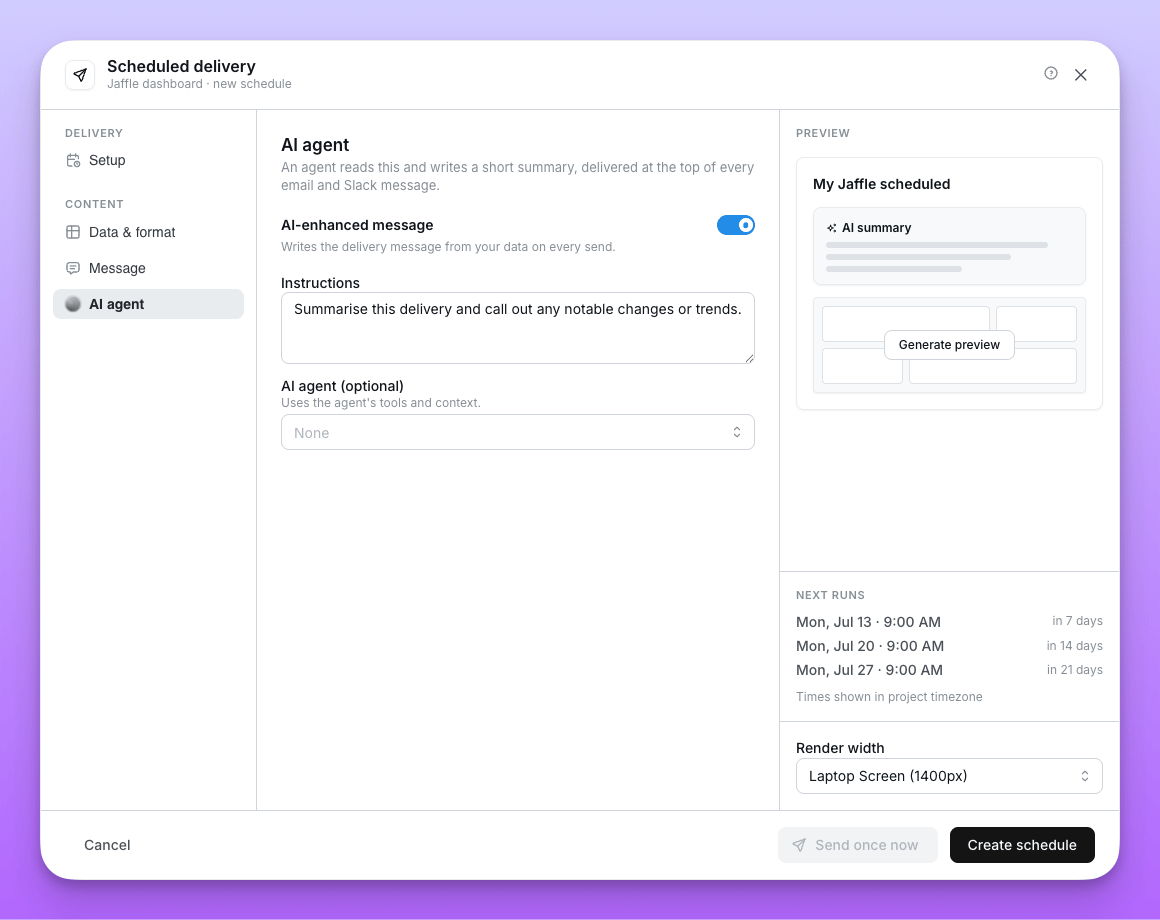 Under `Content > AI agent`, toggle on **AI-enhanced message** and edit the **Instructions** to tell Lightdash what to focus on. You can optionally pick an **AI agent** to write the message using that agent's tools, context, and knowledge instead of a plain summary.
## Editing and deleting your scheduled deliveries
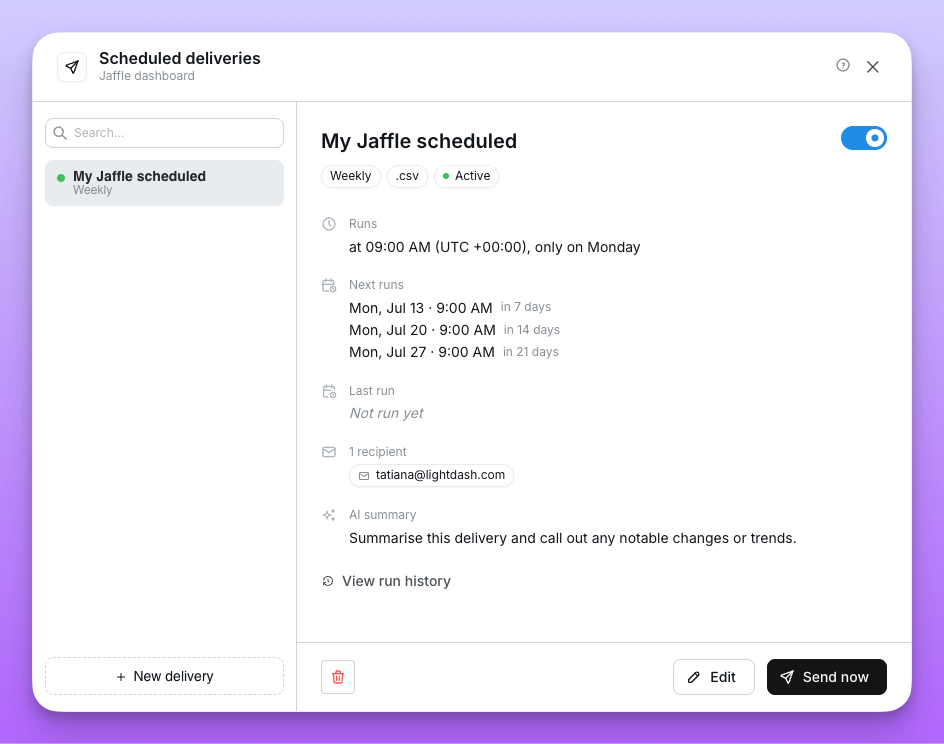
Selecting a scheduled delivery from the list shows its details: schedule and format, next and last run, recipients, and an AI summary preview if you've turned one on. From here you can toggle the delivery active or inactive, jump to `Edit` to change its configuration, run it immediately with `Send now`, view its run history, or delete it with the trash icon.
Under `Content > AI agent`, toggle on **AI-enhanced message** and edit the **Instructions** to tell Lightdash what to focus on. You can optionally pick an **AI agent** to write the message using that agent's tools, context, and knowledge instead of a plain summary.
## Editing and deleting your scheduled deliveries
Selecting a scheduled delivery from the list shows its details: schedule and format, next and last run, recipients, and an AI summary preview if you've turned one on. From here you can toggle the delivery active or inactive, jump to `Edit` to change its configuration, run it immediately with `Send now`, view its run history, or delete it with the trash icon.
 ## Overview of your scheduled deliveries
Users who have an admin role in your project can access an overview of your scheduled deliveries in the project settings.
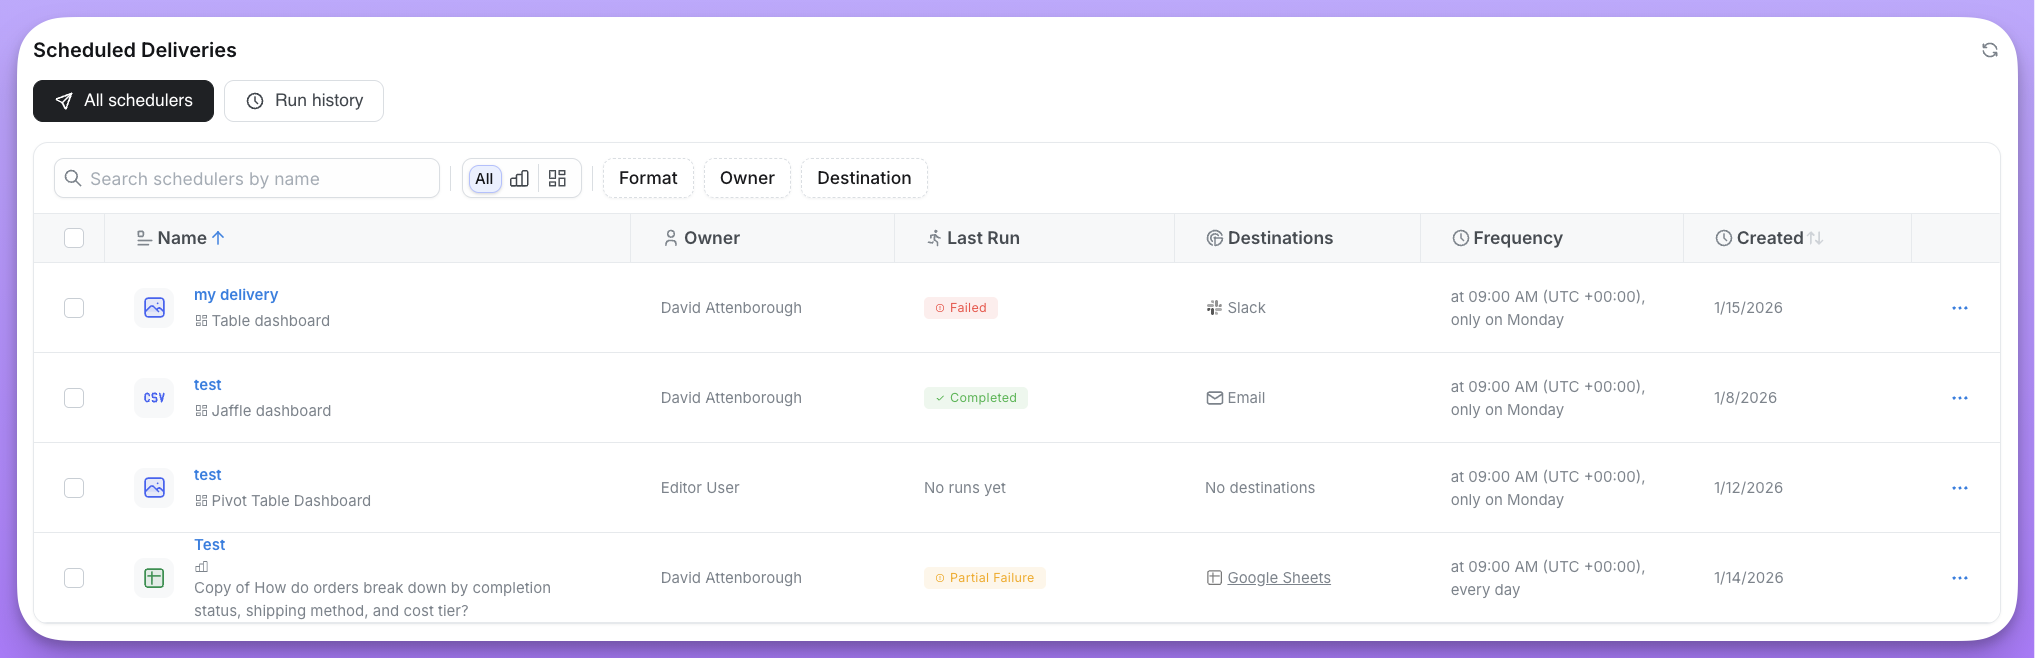
In the scheduled deliveries overview page, you can see a list of all of your scheduled deliveries, their most recent delivery status, and a history of all of the previous scheduled deliveries in your project.
To access the overview page, just head to your project settings, then to the `Syncs & Scheduled Deliveries` tab.
## Overview of your scheduled deliveries
Users who have an admin role in your project can access an overview of your scheduled deliveries in the project settings.
In the scheduled deliveries overview page, you can see a list of all of your scheduled deliveries, their most recent delivery status, and a history of all of the previous scheduled deliveries in your project.
To access the overview page, just head to your project settings, then to the `Syncs & Scheduled Deliveries` tab.
 ### Delivery status
Each scheduled delivery displays a clear status indicator showing its current state:
* **Completed successfully** - All jobs in the delivery completed without errors
* **Failed** - The delivery encountered an error and did not complete
* **Partial failure** - Some jobs completed successfully while others failed
* **Running** - The delivery is currently in progress
* **Scheduled** - The delivery is queued and waiting to run
### Run details
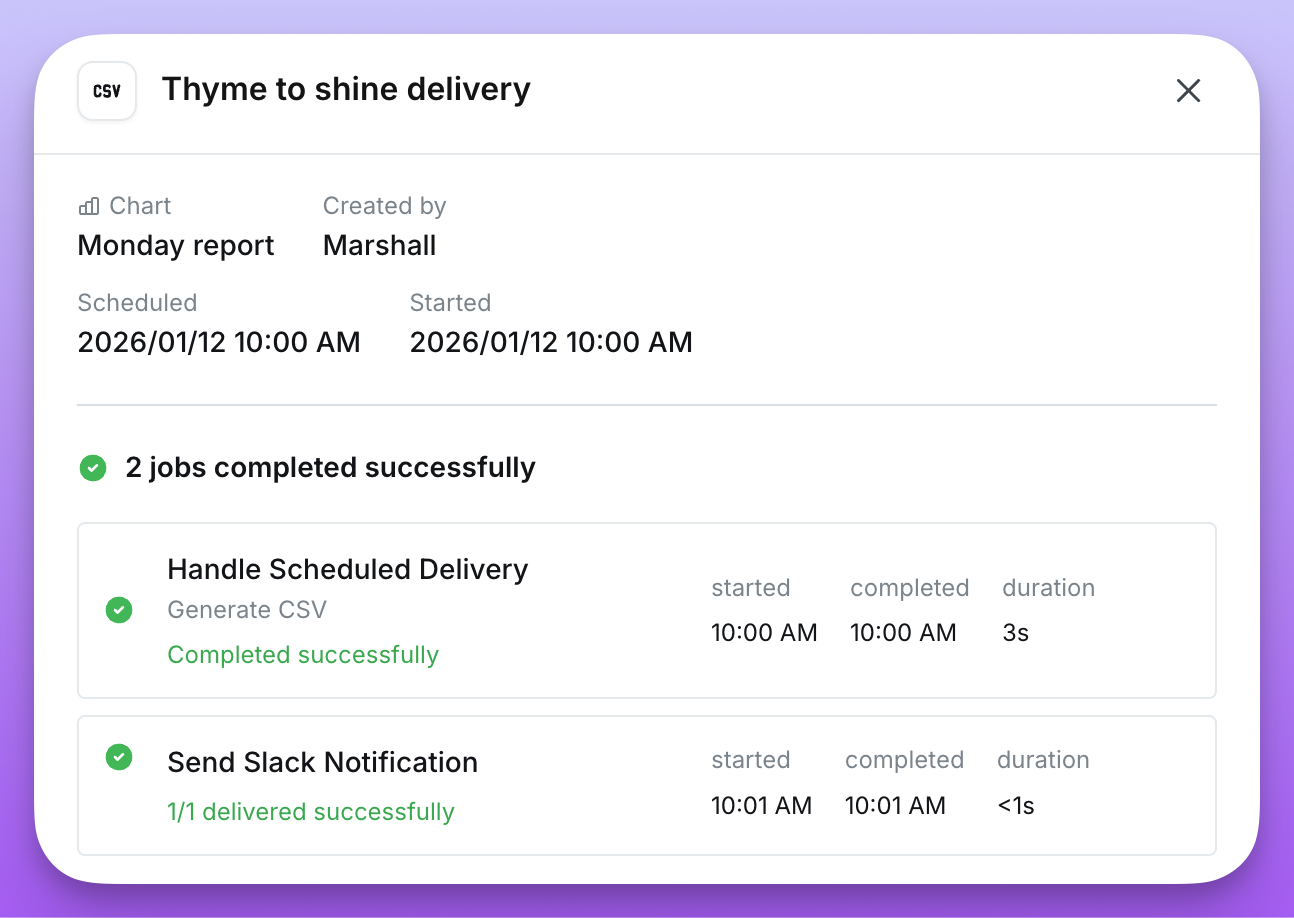
Click on any scheduled delivery run to open the **Run Details** modal. This shows:
* The job configuration including delivery target and schedule
* A list of all sub-jobs with their individual status, timing, and any error details
* For failed jobs, detailed error information to help with troubleshooting
### Delivery status
Each scheduled delivery displays a clear status indicator showing its current state:
* **Completed successfully** - All jobs in the delivery completed without errors
* **Failed** - The delivery encountered an error and did not complete
* **Partial failure** - Some jobs completed successfully while others failed
* **Running** - The delivery is currently in progress
* **Scheduled** - The delivery is queued and waiting to run
### Run details
Click on any scheduled delivery run to open the **Run Details** modal. This shows:
* The job configuration including delivery target and schedule
* A list of all sub-jobs with their individual status, timing, and any error details
* For failed jobs, detailed error information to help with troubleshooting
 ### Reassigning scheduled delivery owners
You can transfer ownership of scheduled deliveries to another user in your organization. This is useful when team members change roles or leave the organization.
#### Reassigning a single delivery
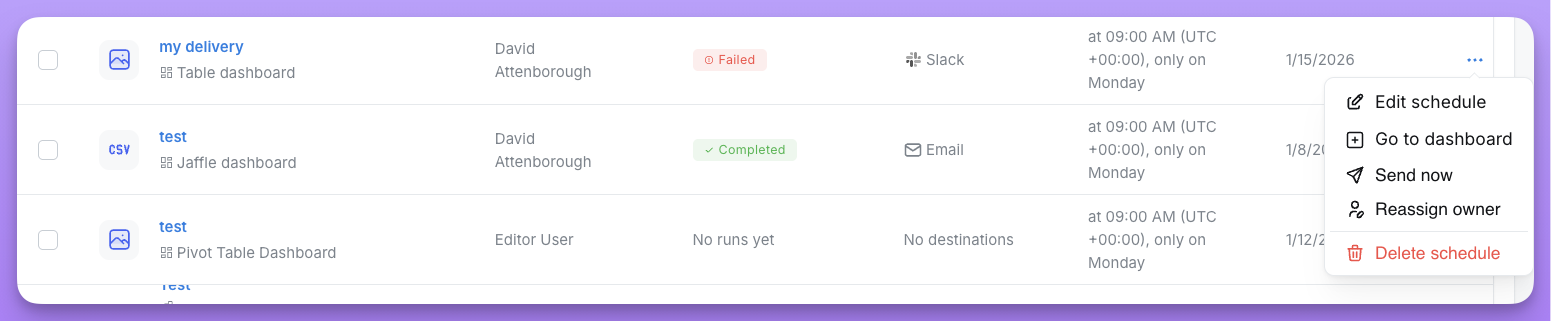
1. In the scheduled deliveries overview, find the delivery you want to reassign
2. Click the three-dot menu next to the delivery
3. Select **Reassign owner**
4. Search for and select the new owner from the dropdown
5. Click **Reassign** to confirm
### Reassigning scheduled delivery owners
You can transfer ownership of scheduled deliveries to another user in your organization. This is useful when team members change roles or leave the organization.
#### Reassigning a single delivery
1. In the scheduled deliveries overview, find the delivery you want to reassign
2. Click the three-dot menu next to the delivery
3. Select **Reassign owner**
4. Search for and select the new owner from the dropdown
5. Click **Reassign** to confirm
 #### Bulk reassignment
To reassign multiple scheduled deliveries at once:
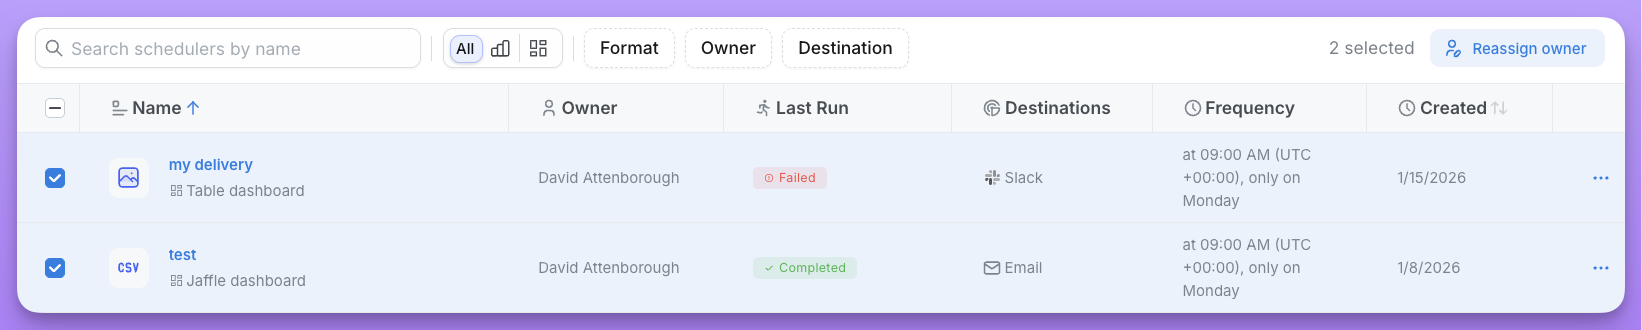
1. Use the checkboxes to select the deliveries you want to reassign
2. A selection counter will appear showing how many deliveries are selected
3. Click the **Reassign owner** button that appears in the toolbar
4. Select the new owner and confirm
#### Bulk reassignment
To reassign multiple scheduled deliveries at once:
1. Use the checkboxes to select the deliveries you want to reassign
2. A selection counter will appear showing how many deliveries are selected
3. Click the **Reassign owner** button that appears in the toolbar
4. Select the new owner and confirm
 The new owner must have permission to create scheduled deliveries in the
project. Users with viewer roles cannot be assigned as owners.
## Sending to private Slack channels
You must add the Lightdash slack bot into the private Slack channel for it to
be able to post scheduled delivery results.
You can also send scheduled deliveries to private Slack channels. To do this, simply type the name of the Slack channel exactly as it appears in Slack into the input text box. Then click on it to confirm and save the scheduled delivery.
## Sending to Microsoft Teams
You can send your Lightdash scheduled deliveries directly to Microsoft Teams using incoming webhooks. This allows you to keep your team updated with key metrics and reports, right inside your Teams channels.
The legacy Office 365 Connector webhooks are deprecated. Microsoft now recommends using **Power Automate Workflows** to create incoming webhooks for Teams.
### Creating a webhook with Power Automate Workflows (recommended)
1. Go to [Power Automate](https://make.powerautomate.com/)
2. Select **Templates**
3. Filter by "webhook"
4. Select the **Post to a channel when a webhook request is received** template
The new owner must have permission to create scheduled deliveries in the
project. Users with viewer roles cannot be assigned as owners.
## Sending to private Slack channels
You must add the Lightdash slack bot into the private Slack channel for it to
be able to post scheduled delivery results.
You can also send scheduled deliveries to private Slack channels. To do this, simply type the name of the Slack channel exactly as it appears in Slack into the input text box. Then click on it to confirm and save the scheduled delivery.
## Sending to Microsoft Teams
You can send your Lightdash scheduled deliveries directly to Microsoft Teams using incoming webhooks. This allows you to keep your team updated with key metrics and reports, right inside your Teams channels.
The legacy Office 365 Connector webhooks are deprecated. Microsoft now recommends using **Power Automate Workflows** to create incoming webhooks for Teams.
### Creating a webhook with Power Automate Workflows (recommended)
1. Go to [Power Automate](https://make.powerautomate.com/)
2. Select **Templates**
3. Filter by "webhook"
4. Select the **Post to a channel when a webhook request is received** template
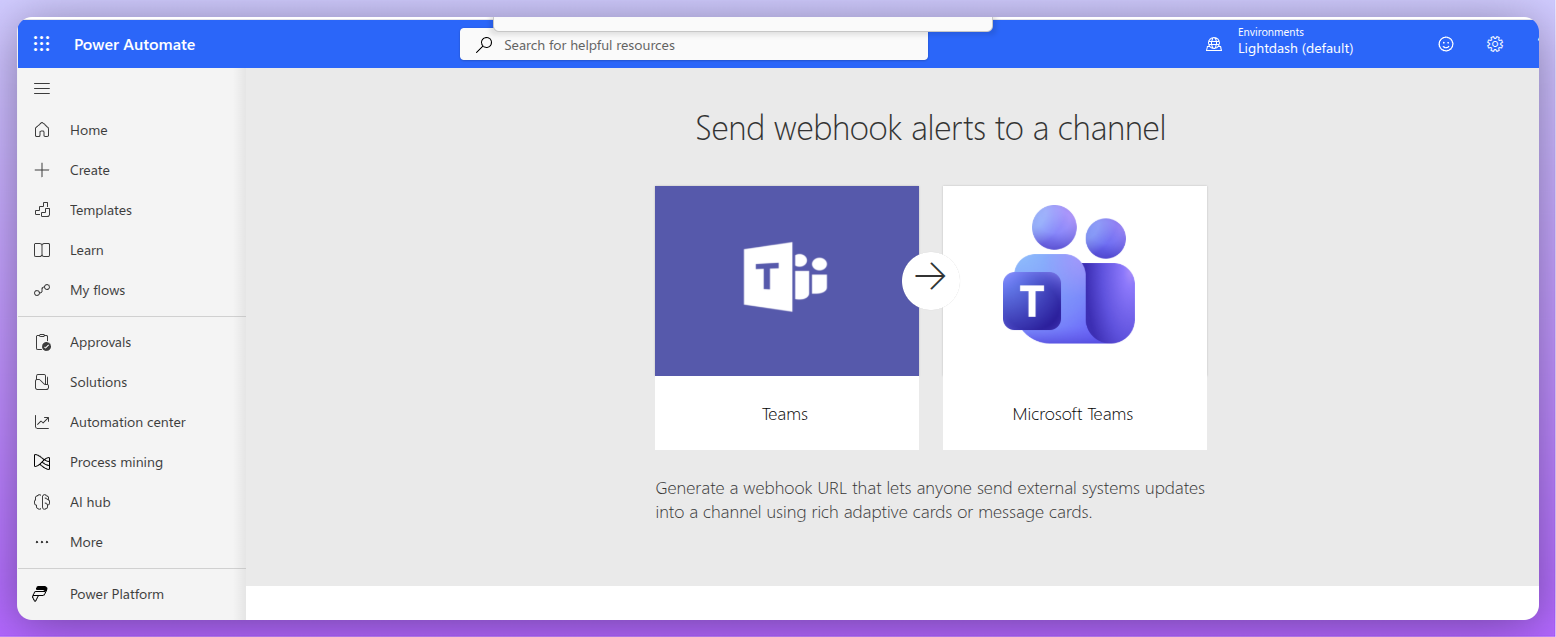 5. Select your Microsoft account and target Teams channel
6. Once added, click **Edit** on the workflow
7. Select the **When a Teams webhook request is received** trigger
8. Copy the **HTTP URL**
5. Select your Microsoft account and target Teams channel
6. Once added, click **Edit** on the workflow
7. Select the **When a Teams webhook request is received** trigger
8. Copy the **HTTP URL**
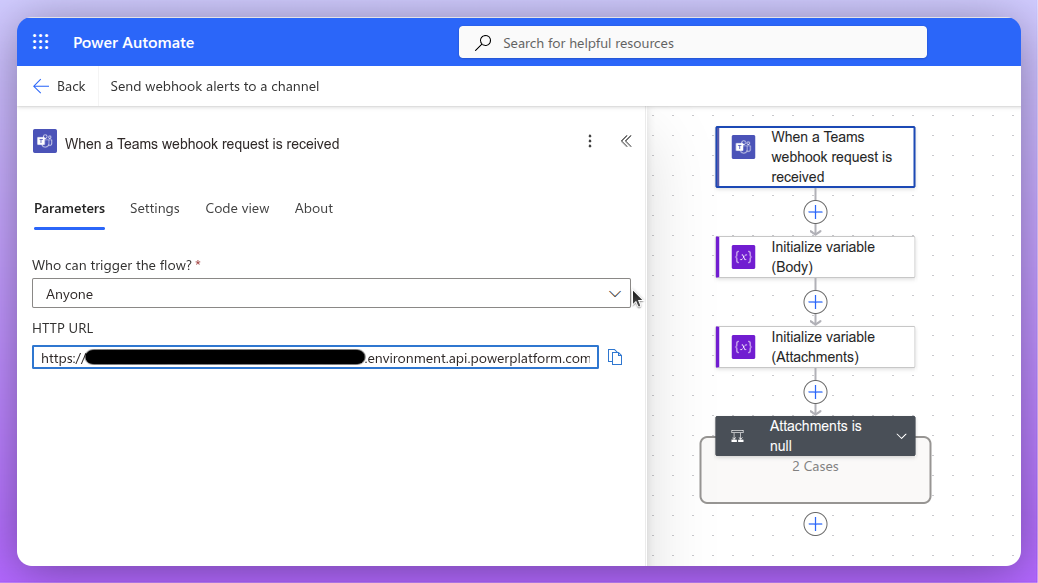 9. Use that HTTP URL in the webhook field in Lightdash
For more details, see the [official Microsoft documentation](https://support.microsoft.com/en-us/office/create-incoming-webhooks-with-workflows-for-microsoft-teams-8ae491c7-0394-4861-ba59-055e33f75498).
Once you have a webhook, add it to the the list of destinations in the scheduled deliveries form. You can also test how it looks on Microsoft teams by pressing `send now`.
## Sending to Google Chat
Google Chat is available when your organization has this destination enabled.
You can send your Lightdash scheduled deliveries directly to a Google Chat space using an incoming webhook.
1. In Google Chat, open the space you want to send deliveries to
2. [Create a webhook](https://developers.google.com/workspace/chat/create-webhook) for that space and copy its URL
3. Paste the webhook URL into the Google Chat destination field in the scheduled deliveries form
You can test how it looks in Google Chat by pressing `send now`.
## Configuring the default time zone
Project admins can set the default time zone used for scheduled deliveries across the project in the `Project settings` --> `Syncs & Scheduled deliveries`.
9. Use that HTTP URL in the webhook field in Lightdash
For more details, see the [official Microsoft documentation](https://support.microsoft.com/en-us/office/create-incoming-webhooks-with-workflows-for-microsoft-teams-8ae491c7-0394-4861-ba59-055e33f75498).
Once you have a webhook, add it to the the list of destinations in the scheduled deliveries form. You can also test how it looks on Microsoft teams by pressing `send now`.
## Sending to Google Chat
Google Chat is available when your organization has this destination enabled.
You can send your Lightdash scheduled deliveries directly to a Google Chat space using an incoming webhook.
1. In Google Chat, open the space you want to send deliveries to
2. [Create a webhook](https://developers.google.com/workspace/chat/create-webhook) for that space and copy its URL
3. Paste the webhook URL into the Google Chat destination field in the scheduled deliveries form
You can test how it looks in Google Chat by pressing `send now`.
## Configuring the default time zone
Project admins can set the default time zone used for scheduled deliveries across the project in the `Project settings` --> `Syncs & Scheduled deliveries`.
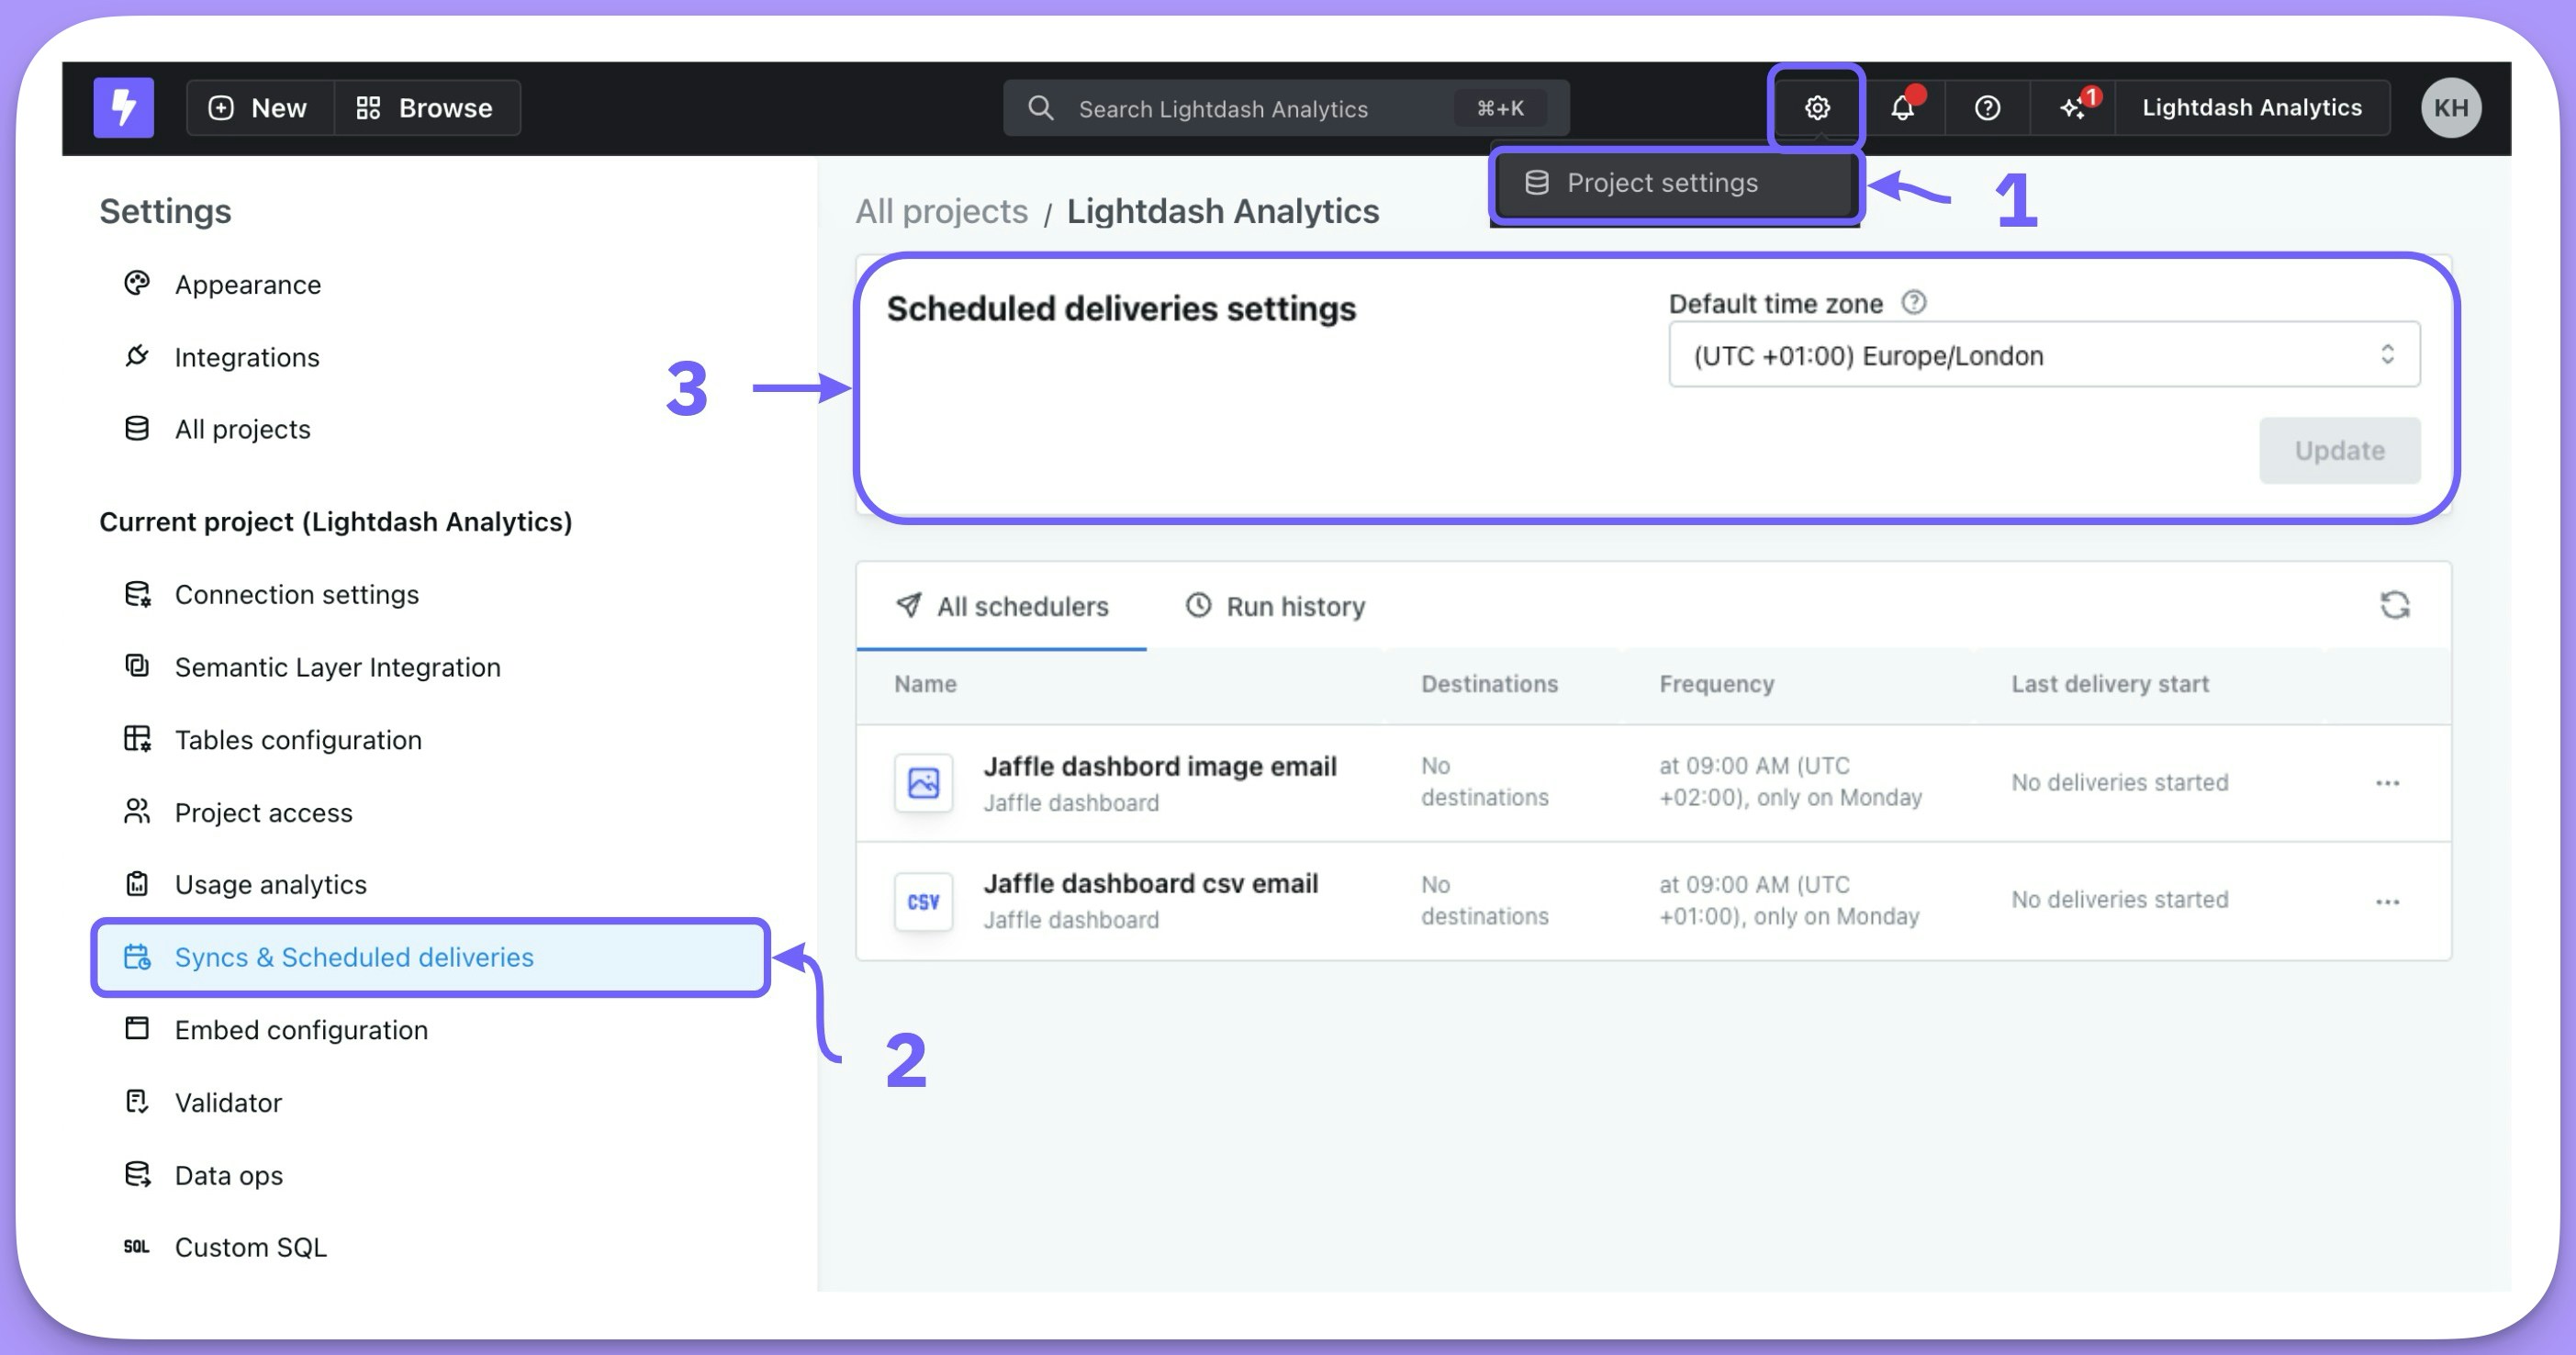 Scheduled deliveries will be set to the project's default time zone that you pick here.
If you update the project's default time zone, then scheduled deliveries where
the time zone hasn't been customized will automatically be translated to use
the new default time zone.
Users can customize the time zone used in a scheduled delivery. This will override the project default for that scheduled delivery.
For example:
* my project default time zone is set to UTC
* I have a scheduled delivery set to `Weekly on Monday at 15:00`
* I change the project default time zone to `(UTC -5:00) America/New York`
* my scheduled delivery will now be set to `Weekly on Monday at 10:00`
## Configuring download link expiration
By default, download links in scheduled deliveries expire after 3 days. Organization admins can change this from **Settings → Organization → Exporting**.
### Settings
* **Download link expiry (days)** — the base expiry that applies to every channel. Accepts 1–365 days.
* **Set a different expiry for specific channels** — when enabled, you can override the base for individual channels you have set up: Email, Slack, Microsoft Teams, and Google Chat. Leave a channel blank (or click the ✕ in the input) to inherit the base.
Only channels your organization has configured appear in the per-channel section. If a channel is later disabled, any saved override is preserved but hidden.
### How expiry is resolved
For each delivery, Lightdash picks the first value that is set, in this order:
```
organization channel override → organization base → environment channel default → environment base default
```
The environment defaults come from the `PERSISTENT_DOWNLOAD_URL_EXPIRATION_SECONDS*` variables on self-hosted instances and ship with sensible defaults on Lightdash Cloud.
### Long-lived links (more than 7 days)
AWS presigned S3 URLs cannot live longer than 7 days. When you set an expiry above 7 days, Lightdash transparently switches that channel to a persistent download URL — a stable app link that mints a fresh short-lived S3 URL on each access. No additional configuration is required, and shorter expiries continue to use direct S3 links as before.
Self-hosted instances can still set instance-wide defaults with the [persistent download URL environment variables](/self-host/customize-deployment/environment-variables#persistent-download-urls). Organization settings override those defaults when present.
Scheduled deliveries will be set to the project's default time zone that you pick here.
If you update the project's default time zone, then scheduled deliveries where
the time zone hasn't been customized will automatically be translated to use
the new default time zone.
Users can customize the time zone used in a scheduled delivery. This will override the project default for that scheduled delivery.
For example:
* my project default time zone is set to UTC
* I have a scheduled delivery set to `Weekly on Monday at 15:00`
* I change the project default time zone to `(UTC -5:00) America/New York`
* my scheduled delivery will now be set to `Weekly on Monday at 10:00`
## Configuring download link expiration
By default, download links in scheduled deliveries expire after 3 days. Organization admins can change this from **Settings → Organization → Exporting**.
### Settings
* **Download link expiry (days)** — the base expiry that applies to every channel. Accepts 1–365 days.
* **Set a different expiry for specific channels** — when enabled, you can override the base for individual channels you have set up: Email, Slack, Microsoft Teams, and Google Chat. Leave a channel blank (or click the ✕ in the input) to inherit the base.
Only channels your organization has configured appear in the per-channel section. If a channel is later disabled, any saved override is preserved but hidden.
### How expiry is resolved
For each delivery, Lightdash picks the first value that is set, in this order:
```
organization channel override → organization base → environment channel default → environment base default
```
The environment defaults come from the `PERSISTENT_DOWNLOAD_URL_EXPIRATION_SECONDS*` variables on self-hosted instances and ship with sensible defaults on Lightdash Cloud.
### Long-lived links (more than 7 days)
AWS presigned S3 URLs cannot live longer than 7 days. When you set an expiry above 7 days, Lightdash transparently switches that channel to a persistent download URL — a stable app link that mints a fresh short-lived S3 URL on each access. No additional configuration is required, and shorter expiries continue to use direct S3 links as before.
Self-hosted instances can still set instance-wide defaults with the [persistent download URL environment variables](/self-host/customize-deployment/environment-variables#persistent-download-urls). Organization settings override those defaults when present.